标签:art des 简单 after https 启动服务 开机启动 web load
Prometheus 是一个开源的监控系统。支持灵活的查询语言(PromQL),采用 http 协议的 pull 模式拉取数据等特点使 Prometheus 即简单易懂又功能强大。
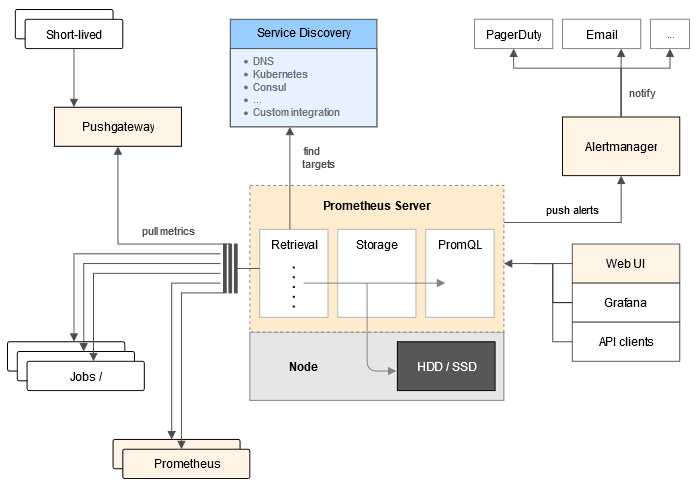
Prometheus 由 server, client, push gateway, exporter, alertmanager 等核心组件构成。Prometheus server 主要用于抓取和存储数据。Client libraries 可以用来连接 server 并进行查询等操作。Push gateway 用于批量,短期的监控数据的汇总节点,主要用于业务数据汇报等。不同的 exporter 用于不同场景下的数据收集,如收集主机信息的 node_exporter,收集 MongoDB 信息的 MongoDB exporter 等等。下图是 Prometheus 官方提供的架构图:

从这个架构图,我们可以看出它的运行逻辑大概是这样的:
Prometheus server 定期从数据源拉取数据,然后将数据持久化到磁盘。Prometheus 可以配置 rules,然后定时查询数据,当条件触发的时候,会将 alert 推送到配置的 Alertmanager。Alertmanager 收到警告的时候,可以根据配置,聚合,去重,降噪,最后发送警告。同时还可以使用 API, Prometheus Console 或者 Grafana 查询和聚合数据。
本文将介绍在 ubuntu 16.04 系统中安装 Prometheus Server,并配置它从一台主机上拉取监控信息,然后通过 Prometheus Server 提供的简易 UI 查询数据。
请从 Prometheus 官方下载 linux 版的二进制压缩包。注意在下载前要选择操作系统为 linux。
执行下面的命令把 prometheus server 安装到 /usr/local/share/prometheus 目录:
$ tar -xf prometheus-1.7.2.linux-amd64.tar.gz
$ sudo mv prometheus-1.7.2.linux-amd64 /usr/local/share/prometheus
理论上来说这样就算是安装完成了,但是无论如何这都太简陋了。因为每次启动 Prometheus server 都需要手动执行命令:
$ /usr/local/share/prometheus/prometheus -config.file=/usr/local/share/prometheus/prometheus.yml
这实在是太不方便了!应该把它配置成服务,用 systemd 来管理。
先创建一个名为 prometheus 的用户:
$ sudo adduser prometheus
把目录 /usr/local/share/prometheus/ 的所有者设置为 prometheus 用户:
$ sudo chown -R prometheus:prometheus /usr/local/share/prometheus/
然后创建文件 /etc/systemd/system/prometheus.service,内容如下:
[Unit]
Description=Prometheus Server
Documentation=https://prometheus.io/docs/introduction/overview/
After=network.target

[Service]
User=prometheus
Restart=on-failure
WorkingDirectory=/usr/local/share/prometheus/
ExecStart=/usr/local/share/prometheus/prometheus           -config.file=/usr/local/share/prometheus/prometheus.yml

[Install]
WantedBy=multi-user.target
好了,现在可以通过 systemd 来控制 Prometheus 服务了,先启动服务:
$ sudo systemctl daemon-reload
$ sudo systemctl start prometheus
再把服务配置为开机时启动:
$ sudo systemctl enable prometheus
检查一下服务的状态:
$ sudo systemctl status prometheus

到此为止 Prometheus Server 已经开始运行了。接下来我们就可以收集数据了。
数据收集的任务由不同的 exporter 来完成,如果要收集 linux 主机的信息,可以使用 node exporter。然后由 Prometheus Server 从 node exporter 上拉取信息。接下来我们介绍如何安装并配置 node exporter。
请从 Prometheus 官方下载 node exporter 的二进制压缩包。执行下面的命令把 node exporter 安装到 /usr/local/share/ 目录:
$ tar -xf node_exporter-0.14.0.linux-amd64.tar.gz
$ sudo cp node_exporter-0.14.0.linux-amd64/node_exporter /usr/local/sbin/
同样的我们把 node exporter 也配置成通过 systemd 管理。创建文件 /etc/systemd/system/node-exporter.service,内容如下:
[Unit]
Description=Prometheus Node Exporter
After=network.target

[Service]
ExecStart=/usr/local/sbin/node_exporter
User=nobody

[Install]
WantedBy=multi-user.target
执行下面的命令设置为开机启动并启动服务:
$ sudo systemctl daemon-reload
$ sudo systemctl enable node-exporter
$ sudo systemctl start node-exporter
node exporter 默认监听 9100 端口,让我们检查一下端口的监听情况:
$ ss -tunl

Node exporter 已经可以收集主机上的信息了,接下来我们还需要配置 Prometheus Server 从 node exporter 那里拉取数据。
Prometheus Server 可以从不同的 exporter 上拉取数据,对于上面的 node exporter 我们可以利用 Prometheus 的 static_configs 来拉取 node exporter 的数据。编辑 Prometheus server 的配置文件:
$ sudo vim /usr/local/share/prometheus/prometheus.yml
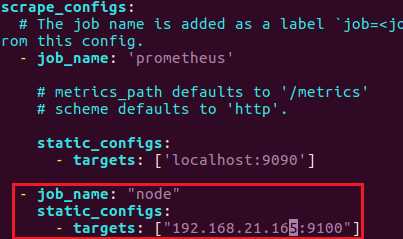
在 scrape_configs 中添加一个 名称为 node 的 static_configs:
- job_name: "node"
    static_configs:
      - targets: ["127.0.0.1:9100"]
注意,要把上面的 IP 地址替换为运行 node exporter 的主机的 IP。

保存文件然后重启 prometheus 服务!重启后 prometheus 服务会每隔 15s 从 node exporter 上拉取一次数据。
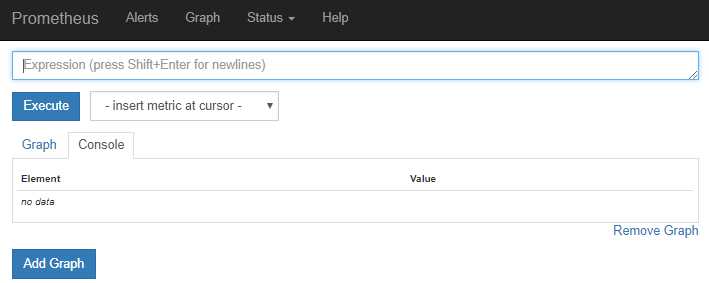
Prometheus Server 提供了简易的 WebUI 可以进数据查询并展示,它默认监听的端口为 9090。接下来我们进行一次简单的查询来验证本文安装配置的系统。
在浏览器中访问 Prometheus Server 的 9090 端口:

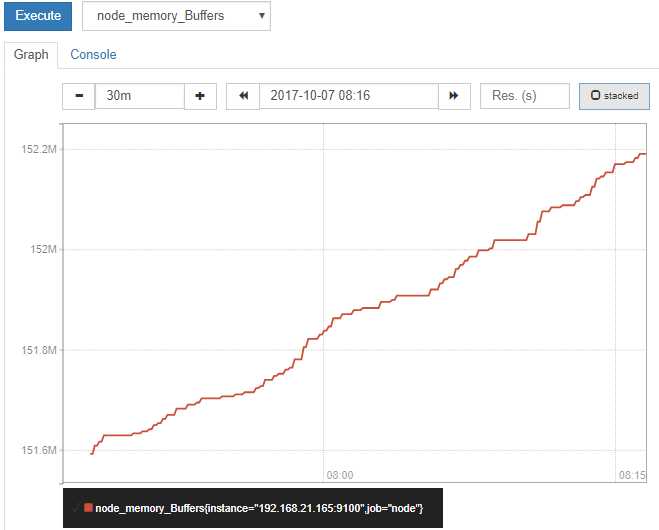
在下拉菜单中选择 "node_memory_Buffers",然后点击 "Execute" 按钮:

查询出来的结果略微有些粗犷,连单位都没带。请选择 "Graph" 标签页:

通过图表查看查询结果就好多了!
Prometheus 是当下比较流行的开源监控工具,这里只是简单的介绍了安装过程及一个最基本的用例。但是不难看出 Prometheus 虽然支持灵活的查询语言,但是自身只支持简单的展示能力。如果要友好的展示 Prometheus 的查询结果,还需要使用更专业的展示工具 Grafana。
标签:art des 简单 after https 启动服务 开机启动 web load
原文地址:http://www.cnblogs.com/sparkdev/p/7637583.html