标签:import 图像 es2017 file self 调用 ast child images
github 上大神的代码 https://github.com/endernewton/tf-faster-rcnn.git
在自己跑的过程中的问题:
1. 数据集的问题:
作者实现了 voc,coco数据集接口。由于我要跑自己的数据,所以要重写数据接口。为了方便我将自己的数据格式改为voc的数据格式,使用原来voc的数据接口pascal_voc.py。
voc 数据格式中需要文件:
data
-----VOCdevkit2007 (自己可以改)
|
----VOC2007
|
-----Annotations (目标的标注文件.xml)
-----ImageSets
|
----- trainval.txt (用于训练的图像名)
----- test.txt (用于测试的图像名)
-----JPEGImages (jpg 图像)
具体 .xml 文件编写根据自己已有的数据
写xml 文件主要内容:
from  xml.dom.minidom import Document

doc=Document()
Annotation=doc.createElement(‘annotation‘)  # 创建annotation 域
doc.appendChild(Annotation) # 写入annotation 域

object=doc.createElement(‘object‘)
Annotation.appendChild(‘object‘)

# 写入name
object_name=doc.createElement(‘name‘)
object_name_text=doc.createTextNode(‘分类类别名‘)
object_name.appendChild(object_name_text)
object.appendChild(object_name)

# 写入difficult,虽然不用,但是如果不加直接使用pascal_voc会出错
object_difficult=doc.createElement(‘difficult‘)
object_difficult_text=doc.createTextNode(‘0‘)
object_difficult.appendChild(object_difficult_text)
object.appendChild(object_difficult)

# 写入box
bndbox=doc.createElement(‘bndbox‘)
object.appendChild(bndbox)


object_box=doc.createElement(‘bndbox‘)
object_box_xmin=doc.createElement(‘xmin‘)
object_box_xmin_text=doc.createTextNode(str(image_box[0]))
object_box_xmin.appendChild(object_box_xmin_text)
bndbox.appendChild(object_box_xmin)

object_box_ymin=doc.createElement(‘ymin‘)
object_box_ymin_text=doc.createTextNode(str(image_box[1]))
object_box_ymin.appendChild(object_box_ymin_text)
bndbox.appendChild(object_box_ymin)

object_box_xmax=doc.createElement(‘xmax‘)
object_box_xmax_text=doc.createTextNode(str(image_box[2]))
object_box_xmax.appendChild(object_box_xmax_text)
bndbox.appendChild(object_box_xmax)

object_box_ymax=doc.createElement(‘ymax‘)
object_box_ymax_text=doc.createTextNode(str(image_box[3]))
object_box_ymax.appendChild(object_box_ymax_text)
bndbox.appendChild(object_box_ymax)


f=open(filename,"w")
f.write(doc.toprettyxml(indent="   "))
f.close()
得到:
<annotation>
   <object>
      <name>abc</name>
      <difficult>0</difficult>
      <bndbox>
         <xmin>107</xmin>
         <ymin>155</ymin>
         <xmax>193</xmax>
         <ymax>214</ymax>
      </bndbox>
   </object>
</annotation>
改pascal_voc.py 文件,修改自己的classes,以及xml中对应域的名字等。
2. 数据完成之后,就可以用来训练了,此时出现问题:
因为我现在变为30类,30+1 (背景),31*4=124 (4为box 的定位),而原来为84类。
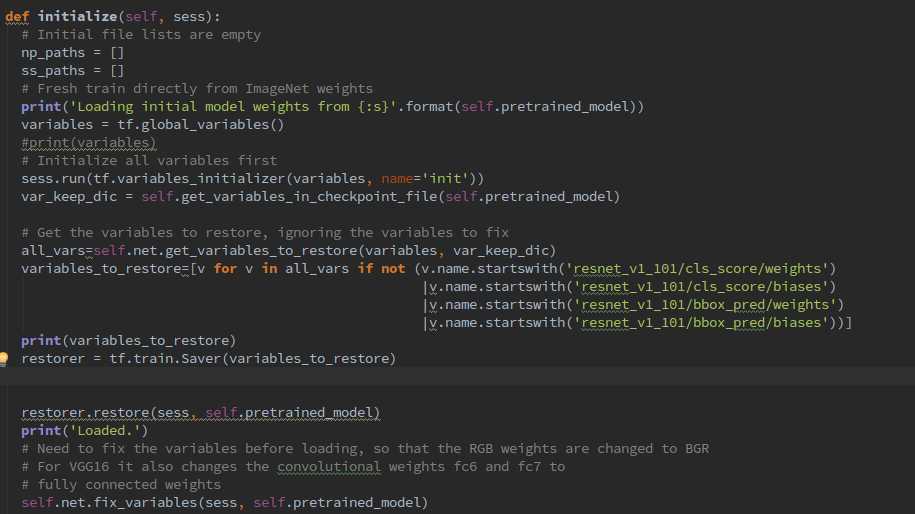
怎么改最后的输出类别个数?在caffe中可以直接在prototxt 定义的网络结构中改,在tensorflow中怎么改呢?
  def initialize(self, sess):
    # Initial file lists are empty
    np_paths = []
    ss_paths = []
    # Fresh train directly from ImageNet weights
    print(‘Loading initial model weights from {:s}‘.format(self.pretrained_model))
    variables = tf.global_variables()
    # Initialize all variables first
    sess.run(tf.variables_initializer(variables, name=‘init‘))
    var_keep_dic = self.get_variables_in_checkpoint_file(self.pretrained_model)
    # Get the variables to restore, ignoring the variables to fix
    variables_to_restore = self.net.get_variables_to_restore(variables, var_keep_dic)
    # 要加载的变量
    restorer = tf.train.Saver(variables_to_restore)
    # 进行加载。。出错的地方就是这里
    restorer.restore(sess, self.pretrained_model)
    print(‘Loaded.‘)
    # Need to fix the variables before loading, so that the RGB weights are changed to BGR
    # For VGG16 it also changes the convolutional weights fc6 and fc7 to
    # fully connected weights
    self.net.fix_variables(sess, self.pretrained_model)
    print(‘Fixed.‘)
    last_snapshot_iter = 0
    rate = cfg.TRAIN.LEARNING_RATE
    stepsizes = list(cfg.TRAIN.STEPSIZE)

    return rate, last_snapshot_iter, stepsizes, np_paths, ss_paths
要改正,就要不加载最后的 预测层和 box 回归层。

对要加载的文件进行选择,然后就可训练自己的数据了
标签:import 图像 es2017 file self 调用 ast child images
原文地址:http://www.cnblogs.com/fanhaha/p/7699290.html