标签:forward 下载 热备 access 设置 c# 双机热备 pst images
很多情况下基于wcf的复杂均衡都首选zookeeper,这样可以拥有更好的控制粒度,但zk对C# 不大友好,实现起来相对来说比较麻烦,实际情况下,如果
你的负载机制粒度很粗糙的话,优先使用nginx就可以搞定,既可以实现复杂均衡,又可以实现双机热备,以最小的代码量实现我们的业务,下面具体分享下。
一:准备的材料
1. 话不多说,一图胜千言,图中的服务器都是采用vmware虚拟化,如下图:
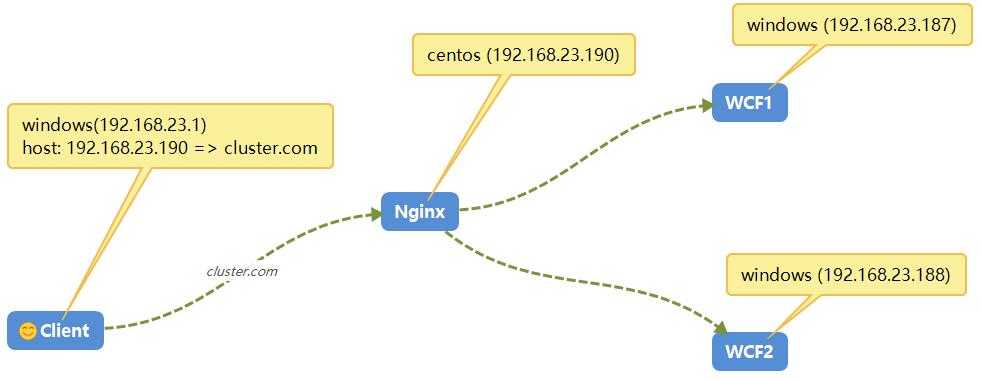
《1》 三台windows机器 ,两个WCF的windows服务器承载(192.168.23.187,192.168.23.188),一台Client的服务器(192.168.23.1)
《2》 一台Centos机器,用来承载web复杂均衡nginx(192.168.23.190)。
《3》在所有的Client的Hosts文件中增加host映射:【192.168.23.190 cluster.com】,方便通过域名的形式访问nginx所在服务器的ip地址。
二:环境搭建
1. WCF程序
既然是测试,肯定就是简单的程序,代码就不完全给出了。
《1》 HomeService实现类代码如下(输出当前server的ip地址,方便查看):
 1     public class HomeService : IHomeService
 2     {
 3         public string DoWork(string msg)
 4         {
 5             var ip = Dns.GetHostAddresses(Dns.GetHostName()).FirstOrDefault(i => i.AddressFamily ==
 6                                                                AddressFamily.InterNetwork).ToString();
 7
 8             return string.Format("当前 request 由 server={0} 返回", ip);
 9         }
10     }
《2》 App.Config代码
 1 <?xml version="1.0" encoding="utf-8" ?>
 2 <configuration>
 3   <startup>
 4     <supportedRuntime version="v4.0" sku=".NETFramework,Version=v4.5.2" />
 5   </startup>
 6   <system.serviceModel>
 7     <behaviors>
 8       <serviceBehaviors>
 9         <behavior name="">
10           <serviceMetadata httpGetEnabled="true" httpsGetEnabled="true" />
11           <serviceDebug includeExceptionDetailInFaults="false" />
12         </behavior>
13       </serviceBehaviors>
14     </behaviors>
15     <services>
16       <service name="WcfService.HomeService">
17         <endpoint address="/HomeService" binding="basicHttpBinding" contract="WcfService.IHomeService">
18           <identity>
19             <dns value="localhost" />
20           </identity>
21         </endpoint>
22         <endpoint address="mex" binding="mexHttpBinding" contract="IMetadataExchange" />
23         <host>
24           <baseAddresses>
25             <add baseAddress="http://192.168.23.187:8733" />
26           </baseAddresses>
27         </host>
28       </service>
29     </services>
30   </system.serviceModel>
31 </configuration>
因为windows的两台机器的ip地址是192.168.23.187,192.168.23.188,所以部署的时候注意一下config中的baseAddress地址。
2. centos上的nginx搭建
nginx我想大家用的还是比较多的,去官网下载最新的就好【nginx-1.13.6】:http://nginx.org/en/download.html,下载之后,就是常规的三板斧安装!!!
[root@localhost nginx-1.13.6]# ./configure --prefix=/usr/myapp/nginx
[root@localhost nginx-1.13.6]# make && make install
然后在nginx的安装目录下面找到conf文件,修改里面的nginx.conf 配置。
[root@localhost nginx]# cd conf
[root@localhost conf]# ls
fastcgi.conf            koi-utf             nginx.conf           uwsgi_params
fastcgi.conf.default    koi-win             nginx.conf.default   uwsgi_params.default
fastcgi_params          mime.types          scgi_params          win-utf
fastcgi_params.default  mime.types.default  scgi_params.default
[root@localhost conf]# vim nginx.conf
详细配置如下,注意下面“标红”的地方,权重按照1:5的方式进行调用,关于其他的配置,大家可以在网上搜一下就可以了。
#user  nobody;
worker_processes  1;

#error_log  logs/error.log;
#error_log  logs/error.log  notice;
#error_log  logs/error.log  info;

#pid        logs/nginx.pid;


events {
    worker_connections  1024;
}


http {
    include       mime.types;
    default_type  application/octet-stream;

    #log_format  main  ‘$remote_addr - $remote_user [$time_local] "$request" ‘
    #                  ‘$status $body_bytes_sent "$http_referer" ‘
    #                  ‘"$http_user_agent" "$http_x_forwarded_for"‘;

    #access_log  logs/access.log  main;

    sendfile        on;
    #tcp_nopush     on;

    #keepalive_timeout  0;
    keepalive_timeout  65;

    #gzip  on;

    upstream  cluster.com{
                 server 192.168.23.187:8733 weight=1;
                 server 192.168.23.188:8733 weight=5;
                 }

    server {
        listen       80;
        server_name  localhost;

        #charset koi8-r;

        #access_log  logs/host.access.log  main;

        location / {
            root   html;
            index  index.html index.htm;
            proxy_pass http://cluster.com;
            #设置主机头和客户端真实地址,以便服务器获取客户端真实IP
            proxy_set_header X-Forwarded-Host $host;
            proxy_set_header X-Forwarded-Server $host;
            proxy_set_header X-Forwarded-For $proxy_add_x_forwarded_for;
            proxy_set_header  X-Real-IP  $remote_addr;
        }

        #error_page  404              /404.html;

        # redirect server error pages to the static page /50x.html
        #
        error_page   500 502 503 504  /50x.html;
        location = /50x.html {
            root   html;
        }

        # proxy the PHP scripts to Apache listening on 127.0.0.1:80
        #
        #location ~ \.php$ {
        #    proxy_pass   http://127.0.0.1;
        #}

        # pass the PHP scripts to FastCGI server listening on 127.0.0.1:9000
        #
        #location ~ \.php$ {
        #    root           html;
        #    fastcgi_pass   127.0.0.1:9000;
        #    fastcgi_index  index.php;
        #    fastcgi_param  SCRIPT_FILENAME  /scripts$fastcgi_script_name;
        #    include        fastcgi_params;
        #}

        # deny access to .htaccess files, if Apache‘s document root
        # concurs with nginx‘s one
        #
        #location ~ /\.ht {
        #    deny  all;
        #}
    }


    # another virtual host using mix of IP-, name-, and port-based configuration
    #
    #server {
    #    listen       8000;
    #    listen       somename:8080;
    #    server_name  somename  alias  another.alias;

    #    location / {
    #        root   html;
    #        index  index.html index.htm;
    #    }
    #}


    # HTTPS server
    #
    #server {
    #    listen       443 ssl;
    #    server_name  localhost;

    #    ssl_certificate      cert.pem;
    #    ssl_certificate_key  cert.key;

    #    ssl_session_cache    shared:SSL:1m;
    #    ssl_session_timeout  5m;

    #    ssl_ciphers  HIGH:!aNULL:!MD5;
    #    ssl_prefer_server_ciphers  on;

    #    location / {
    #        root   html;
    #        index  index.html index.htm;
    #    }
    #}

}
3. client端的程序搭建
《1》 第一件事就是将 192.168.23.190 映射到本机的host中去,因为服务不提供给第三方使用,所以加host还是很轻松的。
192.168.23.190 cluster.com
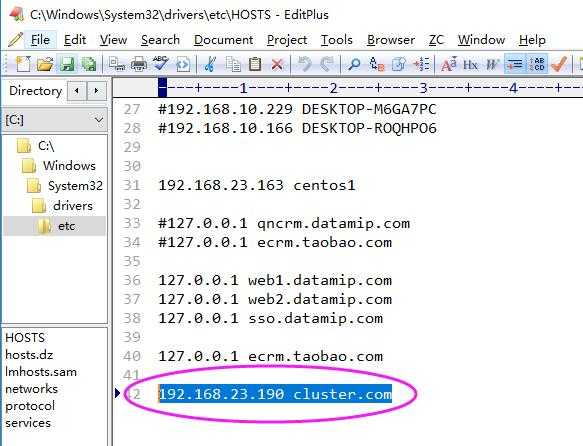
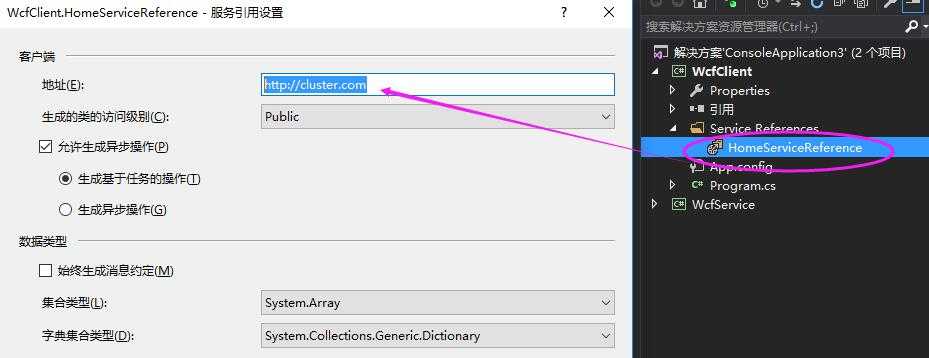
《2》 然后就是client端程序添加服务引用,因为添加了host映射,所以服务引用地址就是"http://cluster.com"。 代码如下:
 1     class Program
 2     {
 3         static void Main(string[] args)
 4         {
 5             for (int i = 0; i < 1000; i++)
 6             {
 7                 HomeServiceClient client = new HomeServiceClient();
 8
 9                 var info = client.DoWork("hello world!");
10
11                 Console.WriteLine(info);
12
13                 System.Threading.Thread.Sleep(1000);
14             }
15
16             Console.Read();
17         }
18     }
最后来执行以下程序,看看1000次循环中,是不是按照权重1:5 的方式对后端的wcf进行调用的???
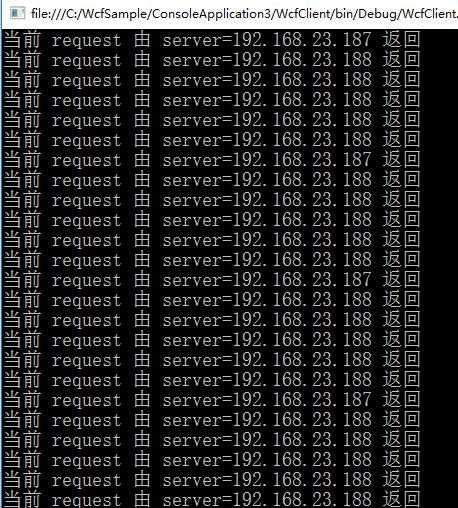
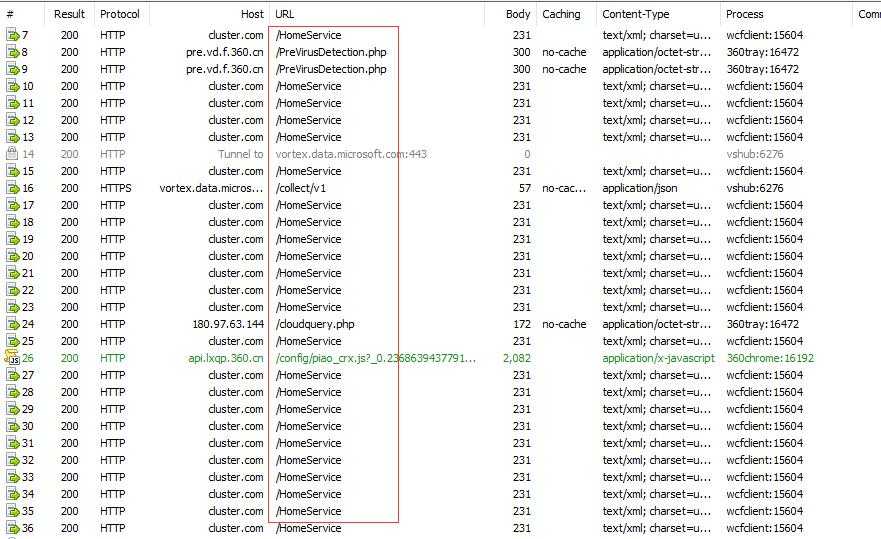
看到没有,是不是很牛逼,我只需要通过cluster.com进行服务访问,nginx会自动给我复杂均衡,这就是我们开发中非常简单化的wcf复杂均衡。
希望本篇对你有帮助~~~~ 附完整源代码:cluster.zip
标签:forward 下载 热备 access 设置 c# 双机热备 pst images
原文地址:http://www.cnblogs.com/huangxincheng/p/7707830.html