标签:效果 http 网上 rbo callback environ 目录 yaml eve
本文主要是使用【监督学习】实现一个图像分类器,目的是识别图片是猫还是狗。
从【数据预处理】到 【图片预测】实现一个完整的流程, 当然这个分类在 Kaggle 上已经有人用【迁移学习】(VGG,Resnet)做过了,迁移学习我就不说了,我自己用 Keras + Tensorflow 完整的实现了一遍。
准备工作:
Ps:NVIDIA的显卡才支持GPU加速运算,具体哪些卡,看它的官网,使用GPU比CPU要节省四五倍的时间。
先导入用到的库:
import os
os.environ[‘TF_CPP_MIN_LOG_LEVEL‘] = ‘2‘
import numpy as np
from keras import callbacks
from keras.models import Sequential, model_from_yaml, load_model
from keras.layers import Dense, Conv2D, Flatten, Dropout, MaxPool2D
from keras.optimizers import Adam, SGD
from keras.preprocessing import image
from keras.utils import np_utils, plot_model
from sklearn.model_selection import train_test_split
from keras.applications.resnet50 import preprocess_input, decode_predictions
注意: os.environ[‘TF_CPP_MIN_LOG_LEVEL‘] = ‘2‘
这一行代码是为了不让在控制钱显示Tensorflow输出的一堆信息,不写就可以看到 tensorflow 输出的一堆日志。
线上代码,后面解释
def load_data():
    path = ‘./data/train/‘
    files = os.listdir(path)
    images = []
    labels = []
    for f in files:
        img_path = path + f
        img = image.load_img(img_path, target_size=image_size)
        img_array = image.img_to_array(img)
        images.append(img_array)

        if ‘cat‘ in f:
            labels.append(0)
        else:
            labels.append(1)

    data = np.array(images)
    labels = np.array(labels)

    labels = np_utils.to_categorical(labels, 2)
    return data, labels
因为计算机不能直接对图片,视频,文字等直接进行运算,所以首先要把图片转成数值类型的矩阵,并且保证你训练的图片大小一样,我在这里使用keras自带的图片处理类 from keras.preprocessing import image ,主要是就是两个函数 :
image.load_img(img_path, target_size=image_size) 第一个参数图片的路径,第二个参数target_size 是个tuple 类型,(img_w,img_h)
image.img_to_array(img) 图片转成矩阵,当然你也可以使用Numpy的 asarray 效果应该一样
    model = Sequential()

    model.add(Conv2D(32, kernel_size=(5, 5), input_shape=(img_h, img_h, 3), activation=‘relu‘, padding=‘same‘))
    model.add(MaxPool2D())
    model.add(Dropout(0.3))

    model.add(Conv2D(64, kernel_size=(5, 5), activation=‘relu‘, padding=‘same‘))
    model.add(MaxPool2D())
    model.add(Dropout(0.3))

    model.add(Conv2D(128, kernel_size=(5, 5), activation=‘relu‘, padding=‘same‘))
    model.add(MaxPool2D())
    model.add(Dropout(0.5))

    model.add(Conv2D(256, kernel_size=(5, 5), activation=‘relu‘, padding=‘same‘))
    model.add(MaxPool2D())
    model.add(Dropout(0.5))

    model.add(Flatten())
    model.add(Dense(512, activation=‘relu‘))
    model.add(Dropout(0.5))

    model.add(Dense(2, activation=‘softmax‘))

    model.summary()  //这一句只是输出网络结构
模型:使用序贯模型,然后加了4个卷积层,Conv2D 第一个参数就是卷基层的输出维度,为什么我写了32呢,因为我电脑渣啊,GPU显存太小了,否则我就写64了。参考了VGG,Resnet 等的网络结构
激活函数:卷基层的激活函数使用非线性激活函数: relu。输出层的激活函数使用 softmax, 多分类就用这个。
池化层(MaxPool2D):主要是降维,减少参数加速运算,防止过拟合,为了防止过拟合还加入了 Dropout 层
    sgd = Adam(lr=0.0003)
    model.compile(loss=‘binary_crossentropy‘,optimizer=sgd, metrics=[‘accuracy‘])
讲一下优化器: Adam(lr=0.0003) 效果最好,基本都是用这个,lr:学习速率,学习速率越小,理论上来说损失函数越小,精度越高,但是计算越慢,默认是 0.001
注意:不加 metrics=[‘accuracy‘] 参数不会输出日志,在控制台看不到变化。
    images, lables = load_data()
    images /= 255
    x_train, x_test, y_train, y_test = train_test_split(images, lables, test_size=0.2)
除以 255 是为了数据归一化,理论上来说归一化,会减少损失函数的震荡,有助于减小损失函数提高精度。
  print("train.......")
    tbCallbacks = callbacks.TensorBoard(log_dir=‘./logs‘, histogram_freq=1, write_graph=True, write_images=True)
    model.fit(x_train, y_train, batch_size=nbatch_size, epochs=nepochs, verbose=1, validation_data=(x_test, y_test), callbacks=[tbCallbacks])
运行 TensorBoard 只需要两行代码,在cmd,cd D:\Learning\learn_python\ 先切到你的logs目录的上一级,然后执行 tensorboard --logdir="logs" 即可。
    scroe, accuracy = model.evaluate(x_test, y_test, batch_size=nbatch_size)
    print(‘scroe:‘, scroe, ‘accuracy:‘, accuracy)
    yaml_string = model.to_yaml()
    with open(‘./models/cat_dog.yaml‘, ‘w‘) as outfile:
        outfile.write(yaml_string)
    model.save_weights(‘./models/cat_dog.h5‘)
深度学习工程师50%的时间在调参数,49%的时间在对抗过/欠拟合,剩下1%时间在修改网上down下来的程序
深以为然啊,刚开始我的网络结构不是这样的,卷基层只有2层,kernel_size=(3,3), 学习速率采用的默认参数,全连接层是: Dense(256),训练之后发现欠拟合,精度只有86%左右,后来增加了卷积层数量,调小学习速率等几轮的调参,精度接近93%,还可以继续提升,但我不想调了,因为笔记本的GPU太渣(1050ti)训练一次差不多需要一个多小时。
调参也没什么好办法,只能一次次的去试,如果采用迁移学习,VGG,Resnet的网络结构和权重的话,分分钟能上98%,毫无难度。
def pred_data():

    with open(‘./models/cat_dog.yaml‘) as yamlfile:
        loaded_model_yaml = yamlfile.read()
    model = model_from_yaml(loaded_model_yaml)
    model.load_weights(‘./models/cat_dog.h5‘)

    sgd = Adam(lr=0.0003)
    model.compile(loss=‘categorical_crossentropy‘,optimizer=sgd, metrics=[‘accuracy‘])

    images = []
    path=‘./data/test/‘
    for f in os.listdir(path):
        img = image.load_img(path + f, target_size=image_size)
        img_array = image.img_to_array(img)

        x = np.expand_dims(img_array, axis=0)
        x = preprocess_input(x)
        result = model.predict_classes(x,verbose=0)

        print(f,result[0])
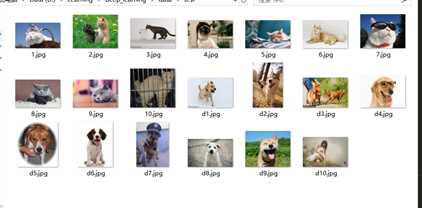
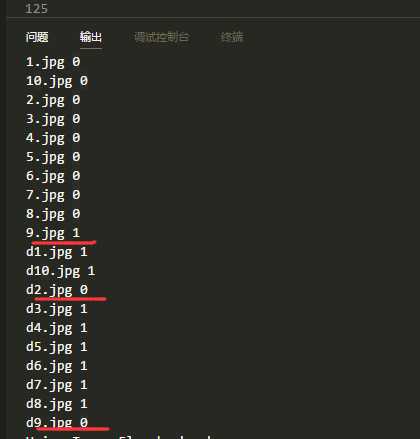
因为做的分类任务,我在加载数据的时候写的是 cat 索引为 0 ,dog索引为 1,所以输出的时候,预测的值与之对应,我从百度找了20张图片猫狗个10张,图片长这样:

预测的结果如下:

可以看到,猫 有一张错误,狗 有两张错误,这个精度在小样本数据集不适用迁移学习的情况下还是可以的。
完整代码:https://github.com/jarvisqi/deep_learning
参考:http://keras-cn.readthedocs.io/en/latest/
【深度学习】keras + tensorflow 实现猫和狗图像分类
标签:效果 http 网上 rbo callback environ 目录 yaml eve
原文地址:http://www.cnblogs.com/JreeyQi/p/7739141.html