标签:direct rust format vol mon UI dock log rbo
Compose是Docker官方的开源项目,可以实现对Docker容器集群的快速编排。
Compose 中有两个重要的概念:
服务(service):一个应用的容器,实际上可以包括若干运行相同镜像的容器实例。
项目(project):由一组关联的应用容器组成的一个完整业务单元,在 docker-compose.yml 文件中定义。
一、安装Compose
Compose由python编写,因此可以使用pip方式进行安装。
# pip install -U docker-compose
安装成功后可以查看docker-compose的用法:
# docker-compose -h
Define and run multi-container applications with Docker.

Usage:
  docker-compose [-f=<arg>...] [options] [COMMAND] [ARGS...]
  docker-compose -h|--help

Options:
  -f, --file FILE             Specify an alternate compose file (default: docker-compose.yml)
  -p, --project-name NAME     Specify an alternate project name (default: directory name)
  --verbose                   Show more output
  -v, --version               Print version and exit
  -H, --host HOST             Daemon socket to connect to

  --tls                       Use TLS; implied by --tlsverify
  --tlscacert CA_PATH         Trust certs signed only by this CA
  --tlscert CLIENT_CERT_PATH  Path to TLS certificate file
  --tlskey TLS_KEY_PATH       Path to TLS key file
  --tlsverify                 Use TLS and verify the remote
  --skip-hostname-check       Don‘t check the daemon‘s hostname against the name specified
                              in the client certificate (for example if your docker host
                              is an IP address)

Commands:
  build              Build or rebuild services
  config             Validate and view the compose file
  create             Create services
  down               Stop and remove containers, networks, images, and volumes
  events             Receive real time events from containers
  exec               Execute a command in a running container
  help               Get help on a command
  kill               Kill containers
  logs               View output from containers
  pause              Pause services
  port               Print the public port for a port binding
  ps                 List containers
  pull               Pulls service images
  restart            Restart services
  rm                 Remove stopped containers
  run                Run a one-off command
  scale              Set number of containers for a service
  start              Start services
  stop               Stop services
  unpause            Unpause services
  up                 Create and start containers
  version            Show the Docker-Compose version information
添加bash补全命令:
# curl -L https://raw.githubusercontent.com/docker/compose/1.8.0/contrib/completion/bash/docker-compose > /etc/bash_completion.d/docker-compose
其它安装方式:二进制包、容器中运行。
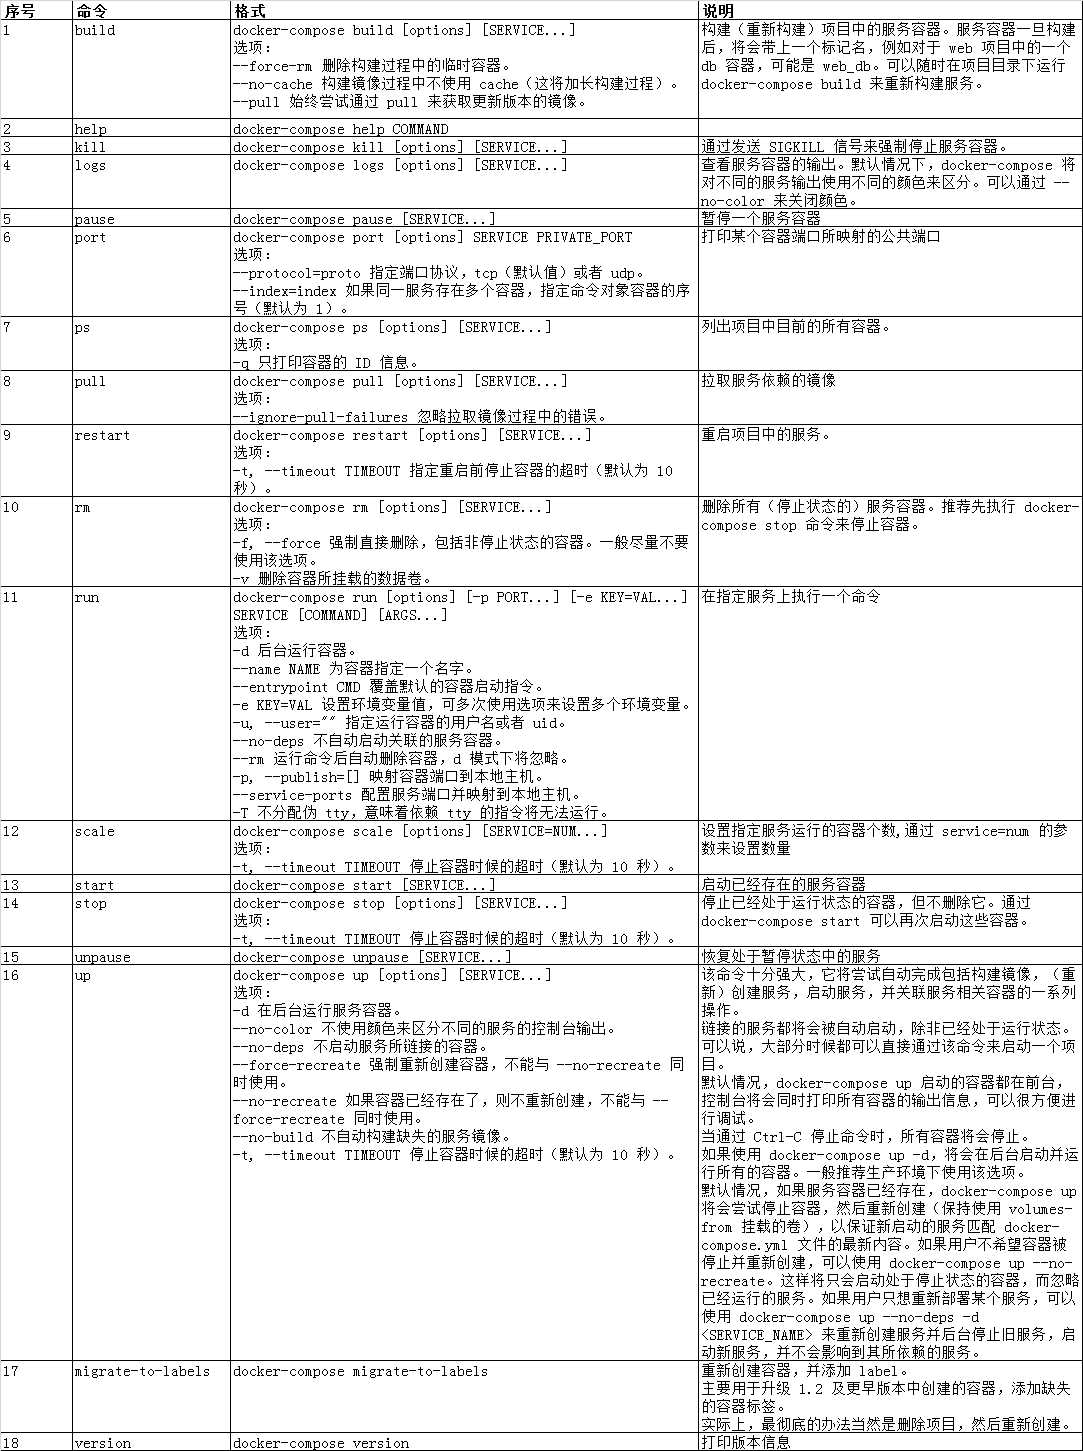
二、Compose命令说明
格式:
docker-compose [-f=<arg>...] [options] [COMMAND] [ARGS...]
选项:
-f, --file FILE 指定使用的 Compose 模板文件,默认为 docker-compose.yml,可以多次指定。
-p, --project-name NAME 指定项目名称,默认将使用所在目录名称作为项目名。
--x-networking 使用 Docker 的可拔插网络后端特性(需要 Docker 1.9 及以后版本)。
--x-network-driver DRIVER 指定网络后端的驱动,默认为 bridge(需要 Docker 1.9 及以后版本)。
--verbose 输出更多调试信息。
-v, --version 打印版本并退出
常用命令使用说明:
三、Compose模板文件
默认的模板文件名称为 docker-compose.yml,格式为 YAML 格式。
版本1中,其中每个顶级元素为服务名称,次级元素为服务容器的配置信息,例如
webapp:
  image: examples/web
  ports:
    - "80:80"
  volumes:
    - "/data"
版本2扩展了 Compose 的语法,同时尽量保持跟版本1的兼容,除了可以声明网络和存储信息外,最大的不同一是添加了版本信息,另一个是需要将所有的服务放到 services 根下面。版本2写法如下:
version: "2"
services:
  webapp:
    image: examples/web
    ports:
      - "80:80"
    volumes:
      - "/data"
每个服务都必须通过 image 指令指定镜像或 build 指令(需要 Dockerfile)等来自动构建生成镜像。
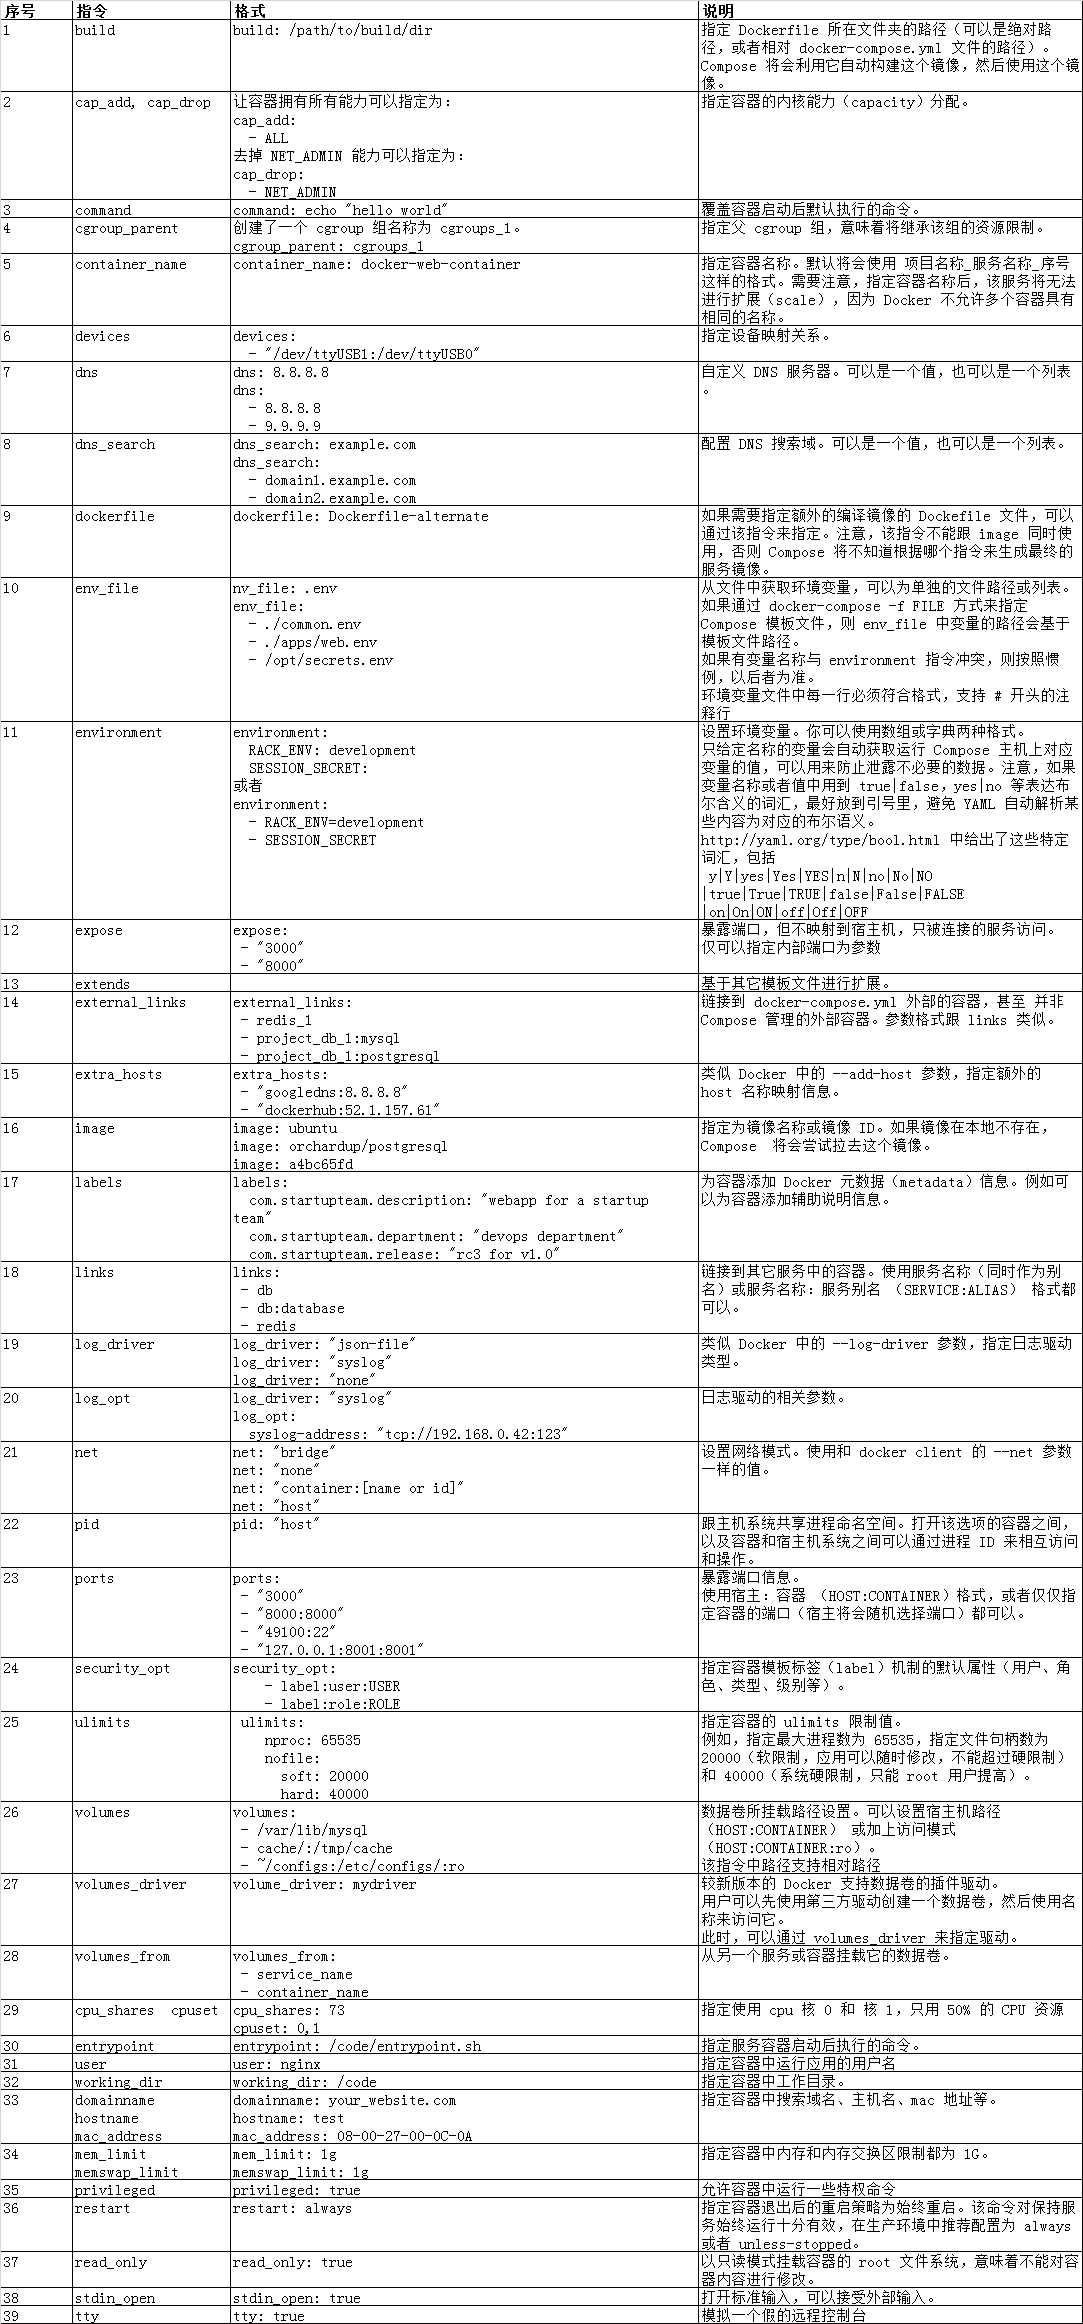
常用指定如下:
四、使用docker-compose编排nginx、tomcat集群
创建一个名为compose-tomcat-nginx的目录,作为项目工作目录,并在其中创建两个子目录:nginx、tomcat。目录结构如下:
# tree
.
├── docker-compose.yml
├── nginx
│   ├── Dockerfile
│   ├── nginx-1.8.0.tar.gz
│   ├── nginx.conf
│   └── nginx-sticky.tar.gz
└── tomcat
    ├── apache-tomcat-7.0.56.tar.gz
    ├── Dockerfile
    └── jdk-8u73-linux-x64.tar.gz

2 directories, 8 files
docker-compose.yml文件内容如下:
# cat docker-compose.yml
tomcat1:
    build: ./tomcat
    expose:
        - 8080

tomcat2:
    build: ./tomcat
    expose:
        - 8080

nginx:
    build: ./nginx
    links:
        - tomcat1:t01
        - tomcat2:t02
    ports:
        - "80:80"
    expose:
        - "80"
tomcat的Dockerfile文件内容如下:
# cat Dockerfile
FROM centos:6.9
MAINTAINER eivll0m@163.com

ADD jdk-8u73-linux-x64.tar.gz /app

ENV JAVA_HOME /app/jdk1.8.0_73

ADD apache-tomcat-7.0.56.tar.gz /app

WORKDIR /app/apache-tomcat-7.0.56

ENTRYPOINT ["bin/catalina.sh","run"]

EXPOSE 8080
nginx的Dockerfile文件内容如下:
FROM centos:6.9
MAINTAINER eivll0m@163.com

ADD nginx-1.8.0.tar.gz /app
ADD nginx-sticky.tar.gz /app

RUN yum -y install gcc gcc-c++ pcre pcre-devel zlib zlib-devel openssl openssl-devel

RUN cd /app/nginx-1.8.0     && ./configure --prefix=/app/nginx  --add-module=/app/nginx-sticky     && make     && make install
COPY nginx.conf /app/nginx/conf

cmd ["/app/nginx/sbin/nginx", "-g", "daemon off;"]

EXPOSE 80
nginx.conf文件内容如下(未优化):
# cat nginx.conf

user  root root;
worker_processes  2;

#error_log  logs/error.log;
#error_log  logs/error.log  notice;
#error_log  logs/error.log  info;

#pid        logs/nginx.pid;


events {
    worker_connections  1024;
}


http {
    include       mime.types;
    default_type  application/octet-stream;

    log_format  main  ‘$remote_addr - $remote_user [$time_local] "$request" ‘
                      ‘$status $body_bytes_sent "$http_referer" ‘
                      ‘"$http_user_agent" "$http_x_forwarded_for"‘;

    access_log  logs/access.log  main;

    sendfile        on;
    #tcp_nopush     on;

    #keepalive_timeout  0;
    keepalive_timeout  65;

    gzip on;
    gzip_comp_level 6;
    gzip_proxied any;
    gzip_buffers 4 8k;
    gzip_min_length 1024;
    gzip_types text/plain text/xml text/css application/x-javascript text/javascript image/jpeg;

    proxy_buffer_size 64k;
    proxy_buffers   32 32k;
    proxy_ignore_client_abort on;
    client_header_buffer_size 4k;
    client_max_body_size 50m;
    #send_timeout 5m;

    upstream tomcat_client {
         sticky;
         server t01:8080 weight=1;
         server t02:8080 weight=1;
    }

    server {
        listen       80;
        server_name  localhost;

        #charset koi8-r;

        #access_log  logs/host.access.log  main;
	location / {
            proxy_pass http://tomcat_client;
            proxy_redirect default;
            proxy_set_header Host $host;
            proxy_set_header X-Real-IP $remote_addr;
        }


	#location ~ ^/console/ {
        #        proxy_pass      http://mh.lkpower.com;
        #        ssi on;
        #        proxy_redirect off;
        #}
	#location ~ ^/hospital/ {
        #        proxy_pass      http://mh.lkpower.com;
        #        ssi on;
        #        proxy_redirect off;
        #}
        #error_page  404              /404.html;

        # redirect server error pages to the static page /50x.html
        #
        error_page   500 502 503 504  /50x.html;
        location = /50x.html {
            root   html;
        }

        # proxy the PHP scripts to Apache listening on 127.0.0.1:80
        #
        #location ~ \.php$ {
        #    proxy_pass   http://127.0.0.1;
        #}

        # pass the PHP scripts to FastCGI server listening on 127.0.0.1:9000
        #
        #location ~ \.php$ {
        #    root           html;
        #    fastcgi_pass   127.0.0.1:9000;
        #    fastcgi_index  index.php;
        #    fastcgi_param  SCRIPT_FILENAME  /scripts$fastcgi_script_name;
        #    include        fastcgi_params;
        #}

        # deny access to .htaccess files, if Apache‘s document root
        # concurs with nginx‘s one
        #
    }

}
运行docker-compose:
# docker-compose up     #前台
# docker-compose up -d  #后台
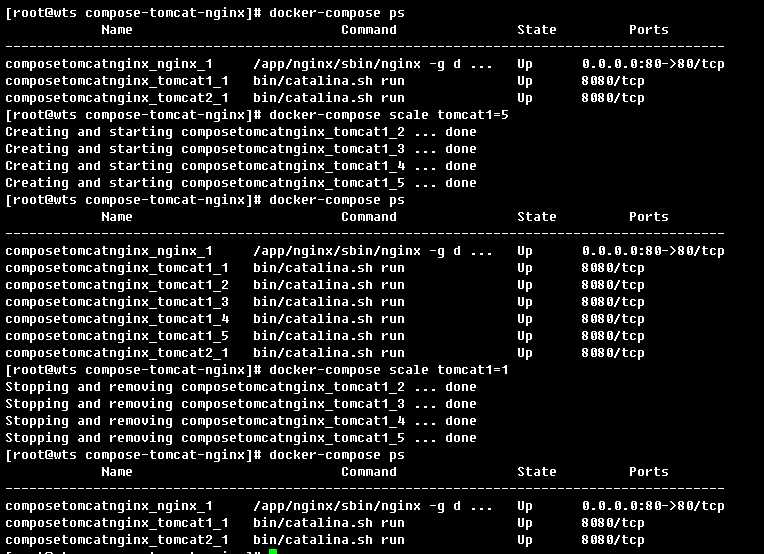
其它相关命令:
# docker-compose ps
# docker-compose build --no-cache --force-rm
# docker-compose rm --all
# docker-compose scale tomcat1=5


弹性伸缩:
本集群实现了nginx代理后端tomcat,并实现了session保持。
标签:direct rust format vol mon UI dock log rbo
原文地址:http://www.cnblogs.com/Eivll0m/p/7744937.html