标签:xenapp vsphere esxi 云计算 xendesktop
《企业云桌面实施》-系列博文-陆续更新中
《企业云桌面实施》-小技巧-01-规划注意事项
http://dynamic.blog.51cto.com/711418/1884922
《企业云桌面实施》-小技巧-02-使用ISO光驱安装esxi6.5
http://dynamic.blog.51cto.com/711418/1885884
《企业云桌面实施》-小技巧-03-vSAN6.5中SAS和SSD的使用建议
http://dynamic.blog.51cto.com/711418/1885887
《企业云桌面实施》-小技巧-04-VMWare Workstation-虚拟机强行关机开机
http://dynamic.blog.51cto.com/711418/1890220
《企业云桌面实施》-小技巧-05-瘦客户端的选择
http://dynamic.blog.51cto.com/711418/1890221
有人经常会问,K2显卡如何在虚拟化中使用?
其实在本次项目之前,我也不知道如何安装和使用K2显卡,经过了本次项目后,作了如何笔记本,我将分享一下此过程。(希望对初学者有帮助!)
1. 准备物理服务器
2. 连接K2显卡
3. 安装esxi 6.5
4. 安装vCenter 6.5
5. 开启SSH
6. 使用SSH远程
7. 使用WinSCP复制K2显卡驱动以指定位置
WinSCP
8. 安装驱动
将此主机进入维护模式
安装K2显卡驱动成功。
重启
Reboot the ESXi host and remove it from maintenance mode.
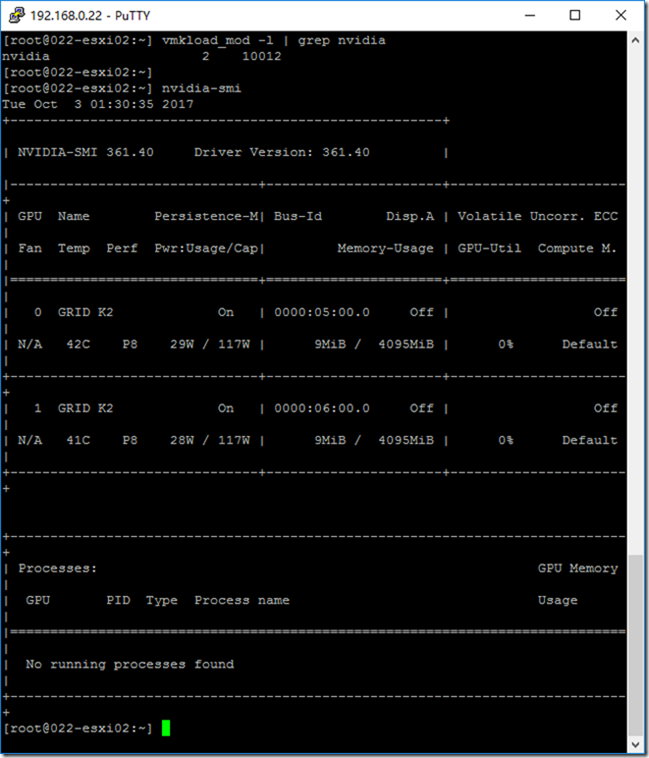
After the ESXi host has rebooted, verify that the GRID package installed and loaded
correctly by checking for the NVIDIA kernel driver in the list of kernel loaded modules.
[root@esxi:~] vmkload_mod -l | grep nvidia
nvidia 5 8420
If the nvidia driver is not listed in the output, check dmesg for any load-time errors
reported by the driver.
Verify that the NVIDIA kernel driver can successfully communicate with the GRID
physical GPUs in your system by running the nvidia-smi command, which should
produce a listing of the GPUs in your platform:
[root@esxi:~] nvidia-smi 
The nvidia-smi command is described in more detail in section 4.1.
If nvidia-smi fails to report the expected output for all the NVIDIA GPUs in your
system, see Chapter 7 for troubleshooting steps.
9. 新建虚拟机使用K2显卡
注意:安装虚拟机时候,选择K2显卡,此处选择grid_k220q,一张显卡可以供16台虚拟机使用。具体参考以下表格。
选择新设备-共享PCI设备,选择添加
选择grid_k220q
10. 安装虚拟机使用
安装VMware Tools
设置:
C
D
E
关闭防火墙
安装Windows update
关机
快照
002-OS-OK
11. 为Windows 8虚拟机安装K2显卡驱动
注意:安装前,显卡驱动不能使用。
注意:安装后,显卡可以正常使用。
安装K2显卡后,显示效果会比没有K2显卡效果好很多,如下图所示。如果你显示还不正常,请联系我。
本文出自 “学无止境” 博客,请务必保留此出处http://dynamic.blog.51cto.com/711418/1977259
《企业云桌面实施》-小技巧-06-为设计行业桌面虚拟化-安装和使用K2显卡
标签:xenapp vsphere esxi 云计算 xendesktop
原文地址:http://dynamic.blog.51cto.com/711418/1977259