标签:cli 返回 ntc efs 原因 initial lan back init
在组件的整个生命周期中,随着该组件的props或者state发生改变,其DOM表现也会有相应的变化。一个组件就是一个状态机,对于特定地输入,它总返回一致的输出。
一个React组件的生命周期分为三个部分:实例化、存在期和销毁时。
当组件在客户端被实例化,第一次被创建时,以下方法依次被调用:
1、getDefaultProps
2、getInitialState
3、componentWillMount
4、render
5、componentDidMount
当组件在服务端被实例化,首次被创建时,以下方法依次被调用:
1、getDefaultProps
2、getInitialState
3、componentWillMount
4、render
componentDidMount 不会在服务端被渲染的过程中调用。
对于每个组件实例来讲,这个方法只会调用一次,该组件类的所有后续应用,getDefaultPops 将不会再被调用,其返回的对象可以用于设置默认的 props(properties的缩写) 值。
<!DOCTYPE html>
<html lang="en">
<head>
    <meta charset="UTF-8">
    <title>Title</title>
    <style>

    </style>
</head>
<body>
<script src="js/react.js"></script>
<script src="js/JSXTransformer.js"></script>
<script type="text/jsx">
    var Hello = React.createClass({
        getDefaultProps: function () {
            return {
                name: ‘neinei‘,
                username: ‘jasper‘
            }
        },

        render: function () {
            return (
                    <div>Hello,{this.props.name},git username is {this.props.username}</div>
            )
        }
    });

    React.render(<Hello/>, document.body);
</script>
</body>
</html>

也可以在挂载组件的时候设置 props:
var data = [{title: ‘Hello‘}];
<Hello data={data} />
    var Hello = React.createClass({
        render: function () {
            return (
                    <div>title is:{this.props.title}</div>
            )
        }
    });
    var data = [{title: ‘Hello‘}];
    React.render(<Hello title={data}/>, document.body);
或者调用 setProps (一般不需要调用)来设置其 props:
var data = [{title: ‘Hello‘}];
var Hello = React.render(<Demo />, document.body);
Hello.setProps({data:data});
    var Hello = React.createClass({
        render: function () {
            return (
                    <div>title is:{this.props.data}</div>
            )
        }
    });


    var data = [{title: ‘Hello‘}];
    var Hello = React.render(<Hello />, document.body);
    Hello.setProps({data:data});
但只能在子组件或组件树上调用 setProps。别调用 this.setProps 或者 直接修改 this.props。将其当做只读数据。
React通过 propTypes 提供了一种验证 props 的方式,propTypes 是一个配置对象,用于定义属性类型:
var survey = React.createClass({
    propTypes: {
        survey: React.PropTypes.shape({
            id: React.PropTypes.number.isRequired
        }).isRequired,
        onClick: React.PropTypes.func,
        name: React.PropTypes.string,
        score: React.PropTypes.array
        ...
    },

    //...
})
组件初始化时,如果传递的属性和 propTypes 不匹配,则会打印一个 console.warn 日志。如果是可选配置,可以去掉.isRequired。
getInitialState
对于组件的每个实例来说,这个方法的调用有且只有一次,用来初始化每个实例的 state,在这个方法里,可以访问组件的 props。每一个React组件都有自己的 state,其与 props 的区别在于 state只存在组件的内部,props 在所有实例中共享。
getInitialState 和 getDefaultPops 的调用是有区别的,getDefaultPops 是对于组件类来说只调用一次,后续该类的应用都不会被调用,而 getInitialState 是对于每个组件实例来讲都会调用,并且只调一次。
    var LikeButton = React.createClass({
        getInitialState: function () {
            return {liked: false};
        },
        handleClick: function (event) {
            this.setState({liked: !this.state.liked});
        },
        render: function () {
            var text = this.state.liked ? ‘like‘ : ‘havent liked‘;
            return (
                    <p onClick={this.handleClick}>
                        You {text} this. Click to toggle.
                    </p>
            );
        }
    });

    React.render(
            <LikeButton/>,
        document.body
    );

每次修改 state,都会重新渲染组件,实例化后通过 state 更新组件,会依次调用下列方法:
1、shouldComponentUpdate
2、componentWillUpdate
3、render
4、componentDidUpdate
但是不要直接修改 this.state,要通过 this.setState 方法来修改。
该方法在首次渲染之前调用,也是再 render 方法调用之前修改 state 的最后一次机会。
该方法会创建一个虚拟DOM,用来表示组件的输出。对于一个组件来讲,render方法是唯一一个必需的方法。render方法需要满足下面几点:
只能通过 this.props 和 this.state 访问数据(不能修改)
可以返回 null,false 或者任何React组件
只能出现一个顶级组件,不能返回一组元素
不能改变组件的状态
不能修改DOM的输出
render方法返回的结果并不是真正的DOM元素,而是一个虚拟的表现,类似于一个DOM tree的结构的对象。react之所以效率高,就是这个原因。
该方法不会在服务端被渲染的过程中调用。该方法被调用时,已经渲染出真实的 DOM,可以再该方法中通过 this.getDOMNode() 访问到真实的 DOM(推荐使用 ReactDOM.findDOMNode())。
    var MessageBox = React.createClass({
        componentDidMount: function () {
            console.log(‘componentDidMount‘);
        },
        killMySelf: function () {
            React.unmountComponentAtNode(document.getElementById(‘app‘))
        },
        render: function () {
            console.log(‘render‘);
            return (
                    <div>
                        <button onClick={this.killMySelf}>卸载掉这个组件</button>
                    </div>
            )
        }
    });

    var messageBox = React.render(<MessageBox/>,
        document.getElementById(‘app‘)
    )

由于组件并不是真实的 DOM 节点,而是存在于内存之中的一种数据结构,叫做虚拟 DOM (virtual DOM)。只有当它插入文档以后,才会变成真实的 DOM 。有时需要从组件获取真实 DOM 的节点,这时就要用到 ref 属性:
    var Area = React.createClass({
        render: function () {
//            this.getDOMNode(); //render调用时,组件未挂载,这里将报错
            return (
                <h1 ref="mainCanvas">根据ref访问</h1>
            )
        },
        componentDidMount: function () {
            var canvas = this.refs.mainCanvas.getDOMNode();
            console.log(canvas);
            //这是有效的,可以访问到 Canvas 节点

        }
    });
    React.render(<Area/>,
        document.getElementById(‘app‘)
    );

需要注意的是,由于 this.refs.[refName] 属性获取的是真实 DOM ,所以必须等到虚拟 DOM 插入文档以后,才能使用这个属性,否则会报错。
此时组件已经渲染好并且用户可以与它进行交互,比如鼠标点击,手指点按,或者其它的一些事件,导致应用状态的改变,你将会看到下面的方法依次被调用
1、componentWillReceiveProps
2、shouldComponentUpdate
3、componentWillUpdate
4、render
5、componentDidUpdate
组件的 props 属性可以通过父组件来更改,这时,componentWillReceiveProps 将来被调用。可以在这个方法里更新 state,以触发 render 方法重新渲染组件。
    var MessageBox = React.createClass({
        getInitialState: function () {
            console.log(‘getInitialState‘);
            return {
                count: 0,
            }
        },
        render: function () {
            console.log(‘render‘);
            return (
                    <div>
                        <h1>计数:{this.state.count}</h1>
                        <Submessage message="sub message"/>
                    </div>
            )
        }
    });
    var Submessage = React.createClass({
        componentWillReceiveProps: function (nextProps) {
            console.log(‘子组件将要获取props‘);
            console.log(nextProps);
        },
        render: function () {
            return (
                    <div>
                        <h3>写代码很有意思</h3>
                        <span>传过来的props的值为{this.props.message}</span>
                    </div>
            )
        }
    });
    var messageBox = React.render(<MessageBox/>,
        document.getElementById(‘app‘)
    )

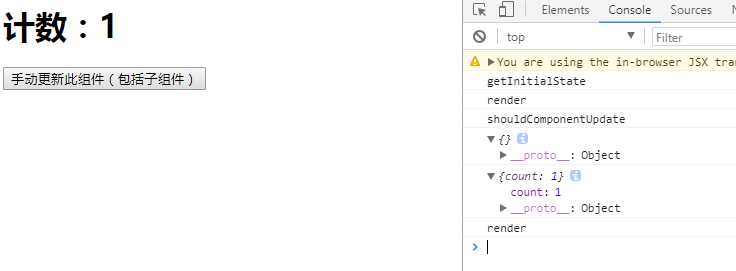
如果你确定组件的 props 或者 state 的改变不需要重新渲染,可以通过在这个方法里通过返回 false 来阻止组件的重新渲染,返回 `false 则不会执行 render 以及后面的 componentWillUpdate,componentDidUpdate 方法。
该方法是非必须的,并且大多数情况下没有在开发中使用。
    var MessageBox = React.createClass({
        getInitialState: function () {
            console.log(‘getInitialState‘);
            return {
                count: 0,
            }
        },
        shouldComponentUpdate: function (nextProp, nextState) {
            console.log(‘shouldComponentUpdate‘);
            console.log(nextProp)
            console.log(nextState)
            return true;
        },
        doUpdate: function () {
            this.setState({
                count: this.state.count + 1
            })
        },
        render: function () {
            console.log(‘render‘);
            return (
                    <div>
                        <h1>计数:{this.state.count}</h1>
                        <button onClick={this.doUpdate}>手动更新此组件(包括子组件)</button>
                    </div>
            )
        }
    });
    var messageBox = React.render(<MessageBox/>,
        document.getElementById(‘app‘)
    )


这个方法和 componentWillMount 类似,在组件接收到了新的 props 或者 state 即将进行重新渲染前,componentWillUpdate(object nextProps, object nextState) 会被调用,注意不要在此方面里再去更新 props 或者 state。
这个方法和 componentDidMount 类似,在组件重新被渲染之后,componentDidUpdate(object prevProps, object prevState) 会被调用。可以在这里访问并修改 DOM。
每当React使用完一个组件,这个组件必须从 DOM 中卸载后被销毁,此时 componentWillUnmout 会被执行,完成所有的清理和销毁工作,在 componentDidMount 中添加的任务都需要再该方法中撤销,如创建的定时器或事件监听器。
当再次装载组件时,以下方法会被依次调用:
1、getInitialState
2、componentWillMount
3、render
4、componentDidMount
在 getInitialState 方法中,尝试通过 this.props 来创建 state 的做法是一种反模式。
//反模式
getDefaultProps: function(){
    return {
        data: new Date()
    }
},
getInitialState: function(){
    return {
        day: this.props.date - new Date()
    }
},
render: function(){
    return <div>Day:{this.state.day}</div>
}
经过计算后的值不应该赋给 state,正确的模式应该是在渲染时计算这些值。这样保证了计算后的值永远不会与派生出它的 props 值不同步。
//正确模式
getDefaultProps: function(){
    return {
        data: new Date()
    }
},
render: function(){
    var day = this.props.date - new Date();
    return <div>Day:{day}</div>
}
如果只是简单的初始化 state,那么应用反模式是没有问题的。
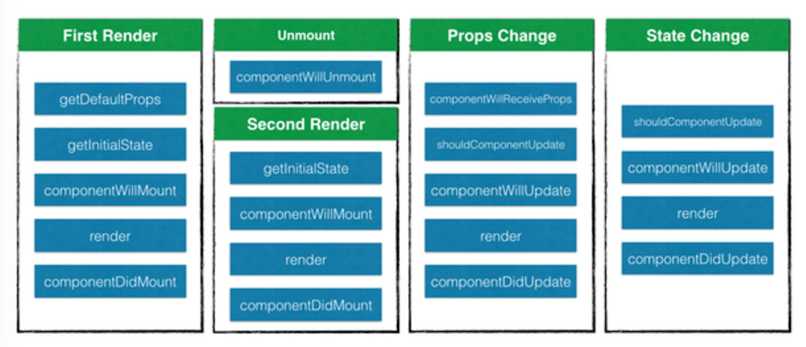
以下面的一张图总结组件的生命周期:

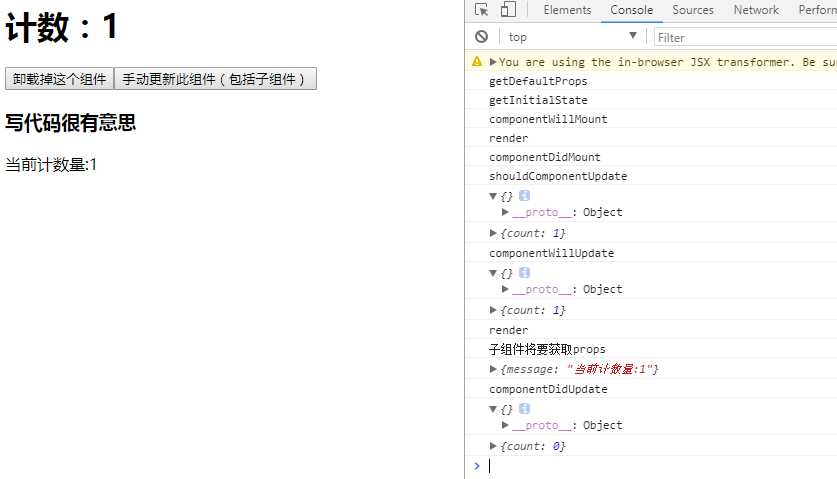
综合生命周期的总例:
    var MessageBox = React.createClass({
        getInitialState: function () {
            console.log(‘getInitialState‘);
            return {
                count: 0,
            }
        },
        getDefaultProps: function () {
            console.log(‘getDefaultProps‘);
        },
        componentWillMount: function () {
            console.log(‘componentWillMount‘);
        },
        componentDidMount: function () {
            console.log(‘componentDidMount‘);
        },
        componentWillUnmount: function () {
           alert(‘componentWillUnmount‘);
        },
        shouldComponentUpdate: function (nextProp, nextState) {
            console.log(‘shouldComponentUpdate‘);
            console.log(nextProp)
            console.log(nextState)
            return true;
        },
        componentDidUpdate: function (nextProp, nextState) {
            console.log(‘componentDidUpdate‘);
            console.log(nextProp)
            console.log(nextState)
        },
        componentWillUpdate: function (nextProp, nextState) {
            console.log(‘componentWillUpdate‘);
            console.log(nextProp)
            console.log(nextState)
        },
        killMySelf: function () {
            React.unmountComponentAtNode(document.getElementById(‘app‘))
        },
        doUpdate: function () {
            this.setState({
                count: this.state.count + 1
            })
        },
        render: function () {
            console.log(‘render‘);
            return (
                    <div>
                        <h1>计数:{this.state.count}</h1>
                        <button onClick={this.killMySelf}>卸载掉这个组件</button>
                        <button onClick={this.doUpdate}>手动更新此组件(包括子组件)</button>
                        <Submessage message={‘当前计数量:‘ + this.state.count}/>
                    </div>
            )
        }
    });
    var Submessage = React.createClass({
        componentWillReceiveProps: function (nextProps) {
            console.log(‘子组件将要获取props‘);
            console.log(nextProps);
        },
        render: function () {
            return (
                    <div>
                        <h3>写代码很有意思</h3>
                        <span>{this.props.message}</span>
                    </div>
            )
        }
    });
    var messageBox = React.render(<MessageBox/>,
        document.getElementById(‘app‘)
    )


标签:cli 返回 ntc efs 原因 initial lan back init
原文地址:http://www.cnblogs.com/theWayToAce/p/7760508.html