标签:des style blog http color io os 使用 ar
——纯属把之前写的搬过来——
PyQt是Qt库的Python接口,利用Python丰富的第三方库,再配合Qt Designer,PyQt成为了桌面软件开发非常好的选择。下面介绍一个在项目中的实际应用:
背景:某项目中,xx方需要开发自己的报送程序,主要会涉及与服务器端的socket通信、数据的aes加密等
1.实现数据加密传输
使用Python的优势在于Python丰富的第三方库,这样一个小工具开发中,我们完全没有必要自己实现aes算法。下面是利用Crypto.Cipher库实现的aes加解密:
class MyCrypt():
    def __init__(self,key):
        self.key = key
        self.mode = AES.MODE_CBC
        self.iv = 16 * ‘\x00‘

    def myEncrypt(self,text):
        cryptor = AES.new(self.key,self.mode, self.iv)
        length = 16
        count = len(text.encode(‘gbk‘))
        if count < length:
            add = length-count
            text = text + (‘ ‘ * add)
        elif count > length:
            add = length-(count % length)
            text = text + (‘ ‘ * add)
        text = text.encode(‘gbk‘)
        cipherText = cryptor.encrypt(text)
        return cipherText

    def myDecrypt(self,text):
        cryptor = AES.new(self.key, self.mode, self.iv)
        plainText  = cryptor.decrypt(text)
        return plainText
2.多线程
Qt的界面是在主线程中实现,在socket编程中如果把accept也放在主线程中实现,会导致界面假死。Python提供的多线程库可以帮助解决这个问题:
#ui thread
class InitInterface(ui.Ui_MainWindow):
    def    __init__(self, parent=None):
        super(InitInterface, self).__init__()
        #...

    def listenStart(self):
        self.s = socket.socket(socket.AF_INET, socket.SOCK_STREAM)
        self.s.bind((self.ip, int(self.port)))
        self.s.listen(100)
        c = myAccept(self.key, self.s)
        c.sigrefresh.connect(self.InterfaceRefresh)
        c.start()

#work thread
class myAccept(QObject, threading.Thread):
    sigrefresh = pyqtSignal()
    def    __init__(self, key, s):
        super(myAccept, self).__init__()
        #...
        self.s = s

    def run(self):
        self.conn, address = self.s.accept()
        while True:
            if not self.conn.recv(1024):
                break
    #...
3.界面
Qt提供了类似css界面布局功能的qss
QPushButton
{
    color: rgb(255, 255, 255);
    background-color: rgb(167, 205, 255);
    border:none;
    padding: 3px;
    font-family: "Verdana";
    font-size: 15px;
    text-align: center;
}
QPushButton:hover, QPushButton:pressed , QPushButton:checked
{
    background-color: rgb(85, 170, 255);
    text-align: right;
    padding-right: 20px;
    font-weight:100
}
QPushButton:hover
{
    background-image: url(:/icon/icons/dark/appbar.navigate.next.png);
    background-repeat:no-repeat;
    background-position: center left;
}
QPushButton:pressed, QPushButton:checked
{
    background-image: url(:/icon/icons/light/appbar.navigate.next.png);
    background-repeat:no-repeat;
    background-position: center left;
}
qss使用:
qss_file = open(‘style_file.qss‘).read()
self.b_send.setStyleSheet(qss_file)
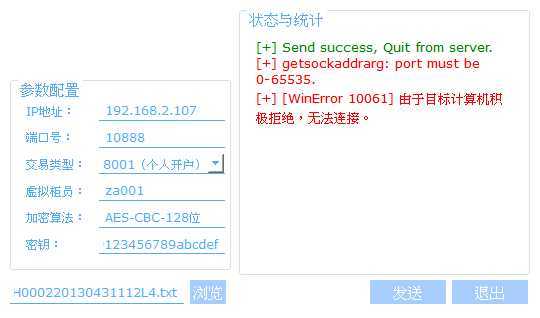
有图有真相:
标签:des style blog http color io os 使用 ar
原文地址:http://www.cnblogs.com/superkv/p/3970908.html