标签:100% 计算 滚动 示例 scale 驼峰命名 bottom 显示与隐藏 device
# watch 用法
(1)、普通的watch
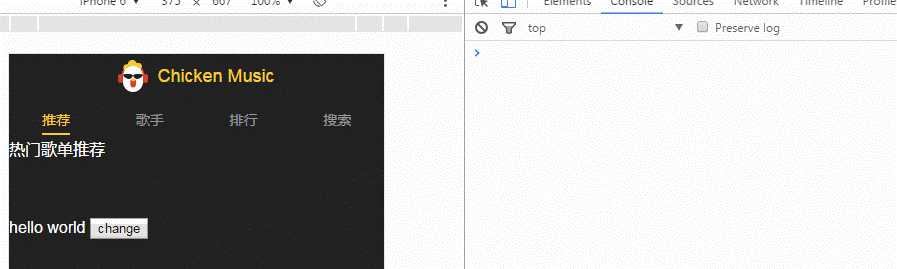
<div style="margin-top: 60px;">
     {{common}}
      <button @click="common=‘123456‘">change</button>
</div>
data () {
     return {
          common: ‘hello world‘
     }
},
watch: {
     common (newVal, oldVal) {
         console.log(`newVal--->${newVal}`)
      }
 },
运行:
(2)、对象的属性watch (需要借助 computed 计算属性)
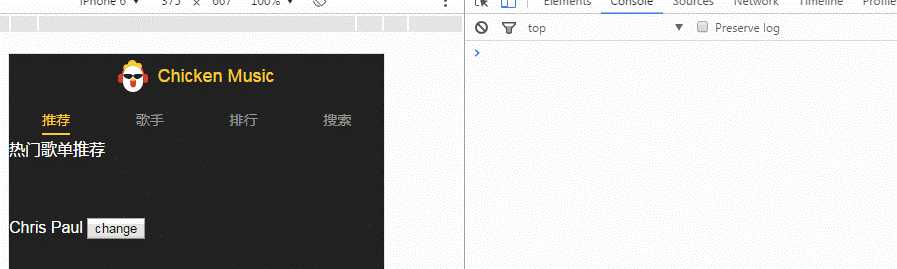
<div style="margin-top: 60px;">
    {{common.name}}
   <button @click="common.name=‘KobeByrant‘">change</button>
 </div>
computed: {
     name () {
        return this.common.name
     }
},
watch: {
     name (newVal, oldVal) {
         console.log(`newVal--->${newVal}`)
      }
},
# 移动端 1px:
HTML部分:加一个 “border-1px” 类
<div class="container border-1px"></div>
CSS部分:两部分,一部分是通过伪类给定1px 的宽度,另一部分是在不同DPI下缩小一定的倍数
.border-1px{
    position: relative;
    &:after{
        position: absolute;
        bottom: 0;
        left: 0;
        display: block;
        width: 100%;
        content: ‘‘;
        border-top: 1px solid $color;
    }
}

@media (-webkit-min-device-pixel-ratio: 1.5) {
    .border-1px{
        &::after{
            -webkit-transform: scaleY(0.7);
            -moz-transform: scaleY(0.7);
            transform: scaleY(0.7);
        }
    }
}

@media (-webkit-min-device-pixel-ratio: 1.0) {
    .border-1px{
        &::after{
            -webkit-transform: scaleY(0.5);
            -moz-transform: scaleY(0.5);
            transform: scaleY(0.5);
        }
    }
}
# Element.getBoundingClientRect()
Element.getBoundingClientRect() 方法返回元素的大小及其相对于视口的位置
返回值是一个 DOMRect 对象,该对象包含了一组用于描述边框的只读属性,left、right、top 和 bottom,单位为像素。除了width 和 height 以外的属性都是相对于视口的左上角
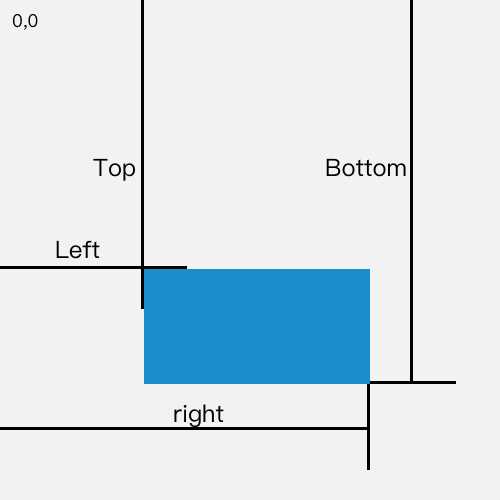
当滚动位置发生改变时,top 和 left 属性值会立即随之发生变化,因为它们的值是相对于视口的,不是绝对的。
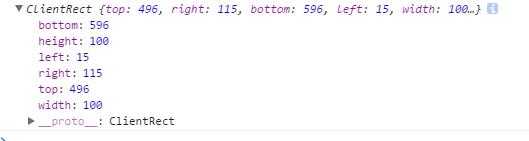
<div class="bounding bounding-hook" style="width: 100px; height: 100px; margin-left: 15px; background-color: rgb(0,160,220)"></div>

let rect = document.getElementsByClassName(‘bounding-hook‘)[0].getBoundingClientRect()

console.log(rect)
控制台打印结果:
# ref 属性:
属性值是一个 String,这里要注意一点,属性值必须是一个单词或者驼峰命名法(这点可以自行试验),如果模板中用短横杠命名法,js中用驼峰的话会报错;如果二者都用短横杠,也会报错
如果用在普通的DOM元素上,引用指向的就是DOM元素;如果用在子组件上,引用就指向组件实例
(1)、用在普通的DOM元素上
<template>
  <div>
    <p ref="profile"> hello world!</p>
    <button @click="hello">button</button>
    <h1 style="font-size: 16px; color: red;">{{str}}</h1>
  </div>
</template>
<script type="text/ecmascript-6">
  export default {
    data () {
      return {
        str: ‘‘
      }
    },
    methods: {
      hello () {
        this.str = this.$refs.profile.innerHTML
      }
    }
  }

</script>
运行效果:
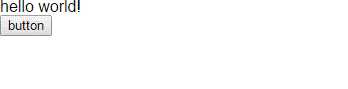
可以看到,点击按钮时,通过 " this.$refs.profile" 获取到的是整个 DOM元素 ( <p data-v-04987154> hello world!</p> )
(2)、用在子组件上
父组件:
<template>
  <div>
    <child ref="childWrapper"></child>
    <button @click="get">父组件按钮</button>
    <h1>{{str}}</h1>
  </div>
</template>
<script type="text/ecmascript-6">
  import child from ‘./child‘
  export default {
    components: {
      child
    },
    data () {
      return {
        str: ‘‘
      }
    },
    methods: {
      get () {
        this.$refs.childWrapper.addNum()
        this.str = this.$refs.childWrapper.str
      }
    }
  }

</script>
子组件:
<template>
  <div class="child-wrapper" style="margin:30px 15px; padding: 15px; border: 3px double #ddd;">
      <button @click="addNum()">子组件按钮</button>
      <div v-show="isShow" style="width: 100px; height: 100px; background-color: red;"></div>
  </div>
</template>

<script>
export default {
    data () {
        return {
            isShow: false,
            str: ‘我是子组件的数据,你能拿到我吗?‘
        }
    },
    methods: {
        addNum () {
            this.isShow = !this.isShow
        }
    }
}
</script>
运行效果:
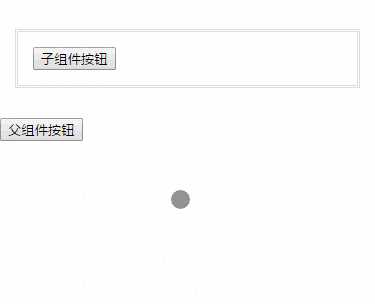
可以看到,child组件可以通过点击按钮实现红色DIV的显示与隐藏,父组件一样可以通过 " this.$ref.childWrapper" 拿到子组件,并调用获取子组件的数据和方法,对子组件加以控制
关于 ref 注册时间的重要说明:因为 ref 本身是作为渲染结果被创建的,在初始渲染的时候你不能访问它们 - 它们还不存在!$refs 也不是响应式的,因此你不应该试图用它在模板中做数据绑定。
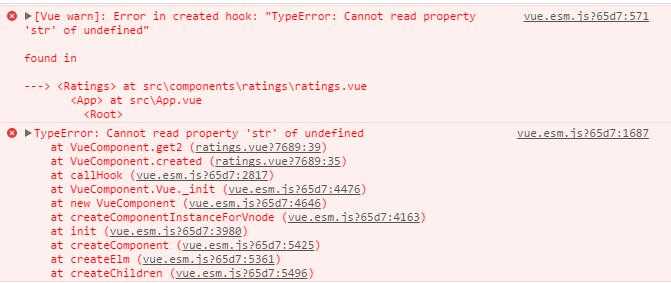
上面的两个例子,都是通过点击事件来实现示例效果,如果我们直接在数据更新的时候通过 ref来访问的话是找不到的,报错未定义,如下图:
<script type="text/ecmascript-6">
  import child from ‘./child‘
  export default {
    components: {
      child
    },
    data () {
      return {
        str: ‘‘
      }
    },
    created () {
      // this.get2()
      this.$nextTick(() => {
        this.get2()  // 我是子组件的数据,你能拿到我吗?
      })
    },
    methods: {
      get2 () {
        console.log(this.$refs.childWrapper.str)
      }
    }
  }

</script>
# 为动画DOM元素添加 transform: translate3d(0,0,0) 开启GPC硬件加速模式,从而让浏览器在渲染动画时,从CPU转向GPU。具体有两篇较好的文章可查阅
http://blog.bingo929.com/transform-translate3d-translatez-transition-gpu-hardware-acceleration.html
http://www.w3cplus.com/animation/animation-performance.html
.cart-decrease{
        display: inline-block;
        padding: 6px;
        opacity: 1;
        transform: translate3d(0,0,0); // 开启GPU硬件加速,解决Chrome动画卡顿
        .inner{
            display: inline-block;
            line-height: 24px;
            font-size: 24px;
            color: rgb(0, 160, 220);
            transition: all 0.4s linear;
            transform: rotate(0);
        }
        &.move-enter-active, &.move-leave-active{
            transition: all 0.4s linear
        }
        &.move-enter, &.move-leave-to{
            opacity: 0;
            transform: translate3d(24px, 0, 0);
            .inner{
                transform: rotate(180deg);
            }
        }

    }
# navtive 修饰符
浏览器默认会把 <router-link>渲染成 a 标签,如果需要为 router-link 添加事件,不能像一般 html 元素那样直接写 " @click="someMethod",必须加 .navtive 修饰符
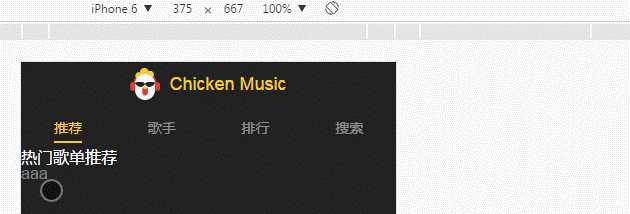
Demo 1:按一般的写法添加事件
<router-link to="/rank" @click="test">aaa</router-link>
test () {
      alert(1)
}
Demo2:用.native 修饰符来添加事件
<router-link to="/rank" @click.native="test">aaa</router-link>
同样,给组件绑定原生事件也必须用 .native 修饰符
<select v-model="optSelected">
          <option value="aa">AA</option>
            <option value="bb">BB</option>
</select>
<component :is="optSelected" @click="test"></component>
不加的情况下,没法弹出1,并且控制台会有警告消息

现在加上修饰符
<select v-model="optSelected">
          <option value="aa">AA</option>
            <option value="bb">BB</option>
</select>
 <component :is="optSelected" @click.native="test"></component>

标签:100% 计算 滚动 示例 scale 驼峰命名 bottom 显示与隐藏 device
原文地址:http://www.cnblogs.com/rogerwu/p/7777382.html