标签:users 不同的 http 文件中 parser markdown request方法 from text
在前面说过,请求到达REST framework的时候,会对request进行二次封装,在封装的过程中会对客户端发送过来的request封装进认证,选择,解析等功能
request方法封装完成之后,执行initial方法时,又会再次对客户端的请求执行认证操作,确保请求的合法性
现在来说说REST framework的认证
在对request方法进行封装时,通过查看dispatch的源码,可以知道request二次封装是调用了get_authenticators这个方法
def initialize_request(self, request, *args, **kwargs):
    """
    Returns the initial request object.
    """
    parser_context = self.get_parser_context(request)
            self.authentication_classes
    return Request(
        request,
        parsers=self.get_parsers(),
        authenticators=self.get_authenticators(),
        negotiator=self.get_content_negotiator(),
        parser_context=parser_context
    )
再次查看get_authenticators方法的源码
def get_authenticators(self):
    """
    Instantiates and returns the list of authenticators that th
    """
return [auth() for auth in self.authentication_classes] 可以看出使用了列表生成式,如果self.authentication_classes是一个列表,且列表中的每一个元素都是一个类,则循环这个列表,并对列表中的元素进行实例化
所以可以知道,self.get_authenticators()方法的执行结果是一个对象列表
还有一个问题,列表生成式中的self.authentication_classes又是什么呢??
再查看self.authentication_classes的源码
class APIView(View):

    # The following policies may be set at either globally, or per-view.
    renderer_classes = api_settings.DEFAULT_RENDERER_CLASSES
    parser_classes = api_settings.DEFAULT_PARSER_CLASSES
    authentication_classes = api_settings.DEFAULT_AUTHENTICATION_CLASSES
    throttle_classes = api_settings.DEFAULT_THROTTLE_CLASSES
    permission_classes = api_settings.DEFAULT_PERMISSION_CLASSES
    content_negotiation_class = api_settings.DEFAULT_CONTENT_NEGOTIATION_CLASS
    metadata_class = api_settings.DEFAULT_METADATA_CLASS
    versioning_class = api_settings.DEFAULT_VERSIONING_CLASS

    # Allow dependency injection of other settings to make testing easier.
    settings = api_settings
可以看出,authentication_classes来自api_settings
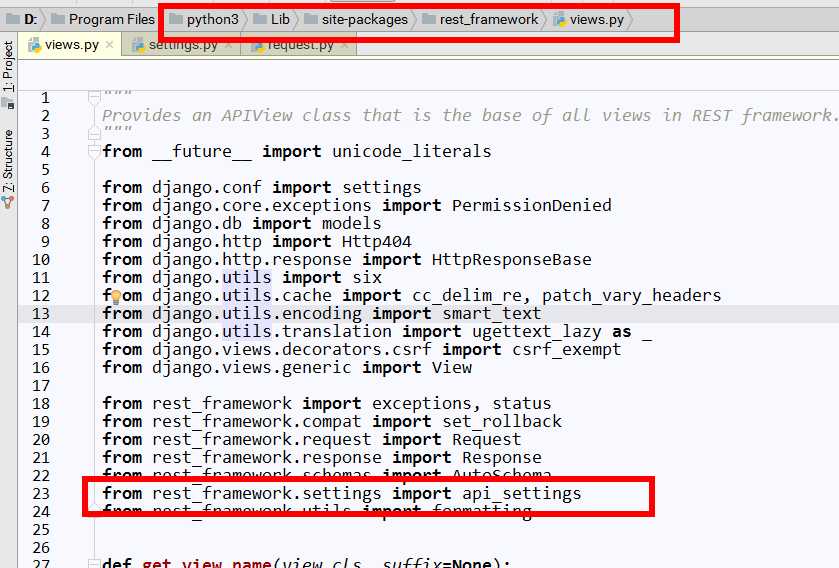
查看REST framework的views.py文件的导入模块时,可以看到

也就是说authentication_classes是来看于REST framework的配置文件
新建一个项目test_rest,定义视图函数,打印authentication_classes到底是什么??
views.py文件内容
from django.shortcuts import render,HttpResponse
from rest_framework.views import APIView

class UsersView(APIView):

    def get(self,request,*args,**kwargs):

        print(‘authentication_classes:‘, self.authentication_classes)
        return HttpResponse("aaaa")
打印结果为
authentication_classes: [<class ‘rest_framework.authentication.SessionAuthentication‘>, <class ‘rest_framework.authentication.BasicAuthentication‘>]由此可以知道,authentication_classes默认就是这两个类
在视图函数中导入这两个类,再查看这两个类的源码,可以知道
class BasicAuthentication(BaseAuthentication):

    www_authenticate_realm = ‘api‘

    def authenticate(self, request):

        ...

    def authenticate_credentials(self, userid, password):

        ...

class SessionAuthentication(BaseAuthentication):

    def authenticate(self, request):

        ...

    def enforce_csrf(self, request):

        ...

class TokenAuthentication(BaseAuthentication):
...在这个文件中,可以发现,这个文件中不仅定义了SessionAuthentication和BasicAuthentication这两个类,
相关的类还有TokenAuthentication,而且这三个认证相关的类都是继承自BaseAuthentication类
从上面的源码可以大概知道,这三个继承自BaseAuthentication的类是不同的认证方式.
到现在大致的认证流程也已经清楚了
get_authenticators方法获取到SessionAuthentication类和BasicAuthentication类,并实例化后返回经
REST framework方法中的initialize_request方法,把这两个方法的实例化对象封装进行客户端发过来的request中,返回REST framework中看到的Request
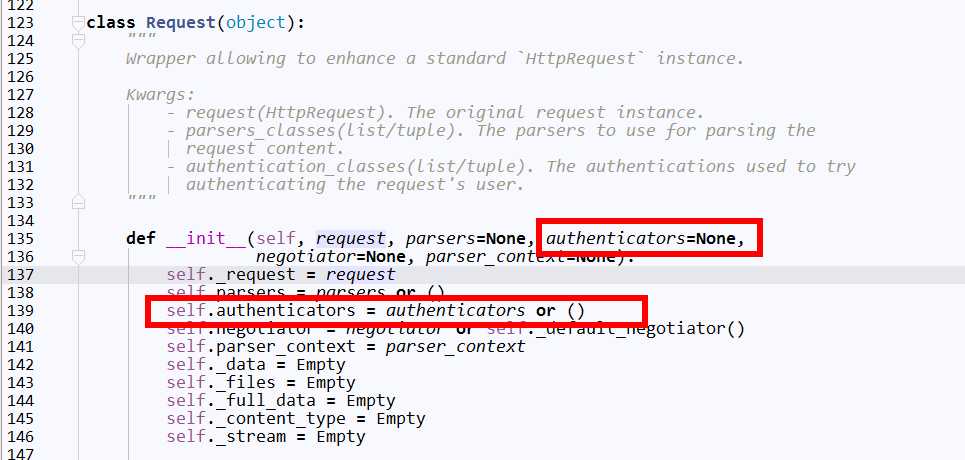
查看REST framework中的Request方法的源码

在Request方法中,get_authenticators方法执行完成返回的对象列表被赋值给了authenticators参数
所以在REST framework中执行request.authenticators方法时,就是在调用相关的认证功能对请求进行过滤
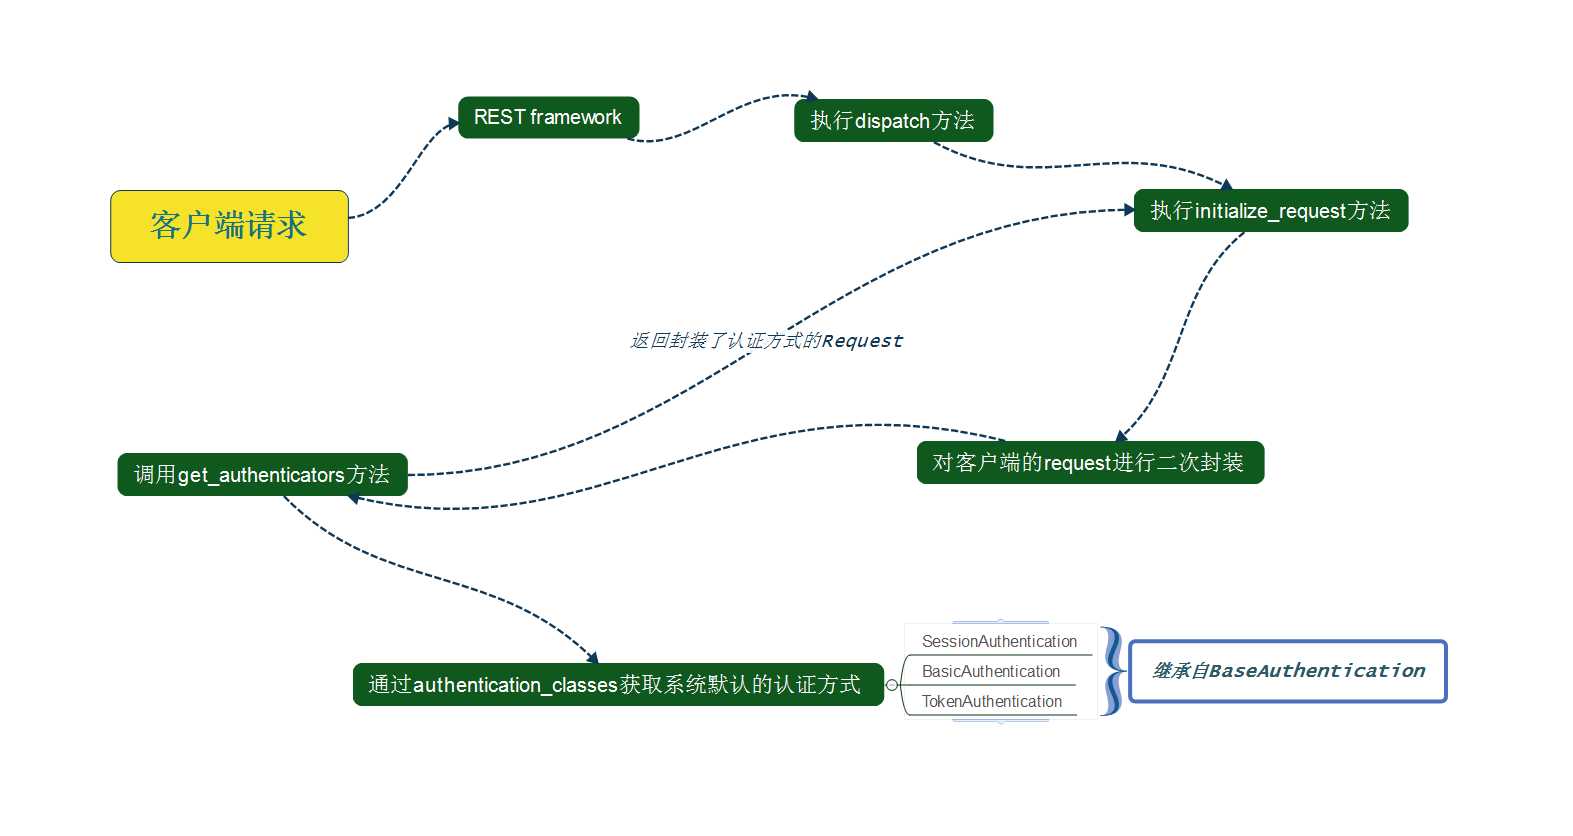
Django REST framework的认证方式的执行流程图解

request封装完成后执行initial方法,在这里调用默认的认证功能进行认证,返回认证通过后的用户对象
def perform_authentication(self, request):

    request.user
进入request.user的执行流程
def _authenticate(self):
    """
    Attempt to authenticate the request using each authentication instance
    in turn.
    Returns a three-tuple of (authenticator, user, authtoken).
    """
    for authenticator in self.authenticators:
        try:
            user_auth_tuple = authenticator.authenticate(self)
        except exceptions.APIException:
            self._not_authenticated()
            raise

        if user_auth_tuple is not None:
            self._authenticator = authenticator
            self.user, self.auth = user_auth_tuple
            return

self._not_authenticated()在这里self.authenticators方法的执行结果就是get_authenticators方法执行完成后返回的对象列表
循环认证的对象列表,执行每一个认证方法的类中的authenticate方法
class ForcedAuthentication(object):
    """
    This authentication class is used if the test client or request factory
    forcibly authenticated the request.
    """

    def __init__(self, force_user, force_token):
        self.force_user = force_user
        self.force_token = force_token

    def authenticate(self, request):
return (self.force_user, self.force_token)authenticate方法返回用户认证的元组,这个元组包括通过认证的用户及用户的口令
在_authenticate方法中使用了try/except方法来捕获authenticate方法可能出现的异常
如果出现异常,就调用_not_authenticated方法来设置返回元组中的用户及口令并终止程序继续运行
在上面我们知道,Request会调用认证相关的类及方法,APIView会设置认证相关的类及方法
所以如果想自定义认证功能,只需要重写authenticate方法及authentication_classes的对象列表即可
新建一个项目test_auth,项目中有一个app01的项目
在项目配置文件的INSTALLED_APPS中引入rest_framework,
urls.py文件配置如下
from django.conf.urls import url
from django.contrib import admin
from app01 import views

urlpatterns = [
    url(r‘^admin/‘, admin.site.urls),
    url(r‘^users/‘,views.UsersView.as_view())
]
对应的视图函数内容
from django.shortcuts import render,HttpResponse
from rest_framework.views import APIView
from rest_framework.authentication import BaseAuthentication
from rest_framework import exceptions

TOKEN_LIST=[            # 定义token_list
    ‘aabbcc‘,
    ‘ddeeff‘,
]
class UserAuthView(BaseAuthentication):
    def authenticate(self,request):
        tk=request._request.GET.get("tk")   # request._request为原生的request

        if tk in TOKEN_LIST:
            return (tk,None)        # 返回一个元组
        raise exceptions.AuthenticationFailed("用户认证失败")

    def authenticate_header(self,request):
        pass

class UsersView(APIView):
    authentication_classes = [UserAuthView,]

    def get(self,request,*args,**kwargs):
        print(request.user)

return HttpResponse(".....")启动项目,在浏览器中输入http://127.0.0.1:8000/users/?tk=aabbcc,然后回车,在服务端后台会打印
aabbcc把浏览器中的url换为http://127.0.0.1:8000/users/?tk=ddeeff,后台打印信息则变为
ddeeff这样就实现REST framework的自定义认证功能
修改上面的项目,在urls.py文件中添加一条路由记录
from django.conf.urls import url
from django.contrib import admin
from app01 import views

urlpatterns = [
    url(r‘^admin/‘, admin.site.urls),
    url(r‘^users/‘,views.UsersView.as_view()),
    url(r‘^auth/‘,views.AuthView.as_view()),
]
修改视图函数
from django.shortcuts import render,HttpResponse
from rest_framework.views import APIView
from rest_framework.authentication import BaseAuthentication
from rest_framework import exceptions
from django.http import JsonResponse

def gen_token(username):
    """
    利用时间和用户名生成用户token
    :param username:
    :return:
    """
    import time
    import hashlib
    ctime=str(time.time())
    hash=hashlib.md5(username.encode("utf-8"))
    hash.update(ctime.encode("utf-8"))
    return hash.hexdigest()

class AuthView(APIView):
    def post(self, request, *args, **kwargs):
        """
        获取用户提交的用户名和密码,如果用户名和密码正确,则生成token,并返回给用户
        :param request:
        :param args:
        :param kwargs:
        :return:
        """
        res = {‘code‘: 1000, ‘msg‘: None}
        user = request.data.get("user")
        pwd = request.data.get("pwd")

        from app01 import models
        user_obj = models.UserInfo.objects.filter(user=user, pwd=pwd).first()

        if user_obj:
            token = gen_token(user) # 生成用户口令

            # 如果数据库中存在口令则更新,如果数据库中不存在口令则创建用户口令
            models.Token.objects.update_or_create(user=user_obj, defaults={‘token‘: token})
            print("user_token:", token)
            res[‘code‘] = 1001
            res[‘token‘] = token
        else:
            res[‘msg‘] = "用户名或密码错误"

        return JsonResponse(res)

class UserAuthView(BaseAuthentication):
    def authenticate(self,request):
        tk=request.query_params.GET.get("tk")   # 获取请求头中的用户token

        from app01 import models

        token_obj=models.Token.objects.filter(token=tk).first()

        if token_obj:   # 用户数据库中已经存在用户口令返回认证元组
            return (token_obj.user,token_obj)

        raise exceptions.AuthenticationFailed("认证失败")

    def authenticate_header(self,request):
        pass

class UsersView(APIView):
    authentication_classes = [UserAuthView,]

    def get(self,request,*args,**kwargs):

        return HttpResponse(".....")
创建用户数据库的类
from django.db import models

class UserInfo(models.Model):
    user=models.CharField(max_length=32)
    pwd=models.CharField(max_length=64)
    email=models.CharField(max_length=64)

class Token(models.Model):
    user=models.OneToOneField(UserInfo)
    token=models.CharField(max_length=64)
创建数据库,并添加两条用户记录

再创建一个test_client.py文件,来发送post请求
import requests

response=requests.post(
    url="http://127.0.0.1:8000/auth/",
    data={‘user‘:‘user1‘,‘pwd‘:‘user123‘},
)

print("response_text:",response.text)
启动Django项目,运行test_client.py文件,则项目的响应信息为
response_text: {"code": 1001, "msg": null, "token": "3736c293443f52fd0c8224a33e0b5945"}由此,就完成了自定义的基于token的用户认证
如果想在项目中使用自定义的认证方式时,可以在authentication_classes继承刚才的认证的类即可
authentication_classes = [UserAuthView,APIViiew]源码剖析Django REST framework的认证方式及自定义认证
标签:users 不同的 http 文件中 parser markdown request方法 from text
原文地址:http://www.cnblogs.com/renpingsheng/p/7897192.html