标签:style blog http color io os ar for 文件
一些基本的基础知识我就不说了,可以找一些材料来了解这些,我就直接进入主题了。
 1 bool AppDelegate::applicationDidFinishLaunching()
 2 {
 3     //.....初始化设置比如刷新频率,窗口大小等
 4
 5     auto scene = Scene::create();
 6     auto layer = new TestController();// 主场景,显示可以测试的项目
 7
 8     //...
 9
10      layer->autorelease();
11      scene->addChild(layer);// 添加至场景
12      director->runWithScene(scene);// 运行场景
13
14     return true;
15 }
AppDelegate.h头文件里新添加的BestTest和省略没讲到的代码,我们回头在讲,后面的每个Test都有我们现在没讲到的内容。
现在我们根据程序运行顺序进入TestController类看看有什么:
 1 class TestController : public Layer
 2 {
 3 public:
 4     TestController();
 5     ~TestController();
 6
 7     void menuCallback(Ref * sender);// 菜单回调
 8     void closeCallback(Ref * sender);// 关闭按钮回调
 9
10     bool onTouchBegan(Touch* touches, Event  *event);// 触摸开始
11     void onTouchMoved(Touch* touches, Event  *event);// 触摸移动
12
13     void onMouseScroll(Event *event);// 滚轮回调
14     //...
15 private:
16     Vec2 _beginPos;// 用于保存触摸开始时坐标
17     Menu* _itemMenu;// 用于滚动事临时显示的坐标
18     //...19 };
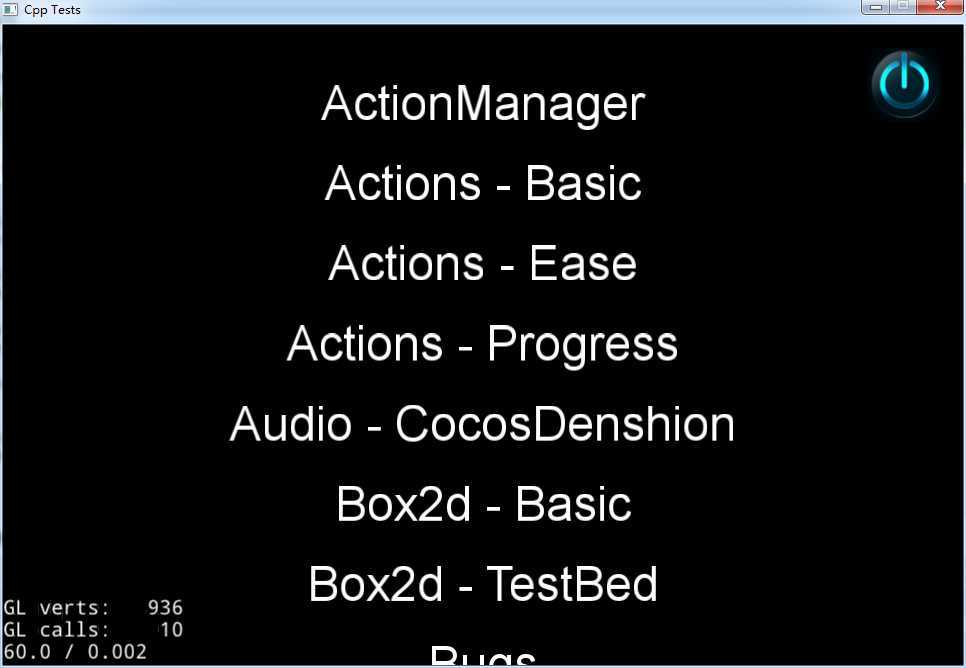
这个类就是提供用于有哪些测试项,可以向上滚动,和向下滚动查看,其实就是一个可滚动菜单。效果图附上:

现在我们来看看controller.cpp里的构造函数如下:
 1 TestController::TestController():_beginPos(Vec2::ZERO),_exitThread(false)
 2 {
 3     /* 添加关闭菜单 */
 4     auto closeItem = MenuItemImage::create(s_pathClose, s_pathClose, CC_CALLBACK_1(TestController::closeCallback, this) );
 5     auto menu =Menu::create(closeItem, nullptr);
 6
 7     menu->setPosition( Vec2::ZERO );// (0,0)
 8     closeItem->setPosition(Vec2( VisibleRect::right().x - 30, VisibleRect::top().y - 30));
 9
10     /* 添加测试菜单 */
11     TTFConfig ttfConfig("fonts/arial.ttf", /* 字号 */24);
12     _itemMenu = Menu::create();
13     for (int i = 0; i < g_testCount; ++i)// g_testCount用于测试项数目
14     {
15         auto label = Label::createWithTTF(ttfConfig, g_aTestNames[i].test_name);
16         auto menuItem = MenuItemLabel::create(label, CC_CALLBACK_1(TestController::menuCallback, this));
17
18         _itemMenu->addChild(menuItem, i + 10000);
19         menuItem->setPosition( Vec2( VisibleRect::center().x, (VisibleRect::top().y - (i + 1) * LINE_SPACE) ));
20     }
21     _itemMenu->setContentSize(Size(VisibleRect::getVisibleRect().size.width, (g_testCount + 1) * (LINE_SPACE)));
22     _itemMenu->setPosition(s_tCurPos);
23     addChild(_itemMenu);
24
25     addChild(menu, 1);
26
27     /* 注册触摸事件 */
28     auto listener = EventListenerTouchOneByOne::create();
29     listener->setSwallowTouches(true);// 设置其他层是否接受
30     listener->onTouchBegan = CC_CALLBACK_2(TestController::onTouchBegan, this);
31     listener->onTouchMoved = CC_CALLBACK_2(TestController::onTouchMoved, this);
32     _eventDispatcher->addEventListenerWithSceneGraphPriority(listener, this);// 设置监听对象
33     /* 注册滚轮事件 */
34     auto mouseListener = EventListenerMouse::create();
35     mouseListener->onMouseScroll = CC_CALLBACK_1(TestController::onMouseScroll, this);
36     _eventDispatcher->addEventListenerWithSceneGraphPriority(mouseListener, this);// 设置监听对象
37 }
第8行了用到了VisibleRet类,主要是获取屏幕的每个位置坐标,请看这里
http://www.cnblogs.com/studweijun/articles/3973600.html
还有用到了一个宏定义如下:
#define LINE_SPACE 40 // 行距40
上面代码主要是显示测试项,下面我们来看回调函数:
 1 void TestController::menuCallback(Ref * sender)
 2 {
 3     Director::getInstance()->purgeCachedData();// 移除所有 cocos2d 缓存数据
 4
 5     auto menuItem = static_cast<MenuItem *>(sender);
 6     int idx = menuItem->getLocalZOrder() - 10000;// 获取Z顺序
 7
 8     auto scene = g_aTestNames[idx].callback();// C++11 创建菜单项相对应的场景
 9
10     if (scene)
11     {
12         scene->runThisTest();
13         scene->release();
14     }
15 }
上面这段代码就是运行相应菜单项。
 1 /* 各平台不同的关闭 */
 2 void TestController::closeCallback(Ref * sender)
 3 {
 4 #if (CC_TARGET_PLATFORM == CC_PLATFORM_WP8) || (CC_TARGET_PLATFORM == CC_PLATFORM_WINRT)
 5     MessageBox("You pressed the close button. Windows Store Apps do not implement a close button.","Alert");
 6     return;
 7 #endif
 8
 9     Director::getInstance()->end();
10 #if (CC_TARGET_PLATFORM == CC_PLATFORM_IOS)
11     exit(0);
12 #endif
13 }
最后是触摸事件回调和滚轮事件回调,因为触摸事件和滚轮事件回调很相似,所以滚轮事件回调我就不贴代码了:
 1 bool TestController::onTouchBegan(Touch* touch, Event  *event)
 2 {
 3     _beginPos = touch->getLocation();// 获得触摸点坐标
 4     return true;
 5 }
 6
 7 void TestController::onTouchMoved(Touch* touch, Event  *event)
 8 {
 9     auto touchLocation = touch->getLocation();
10     float nMoveY = touchLocation.y - _beginPos.y;
11
12     auto curPos  = _itemMenu->getPosition();// 获得菜单坐标
13     auto nextPos = Vec2(curPos.x, curPos.y + nMoveY);
14     /* 滑到最顶端禁止滑动 */
15     if (nextPos.y < 0.0f)
16     {
17         _itemMenu->setPosition(Vec2::ZERO);
18         return;
19     }
20     /* 滑动最低端禁止滑动 */
21     if (nextPos.y > ((g_testCount + 1)* LINE_SPACE - VisibleRect::getVisibleRect().size.height))
22     {
23         _itemMenu->setPosition(Vec2(0, ((g_testCount + 1)* LINE_SPACE - VisibleRect::getVisibleRect().size.height)));
24         return;
25     }
26
27     _itemMenu->setPosition(nextPos);
28     _beginPos = touchLocation;
29     s_tCurPos   = nextPos;
30 }
这里可能有点难理解,但是多想想其实也就不难了,无非就是把把移动距离转换为菜单滚动距离。
标签:style blog http color io os ar for 文件
原文地址:http://www.cnblogs.com/studweijun/p/3973555.html