标签:img 情况 layout 需要 效果 example nta 技术分享 color
1.案例打造过程
1)建立该组件的布局(title.xml)
<?xml version="1.0" encoding="utf-8"?>
<LinearLayout xmlns:android="http://schemas.android.com/apk/res/android"
    android:orientation="horizontal" android:layout_width="match_parent"
    android:layout_height="match_parent"
    android:background="#FF3399">
      <Button
          android:id="@+id/back"
          android:layout_width="wrap_content"
          android:layout_height="wrap_content"
          android:layout_margin="5dp"
          android:background="@mipmap/ic_launcher"
          />
     <TextView
         android:id="@+id/text"
         android:layout_width="0dp"
         android:layout_height="wrap_content"
         android:layout_weight="1"
         android:gravity="center"
         android:text="微信"
         android:textColor="#fff"
         android:textSize="24sp"/>
     <Button
         android:id="@+id/title"
         android:layout_height="wrap_content"
         android:layout_width="wrap_content"
         android:layout_margin="5dp"
         android:background="@mipmap/ic_launcher"
         android:text="Edit"
         android:textColor="#fff"
         />
</LinearLayout>
2)书写自定义view
package com.example.zidingyi;

import android.app.Activity;
import android.content.Context;
import android.util.AttributeSet;
import android.view.LayoutInflater;
import android.view.View;
import android.widget.Button;
import android.widget.LinearLayout;
import android.widget.Toast;

/**
 * Created by 刘鹏达 on 2017/9/12.
 */

public class TitleLayout extends LinearLayout{
    public TitleLayout(Context context, AttributeSet attributeSet){
        super(context,attributeSet);
        LayoutInflater.from(context).inflate(R.layout.title,this);
        Button button1=(Button)findViewById(R.id.back);
        Button button2=(Button)findViewById(R.id.title);
        button1.setOnClickListener(new OnClickListener() {
            @Override
            public void onClick(View v) {
                ((Activity)getContext()).finish();
            }
        });
        button2.setOnClickListener(new OnClickListener() {
            @Override
            public void onClick(View v) {
                Toast.makeText(getContext(),"You clicked Edit button",Toast.LENGTH_SHORT).show();;
            }
        });

    }
}
3)引用该组件
布局:
<?xml version="1.0" encoding="utf-8"?>
<LinearLayout xmlns:android="http://schemas.android.com/apk/res/android"
   android:layout_width="match_parent"
   android:layout_height="match_parent">
   <com.example.zidingyi.TitleLayout
       android:layout_width="match_parent"
       android:layout_height="wrap_content" />
</LinearLayout>
activity:
public class MainActivity extends AppCompatActivity {

    @Override
    protected void onCreate(Bundle savedInstanceState) {
        super.onCreate(savedInstanceState);
        setContentView(R.layout.activity_main);
        //setContentView(new MyView(this);这个方法也可以实现显示自定义组件,其是利用了自定义组件的组件构造函数
    }
}
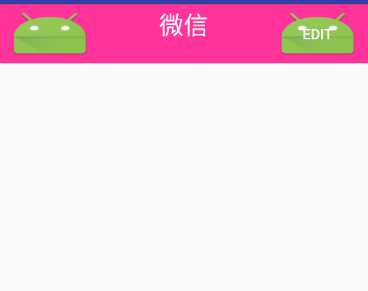
效果图:
总结:
继承viewgroup一般是需要多个组件重组的情况,所以一般需要书写一个布局,然后引用这个布局。
标签:img 情况 layout 需要 效果 example nta 技术分享 color
原文地址:http://www.cnblogs.com/lpd1/p/8011635.html