标签:索引 filename ima proc att available 无法 rds man
在这个kernel中,我们将讨论有助于更好地理解问题陈述和数据可视化的方法。 我还将提供有用的资源和信息的链接。
此脚本是用Python编写的。 我建议人们在桌面上安装anaconda,因为here提到了它的优点。 本教程中用于读取,处理和可视化数据的库是matplotlib,numpy,skimage和pydicom.。
图像大小(z,512,512),其中z是CT扫描中的切片数量,取决于扫描仪的分辨率。 由于计算能力的限制,这样的大图像不能直接送到卷积网络中。 因此,我们将不得不找到更可能患有癌症的地区。 我们将通过首先分割肺部,然后去除低强度区域来缩小我们的搜索空间。
在本教程中,我们将首先读入数据集并对其进行可视化。 之后,我们将分割肺部结构,然后使用图像处理方法在CT扫描中找到感兴趣的区域(可能的癌症区域)。 接下来我将介绍如何预处理LUNA16数据集,用于UNet等训练架构的分割和候选分类。
肺结构的分割是非常具有挑战性的问题,因为在肺部区域不存在同质性,在肺部结构,不同扫描仪和扫描协议中密度相似。 分割的肺可以进一步用于发现肺部结节候选者和感兴趣的区域,这可能有助于更好地分类CT扫描。 发现肺结节区域是一个非常困难的问题,因为附着在血管上的结节或者存在于肺区域的边界处。 肺结节候选者可以通过切割周围的三维体素并通过可以在LUNA16数据集上训练的3D CNNs进一步用于分类。 LUNA 16数据集具有每个CT扫描中的结节的位置,因此对于训练分类器将是有用的。
输入文件夹有三件事,一个是sample_images文件夹,它具有CT扫描样本。 stage1_labels.csv包含阶段1训练集图像的癌症基础事实,stage1_sample_submission.csv显示阶段1的提交格式。
In [1]:
# This Python 3 environment comes with many helpful analytics libraries installed
# It is defined by the kaggle/python docker image: https://github.com/kaggle/docker-python
# For example, here‘s several helpful packages to load in

import numpy as np # linear algebra
import pandas as pd # data processing, CSV file I/O (e.g. pd.read_csv)
import skimage, os
from skimage.morphology import ball, disk, dilation, binary_erosion, remove_small_objects, erosion, closing, reconstruction, binary_closing
from skimage.measure import label,regionprops, perimeter
from skimage.morphology import binary_dilation, binary_opening
from skimage.filters import roberts, sobel
from skimage import measure, feature
from skimage.segmentation import clear_border
from skimage import data
from scipy import ndimage as ndi
import matplotlib.pyplot as plt
from mpl_toolkits.mplot3d.art3d import Poly3DCollection
import dicom
import scipy.misc
import numpy as np

# Input data files are available in the "../input/" directory.
# For example, running this (by clicking run or pressing Shift+Enter) will list the files in the input directory

from subprocess import check_output
print(check_output(["ls", "../input"]).decode("utf8"))
#上面两句话是无法在windows下执行的(没有ls的binay文件)
import os
cwd = os.getcwd()
file_path=cwd+‘/input‘
print(os.listdir(file_path))
结果:
[‘sample_images‘, ‘stage1_labels.csv‘, ‘stage1_sample_submission.csv‘]
每个三维CT扫描由多个切片组成,其数目取决于扫描仪的分辨率,每个切片都有一个与之关联的实例号,它告诉从顶部切片的索引。 CT扫描的所有dicom文件都在CT扫描名称的一个文件夹内。 现在我们将读取扫描的所有dicom切片,然后根据它们的实例编号堆叠它们以获得3D肺部CT扫描图像。
sample_images文件夹大约有20个文件夹,每个文件夹对应一个CT扫描。 在文件夹里面有很多dicom文件。
In [2]:
image_path=file_path+‘/sample_images‘
print(os.listdir(image_path))
结果:
[‘00cba091fa4ad62cc3200a657aeb957e‘, ‘0a099f2549429d29b32f349e95fb2244‘, ‘0a0c32c9e08cc2ea76a71649de56be6d‘, ‘0a38e7597ca26f9374f8ea2770ba870d‘, ‘0acbebb8d463b4b9ca88cf38431aac69‘, ‘0b20184e0cd497028bdd155d9fb42dc9‘, ‘0bd0e3056cbf23a1cb7f0f0b18446068‘, ‘0c0de3749d4fe175b7a5098b060982a1‘, ‘0c37613214faddf8701ca41e6d43f56e‘, ‘0c59313f52304e25d5a7dcf9877633b1‘, ‘0c60f4b87afcb3e2dfa65abbbf3ef2f9‘, ‘0c98fcb55e3f36d0c2b6507f62f4c5f1‘, ‘0c9d8314f9c69840e25febabb1229fa4‘, ‘0ca943d821204ceb089510f836a367fd‘, ‘0d06d764d3c07572074d468b4cff954f‘, ‘0d19f1c627df49eb223771c28548350e‘, ‘0d2fcf787026fece4e57be167d079383‘, ‘0d941a3ad6c889ac451caf89c46cb92a‘, ‘0ddeb08e9c97227853422bd71a2a695e‘, ‘0de72529c30fe642bc60dcb75c87f6bd‘]
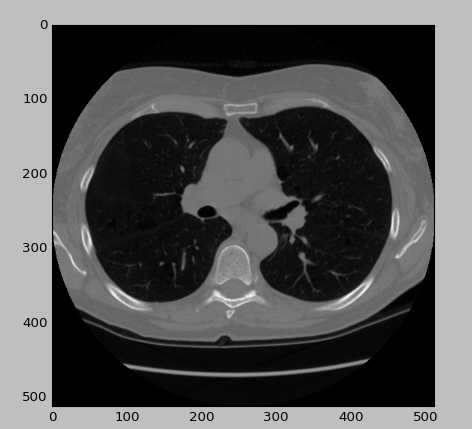
每个CT扫描由多个以DICOM格式提供的2D切片组成。 首先,我将读取CT扫描的随机dicom文件。 读取图像文件后,我们将用0更新-2000的亮度值,因为它们是落在扫描仪边界之外的像素。
# Any results you write to the current directory are saved as output.
def loadFileInformation(filename):
    information = {}
    ds = dicom.read_file(filename)
    information[‘PatientID‘] = ds.PatientID
    information[‘PatientName‘] = ds.PatientName
    information[‘PatientBirthDate‘] = ds.PatientBirthDate
    return information

random_dcm_path=image_path+‘/00cba091fa4ad62cc3200a657aeb957e/38c4ff5d36b5a6b6dc025435d62a143d.dcm‘
# print(loadFileInformation(random_dcm_path))
lung = dicom.read_file(random_dcm_path)

slice = lung.pixel_array
slice[slice == -2000] = 0
plt.imshow(slice, cmap=plt.cm.gray)
plt.show()
结果:
def read_ct_scan(folder_name):
    # Read the slices from the dicom file
    slices = [dicom.read_file(folder_name + ‘/‘+filename) for filename in os.listdir(folder_name)]

    # Sort the dicom slices in their respective order
    slices.sort(key=lambda x: int(x.InstanceNumber))

    # Get the pixel values for all the slices
    slices = np.stack([s.pixel_array for s in slices])
    slices[slices == -2000] = 0
    return slices
某个病人CT_path=image_path+‘/00cba091fa4ad62cc3200a657aeb957e‘
ct_scan = read_ct_scan(某个病人CT_path)
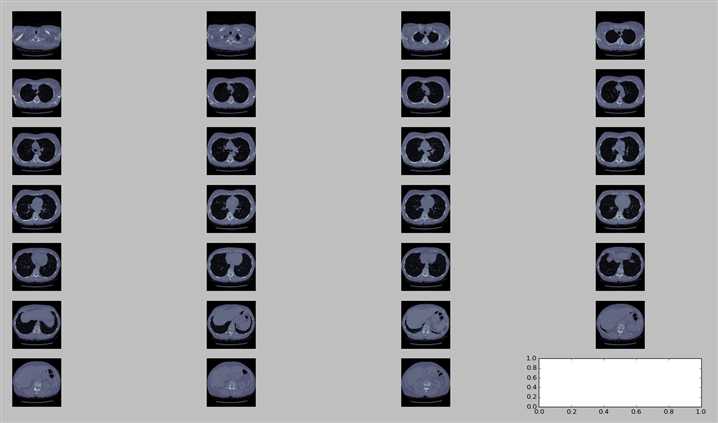
为了可视化切片,我们将必须绘制它们。 matplotlib用于绘制切片。 plot_ct_scan函数将三维CT扫描图像数组作为输入,并绘制等间距切片。 CT扫描是灰度图像,即每个像素的值是单个样本,这意味着它仅携带强度信息。
def plot_ct_scan(scan):
    f, plots = plt.subplots(int(scan.shape[0] / 20) + 1, 4, figsize=(25, 25))
    for i in range(0, scan.shape[0], 5):
        plots[int(i / 20), int((i % 20) / 5)].axis(‘off‘)
        plots[int(i / 20), int((i % 20) / 5)].imshow(scan[i], cmap=plt.cm.bone)
plot_ct_scan(ct_scan)
plt.show()
结果:
在阅读CT扫描之后,预处理的第一步就是肺结构的分割,因为显然感兴趣的区域位于肺内。 可以看出,肺部是CT扫描中较暗的区域。 肺内的明亮区域是血管或空气。 在所有地方使用604(-400HU)的阈值,因为在实验中发现它工作得很好。 我们从CT扫描图像的每个切片中分割出肺部结构,尽量不要放过附着在肺壁上的可能区域。 有一些可能附着在肺壁上的结节。
我将首先解释一个常见的方法,使用简单的图像处理和形态学操作来分割肺部,然后将给文献的良好链接提供参考和总结。
def get_segmented_lungs(im, plot=False):
    ‘‘‘
    This funtion segments the lungs from the given 2D slice.
    ‘‘‘
    if plot == True:
        f, plots = plt.subplots(8, 1, figsize=(5, 40))
    ‘‘‘
    Step 1: Convert into a binary image.
    ‘‘‘
    binary = im < 604
    if plot == True:
        plots[0].axis(‘off‘)
        plots[0].imshow(binary, cmap=plt.cm.bone)
    ‘‘‘
    Step 2: Remove the blobs connected to the border of the image.
    ‘‘‘
    cleared = clear_border(binary)
    if plot == True:
        plots[1].axis(‘off‘)
        plots[1].imshow(cleared, cmap=plt.cm.bone)
    ‘‘‘
    Step 3: Label the image.
    ‘‘‘
    label_image = label(cleared)
    if plot == True:
        plots[2].axis(‘off‘)
        plots[2].imshow(label_image, cmap=plt.cm.bone)
    ‘‘‘
    Step 4: Keep the labels with 2 largest areas.
    ‘‘‘
    areas = [r.area for r in regionprops(label_image)]
    areas.sort()
    if len(areas) > 2:
        for region in regionprops(label_image):
            if region.area < areas[-2]:
                for coordinates in region.coords:
                    label_image[coordinates[0], coordinates[1]] = 0
    binary = label_image > 0
    if plot == True:
        plots[3].axis(‘off‘)
        plots[3].imshow(binary, cmap=plt.cm.bone)
    ‘‘‘
    Step 5: Erosion operation with a disk of radius 2. This operation is
    seperate the lung nodules attached to the blood vessels.
    ‘‘‘
    selem = disk(2)
    binary = binary_erosion(binary, selem)
    if plot == True:
        plots[4].axis(‘off‘)
        plots[4].imshow(binary, cmap=plt.cm.bone)
    ‘‘‘
    Step 6: Closure operation with a disk of radius 10. This operation is
    to keep nodules attached to the lung wall.
    ‘‘‘
    selem = disk(10)
    binary = binary_closing(binary, selem)
    if plot == True:
        plots[5].axis(‘off‘)
        plots[5].imshow(binary, cmap=plt.cm.bone)
    ‘‘‘
    Step 7: Fill in the small holes inside the binary mask of lungs.
    ‘‘‘
    edges = roberts(binary)
    binary = ndi.binary_fill_holes(edges)
    if plot == True:
        plots[6].axis(‘off‘)
        plots[6].imshow(binary, cmap=plt.cm.bone)
    ‘‘‘
    Step 8: Superimpose the binary mask on the input image.
    ‘‘‘
    get_high_vals = binary == 0
    im[get_high_vals] = 0
    if plot == True:
        plots[7].axis(‘off‘)
        plots[7].imshow(im, cmap=plt.cm.bone)

    return im
get_segmented_lungs函数分割CT扫描的二维切片。 为了更好的可视化和理解代码和应用操作,我已经输出切片。
get_segmented_lungs(ct_scan[71], True)
plt.show()
结果:

Candidate Generation and LUNA16 preprocessing
标签:索引 filename ima proc att available 无法 rds man
原文地址:http://www.cnblogs.com/skykill/p/8016606.html