????????目录
1.13????proxy_next_upstream参数说明????1
?
?

英文官网网站
http://nginx.org
基础概念
概念
Nginx是一个WEB服务和代理服务软件。
?
特点
支持高并发:几万并发连接,特别是静态小文件业务环境;
资源消耗少:在3万并发连接下,开启10个nginx线程消耗不到200m内存;
可做反向代理、加速缓存,及负载均衡;
具备squid等专业缓存软件的缓存功能;
支持异步网络IO事件模型epoll。
版本选择
Nginx的三种版本:
- 稳定版
更新较慢,bug较少,可作为企业生产环境的首选;
- 开发版
更新较快,包含最新的功能和bug的修复,同时也会遇上新的bug;
- 历史稳定版
开发版的更新稳定下来后,将被纳入稳定版中;但是有些新功能不会被加到历史稳定版中;
总结
企业生产环境首选稳定版,同时也尽量别用最新的稳定版,应选择比已经出来的最新版晚6~10个月的稳定版。
本公司使用版本
[root@master(35.100) /usr/local/openresty/nginx/sbin]# ./nginx -V
nginx version: openresty/1.11.2.4
服务安装
- 依赖解决
安装pcre库(Perl Compatible Regular Expressions;perl兼容正则表达式),为了使nginx支持具备URL重写功能的Rewrite模块。
# yum -y install pcre pcre-devel
# yum -y install openssl openssl-devel gcc
- 依赖检查
# rpm -qa pcre pcre-devel
- 服务安装
# wget http://nginx.org/download/nginx-1.12.1.tar.gz
# tar axvf nginx-1.12.1.tar.gz
# useradd nginx -s /sbin/nologin -M
# cd nginx-1.12.1
# ./configure --help
# ./configure --user=nginx --group=nginx --with-http_ssl_module --with-http_stub_status_module --prefix=/usr/local/nginx-1.12.1/
根据返回值判断是否正常编译
# echo $?
0
C语言编译的过程
# make
把编译的内容进行安装
# make install
- 链接完善
# ln -sv /usr/local/nginx-1.12.1 /usr/local/nginx
- 服务启动
# /usr/local/nginx/sbin/nginx -t
# /usr/local/nginx/sbin/nginx
- 功能检测
WINDOS:浏览器直接输入ip,即可出现nginx页面;
LINUX:# curl -I 127.0.0.1
HTTP/1.1 200 OK
Server: nginx/1.12.1
Date: Sun, 03 Sep 2017 12:53:41 GMT
Content-Type: text/html
Content-Length: 612
Last-Modified: Sun, 03 Sep 2017 12:35:56 GMT
Connection: keep-alive
ETag: "59abf72c-264"
Accept-Ranges: bytes
模块说明
功能模块

配置说明
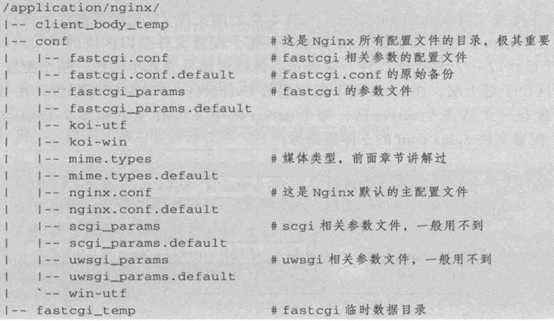
目录结构
# tree /application/nginx/

基础配置
Nginx整个配置文件是以区块的形式组织的。每个区块以一个大括号{}来表示,区块可分为几个层次,整个配置文件中,Main区位于最上层,在Main区下面可以有Events区、Http区等层级,在Http区中又包含一个或多个server区,每个server区中又可有一个或多个location区,主体框架如下:

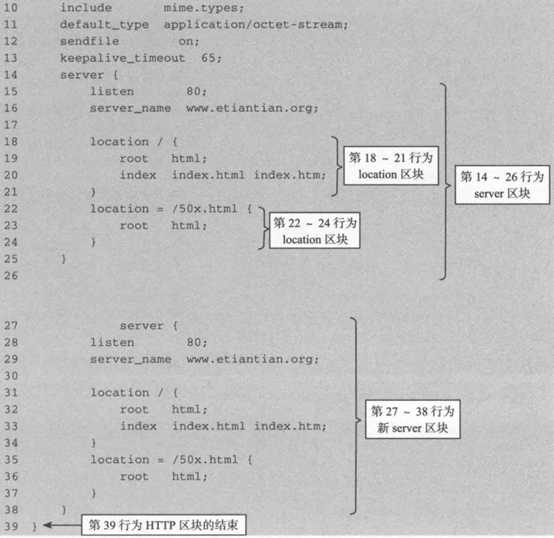
# egrep -v "^$|#" /usr/local/nginx/conf /nginx.conf.default

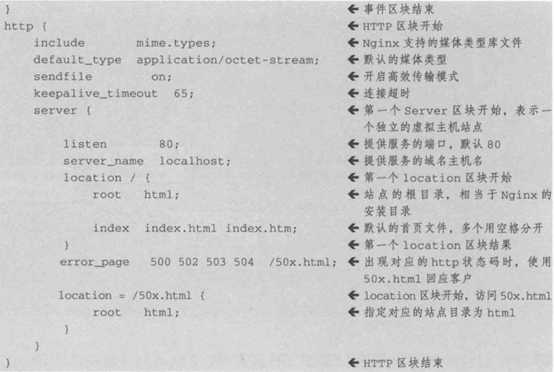
核心框架如下:

?
操作
# /usr/local/nginx/sbin/nginx -s reload
# 将11行localhost改成对应的网站名后,重启
# 对应的bingbing.jpg图片存在当前目录下
# cat /usr/local/nginx/html/index.html
<html>
<head>
<title>Nginx of kazihuo</title>
<body background="bingbing.jpg">
My name is kazihuo!
</body>
</head>
</html>
?
多个配置文件的调用,需满足以下条件
方框内conf.d为多出的自定义的配置文件目录,圈内aaa为自定义域名对应的根目录;
# ls /usr/local/nginx/
aaa conf fastcgi_temp logs sbin uwsgi_temp
client_body_temp conf.d html proxy_temp scgi_temp
# cat /usr/local/nginx/conf/nginx.conf
worker_processes 1;
events {
worker_connections 1024;
}
http {
include mime.types;
default_type application/octet-stream;
sendfile on;
keepalive_timeout 65;
server {
listen 80;
server_name localhost;
location / {
root html;
index index.html index.htm;
}
error_page 500 502 503 504 /50x.html;
location = /50x.html {
root html;
}
}
include /usr/local/nginx/conf.d/*.conf;
}
?
自定义的配置文件只需配置server区域(个人实操:多配报错)
# cat /usr/local/nginx/conf.d/kazihuo.conf
server {
????listen 80;
????server_name aaa.kazihuo.com;
????location / {
????????root aaa;
????????index index.html index.htm;
????}
}
location
- 作用
location指令的作用是根据用户请求的URI来执行不同的应用。
- 语法
location[=|~|~*|^~|@]uri{
···
}
- 说明
location | [=|~|~*|^~|@] | uri | {···} |
指令 | 匹配标识 | 匹配的网站网址 | 匹配URI后要执行的配置段 |
上表中URI部分是关键,其可以是普通的字符串地址路径或者是正则表达式,当匹配成功则执行后面大括号里面的相关指令,正则表达式可有特殊字符。
- 特殊字符
= 表示精确匹配
~ 表示区分大小写的正则匹配
^~ 表示以某个常规字符串开头的url即可
~* 表示不区分大消息的正则匹配
!~(*!~) 表示不区分大小写不匹配的正则
/ 通配符,任何请求都能匹配到这个location,如果有任何其他location可以匹配,则会覆盖该location
虚拟主机
- 概念
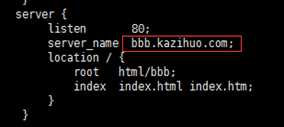
虚拟主机在WEB服务里就是一个独立的网站站点,这个站点对应独立的域名(也可能是IP或端口),具有独立的程序及资源目录,可独立对外提供服务供用户访问。
Nginx使用一个server{}标签来标记一个虚拟主机,一个WEB服务里可有多个虚拟主机标签对,即同时可支持多个虚拟主机站点。
- 类型
基于域名的虚拟主机
应用:外部网站
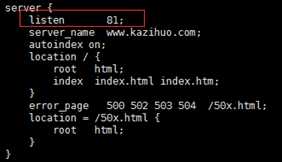
基于端口的虚拟主机
应用:公司内部网站
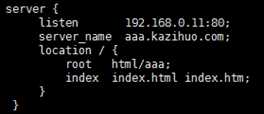
基于IP的虚拟主机
应用:几乎不用
状态模块
在配置文件里,添加如下配置
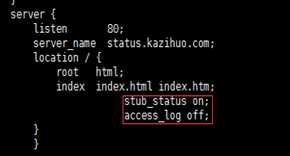
# /usr/local/nginx/sbin/nginx -s reload
状态查看

第一行表示正处理的活动连接数:6个;
第二行对应第三行,第一个server表示nginx启动到现在共处理了62个连接;
第二个accepts表示nginx启动到现在共成功创建62次握手;请求丢失数=(握手数-连接数),可得,本次状态显示没有丢失请求;
第四行Reading为Nginx读取到客户端的Header信息数;Writing为Nginx返回给客户端的Header信息数;Waiting为Nginx已经处理完正在等候下一次请求指令的驻留连接,在开启keep-alive的情况下,这个值等于active-(reading+writing)。
或者
# cat >>/usr/local/nginx/conf/extra/status.conf<< EOF
##status
server{
listen 80;
server_name status.kazihuo.com;
location / {
stub_status on;
access_log off;
}
}
EOF
配置文件里添加一行使Nginx读取指定目录下配置文件
include extra/*.conf;
Rewrite
主要功能是实现URL地址重写。
- 指令语法
rewrite regex replacement [flag];
- 应用位置
server、location、if
- 说明
rewrite 是实现URL重写的关键指令,根据regex(正则表达式)部分内容,重定向到replacement部分内容,结尾是flag标记。
- 例子
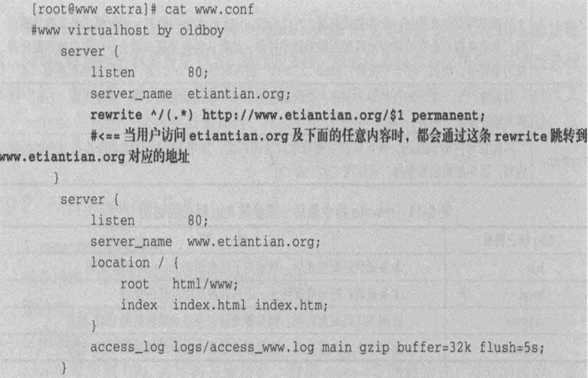
rewrite ^/(.*) http://www.kazihuo.org/$1 permanent;
- 解释
rewrite为固定关键字,表示开启一条rewrite匹配规则,regex为正则表达式部分^/(.*),匹配所有,成功后跳转到http://www.kazihuo.org/$1,$1是去前面regex部分()里的内容,结尾permanent表示永久301重定向标记,即跳转到后面的http://www.kazihuo.org/$1地址上。
应用场景
*可调整用户浏览的URL,看起来更规范,合乎开发及产品人员的需求;
*为了让搜索引擎收录网站内容及用户体验更好,企业会将动态URL地址伪装成静态地址提供服务;
*网站换新域名后,让旧域名的访问跳转到新域名上;
*根据特殊变量、目录、客户端的信息进行URL跳转等。
访问认证
添加用户密码访问,只需添加方框内模块;

# yum install httpd-tools
# mkdir -pv /application/nginx/conf
# htpasswd -c -b /application/nginx/conf/htpasswd kazihuo 000000
-c 指定文件;-b 明文记载;
# /usr/local/nginx/sbin/nginx -s reload
日志信息
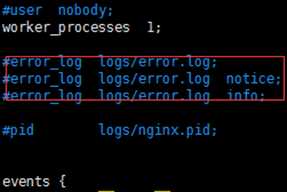
- 错误日志
错误日志级别
[debug|info|notice|warn|error|crit|alert|emerg]
级别越高记录的信息越少,生产场景一般为warn|error|crit其中之一,配置info等较低级别时,会带来巨大的磁盘I/O消耗。
?
语法格式
error_log file level;
关键字???? 日志文件 错误日志级别
eg:error_log logs/error.log debug; (不加时默认为error)
其中关键字error_log不能改变,日志文件可指定目录,错误日志级别可根据需求设置。
默认配置如下:
- 访问日志
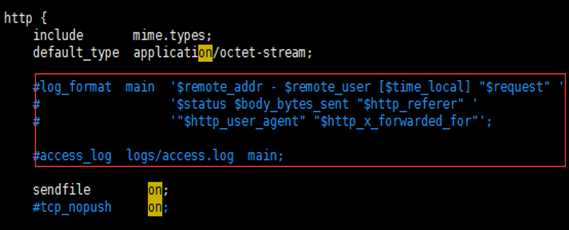
配置位置:http标签内
参数 | 说明 |
log_format | 用来定义记录日志的格式(可定义多种日志格式,取不同名字即可) |
access_log | 用来指定日志文件的路径及使用的何种日志格式记录日志 |
?
默认配置如下
Nginx日志变量 | 说明 |
$remote_addr | 记录访问网站的客户端地址 |
$http_x_forwarded_for | 当前端有代理服务器时,设置web节点记录客户端地址的配置,此参数生效的前提是代理服务器上也要进行相关的x_forwarded_for设置 |
$remote_user | 远程客户端用户名称 |
$time_local | 记录访问时间与时区 |
$request | 用户的http请求起始行信息 |
$status | http状态码,记录请求返回的状态,如:200、404、301等 |
$body_bytes_sents | 服务器发送给客户端的相应body字节数 |
$http_referer | 记录此次请求是从哪个链接访问过来的,可根据referer进行防盗链设置 |
$http_user_agent | 记录客户端访问信息,如:浏览器、手机客户端等 |
?
日志内容对应说明

日志切割
脚本见2.2.4.2Nginx日志轮滚
安全优化
版本号隐藏
配置文件添加配置:
http {
????···
????server_tokens off;
????···
}
官方参数资料:http://nginx.org/en/docs/http/ngx_http_core_module.html
软件名更改
要实现软件名及版本号的修改,需要对源码文件进行改动后,编译安装;
所需修改文件分别是:
nginx-1.12.1/src/core/nginx.h
nginx-1.12.1/src/http/ngx_http_header_filter_module.c
nginx-1.12.1/src/http/ngx_http_special_response.c
源码文件如下:
[root@c1 ~/nginx-1.12.1/src/core]# sed -n ‘13,17p‘ nginx.h
#define NGINX_VERSION "1.12.1"
#define NGINX_VER "nginx/" NGINX_VERSION
?
#ifdef NGX_BUILD
#define NGINX_VER_BUILD NGINX_VER " (" NGX_BUILD ")"
#else
#define NGINX_VER_BUILD NGINX_VER
#endif
?
#define NGINX_VAR "NGINX"
#define NGX_OLDPID_EXT ".oldbin"
修改后如下:
#define NGINX_VERSION "5.1.8"
#define NGINX_VER "KZH/" NGINX_VERSION
?
#ifdef NGX_BUILD
#define NGINX_VER_BUILD NGINX_VER " (" NGX_BUILD ")"
#else
#define NGINX_VER_BUILD NGINX_VER
#endif
?
#define NGINX_VAR "KZH"
#define NGX_OLDPID_EXT ".oldbin"
?
源码文件如下:
[root@c1 ~/nginx-1.12.1/src/http]# sed -n ‘49p‘ ngx_http_header_filter_module.c
static u_char ngx_http_server_string[] = "Server: nginx" CRLF;
修改后如下:
static u_char ngx_http_server_string[] = "Server: KZH" CRLF;
?
源码文件如下:
[root@c1 ~/nginx-1.12.1/src/http]# sed -n ‘21,38p‘ ngx_http_special_response.c
static u_char ngx_http_error_full_tail[] =
"<hr><center>" NGINX_VER "</center>" CRLF
"</body>" CRLF
"</html>" CRLF
;
?
?
static u_char ngx_http_error_build_tail[] =
"<hr><center>" NGINX_VER_BUILD "</center>" CRLF
"</body>" CRLF
"</html>" CRLF
;
?
?
static u_char ngx_http_error_tail[] =
"<hr><center>nginx</center>" CRLF
"</body>" CRLF
"</html>" CRLF
修改后如下:
static u_char ngx_http_error_full_tail[] =
"<hr><center>" NGINX_VER "(http://cnblogs.com/kazihuo)</center>" CRLF
"</body>" CRLF
"</html>" CRLF
;
?
?
static u_char ngx_http_error_build_tail[] =
"<hr><center>" NGINX_VER_BUILD "</center>" CRLF
"</body>" CRLF
"</html>" CRLF
;
?
?
static u_char ngx_http_error_tail[] =
"<hr><center>KZH</center>" CRLF
"</body>" CRLF
"</html>" CRLF
[root@c1 ~/nginx-1.12.1]# ./configure --user=nginx --group=nginx --with-http_ssl_module --with-http_stub_status_module --prefix=/usr/local/kzh/
[root@c1 ~/nginx-1.12.1]# make && make install
[root@c1 /usr/local/kzh/sbin]# ./nginx
源码文件显示:
[root@c1 ~]# curl -I 192.168.10.11:80
HTTP/1.1 200 OK
Server: nginx
Date: Thu, 07 Dec 2017 01:12:27 GMT
Content-Type: text/html
Content-Length: 612
Last-Modified: Wed, 06 Dec 2017 19:15:30 GMT
Connection: keep-alive
ETag: "5a2841d2-264"
Accept-Ranges: bytes
修改后页面显示:
[root@c1 ~]# curl -I 192.168.10.11:88
HTTP/1.1 200 OK
Server: KZH/5.1.8
Date: Thu, 07 Dec 2017 01:12:31 GMT
Content-Type: text/html
Content-Length: 612
Last-Modified: Thu, 07 Dec 2017 00:44:19 GMT
Connection: keep-alive
ETag: "5a288ee3-264"
Accept-Ranges: bytes
?
日志轮滚
# cat /server/scripts/cut_log.sh
#/bin/bash
cd /usr/local/nginx/logs/ && /bin/mv access.log access-$(date -d "-1 day" +%F).log
/usr/local/nginx/sbin/nginx -s reload
# crontab -l
1 * * * * /bin/sh /server/scripts/cut_log.sh
关闭指定日志
实际工作中,日志写入消耗磁盘I/O,对于负载均衡器健康节点检查或特定文件日志不需记录;
用location标签匹配不记录日志的元素扩展名,关闭其日志:

日志权限设置
日志目录权限给了NGINX用户,会成为安全隐患:
# chown -R root.root /usr/local/nginx/logs/
# chown -R 700 /usr/local/nginx/logs/
目录访问控制
eg1:配置Nginx,禁止解析指定目录下的指定程序:

对上述目录的限制必须写在Nginx处理PHP服务配置的前面,如下:

?
eg2:禁止访问*.txt和*.doc文件:

?
eg3:禁止访问单个目录:

禁止访问多个目录:

?
eg4:禁止访问目录并返回指定HTTP状态码:
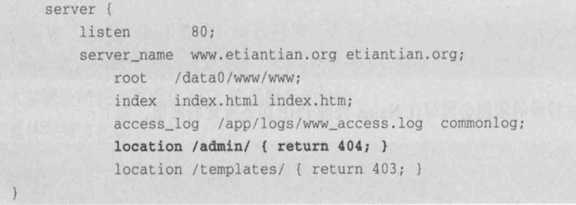
应用场景:
对于集群的共享存储,一般是存放静态资源文件,所以可以禁止执行指定扩展名的程序,例:.php .sh .pl .py
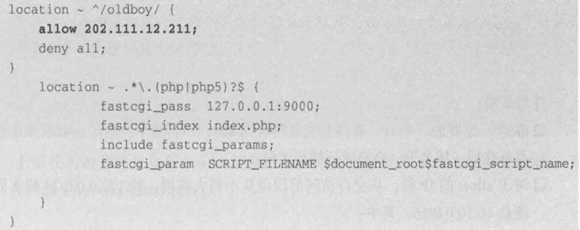
限制IP访问
eg1:只允许指定IP访问该目录,且支持PHP解析:
eg2:限制指定IP或IP段访问:

负载均衡
基础了解
根据URL进行转发的应用情况被称为第7层(应用层)的负载均衡,而LVS的负载均衡一般用于TCP等地转发,被称为第4层(传输层)的负载均衡。
常规第4层负载均衡架构下,可使用不同域名来实现需求,但不同终端用户访问网站时要输入不同的域名进行相应信息的访问,如下图:

????常规第7层负载均衡架构下,对外只是一个域名,当不同终端发起请求时,通过获取用户请求中的设备信息(利用$http_user_agent获取),后端服务器对其相应转发处理,提升了用户访问体验,如下图:

?
模块说明
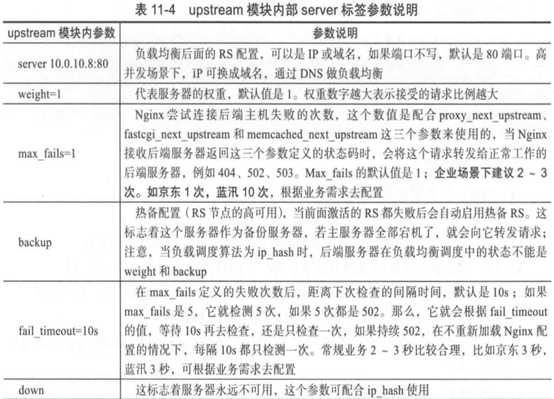

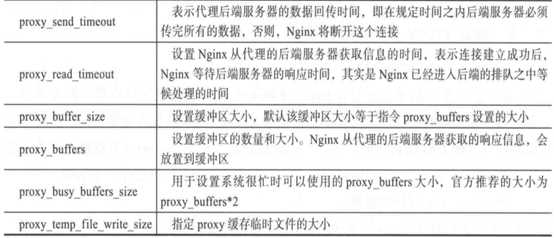
实战操作
环境信息
Client:192.168.10.11
Proxy1:192.168.10.12
WEB1:192.168.10.13
WEB2:192.168.10.14
[root@WEB1 ~]# cat /etc/hosts
192.168.10.13 www.kazihuo.com
192.168.10.13 bbs.kazihuo.com
[root@WEB2 ~]# cat /etc/hosts
192.168.10.14 www.kazihuo.com
192.168.10.14 bbs.kazihuo.com
[root@Client ~]# cat /etc/hosts
192.168.10.12 bbs.kazihuo.com
192.168.10.12 www.kazihuo.com
虚拟主机
- 配置NGINX,2台WEB相同
# cat /usr/local/nginx/conf/nginx.conf
worker_processes 1;
events {
worker_connections 1024;
}
http {
include mime.types;
default_type application/octet-stream;
sendfile on;
keepalive_timeout 65;
log_format main ‘$remote_addr - $remote_user [$time_local] "$request" ‘
????????????????????‘$status $body_bytes_sent "$http_referer" ‘
????????????????????‘"$http_user_agent" "$http_x_forwarded_for"‘;
server {
listen 80;
server_name bbs.kazihuo.com;
location / {
root html/bbs;
index index.html index.htm;
????}
????????access_log logs/access_bbs.log main;
????}
server {
listen 80;
server_name www.kazihuo.com;
location / {
root html/www;
index index.html index.htm;
????}
????????access_log logs/access_www.log main;
????}
}
?
- 创建站点目录及文件
[root@WEB1 ~]# for i in bbs www;do cd /usr/local/nginx/html/;mkdir -pv $i;echo "$i-->192.168.10.13" > $i/index.html;done
[root@WEB2 ~]# for i in bbs www;do cd /usr/local/nginx/html/;mkdir -pv $i;echo "$i-->192.168.10.14" > $i/index.html;done
- 本机访问测试
[root@WEB1 ~]# /usr/local/nginx/sbin/nginx -s reload
[root@WEB1 ~]# curl www.kazihuo.com
www-->192.168.10.13
[root@WEB1 ~]# curl bbs.kazihuo.com
bbs-->192.168.10.13
WEB2雷同操作
代理配置
[root@Proxy1 ~]# cat /usr/local/nginx/conf/nginx.conf
worker_processes 1;
events {
worker_connections 1024;
}
http {
include mime.types;
default_type application/octet-stream;
sendfile on;
keepalive_timeout 65;
????upstream server_pools {
????????server 192.168.10.13:80 weight=1;
????????server 192.168.10.14:80 weight=1;
????}
server {
listen 80;
server_name www.kazihuo.com;
location / {
????????????proxy_pass http://server_pools;
????????????proxy_set_header Host $host;
????????????proxy_set_header X-Forwarded-For $remote_addr;
}
}
}
?
配置说明:
- upstream server_pools
#定义对应的WEB服务器池;
- proxy_set_header Host $host
#当客户端请求代理服务器时,反向代理服务器向其下面节点重新发起请求,默认没有在请求头里指定节点的虚拟主机信息,节点服务器默认吧第一个虚拟主机发给代理服务器(节点配置上BBS故意放第一个),当配置文件添加此行配置时,代理服务器重新发起请求时将携带主机头信息;
- proxy_set_header X-Forwarded-For $remote_addr
#添加此行配置可在访问日志中记录下客户端的访问IP;
功能测试
[root@Client ~]# curl www.kazihuo.com
www-->192.168.10.13
[root@Client ~]# curl www.kazihuo.com
www-->192.168.10.14
[root@Client ~]# curl bbs.kazihuo.com
bbs-->192.168.10.13
[root@Client ~]# curl bbs.kazihuo.com
bbs-->192.168.10.14
实用进阶
当参数较多时,可用include方式包含;
[root@Proxy1 ~]# cat /usr/local/nginx/conf/nginx.conf
worker_processes 1;
events {
worker_connections 1024;
}
http {
include mime.types;
default_type application/octet-stream;
sendfile on;
keepalive_timeout 65;
????upstream server_pools {
????????server 192.168.10.13:80 weight=1;
????????server 192.168.10.14:80 weight=1;
????}
server {
listen 80;
server_name www.kazihuo.com;
location / {
???????? proxy_pass http://server_pools;
???????? include proxy.conf;
}
}
}
[root@Proxy1 ~]# cat /usr/local/nginx/conf/proxy.conf
proxy_set_header Host $host;
proxy_set_header X-Forwarded-For $remote_addr;
proxy_connect_timeout 60;
proxy_send_timeout 60;
proxy_read_timeout 60;
proxy_buffer_size 4k;
proxy_buffers 4 32k;
proxy_busy_buffers_size 64k;
proxy_temp_file_write_size 64k;
根据URL目录地址代理转发
实现动静分离,即通过Nginx反向代理配置规则(根据URL中的目录地址实现代理转发)实现让动态资源和静态资源及其他业务分别由不同的服务器解析,以解决网站性能、安全、用户体验等重要问题。
应用场景
????企业中只有一个域名对外提供服务,不希望使用多个域名对应用一个产品业务,此时需要在代理服务器上通过配置规则,使得匹配不同规则的请求会交给不同的服务器池处理。此类业务如下:
- 业务的域名没有拆分或者不希望拆分,但希望实现动静分离、多业务分离;
- 不同的客户端设置使用同一个域名访问同一个业务网站;
?
将不同URL的请求分给不同服务器池处理的方式有2种:
- location实现
以下实操说明;
- if语句实现
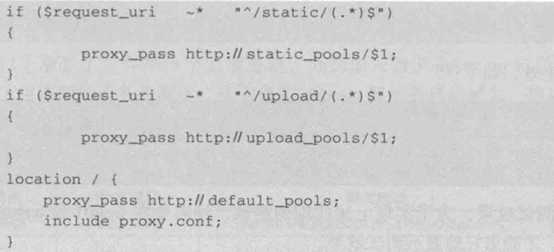
环境信息
Proxy1:192.168.10.12
WEB1:192.168.10.13
WEB2:192.168.10.14
WEB3:192.168.10.15
实战操作
- 配置NGINX,3台WEB相同
# cat /usr/local/nginx/conf/nginx.conf
worker_processes 1;
events {
worker_connections 1024;
}
http {
include mime.types;
default_type application/octet-stream;
sendfile on;
keepalive_timeout 65;
server {
listen 80;
server_name www.kazihuo.com;
location / {
root html;
index index.html index.htm;
}
error_page 500 502 503 504 /50x.html;
location = /50x.html {
root html;
}
}
}
- 代理服务器配置
[root@Proxy1 ~]# cat /usr/local/nginx/conf/nginx.conf
worker_processes 1;
events {
worker_connections 1024;
}
http {
include mime.types;
default_type application/octet-stream;
sendfile on;
keepalive_timeout 65;
????upstream static_pools {
????????server 192.168.10.13:80 weight=1;
????}
????upstream upload_pools {
????????server 192.168.10.14:80 weight=1;
????}
????upstream default_pools {
????????server 192.168.10.15:80 weight=1;
????}
server {
listen 80;
server_name www.kazihuo.com;
location / {
???????? proxy_pass http://default_pools;
???????? include proxy.conf;
}
location /static/ {
???????? proxy_pass http://static_pools;
???????? include proxy.conf;
}
location /upload/ {
???????? proxy_pass http://upload_pools;
???????? include proxy.conf;
}
}
}
[root@WEB1 ~]# mkdir -pv /usr/local/nginx/html/static;echo "static_pool" > /usr/local/nginx/html/static/index.html
[root@WEB2 ~]# mkdir -pv /usr/local/nginx/html/upload;echo "upload_pool" > /usr/local/nginx/html/upload/index.html
[root@WEB3 ~]# mkdir -pv /usr/local/nginx/html/default;echo "default_pool" > /usr/local/nginx/html/default/index.html
功能测试
在WINDOW本机做好相应域名解析后浏览器测试:

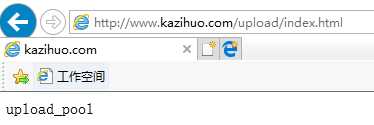

根据客户端设备信息转发
代理配置
[root@Proxy1 ~]# cat /usr/local/nginx/conf/nginx.conf
worker_processes 1;
events {
worker_connections 1024;
}
http {
include mime.types;
default_type application/octet-stream;
sendfile on;
keepalive_timeout 65;
????upstream static_pools {
????????server 192.168.10.13:80 weight=1;
????}
????upstream upload_pools {
????????server 192.168.10.14:80 weight=1;
????}
????upstream default_pools {
????????server 192.168.10.15:80 weight=1;
????}
????
????server {
????????listen 80;
????????server_name www.kazihuo.com;
????????location / {
????????????if ($http_user_agent ~* "Gecko")
????????????????{proxy_pass http://static_pools;}
????????????if ($http_user_agent ~* "Chrome")
????????????????{proxy_pass http://upload_pools;}
????????}
????}
}
注:配置文件中匹配的"Gecko""Chrome"等关键字可通过相应浏览器访问对应节点服务器后根据日志确认出$http_user_agent信息。
功能测试
通过IE浏览器访问效果如下:


?
通过谷歌浏览器访问效果如下:


根据文件扩展名代理转发
相关配置
location方式配置规则:

if语句匹配规则:
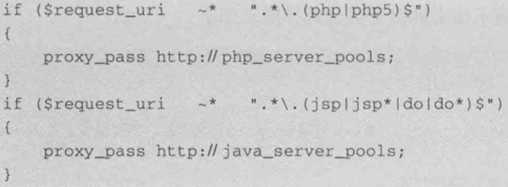
应用场景
可根据扩展名实现资源动静分离访问,如图片、视频等请求静态服务器池,PHP、JSP等请求动态服务器池;
示例代码:


proxy_next_upstream参数说明
当Nginx接收后端服务器返回proxy_next_upstream参数定义的状态码时,会将这个请求转发费正常的后端服务器,如500、502、503、504,此参数可提升用户访问体验,配置如下:

