无状态组件中没有这些生命周期方法
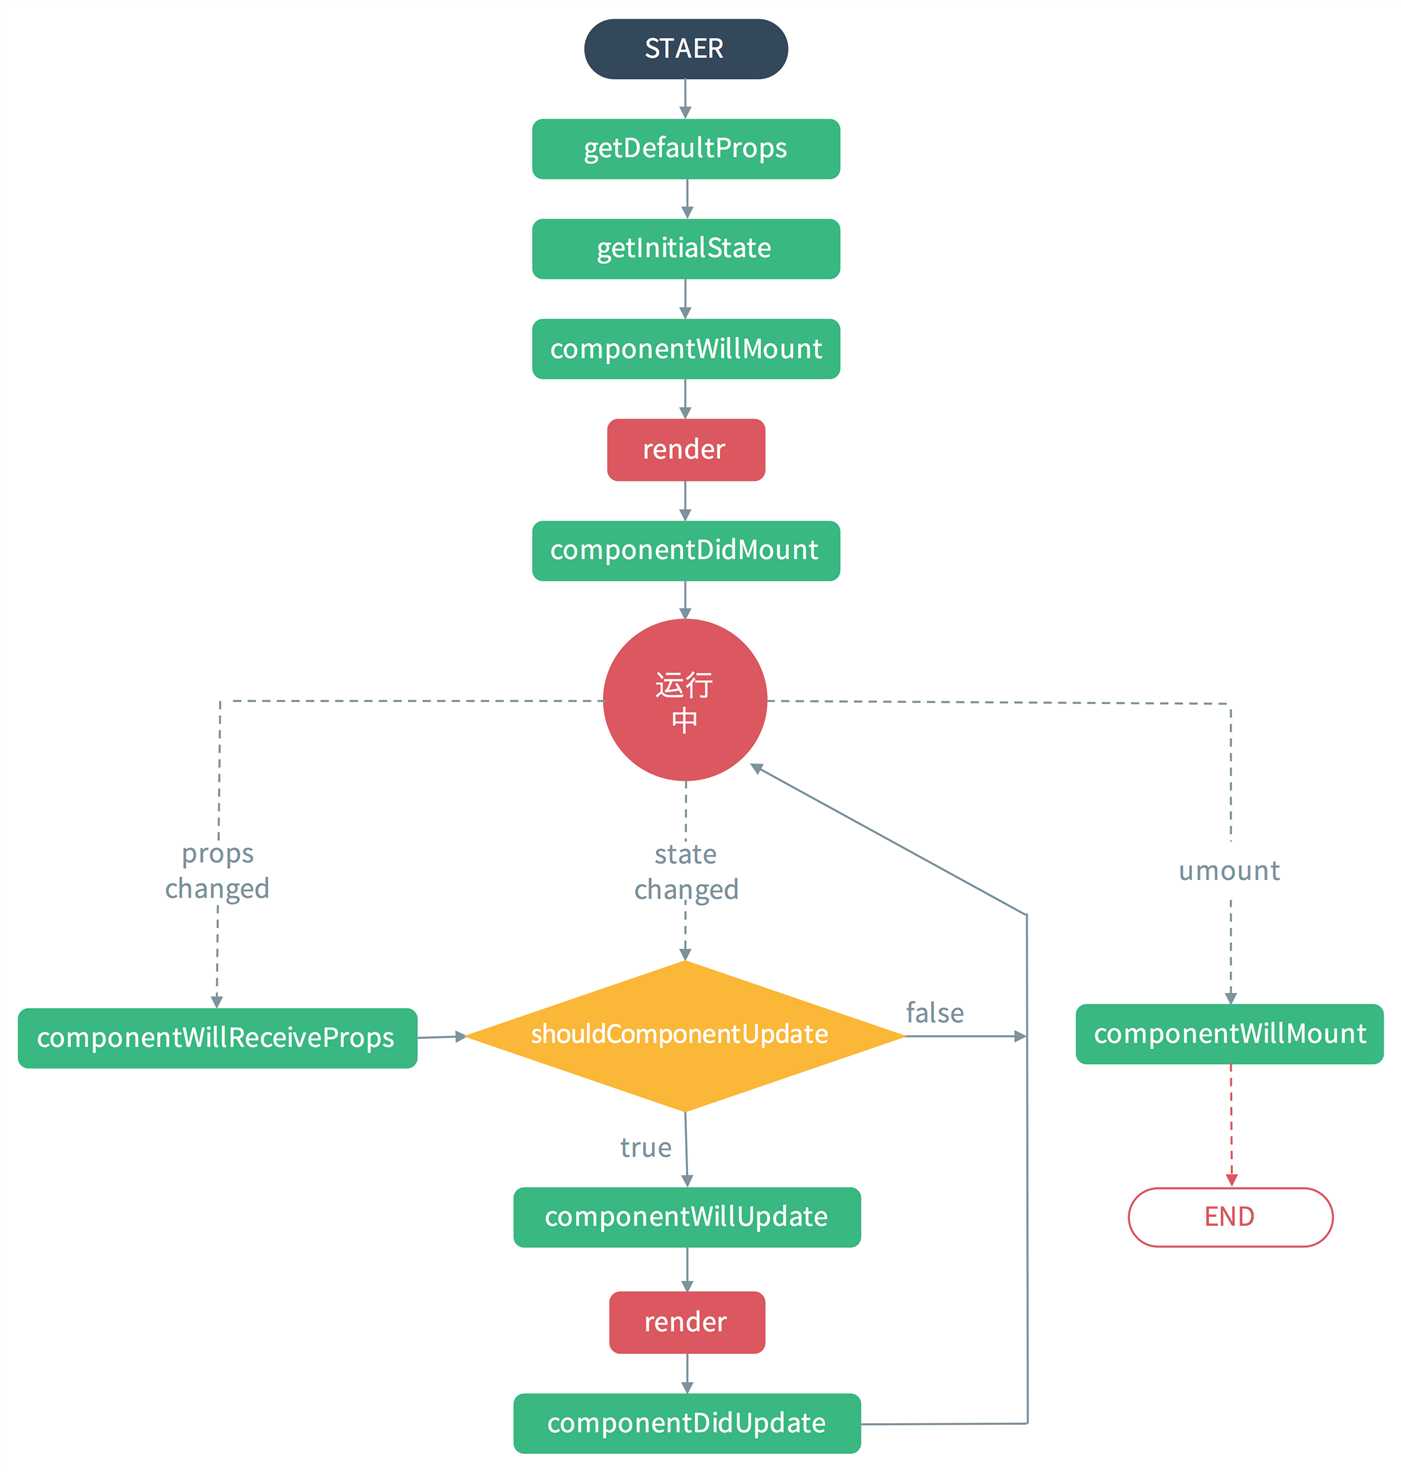
挂载
constructor(),或者getInitialStatecomponentWillMount(),此时dom还没渲染,在这里执行的setState不会导致重绘,执行无效果render()componentDidMount(),在这里执行的setState会导致重绘(或称为二次渲染)
被动更新流程(父组件调用setState)
componentWillReceiveProps(),这时子组件的props仍然是旧的,可以在这里把新的props通过setState设置进state中,不会触发二次渲染shouldComponentUpdate(),这里读取到的state是以上更新后的statecomponentWillUpdate(),不能在这里执行setState,执行了无效果render()componentDidUpdate(),可以在这里进行异步的setState
主动更新流程(当前组件调用setState)
执行的函数相比上面的被动更新流程,少了一个componentWillReceiveProps方法,其余的都一样。
卸载
componentWillUnmount(),用于清除定时器、事件绑定
React 官方不建议在 componentWillMount() 修改 state ,通常建议在 componentDidMount(), 如果需要设置 state 的初始状态,可以在 (es6:)constractor() 或者 (es5:)getInitialState() 中设置。
setState是一个异步操作,修改的state必能通过this.state.xxx来马上读取,但可以在setState的第二个参数(回调函数)中读取更新后的值。
父子组件的生命周期


 1 import React from ‘react‘;
 2 import ReactDOM from ‘react-dom‘;
 3
 4 const buildClass = (name)=>{
 5     return class extends React.Component{
 6         constructor(props) {
 7             super(props);
 8             console.log( name + ‘ constructor‘);
 9         }
10         componentWillMount() {
11             console.log( name + ‘ componentWillMount‘);
12         }
13         componentDidMount() {
14             console.log( name + ‘ componentDidMount‘);
15         }
16         componentWillUnmount() {
17             console.log( name + ‘ componentWillUnmount‘);
18         }
19         componentWillReceiveProps(nextProps) {
20             console.log( name + ‘ componentWillReceiveProps(nextProps)‘);
21         }
22         shouldComponentUpdate(nextProps, nextState) {
23             console.log( name + ‘ shouldComponentUpdate(nextProps, nextState)‘);
24             return true;
25         }
26         componentWillUpdate(nextProps, nextState) {
27             console.log( name + ‘ componentWillUpdate(nextProps, nextState)‘);
28         }
29         componentDidUpdate(prevProps, prevState) {
30             console.log( name + ‘ componetDidUpdate(prevProps, prevState)‘);
31         }
32     }
33 }
34 class Child extends buildClass(‘Child‘){
35     render(){
36         console.log(‘Child render‘)
37         return (
38             <div>child</div>
39         )
40     }
41 }
42 class Parent extends buildClass(‘Parent‘){
43     render(){
44         console.log(‘Parent render‘)
45         return (
46             <Child />
47         )
48     }
49 }
50 ReactDOM.render(
51     <Parent />,
52     document.getElementById(‘root‘)
53 );
运行结果:
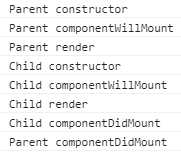
结论:当需要render子组件的时候,才会进入子组件的生命周期,子组件的周期结束后,再回到上级的周期。
更新组件的两种方式
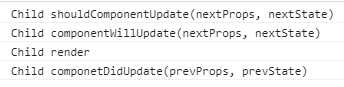
1.主动更新:组件通过setState修改自己的状态。
在以上代码的基础上,往子组件中添加一个按钮,用于主动更新自己的状态:
class Child extends buildClass(‘Child‘){
    render(){
        console.log(‘Child render‘)
        return (
            <button onClick={()=>{this.setState({data:123})}}>child</button>
        )
    }
}
点击按钮:
2.被动更新:父组件通过props把自己的state传递给子组件,父组件执行setState更新状态
父组件修改如下:
class Parent extends buildClass(‘Parent‘){
    render(){
        console.log(‘Parent render‘)
        return (
            <div>
                <Child />
                <button onClick={()=>{this.setState({data:123})}}>Parent</button>
            </div>
        )
    }
}
运行结果:
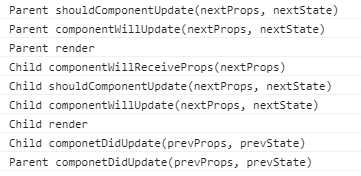
可见:不管父组件有没有把数据传递给子组件,只要父组件setState,都会走一遍子组件的更新周期。而且子组件被动更新会比主动更新所执行的流程多出来一个 componentWillReceiveProps 方法。
在以上被动更新的基础上,修改buildClass中的代码,使 shouldComponentUpdate返回false:
shouldComponentUpdate(nextProps, nextState) {
    console.log( name + ‘ shouldComponentUpdate(nextProps, nextState)‘);
    return false;
}
点击parent中的更新按钮,仅仅输出一句:
Parent shouldComponentUpdate(nextProps, nextState)
结论:只要组件在以上函数中返回false,则子组件不会进行更新re-render,所有更新流程都不执行了
class 和 createClass的区别
class 是ES6中的写法,如果想要创建组件却不使用ES6,那就使用(ES5)createClass。
前者组件的初始化在constructor中,而后者没有constructor,但额外提供了一个getInitialState方法,用于初始化state,使用createClass需要先安装:
npm install --save create-react-class
使用:
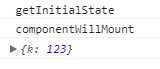
var Counter = createClass({
    getInitialState:function(){
        console.log( ‘ getInitialState‘);
        return {
            k:123
        }
    },
    componentWillMount:function() {
        console.log( ‘ componentWillMount‘);
        console.log(this.state)
    },
    render: function() {
        return <div>{999}</div>;
    }
});
运行结果:
以上是初始化时的第一个区别,接下来说第二个。以下两个组件的执行效果一样:
class Counter2 extends React.Component{
    render(){
        return <div>{this.props.k}</div>;
    }
}
Counter2.defaultProps = {
    k:123
};

var Counter = createClass({
    getDefaultProps:function(){
        return {
            k:123
        }
    },
    render: function() {
        return <div>{this.props.k}</div>;
    }
});
完。