这篇文章我们主要做三件事
1. 讲解木桶布局的原理
2. 把这个效果做成个UI 精美、功能完善的小项目
3. 通过这个项目,演示如何去思考、如何去优化代码
木桶布局原理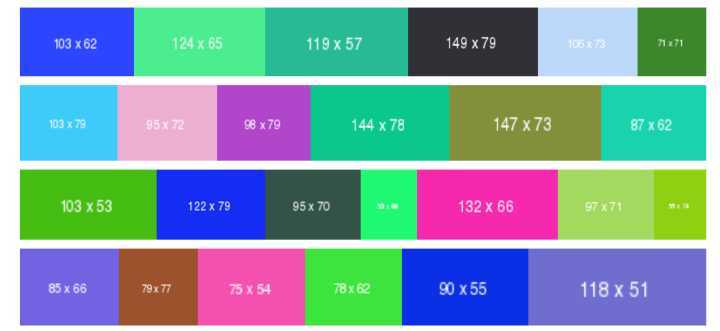
假设我们手里有20张照片,这些照片可以在保持宽高比的情况下进行放大或者缩小。选定一个基准高度比如200px
* 拿第1张照片,锁定宽高比高度压缩到200px,放到第一行
* 拿第2张照片,高度压缩到200px,放到第一行,图片1的后面
...
* 拿第5张照片,高度压缩到200px,放到第一行。oh,不好,空间不够,放不下了
* 把前面水平依次排放好的4个图片当成一个整体,等比拉伸,整体宽度正好撑满容器
* 第5张照片从下一行开始,继续...
以上,就是木桶布局的原理。
木桶布局项目
但现实场景远比仅实现基本效果的DEMO更复杂,以 500px 官网 和 百度图片 为例,主要考虑以下情况
* 图片从服务器通过接口异步获取
* 要结合懒加载实现滚动加载更多图片
* 当屏幕尺寸发生变化后需要重新布局
为了让产品功能更强大我们还需要加入即时检索功能,用户输入关键字即可立即用木桶布局的方式展示搜索到底图片,当页面滚动到底部时会加载更多数据,当调整浏览器尺寸时会重新渲染,效果在这里。下图是效果图
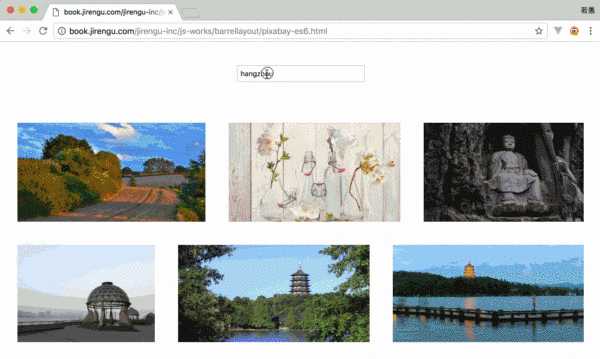
大家一起来理一理思路,看如何实现:
1. 输入框绑定事件,当输入框内容改变时,向接口发送请求获取数据
2. 得到数据后使用木桶布局的方式渲染到页面上
3. 当滚动到底部时获取新的页数对应的数据
4. 得到数据后继续渲染到页面上
5. 当浏览器窗口变化时,重新渲染
按照这个思路,我们可以勉强写出效果,但肯定会遇到很多恼人的细节,比如
1. 当用户输入内容时,如果每输入一个字符就发送请求,会导致请求太多,如何做节流?
2. 对于单次请求的数据,在使用木桶布局渲染时最后一行数据如何判断、如何展示?
3. 对于后续滚动异步加载的新的数据,如何布局到页面?特别是如何处理与上一次请求渲染到页面上的最后一行数据的衔接?
4. 当屏幕尺寸调整时,如何处理?是清空重新获取数据?还是使用已有数据重新渲染?
5. 数据到来的时机和用户操作是否存在关联?如何处理?比如上次数据到来之前用户又发起新的搜索
6. ......
当这些细节处理完成之后,我们会发现代码已经被改的面目全非,逻辑复杂,其他人(可能包括明天的自己)很难看懂。
优化代码
我们可以换一种思路,使用一些方法让代码解耦,增强可读性和扩展性。最常用的方法就是使用「发布-订阅模式」,或者说叫「事件机制」。发布订阅模式的思路本质上是:对于每一个模块,听到命令后,做好自己的事,做完后发个通知
第一,我们先实现一个事件管理器
class Event {
        static on(type, handler) {
            return document.addEventListener(type, handler)
       }
       static trigger(type, data) {
            return document.dispatchEvent(new CustomEvent(type, {
                detail: data
            }))
        }
    }
    // useage
    Event.on(‘search‘, e => {console.log(e.detail)})
    Event.trigger(‘search‘, ‘study frontend in jirengu.com‘)
如果对 ES6不熟悉,可以先看看语法介绍参考这里,大家也可以使用传统的模块模式来写参考这里。当然,我们还可以不借助浏览器内置的CustomEvent,手动写一个发布订阅模式的事件管理器,参考这里。
第二,我们来实现交互模块
class Interaction {
        constructor() {
            this.searchInput = document.querySelector(‘#search-ipt‘)
            this.bind()
        }
       bind() {
            this.searchInput.oninput = this.throttle(() => {
                Event.trigger(‘search‘, this.searchInput.value)
            }, 300)
            document.body.onresize = this.throttle(() =>    Event.trigger(‘resize‘), 300)
            document.body.onscroll = this.throttle(() => {
                if (this.isToBottom()) {
                    Event.trigger(‘bottom‘)
                }
            },3000)
        }
        throttle(fn, delay) {
            let timer = null
            return () => {
                clearTimeout(timer)
                timer = setTimeout(() => fn.bind(this)(arguments), delay)
            }
        }
        isToBottom() {
            return document.body.scrollHeight - document.body.scrollTop - document.documentElement.clientHeight < 5
        }
    }
    new Interaction()
以上代码逻辑很简单:
1. 当用户输入内容时,节流,并且发送事件"search"
2. 当用户滚动页面时,节流,检测是否滚动到页面底部,如果是则发起事件"bottom"
3. 当窗口尺寸变化时,节流,发起事件"resize"
需要注意上述代码中Class 的写法 和箭头函数里 this 的用法,这里不做过多讲解。还需要注意代码中节流函数 throttle 的实现方式,以及页面是否滚动到底部的判断 isToBottom,我们可以直接读代码来理解,然后自己动手写 demo 测试。
第三,我们来实现数据加载模块
class Loader {
        constructor() {
            this.page = 1
            this.per_page = 10
            this.keyword = ‘‘
            this.total_hits = 0
            this.url = ‘//pixabay.com/api/‘
            this.bind()
        }
        bind() {
            Event.on(‘search‘, e => {
                this.page = 1
                this.keyword = e.detail
                this.loadData()
                    .then(data => {
                      console.log(this)
                      this.total_hits = data.totalHits
                      Event.trigger(‘load_first‘, data)
                    })
                    .catch(err => console.log(err))
            })
            Event.on(‘bottom‘, e => {
                if(this.loading) return
                if(this.page * this.per_page > this.total_hits) {
                  Event.trigger(‘load_over‘)
                  return
                }
                 this.loading = true

                ++this.page
                this.loadData()
                    .then(data => Event.trigger(‘load_more‘, data))
                    .catch(err => console.log(err))
            })
        }
        loadData() {
            return fetch(this.fullUrl(this.url, {
                    key: ‘5856858-0ecb4651f10bff79efd6c1044‘,
                    q: this.keyword,
                    image_type: ‘photo‘,
                    per_page: this.per_page,
                    page: this.page
                 }))
                .then((res) => {
                  this.loading = false
                  return res.json()
                  })
        }
        fullUrl(url, json) {
            let arr = []
            for (let key in json) {
                arr.push(encodeURIComponent(key) + ‘=‘ +   encodeURIComponent(json[key]))
            }
            return url + ‘?‘ + arr.join(‘&‘)
        }
    }
    new Loader()
因为加载首页数据与加载后续数据二者的流程是有差异的,所有对于 Loader 模块,我们根据定义了3个事件。流程如下:
1. 当监听到"search"时,获取第一页数据,把页数设置为1,发送事件"load_first"并附上数据
2. 当监听到"bottom"时,根据数据判断数据是否加载完了。如果加载完了发送"load_over"事件;否则把页数自增,加载数据,发送"load_more"事件并附上数据
第四、我们来实现布局模块
class Barrel {
        constructor() {
        this.mainNode = document.querySelector(‘main‘)
        this.rowHeightBase = 200
        this.rowTotalWidth = 0
        this.rowList = []
        this.allImgInfo = []

        this.bind()
    }
    bind() {
        Event.on(‘load_first‘, e => {
          this.mainNode.innerHTML = ‘‘
          this.rowList = []
          this.rowTotalWidth = 0
          this.allImgInfo = [...e.detail.hits]
          this.render(e.detail.hits)
        })

        Event.on(‘load_more‘, e => {
          this.allImgInfo.push(...e.detail.hits)
          this.render(e.detail.hits)
        })

        Event.on(‘load_over‘, e => {
          this.layout(this.rowList, this.rowHeightBase)
        })

        Event.on(‘resize‘, e => {
          this.mainNode.innerHTML = ‘‘
          this.rowList = []
          this.rowTotalWidth = 0
          this.render(this.allImgInfo)
        })
    }
    render(data) {
      if(!data) return
      let mainNodeWidth = parseFloat(getComputedStyle(this.mainNode).width)
      data.forEach(imgInfo => {
          imgInfo.ratio = imgInfo.webformatWidth / imgInfo.webformatHeight
          imgInfo.imgWidthAfter = imgInfo.ratio * this.rowHeightBase

          if (this.rowTotalWidth + imgInfo.imgWidthAfter <= mainNodeWidth) {
              this.rowList.push(imgInfo)
              this.rowTotalWidth += imgInfo.imgWidthAfter
          } else {
              let rowHeight = (mainNodeWidth / this.rowTotalWidth) * this.rowHeightBase
              this.layout(this.rowList, rowHeight)
              this.rowList = [imgInfo]
              this.rowTotalWidth = imgInfo.imgWidthAfter
          }

      })
     }

     layout(row, rowHeight) {
      row.forEach(imgInfo => {
          var figureNode = document.createElement(‘figure‘)
          var imgNode = document.createElement(‘img‘)
          imgNode.src = imgInfo.webformatURL
          figureNode.appendChild(imgNode)
          figureNode.style.height = rowHeight + ‘px‘
          figureNode.style.width = rowHeight * imgInfo.ratio + ‘px‘
          this.mainNode.appendChild(figureNode)
      })
      }
    }

    new Barrel()
对于布局模块来说考虑流程很简单,就是从事件源拿数据自己去做布局,流程如下:
1. 当监听到"load_first"事件时,把页面内容清空,然后使用数据重新去布局
2. 当监听到"load_more"事件时,不清空页面,直接使用数据去布局
3. 当监听到"load_over"事件时,单独处理最后一行剩下的元素
当监听到"resize"事件时,清空页面内容,使用暂存的数据重新布局
完整代码在这里
以上代码实现了逻辑解耦,每个模块仅有单一职责原则,如果新增更能扩展性也很强。
如果你喜欢这篇文章或者觉得有用,点个赞给个鼓励。