An image is a lightweight, stand-alone, executable package that includes everything needed to run a piece of software, including the code, a runtime, libraries, environment variables, and config files.
A container is a runtime instance of an image—what the image becomes in memory when actually executed. It runs completely isolated from the host environment by default, only accessing host files and ports if configured to do so.
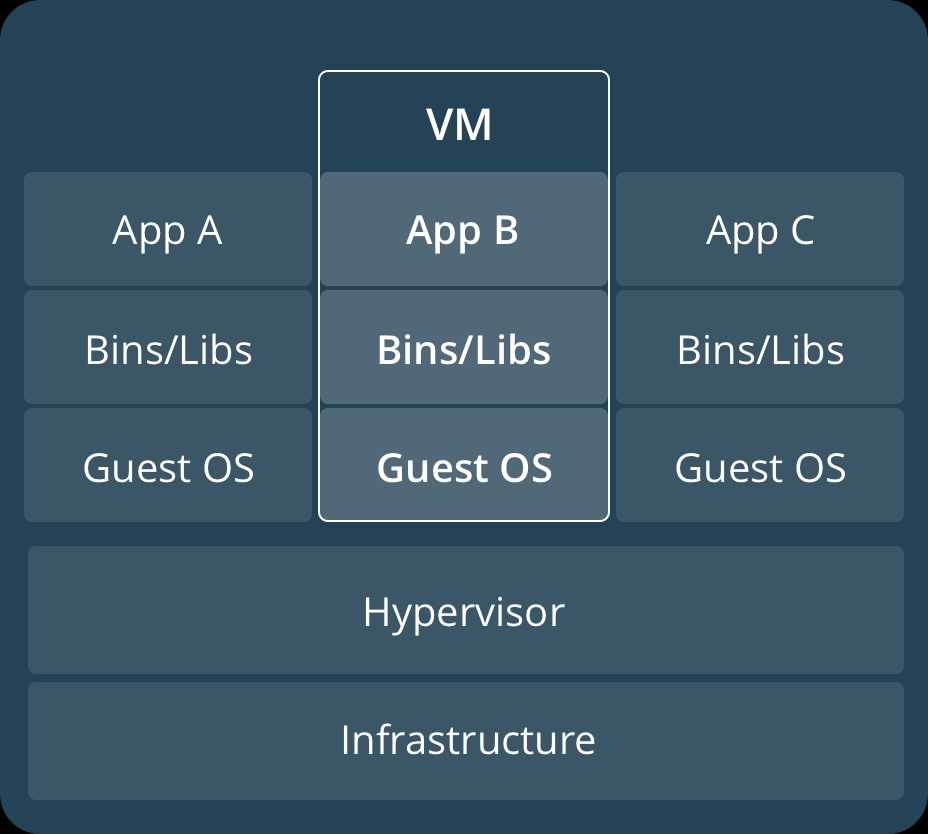
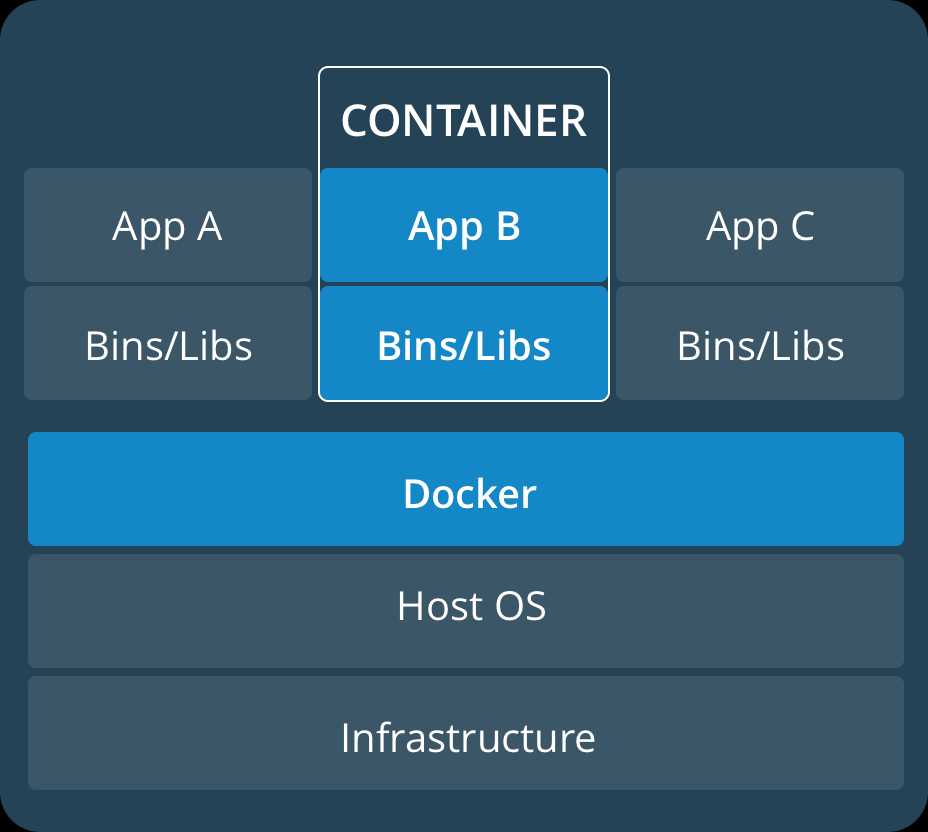
Containers run apps natively on the host machine’s kernel. They have better performance characteristics than virtual machines that only get virtual access to host resources through a hypervisor. Containers can get native access, each one running in a discrete process, taking no more memory than any other executable.
building an app the Docker way.
We’ll start at the bottom of the hierarchy of such an app, which is a container, which we cover on this page.
Above this level is a service, which defines how containers behave in production, covered in Part 3.
Finally, at the top level is the stack, defining the interactions of all the services, covered in Part 5.
- Stack
- Services
- Container (you are here)
development environment
In the past, if you were to start writing a Python app, your first order of business was to install a Python runtime onto your machine. But, that creates a situation where the environment on your machine has to be just so in order for your app to run as expected; ditto for the server that runs your app.
With Docker, you can just grab a portable Python runtime as an image, no installation necessary. Then, your build can include the base Python image right alongside your app code, ensuring that your app, its dependencies, and the runtime, all travel together.
These portable images are defined by something called a Dockerfile.
Dockerfile will define what goes on in the environment inside your container.
Access to resources like networking interfaces and disk drives is virtualized inside this environment, which is isolated from the rest of your system, so you have to map ports to the outside world, and be specific about what files you want to “copy in” to that environment. However, after doing that, you can expect that the build of your app defined in this Dockerfile will behave exactly the same wherever it runs.
# Use an official Python runtime as a parent image
FROM python:2.7-slim

# Set the working directory to /app
WORKDIR /app

# Copy the current directory contents into the container at /app
ADD . /app

# Install any needed packages specified in requirements.txt
RUN pip install --trusted-host pypi.python.org -r requirements.txt

# Make port 80 available to the world outside this container
EXPOSE 80

# Define environment variable
ENV NAME World

# Run app.py when the container launches
CMD ["python", "app.py"]
Proxy servers can block connections to your web app once it’s up and running. If you are behind a proxy server, add the following lines to your Dockerfile, using the ENV command to specify the host and port for your proxy servers:
# Set proxy server, replace host:port with values for your servers
ENV http_proxy host:port
ENV https_proxy host:port
The app itself
Create two more files, requirements.txt and app.py, and put them in the same folder with the Dockerfile. This completes our app, which as you can see is quite simple. When the above Dockerfile is built into an image, app.py andrequirements.txt will be present because of that Dockerfile’s ADD command, and the output from app.py will be accessible over HTTP thanks to the EXPOSE command.
requirements.txt
Flask
Redis
app.py
from flask import Flask
from redis import Redis, RedisError
import os
import socket

# Connect to Redis
redis = Redis(host="redis", db=0, socket_connect_timeout=2, socket_timeout=2)

app = Flask(__name__)

@app.route("/")
def hello():
    try:
        visits = redis.incr("counter")
    except RedisError:
        visits = "<i>cannot connect to Redis, counter disabled</i>"

    html = "<h3>Hello {name}!</h3>"            "<b>Hostname:</b> {hostname}<br/>"            "<b>Visits:</b> {visits}"
    return html.format(name=os.getenv("NAME", "world"), hostname=socket.gethostname(), visits=visits)

if __name__ == "__main__":
    app.run(host=‘0.0.0.0‘, port=80)
we see that pip install -r requirements.txt installs the Flask and Redis libraries for Python, and the app prints the environment variable NAME, as well as the output of a call to socket.gethostname(). Finally, because Redis isn’t running (as we’ve only installed the Python library, and not Redis itself), we should expect that the attempt to use it here will fail and produce the error message.
Accessing the name of the host when inside a container retrieves the container ID, which is like the process ID for a running executable.
That’s it! You don’t need Python or anything in requirements.txt on your system, nor will building or running this image install them on your system. It doesn’t seem like you’ve really set up an environment with Python and Flask, but you have.
Build the app
We are ready to build the app. Make sure you are still at the top level of your new directory. Here’s what ls should show:
$ ls
Dockerfile		app.py			requirements.txt
Now run the build command. This creates a Docker image, which we’re going to tag using -t so it has a friendly name
docker build -t friendlyhello .
Where is your built image? It’s in your machine’s local Docker image registry:
$ docker images

REPOSITORY            TAG                 IMAGE ID
friendlyhello         latest              326387cea398
Run the app
Run the app, mapping your machine’s port 4000 to the container’s published port 80 using -p:
docker run -p 4000:80 friendlyhello
ou should see a message that Python is serving your app at http://0.0.0.0:80. But that message is coming from inside the container, which doesn’t know you mapped port 80 of that container to 4000, making the correct URL http://localhost:4000.
If you are using Docker Toolbox on Windows 7, use the Docker Machine IP instead of localhost. For example, http://192.168.99.100:4000/. To find the IP address, use the command docker-machine ip.
You can also use the curl command in a shell to view the same content.
$ curl http://localhost:4000

<h3>Hello World!</h3><b>Hostname:</b> 8fc990912a14<br/><b>Visits:</b> <i>cannot connect to Redis, counter disabled</i>
This port remapping of 4000:80 is to demonstrate the difference between what you EXPOSE within the Dockerfile, and what you publish using docker run -p. In later steps, we’ll just map port 80 on the host to port 80 in the container and use http://localhost.
Hit CTRL+C in your terminal to quit.
On Windows, explicitly stop the container
On Windows systems, CTRL+C does not stop the container. So, first type CTRL+C to get the prompt back (or open another shell), then typedocker container ls to list the running containers, followed bydocker container stop <Container NAME or ID> to stop the container. Otherwise, you’ll get an error response from the daemon when you try to re-run the container in the next step.
run the app in the background, in detached mode:
docker run -d -p 4000:80 friendlyhello
You get the long container ID for your app and then are kicked back to your terminal. Your container is running in the background. You can also see the abbreviated container ID with docker container ls (and both work interchangeably when running commands):
$ docker container ls
CONTAINER ID        IMAGE               COMMAND             CREATED
1fa4ab2cf395        friendlyhello       "python app.py"     28 seconds ago
You’ll see that CONTAINER ID matches what’s on http://localhost:4000.
use docker container stop to end the process, using the CONTAINER ID, like so:
docker container stop 1fa4ab2cf395
Share your image
how to push to registries when you want to deploy containers to production.
upload our built image and run it somewhere else.
A registry is a collection of repositories, and a repository is a collection of images—sort of like a GitHub repository, except the code is already built. An account on a registry can create many repositories. The docker CLI uses Docker’s public registry by default.
We’ll be using Docker’s public registry here just because it’s free and pre-configured, but there are many public ones to choose from, and you can even set up your own private registry using Docker Trusted Registry.
Log in with your Docker ID
If you don’t have a Docker account, sign up for one at cloud.docker.com. Make note of your username.
Log in to the Docker public registry on your local machine.
$ docker login
Tag the image
The notation for associating a local image with a repository on a registry isusername/repository:tag
The tag is optional, but recommended, since it is the mechanism that registries use to give Docker images a version. Give the repository and tag meaningful names for the context,
such as get-started:part2. This will put the image in the get-started repository and tag it as part2.
put it all together to tag the image. Run docker tag image with your username, repository, and tag names so that the image will upload to your desired destination. The syntax of the command is:
docker tag image username/repository:tag
docker tag friendlyhello john/get-started:part2
Run docker images to see your newly tagged image. (You can also use docker image ls.)
$ docker images
REPOSITORY               TAG                 IMAGE ID            CREATED             SIZE
friendlyhello            latest              d9e555c53008        3 minutes ago       195MB
john/get-started         part2               d9e555c53008        3 minutes ago       195MB
python                   2.7-slim            1c7128a655f6        5 days ago          183MB
...
Publish the image
Upload your tagged image to the repository:
docker push username/repository:tag
Once complete, the results of this upload are publicly available. If you log in to Docker Hub, you will see the new image there, with its pull command.
Pull and run the image from the remote repository
use docker run and run your app on any machine with this command:
If the image isn’t available locally on the machine, Docker will pull it from the repository.
docker run -p 4000:80 username/repository:tag

$ docker run -p 4000:80 john/get-started:part2
Unable to find image ‘john/get-started:part2‘ locally
part2: Pulling from john/get-started
10a267c67f42: Already exists
f68a39a6a5e4: Already exists
9beaffc0cf19: Already exists
3c1fe835fb6b: Already exists
4c9f1fa8fcb8: Already exists
ee7d8f576a14: Already exists
fbccdcced46e: Already exists
Digest: sha256:0601c866aab2adcc6498200efd0f754037e909e5fd42069adeff72d1e2439068
Status: Downloaded newer image for john/get-started:part2
 * Running on http://0.0.0.0:80/ (Press CTRL+C to quit)
No matter where docker run executes, it pulls your image, along with Python and all the dependencies from requirements.txt, and runs your code. It all travels together in a neat little package, and the host machine doesn’t have to install anything but Docker to run it.
docker build -t friendlyname .  # Create image using this directory‘s Dockerfile
docker run -p 4000:80 friendlyname  # Run "friendlyname" mapping port 4000 to 80
docker run -d -p 4000:80 friendlyname         # Same thing, but in detached mode
docker container ls                                # List all running containers
docker container ls -a             # List all containers, even those not running
docker container stop <hash>           # Gracefully stop the specified container
docker container kill <hash>         # Force shutdown of the specified container
docker container rm <hash>        # Remove specified container from this machine
docker container rm $(docker container ls -a -q)         # Remove all containers
docker image ls -a                             # List all images on this machine
docker image rm <image id>            # Remove specified image from this machine
docker image rm $(docker image ls -a -q)   # Remove all images from this machine
docker login             # Log in this CLI session using your Docker credentials
docker tag <image> username/repository:tag  # Tag <image> for upload to registry
docker push username/repository:tag            # Upload tagged image to registry
docker run username/repository:tag                   # Run image from a registry