ElasticSearch介绍
ElasticSearch是一个
基于Lucene的搜索服务器;
它提供了一个分布式多用户能力的全文搜索引擎,基于RESTful web接口;
Elasticsearch是用Java开发的,并作为Apache许可条款下的开放源码发布,是当前流行的企业级搜索引擎(阿里巴巴、Google、京东等都在使用);
设计用于云计算中,能够达到实时搜索,稳定,可靠,快速,安装使用方便;
我们建立一个网站或应用程序,并要添加搜索功能,但是想要完成搜索工作的创建是非常困难的。我们希望搜索解决方案要运行速度快,我们希望能有一个零配置和一个
完全免费的搜索模式,我们希望能够简单地使用JSON通过HTTP来索引数据,我们希望我们的搜索服务器始终可用,我们希望能够从一台开始并扩展到数百台,我们要实时搜索,我们要简单的多租户,我们希望建立一个云的解决方案。因此我们利用Elasticsearch来解决所有这些问题以及可能出现的更多其它问题;
安装环境
- CenterOS7
- JDK1.8
- ElasticSearch-5.6.4 (https://www.elastic.co/downloads/past-releases)
- elasticsearch-head (ElasticSearch插件 https://github.com/mobz/elasticsearch-head)
- Node.js-v8.9.0
安装步骤
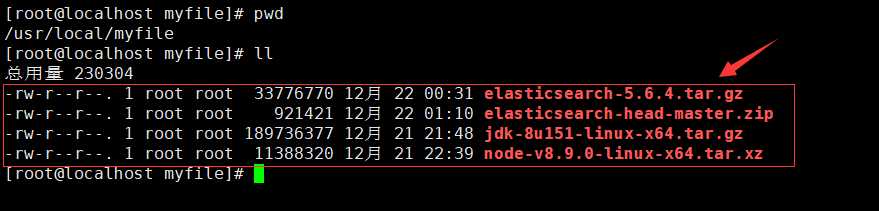
1 . 上传下载好的软件,如下
2 . 安装和配置好JDK和Node.js
自行Google或百度
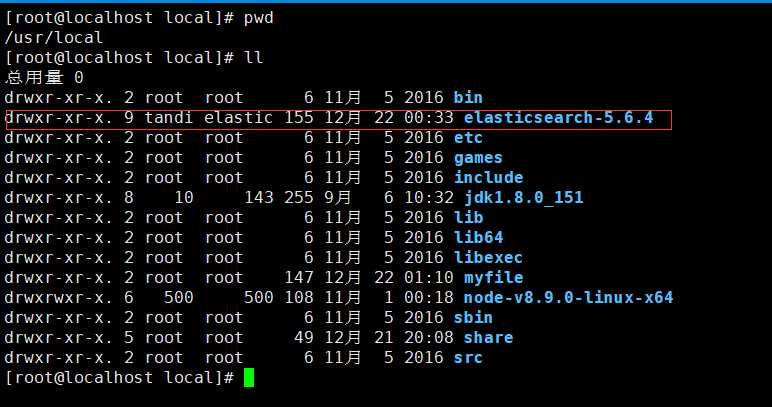
3 . 解压好ElasticSearch
配置ElasticSearch和Linux
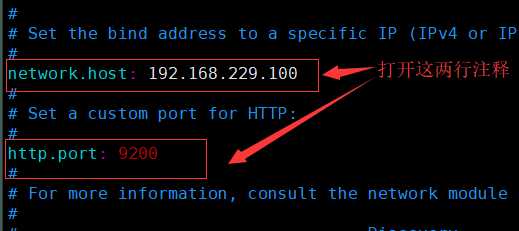
配置ElasticSearch
[root@localhost local]# vim ./elasticsearch-5.6.4/config/elasticsearch.yml
配置Linux
注意:ElasticSearch是不允许root用户启动的,所以需要使用其他用户来进行启动操作,以下是新的用户组和用户的创建:[root@localhost bin]$ useradd tandi # 新增一个用户tandi [root@localhost bin]$ passwd tandi # 修改用户tandi的密码 [root@localhost bin]$ groupadd elastic # 新增一个用户组elastic [root@localhost bin]$ usermod -a -G elastic tandi # 将用户tandi添加到组elastic中 [root@localhost bin]$ chown -R tandi:elastic elasticsearch-5.6.4 # 将elasticsearch-6.1.1/权限给elastic组tandi这个用户 [root@localhost bin]$ su tandi # 切换到tandi用户 [tandi@localhost bin]$ ./elasticsearch -d # 后台运行ElasticSearch 可以使用命令jps来查看是否运行成功,成功如下: [tandi@localhost bin]$ jps 32268 Elasticsearch 32285 Jps
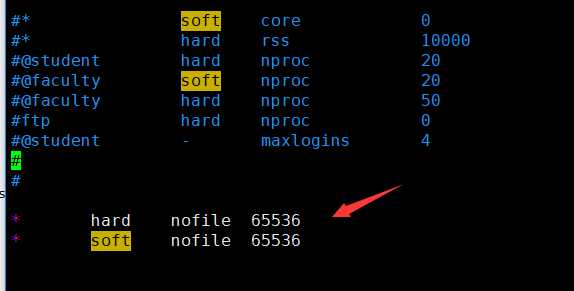
启动ElasticSearch期间可能会出现的问题解决方法
问题:[1]: max file descriptors [4096] for elasticsearch process is too low, increase to at least [65536]
解决方法:
[root@localhost local]# vim /etc/security/limits.conf

在文件后追加以下内容:
*   hard    nofile  65536
*   soft    nofile  65536
如下:
问题:[2]: max virtual memory areas vm.max_map_count [65530] is too low, increase to at least [262144]
解决方法:
[root@localhost local]# vim /etc/sysctl.conf

在文件后追加以下内容:
vm.max_map_count=655360
如下:

其余问题参考以下文章和自行Google或百度
elasticsearch-5.1.1 安装的问题 http://blog.csdn.net/xiegh2014/article/details/53771086
CentOS7上elasticsearch5.5启动报错 http://blog.java1234.com/blog/articles/342.html
浏览器访问ElasticSearch
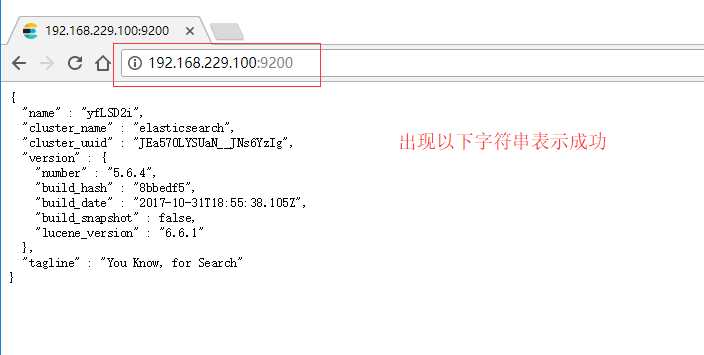
安装elasticsearch-head插件
该插件的作用是让ElasticSearch在浏览器的操作界面更加友好
首选解压elasticsearch-head
[root@localhost myfile]# unzip elasticsearch-head-master.zip
如下:

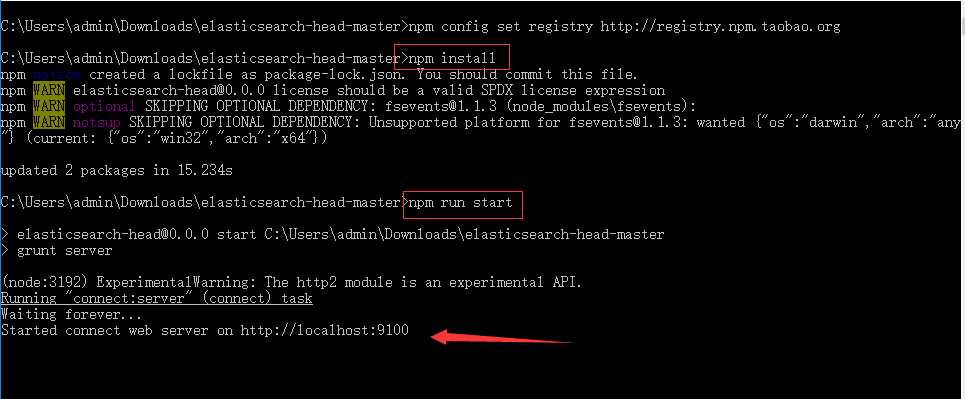
进入elasticsearch-head-master使用nmp命令进行安装操作
[root@localhost elasticsearch-head-master]# npm install
如下:

提示:如果npm安装依赖慢,建议将npm设置为国内镜像,又或者直接在主机中安装该插件,如下:
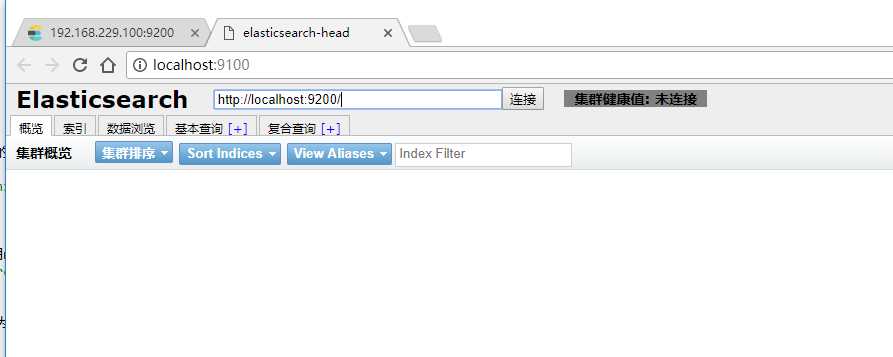
浏览器访问head插件
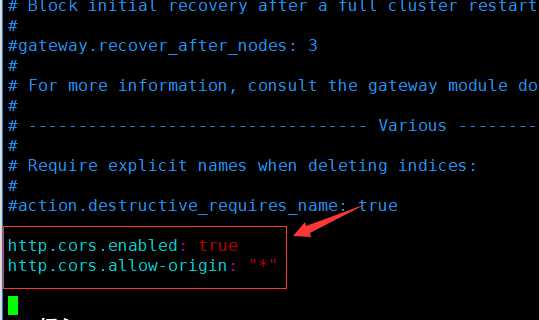
配置ElasticSearch让其和head插件关联起来
[root@localhost config]# vim elasticsearch.yml
在文本最后追加以下内容,并重启ElasticSearch:
http.cors.enabled: true
http.cors.allow-origin: "*"
如下:
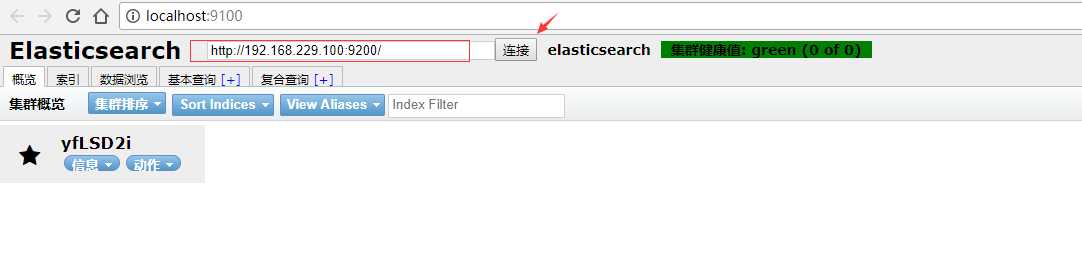
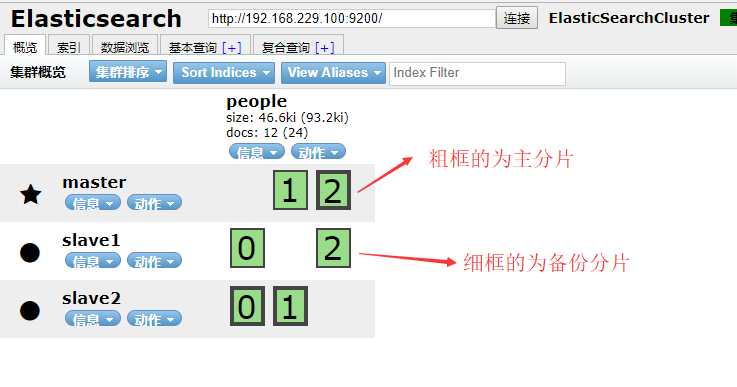
浏览器中使用head插件连接ElasticSearch
配置ElasticSearch集群
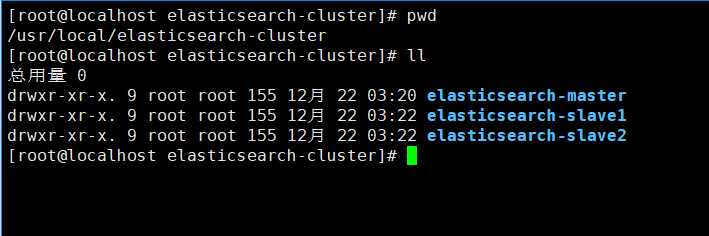
- 以当前ElasticSearch作为源复制三分到elasticsearch-cluster文件夹中,如下:
切记:如果使用之前已有数据的ElasticSearch复制,复制完后记得删除各个ElasticSearch中的data目录,否者集群不成功!!!(问题:http://blog.csdn.net/qq_24879495/article/details/77718032)
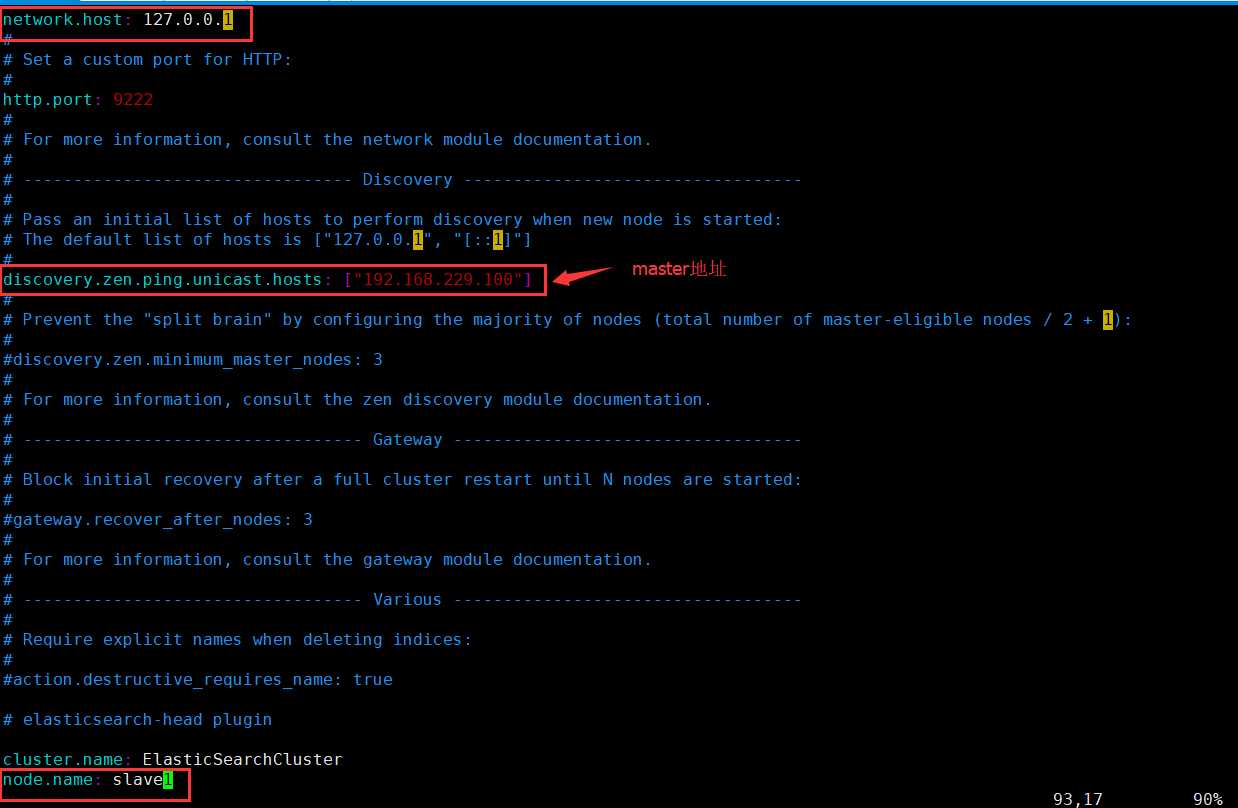
master配置不用动,其余两个从节点配置大体相同(slave1配置如下):
问题
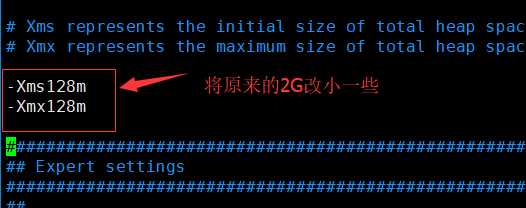
启动过程中可能会出现问题:Java HotSpot(TM) 64-Bit Server VM warning: INFO: os::commit_memory
原因:因为三个elasticsearch在同一台虚拟机中运行,这是系统内存不足所致,elasticsearch启动内容默认为2G
解决:
[root@localhost elasticsearch-cluster]# vim elasticsearch-master/config/jvm.options
[root@localhost elasticsearch-cluster]# vim elasticsearch-slave1/config/jvm.options
[root@localhost elasticsearch-cluster]# vim elasticsearch-slave2/config/jvm.options
ElasticSearch中对索引的基本操作
对索引的基本理解
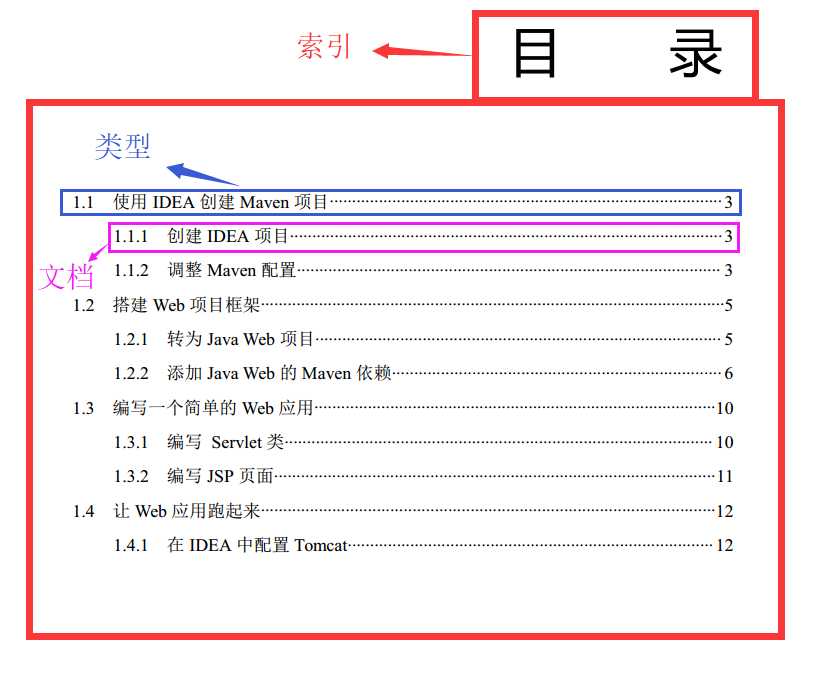
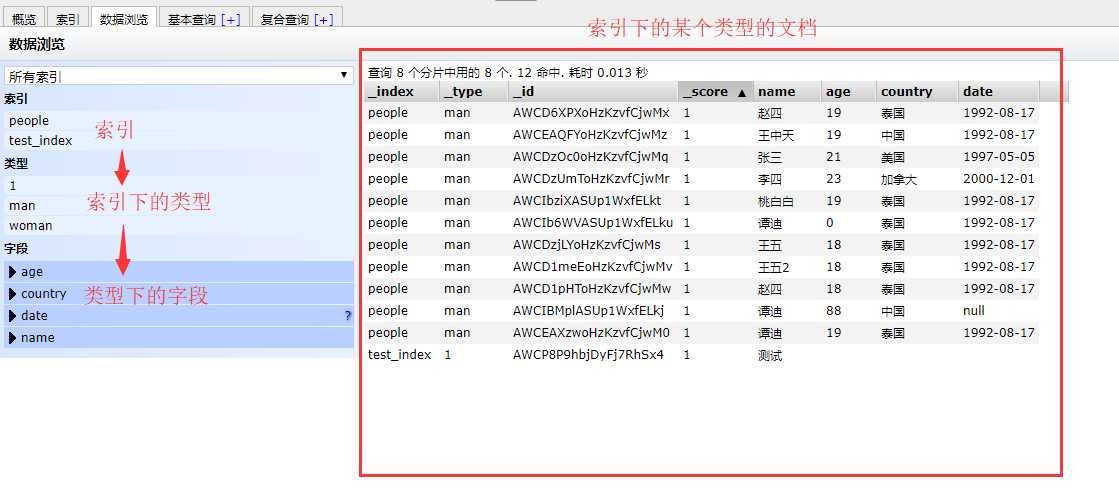
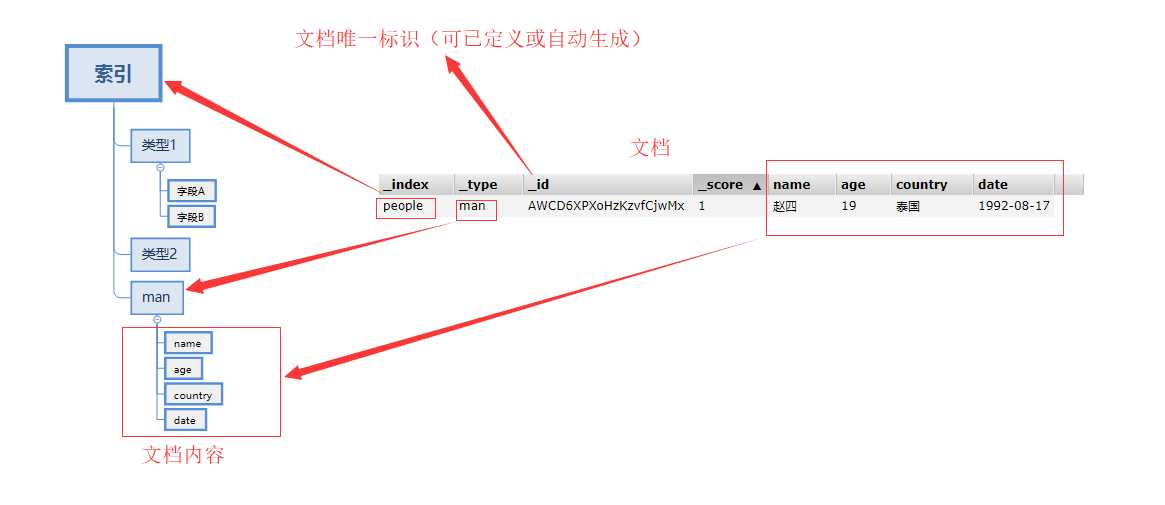
* 索引:可以理解为书的目录(目录=索引)
* 类型:索引的类型,可以理解为目录中的分类标题
* 文档:类型下的具体内容
结合下图理解(个人理解):
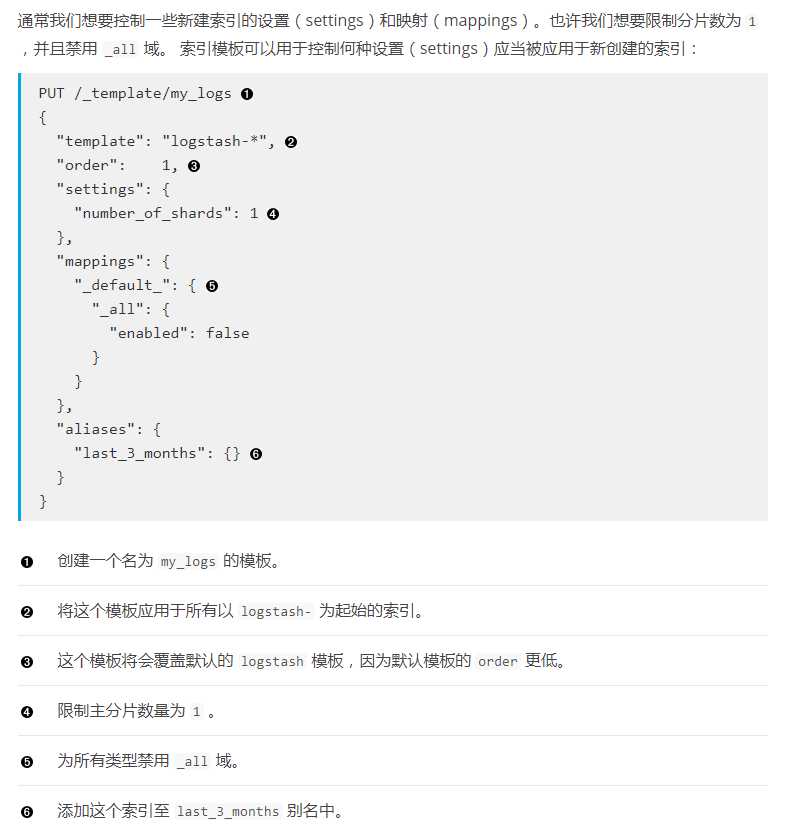
创建索引
参考官方文档,如下:(https://www.elastic.co/guide/cn/elasticsearch/guide/current/index-templates.html)
自定义例子(postman):
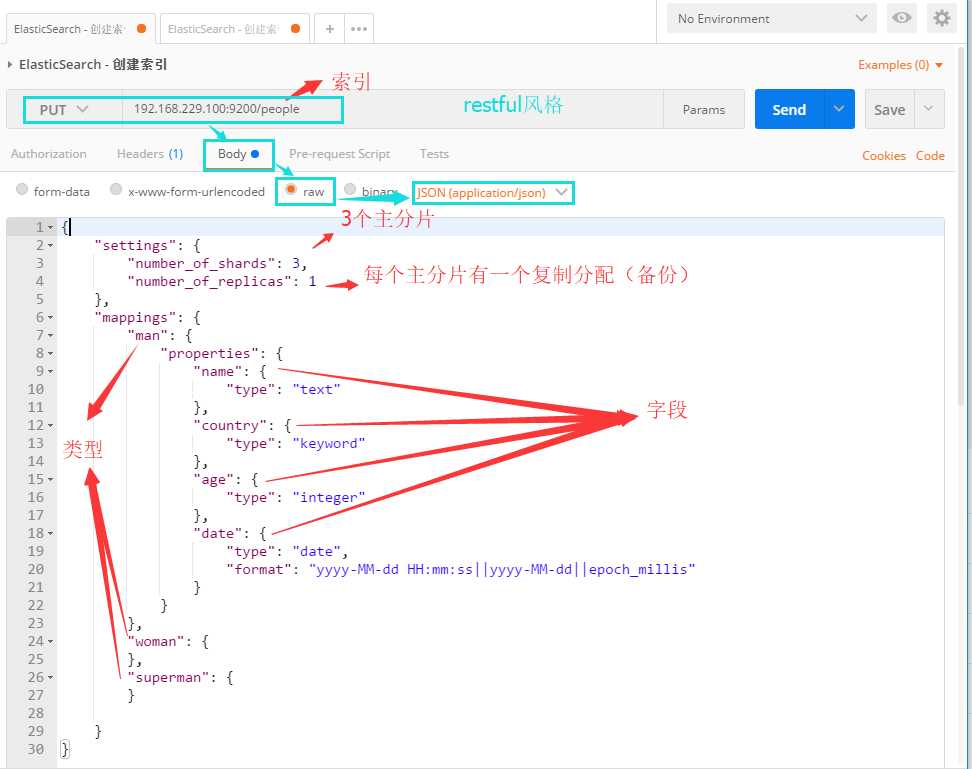
{
    "settings": {
        "number_of_shards": 3,
        "number_of_replicas": 1
    },
    "mappings": {
        "man": {
            "properties": {
                "name": {
                    "type": "text"
                },
                "country": {
                    "type": "keyword"
                },
                "age": {
                    "type": "integer"
                },
                "date": {
                    "type": "date",
                    "format": "yyyy-MM-dd HH:mm:ss||yyyy-MM-dd||epoch_millis"
                }
            }
        },
        "woman": {
        },
        "superman": {
        }

    }
}
结果:
注意:以上设置都不是必须自己设置的,现在尝试创建一个只指定索引名称但不写任何结构的索引,看看是什么情况
请求URL: 192.168.229.100:9200/peoplex
以下是自动生成的索引结构

{
    "state": "open",
    "settings":
    {
        "index":
        {
            "creation_date": "1514247896163",
            "number_of_shards": "5",
            "number_of_replicas": "1",
            "uuid": "tThX8Af3TyWFjA0FJjIsnw",
            "version":
            {
                "created": "5060499"
            },
            "provided_name": "peoplex"
        }
    },
    "mappings":
    {},
    "aliases": [],
    "primary_terms":
    {
        "0": 1,
        "1": 1,
        "2": 1,
        "3": 1,
        "4": 1
    },
    "in_sync_allocations":
    {
        "0": [
            "z7DpqK6OROa9XbYNgQPOWQ",
            "54ZWMzLHQoyMPfxh1nE69A"
        ],
        "1": [
            "LCIDY_G5R1SLhi2mOWUOWw",
            "uzBW-bxfSiSgJVfeqkI49A"
        ],
        "2": [
            "J1m9dQ2NQvykqr12Fg5EYw",
            "8anEJ_TOSyGMoeJU0p_C5w"
        ],
        "3": [
            "SKhsMMwjR4iQxXvrhsvyGg",
            "vBibauuNSIe-k0dqEQuqLQ"
        ],
        "4": [
            "AhfRDd6tTDKr20kU02WnoA",
            "_eFgNTl3SuecNu79ZbVLSw"
        ]
    }
}
增删改查
和ElasticSearch交互:https://www.elastic.co/guide/cn/elasticsearch/guide/current/_talking_to_elasticsearch.html
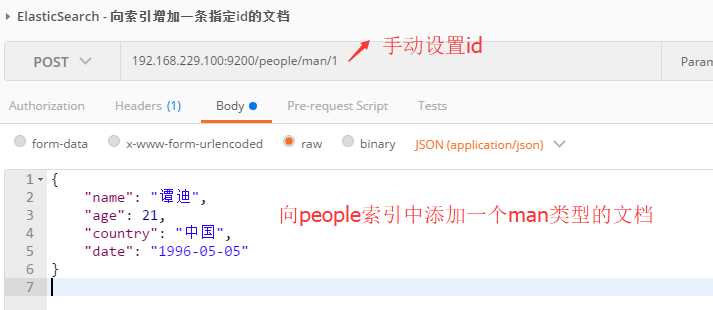
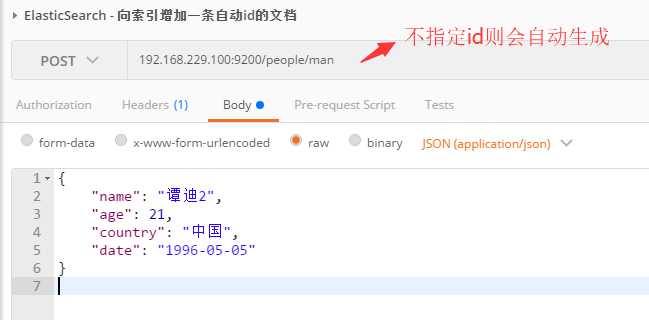
增
指定id:
不指定id:
删
删除文档:

删除索引:

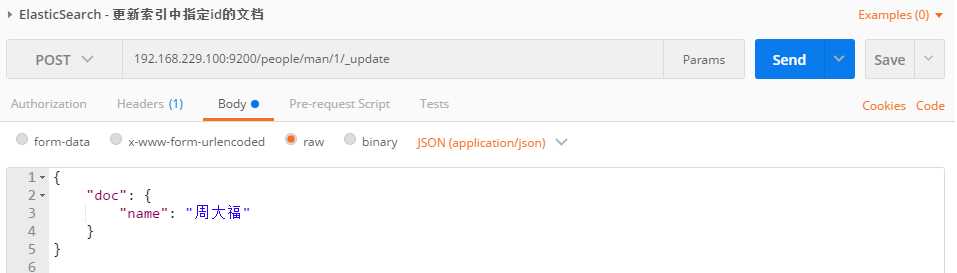
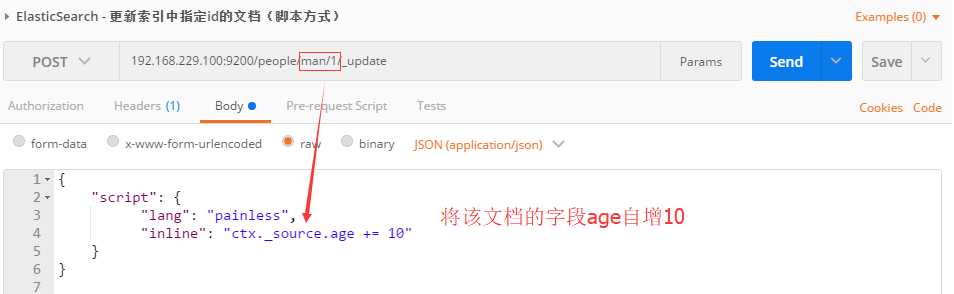
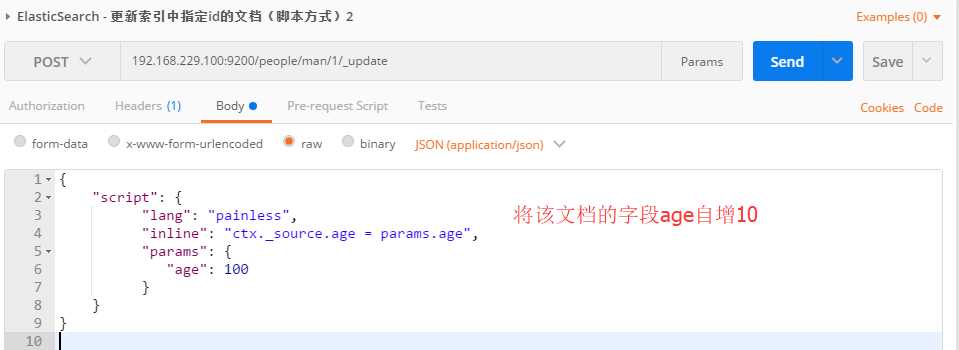
改
删除文档:
/////////////////1
/////////////////2
/////////////////3
查
获取指定id文档

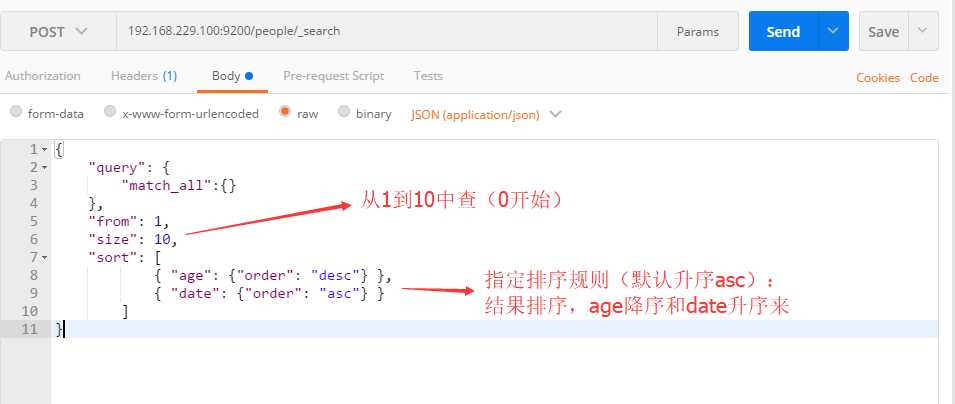
查询全部
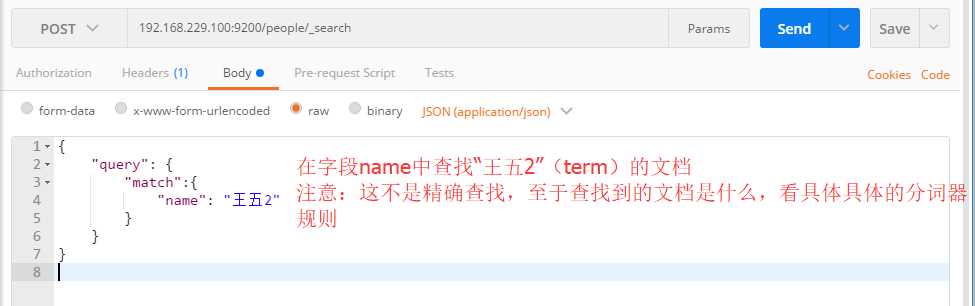
字段查找
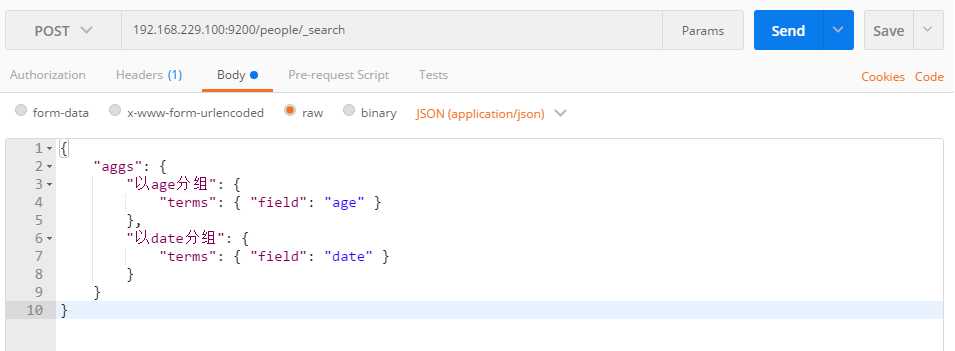
分组查找
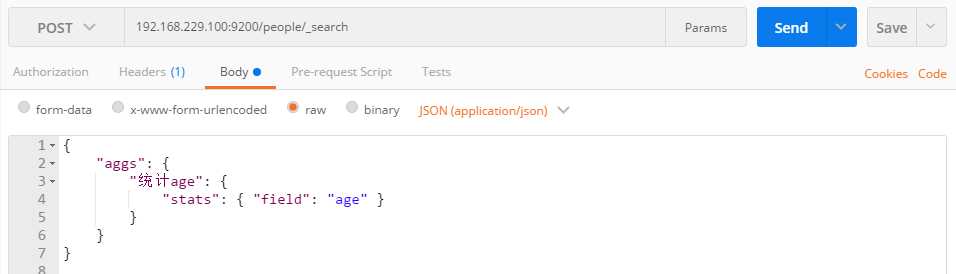
统计查询
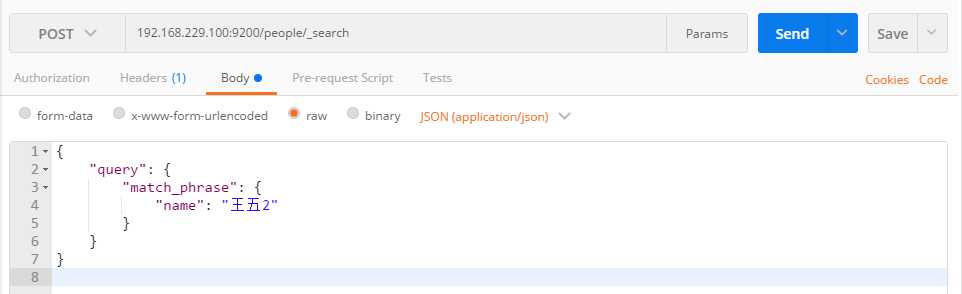
精确查询
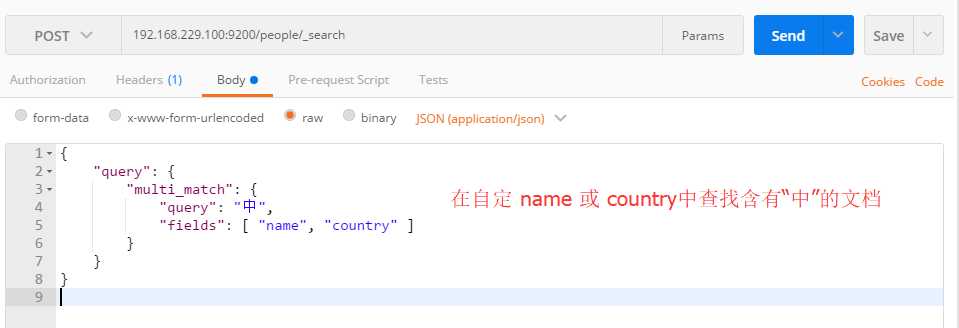
多字段查找
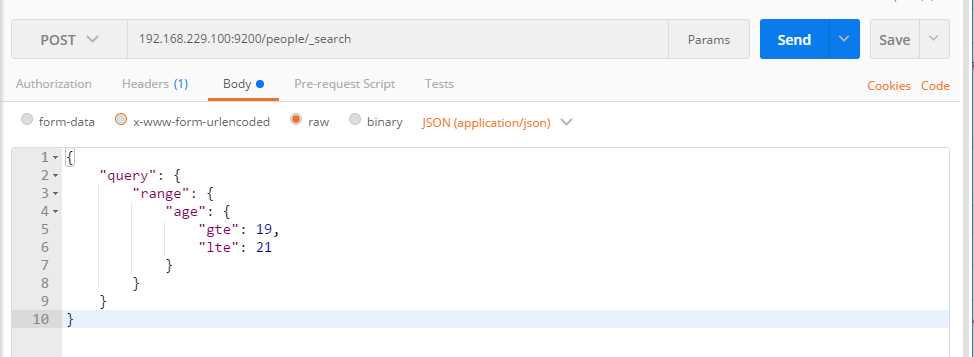
范围查找
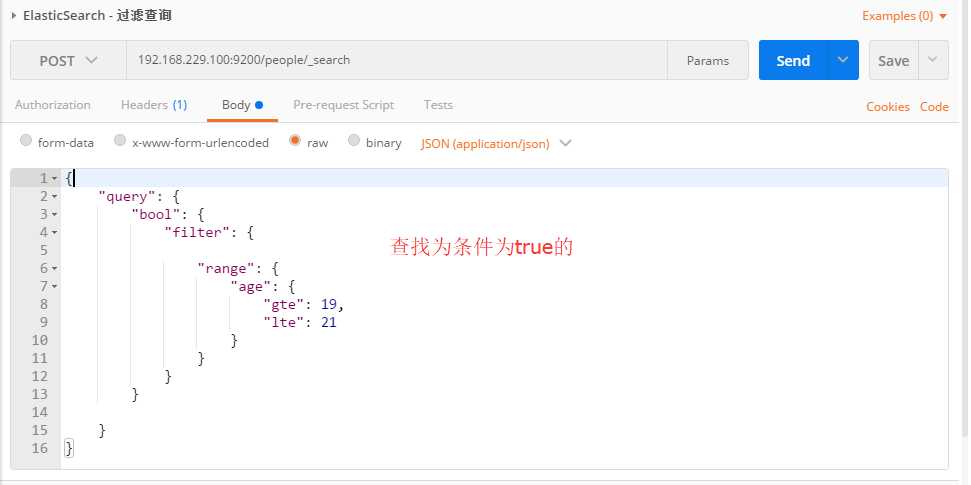
过滤查找
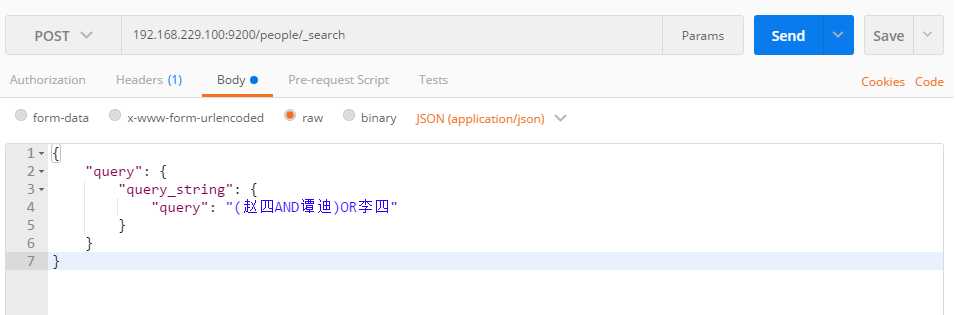
表达式查找
数据返回格式参照
//URL get请求返回数据格式 (192.168.229.100:9200/people/man/AWCDzUmToHzKzvfCjwMr)
{
    "_index": "people",
    "_type": "man",
    "_id": "AWCDzUmToHzKzvfCjwMr",
    "_version": 1,
    "found": true,
    "_source": {
        "name": "李四",
        "age": 23,
        "country": "加拿大",
        "date": "2000-12-01"
    }
}

//post请求返回数据格式(以下为分组查找的响应格式)
{
    "took": 25,
    "timed_out": false,
    "_shards": {
        "total": 3,
        "successful": 3,
        "skipped": 0,
        "failed": 0
    },
    "hits": {
        "total": 12,
        "max_score": 1,
        "hits": [
            {
                "_index": "people",
                "_type": "man",
                "_id": "AWCD6XPXoHzKzvfCjwMx",
                "_score": 1,
                "_source": {
                    "name": "赵四",
                    "age": 19,
                    "country": "泰国",
                    "date": "1992-08-17"
                }
            },
            {
                "_index": "people",
                "_type": "man",
                "_id": "AWCEAQFYoHzKzvfCjwMz",
                "_score": 1,
                "_source": {
                    "name": "王中天",
                    "age": 19,
                    "country": "中国",
                    "date": "1992-08-17"
                }
            },
            {
                "_index": "people",
                "_type": "man",
                "_id": "AWCDzOc0oHzKzvfCjwMq",
                "_score": 1,
                "_source": {
                    "name": "张三",
                    "age": 21,
                    "country": "美国",
                    "date": "1997-05-05"
                }
            },
            {
                "_index": "people",
                "_type": "man",
                "_id": "AWCDzUmToHzKzvfCjwMr",
                "_score": 1,
                "_source": {
                    "name": "李四",
                    "age": 23,
                    "country": "加拿大",
                    "date": "2000-12-01"
                }
            },
            {
                "_index": "people",
                "_type": "man",
                "_id": "AWCIbziXASUp1WxfELkt",
                "_score": 1,
                "_source": {
                    "name": "桃白白",
                    "age": 19,
                    "country": "泰国",
                    "date": "1992-08-17"
                }
            },
            {
                "_index": "people",
                "_type": "man",
                "_id": "AWCIb6WVASUp1WxfELku",
                "_score": 1,
                "_source": {
                    "name": "谭迪",
                    "age": 0,
                    "country": "泰国",
                    "date": "1992-08-17"
                }
            },
            {
                "_index": "people",
                "_type": "man",
                "_id": "AWCDzjLYoHzKzvfCjwMs",
                "_score": 1,
                "_source": {
                    "name": "王五",
                    "age": 18,
                    "country": "泰国",
                    "date": "1992-08-17"
                }
            },
            {
                "_index": "people",
                "_type": "man",
                "_id": "AWCD1meEoHzKzvfCjwMv",
                "_score": 1,
                "_source": {
                    "name": "王五2",
                    "age": 18,
                    "country": "泰国",
                    "date": "1992-08-17"
                }
            },
            {
                "_index": "people",
                "_type": "man",
                "_id": "AWCD1pHToHzKzvfCjwMw",
                "_score": 1,
                "_source": {
                    "name": "赵四",
                    "age": 18,
                    "country": "泰国",
                    "date": "1992-08-17"
                }
            },
            {
                "_index": "people",
                "_type": "man",
                "_id": "AWCIBMplASUp1WxfELkj",
                "_score": 1,
                "_source": {
                    "name": "谭迪",
                    "age": 88,
                    "country": "中国",
                    "date": null
                }
            }
        ]
    },
    "aggregations": {
        "以date分组": {
            "doc_count_error_upper_bound": 0,
            "sum_other_doc_count": 0,
            "buckets": [
                {
                    "key": 714009600000,
                    "key_as_string": "1992-08-17 00:00:00",
                    "doc_count": 8
                },
                {
                    "key": 862790400000,
                    "key_as_string": "1997-05-05 00:00:00",
                    "doc_count": 1
                },
                {
                    "key": 975628800000,
                    "key_as_string": "2000-12-01 00:00:00",
                    "doc_count": 1
                }
            ]
        },
        "以age分组": {
            "doc_count_error_upper_bound": 0,
            "sum_other_doc_count": 0,
            "buckets": [
                {
                    "key": 19,
                    "doc_count": 4
                },
                {
                    "key": 18,
                    "doc_count": 3
                },
                {
                    "key": 21,
                    "doc_count": 2
                },
                {
                    "key": 0,
                    "doc_count": 1
                },
                {
                    "key": 23,
                    "doc_count": 1
                },
                {
                    "key": 88,
                    "doc_count": 1
                }
            ]
        }
    }
}
以上都是些较为简单的例子,推荐参考以下资料来学习
ElasticSearch权威指南:https://www.elastic.co/guide/cn/elasticsearch/guide/current/ structured-search.html
ElasticSearch 常用的查询过滤语句:https://www.cnblogs.com/ghj1976/p/5293250.html
使用java client api基本使用
快速入门案例:spring boot + maven + elasticsearch
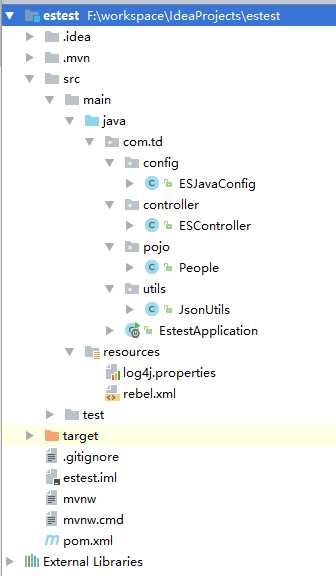
项目目录结构:
以下为主要代码和配置:
pom.xml
<?xml version="1.0" encoding="UTF-8"?>
<project xmlns="http://maven.apache.org/POM/4.0.0" xmlns:xsi="http://www.w3.org/2001/XMLSchema-instance"
    xsi:schemaLocation="http://maven.apache.org/POM/4.0.0 http://maven.apache.org/xsd/maven-4.0.0.xsd">
    <modelVersion>4.0.0</modelVersion>

    <groupId>com.td</groupId>
    <artifactId>estest</artifactId>
    <version>0.0.1-SNAPSHOT</version>
    <packaging>jar</packaging>

    <name>estest</name>
    <description></description>

    <parent>
        <groupId>org.springframework.boot</groupId>
        <artifactId>spring-boot-starter-parent</artifactId>
        <version>1.5.9.RELEASE</version>
        <relativePath/> <!-- lookup parent from repository -->
    </parent>

    <!-- 属性 -->
    <properties>
        <project.build.sourceEncoding>UTF-8</project.build.sourceEncoding>
        <project.reporting.outputEncoding>UTF-8</project.reporting.outputEncoding>
        <java.version>1.8</java.version>
    </properties>

    <!-- 依赖 -->
    <dependencies>

        <dependency>
            <groupId>org.springframework.boot</groupId>
            <artifactId>spring-boot-starter-web</artifactId>
        </dependency>

        <dependency>
            <groupId>org.springframework.boot</groupId>
            <artifactId>spring-boot-starter-test</artifactId>
            <scope>test</scope>
        </dependency>

        <!-- elasticSearch -->
        <dependency>
            <groupId>org.elasticsearch</groupId>
            <artifactId>elasticsearch</artifactId>
            <version>6.1.1</version>
        </dependency>
        <dependency>
            <groupId>org.elasticsearch.client</groupId>
            <artifactId>transport</artifactId>
            <version>6.1.1</version>
        </dependency>
        <dependency>
            <groupId>org.apache.logging.log4j</groupId>
            <artifactId>log4j-core</artifactId>
            <version>2.9.1</version>
        </dependency>

        <!-- lang3 -->
        <dependency>
            <groupId>org.apache.commons</groupId>
            <artifactId>commons-lang3</artifactId>
            <version>3.4</version>
        </dependency>


    </dependencies>

    <build>
        <plugins>
            <plugin>
                <groupId>org.springframework.boot</groupId>
                <artifactId>spring-boot-maven-plugin</artifactId>
            </plugin>
        </plugins>
    </build>


</project>
pojo:
public class People {
    //{"date":"1996-05-05","country":"中国","name":"谭迪","age":21}

    private String name;
    private int age;
    private String country;
    private String date;

    public People() {
    }

    public String getName() {
        return name;
    }

    public void setName(String name) {
        this.name = name;
    }

    public int getAge() {
        return age;
    }

    public void setAge(int age) {
        this.age = age;
    }

    public String getCountry() {
        return country;
    }

    public void setCountry(String country) {
        this.country = country;
    }

    public String getDate() {
        return date;
    }

    public void setDate(String date)throws Exception{
        this.date = date;
    }

    @Override
    public String toString() {
        return "People{" +
                "name=‘" + name + ‘\‘‘ +
                ", age=" + age +
                ", country=‘" + country + ‘\‘‘ +
                ", date=" + date +
                ‘}‘;
    }
}
configuration(spring4-javaConfig):
@Configuration
public class ESJavaConfig {

    /**
     * 返回ElasticSearch 客户端api对象
     * @return
     * @throws Exception
     */
    @Bean
    public TransportClient client()throws Exception {

        Settings.Builder builder = Settings.builder();
        builder.put("cluster.name", "ElasticSearchCluster"); //集群名称
        builder.put("client.transport.sniff", true); //开启嗅探(简单来说就是你不用配置集群中所有的es的ip,开启嗅探后将会自动查找)
        builder.put("client.transport.ignore_cluster_name", false); //是否忽略集群名称校验
        builder.put("client.transport.ping_timeout", "5s"); //超时时间
        builder.put("client.transport.nodes_sampler_interval", "5s");  //取样时间(刷新)

        Settings settings = builder.build();

        TransportClient client = new PreBuiltTransportClient(settings)
                .addTransportAddress(new TransportAddress(InetAddress.getByName("192.168.229.100"), 9300));

        return client;
    }

}
controller:
@RestController
public class ESController {

    @Autowired
    TransportClient client;

    /**
     * URL id查询
     * @param id
     * @return
     */
    @GetMapping("/get/people/{id}")
    public ResponseEntity findPeopleById(@PathVariable("id") String id){

        //使用客户单向es发出查找请求
        GetRequestBuilder getRequestBuilder = client.prepareGet("people", "man", id);

        //获取es响应结果对象
        GetResponse response = getRequestBuilder.get();

        //向浏览器返回json格式的结果
        return new ResponseEntity(response.getSource(), HttpStatus.OK);
    }

    /**
     * 接受表单形式参数来创建文档
     * @param people
     * @return
     * @throws Exception
     */
    @PostMapping("/post/people")
    public ResponseEntity addPeople(People people) throws Exception {

        //创建json构建对象XContentBuilder,并构建json
        XContentBuilder xContentBuilder = XContentFactory.jsonBuilder()
                .startObject()
                .field("name", people.getName())
                .field("age", people.getAge())
                .field("country", people.getCountry())
                .field("date", people.getDate())
                .endObject();

        //使用客户端想es发出创建文档请求
        IndexResponse indexResponse = client.prepareIndex("people", "man")
                .setSource(xContentBuilder)
                .get();

        //向浏览器返回json格式的结果
        return new ResponseEntity(indexResponse.getId(), HttpStatus.OK);
    }

    /**
     * 接受json串形式参数创建对象
     * @param json
     * @return
     * @throws Exception
     */
    @PostMapping ("/post/json2people")
    public ResponseEntity addJson2People(@RequestBody String json) throws Exception {

        //将json串转为pojo
        People people = JsonUtils.jsonToPojo(json, People.class);

        //创建json构建对象XContentBuilder,并构建json
        XContentBuilder xContentBuilder = XContentFactory.jsonBuilder()
                .startObject()
                .field("name", people.getName())
                .field("age", people.getAge())
                .field("country", people.getCountry())
                .field("date", people.getDate()+"")
                .endObject();

        //使用客户端想es发出创建文档请求
        IndexResponse indexResponse = client.prepareIndex("people", "man")
                .setSource(xContentBuilder) //将构建好的文档json对象发送给es
                .get();                     //获取es响应结果对象IndexResponse

        //向浏览器返回json格式的结果
        return new ResponseEntity(indexResponse.getId(), HttpStatus.OK);
    }

    /**
     * 根据id删除文档
     * @param id
     * @return
     */
    @DeleteMapping("/delete/people/{id}")
    public ResponseEntity deletePeopleById(@PathVariable("id") String id){

        //使用客户端向es发出删除请求,并返回响应删除请求的结果对象DeleteRequestBuilder
        DeleteRequestBuilder deleteRequestBuilder = client.prepareDelete("people", "man", id);

        //从DeleteRequestBuilder中获取请求结果
        DeleteResponse deleteResponse = deleteRequestBuilder.get();

        //向浏览器返回json格式的结果
        return new ResponseEntity(deleteResponse.getId(), HttpStatus.OK);
    }


    /**
     * 接受表单形式参数来修改指定id的文档
     * @param id
     * @param json
     * @return
     * @throws Exception
     */
    @PutMapping("/update/people/{id}")
    public ResponseEntity updatePeopleById(@PathVariable("id") String id, @RequestBody String json) throws Exception{

        //将json串转为pojo对象
        People people = JsonUtils.jsonToPojo(json, People.class);

        //创建更新请求对象
        UpdateRequest updateRequest = new UpdateRequest("people", "man", id);

        //创建构建json对象的XContentBuilder
        XContentBuilder xContentBuilder = XContentFactory.jsonBuilder();
        xContentBuilder.startObject(); //构建开始

        if( people.getName() != null ){
            xContentBuilder.field("name", people.getName());
        }
        if ( people.getCountry() != null ){
            xContentBuilder.field("country", people.getCountry());
        }
        if ( people.getDate() != null ){
            xContentBuilder.field("date", people.getDate());
        }
        if ( people.getAge() != 0 ){
            xContentBuilder.field("age", people.getAge());
        }

        xContentBuilder.endObject(); //构建结束

        //将构建好的json对象添加到更新请求对象中
        UpdateRequest request = updateRequest.doc(xContentBuilder);

        //使用客户端想es发出更新请求,并返回请求结果
        UpdateResponse updateResponse = client.update(request).get();

        //向浏览器返回json格式的结果
        return new ResponseEntity(updateResponse.getId(), HttpStatus.OK);
    }

}
附加一段复合查询代码(不属于上面项目)
    @PostMapping("query/book/novel")
    public ResponseEntity query( @RequestParam(value = "gt_word_count", defaultValue = "0") int gtWordCount
            , @RequestParam(value = "author", required =false) String author
            , @RequestParam(value = "title", required =false) String title
            , @RequestParam(value = "lt_word_count", required = false) Integer ltWordCount) {

        //使用QueryBuilders构建 bool查询构建对象 并返回BoolQueryBuilder
        BoolQueryBuilder boolBuilder = QueryBuilders.boolQuery();

        if (author != null) {
            //must相当于sql中的and
            boolBuilder.must( QueryBuilders.matchQuery("author", author ) );
        }
        if (title != null) {
            boolBuilder.must( QueryBuilders.matchQuery("title", title ) );
        }
        if (bookBean.getTitle() != null) {
            builder.must( QueryBuilders.matchQuery("title", bookBean.getTitle()) );
        }

        //使用QueryBuilders构建 range范围查询构建对象 并返回RangeQueryBuilder
        RangeQueryBuilder rangeQuery = QueryBuilders.rangeQuery("word_count").from(gtWordCount);

        if (ltWordCount != null) {
            rangeQuery.to(ltWordCount);
        }

        //将 range范围查询构建对象 作为过滤条件添加进 bool查询构建对象
        boolBuilder.filter(rangeQuery);

        //使用客户端向es发出查找请求,并返回 查找请求构建对象
        SearchRequestBuilder builder = this.client.prepareSearch("book")
                    .setTypes("novel") //查找的是 novel 类型
                    .setSearchType(SearchType.QUERY_THEN_FETCH) //设置检索类型(参考文章:http://www.linuxidc.com/Linux/2015-02/114248.htm)
                    .setQuery(boolBuilder)  //设入 查询构建对象(内包含着整个查询要求)
                    .setFrom(0) //从索引0开始查找
                    .setSize(10); //查找到索引10

        //打印es响应的 查找请求构建对象
        log.info(String.valueOf(builder));

        //从响应中过去请求响应结果
        SearchResponse response = builder.get();

        //创建一个存放查找结果的容器
        List<Map<String,Object>> result = new ArrayList<>();

        //遍历查找的的hits集合【java8 lambda表达式】
        response.getHits().forEach((s)->result.add(s.getSource()));

        //将查找结果返回给浏览器
        return new ResponseEntity(result, HttpStatus.OK);

    }