1. 前言
EMQTT属于一个比较小众的开源软件,很多资料不全,很麻烦,很多功能都是靠猜测,还有就是看官方提供的那几个插件,了解。
2. 说明
上一小节的插件 emq_plugin_wunaozai
文件 emq_plugin_wunaozai.erl
这个文件就是Hook钩子设计了,里面默认已经有了。比如在 on_client_connected这个函数下增加一行 io:format()打印,那么,对应每个mqtt客户端连接到服务器都会打印这一行。一开始我还以为验证逻辑写在这里,然后通过判断,返回{stop,Client},最后发现不是的。能到这里,是表示已经连接上了。具体的权限验证是在emq_auth_demo_wunaozai.erl这个文件。
文件 emq_auth_demo_wunaozai.erl
这个文件check函数改成如下
1 check(#mqtt_client{client_id = ClientId, username = Username}, Password, _Opts) ->
2     io:format("Auth Demo: clientId=~p, username=~p, password=~p~n",
3               [ClientId, Username, Password]),
4     if
5         Username == <<"test">> ->
6             ok;
7         true ->
8             error
9     end.
表示mqtt客户端登录到服务器要使用用户名为test。否则无法登录。参考emq_auth_pgsql 和 emq_auth_mysql 并测试,发现这个check会有三种返回结果。
ok. error. ignore.
如果是ok就表示验证通过。但是要注意的是,多种组合权限验证的时候。例如,在我准备设计的验证流程是,先判断redis是否存在对应的帐号/密码,如果没有那么就到Postgresql读取判断是否有对应的帐号密码。假使是处于两个插件的话,单其中一个Redis插件返回ok,那么就不再判断pgsql插件验证了。如果插件返回error,同样也不会判断pgsql插件。只有返回ignore,才会再判断后面的插件。
文件 emq_acl_demo_wunaozai.erl
这个文件check_acl 函数修改如下
 1 check_acl({Client, PubSub, Topic}, _Opts) ->
 2     io:format("ACL Demo: ~p ~p ~p~n", [Client, PubSub, Topic]),
 3     io:format("~n == ACL ==~n"),
 4     if
 5         Topic == <<"/World">> ->
 6             io:format("allow"),
 7             allow;
 8         true ->
 9             io:format("deny"),
10             deny
11     end.
表示只可以订阅/World 主题。
基本跟上面原理相同,主要修改check_acl并判断权限,有3中返回。
allow. deny. ignore.
3. Redis 连接测试
主要参考emq_auth_redis 这个插件,写插件之前先安装redis和用redis-cli玩一下emqttd知道的emq_plugin_redis插件。
为了简单,很多配置都省略的,只留一些基本的
增加 etc/emq_plugin_wunaozai.config
1 ##redis config
2 wunaozai.auth.redis.server = 127.0.0.1:6379
3 wunaozai.auth.redis.pool = 8
4 wunaozai.auth.redis.database = 0
5 ##wunaozai.auth.redis.password =
6 wunaozai.auth.redis.auth_cmd = HMGET mqtt_user:%u password
7 wunaozai.auth.redis.password_hash = plain
8 wunaozai.auth.redis.super_cmd = HGET mqtt_user:%u is_superuser
9 wunaozai.auth.redis.acl_cmd = HGETALL mqtt_acl:%u
增加 priv/emq_auth_redis.schema
  1 %% wunaozai.auth.redis.server
  2 {
  3     mapping,
  4     "wunaozai.auth.redis.server",
  5     "emq_plugin_wunaozai.server",
  6     [
  7         {default, {"127.0.0.1", 6379}},
  8         {datatype, [integer, ip, string]}
  9     ]
 10 }.
 11
 12 %% wunaozai.auth.redis.pool
 13 {
 14     mapping,
 15     "wunaozai.auth.redis.pool",
 16     "emq_plugin_wunaozai.server",
 17     [
 18         {default, 8},
 19         {datatype, integer}
 20     ]
 21 }.
 22
 23 %% wunaozai.auth.redis.database = 0
 24 {
 25     mapping,
 26     "wunaozai.auth.redis.database",
 27     "emq_plugin_wunaozai.server",
 28     [
 29         {default, 0},
 30         {datatype, integer}
 31     ]
 32 }.
 33
 34 %% wunaozai.auth.redis.password =
 35 {
 36     mapping,
 37     "wunaozai.auth.redis.password",
 38     "emq_plugin_wunaozai.server",
 39     [
 40         {default, ""},
 41         {datatype, string},
 42         hidden
 43     ]
 44 }.
 45
 46 %% translation
 47 {
 48     translation,
 49     "emq_plugin_wunaozai.server",
 50     fun(Conf) ->
 51             {RHost, RPort} =
 52             case cuttlefish:conf_get("wunaozai.auth.redis.server", Conf) of
 53                 {Ip, Port} -> {Ip, Port};
 54                 S          -> case string:tokens(S, ":") of
 55                                   [Domain]       -> {Domain, 6379};
 56                                   [Domain, Port] -> {Domain, list_to_integer(Port)}
 57                               end
 58             end,
 59             Pool = cuttlefish:conf_get("wunaozai.auth.redis.pool", Conf),
 60             Passwd = cuttlefish:conf_get("wunaozai.auth.redis.password", Conf),
 61             DB = cuttlefish:conf_get("wunaozai.auth.redis.database", Conf),
 62             [{pool_size, Pool},
 63              {auto_reconnect, 1},
 64              {host, RHost},
 65              {port, RPort},
 66              {database, DB},
 67              {password, Passwd}]
 68     end
 69 }.
 70
 71
 72 %% wunaozai.auth.redis.auth_cmd = HMGET mqtt_user:%u password
 73 {
 74     mapping,
 75     "wunaozai.auth.redis.auth_cmd",
 76     "emq_plugin_wunaozai.auth_cmd",
 77     [
 78         {datatype, string}
 79     ]
 80 }.
 81
 82 %% wunaozai.auth.redis.password_hash = plain
 83 {
 84     mapping,
 85     "wunaozai.auth.redis.password_hash",
 86     "emq_plugin_wunaozai.password_hash",
 87     [
 88         {datatype, string}
 89     ]
 90 }.
 91
 92 %% wunaozai.auth.redis.super_cmd = HGET mqtt_user:%u is_superuser
 93 {
 94     mapping,
 95     "wunaozai.auth.redis.super_cmd",
 96     "emq_plugin_wunaozai.super_cmd",
 97     [
 98         {datatype, string}
 99     ]
100 }.
101
102 %% wunaozai.auth.redis.acl_cmd = HGETALL mqtt_acl:%u
103 {
104     mapping,
105     "wunaozai.auth.redis.acl_cmd",
106     "emq_plugin_wunaozai.acl_cmd",
107     [
108         {datatype, string}
109     ]
110 }.
111
112 %%translation
113 {
114     translation, "emq_plugin_wunaozai.password_hash",
115     fun(Conf) ->
116             HashValue = cuttlefish:conf_get("wunaozai.auth.redis.password_hash", Conf),
117             case string:tokens(HashValue, ",") of
118                 [Hash]           -> list_to_atom(Hash);
119                 [Prefix, Suffix] -> {list_to_atom(Prefix), list_to_atom(Suffix)};
120                 [Hash, MacFun, Iterations, Dklen] -> {list_to_atom(Hash), list_to_atom(MacFun), list_to_integer(Iterations), list_to_integer(Dklen)};
121                 _                -> plain
122             end
123     end
124 }.
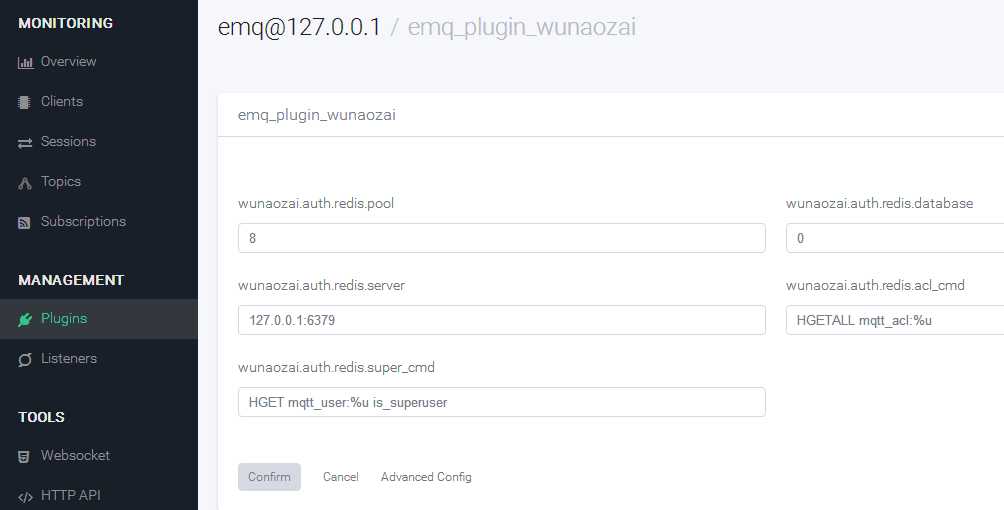
这个时候,dashboard端,可以看到如下信息:

如果遇到特殊情况,有时候,是热加载插件问题,记住 rm -rf _rel && make clean && make 即可
修改 rebar.confi 增加redis依赖
$ cat rebar.config
1 {deps, [
2     {eredis, ".*", {git, "https://github.com/wooga/eredis", "master"}},
3     {ecpool, ".*", {git, "https://github.com/emqtt/ecpool", "master"}}
4 ]}.
5 {erl_opts, [debug_info,{parse_transform,lager_transform}]}.
修改 Makefile 增加redis依赖
增加 include/emq_plugin_wunaozai.hrl 头文件
1 -define(APP, emq_plugin_wunaozai).
复制emq_auth_redis/src/emq_auth_redis_config.erl 这个文件到我们的插件中,然后修改文件名和对应的一些内容。
-module ...
-include ...
keys() -> ...
为每个文件都加上-include (“emq_plugin_wunaozai.hrl”).
文件emq_plugin_wunaozai_sup.erl 要在后面增加redis连接池配置。
 1 -module(emq_plugin_wunaozai_sup).
 2 -behaviour(supervisor).
 3 -include("emq_plugin_wunaozai.hrl").
 4
 5 %% API
 6 -export([start_link/0]).
 7
 8 %% Supervisor callbacks
 9 -export([init/1]).
10
11 start_link() ->
12     supervisor:start_link({local, ?MODULE}, ?MODULE, []).
13
14 init([]) ->
15     {ok, Server} = application:get_env(?APP, server),
16     PoolSpec = ecpool:pool_spec(?APP, ?APP, emq_plugin_wunaozai_cli, Server),
17     {ok, { {one_for_one, 10, 100}, [PoolSpec]} }.
18
创建 emq_plugin_wunaozai_cli.erl 文件, 同样从emq_auth_redis_cli.erl进行复制然后作修改。
到这里,可以先编译一下看是否通过,由于Erlang语言不是很熟悉,基本每做一步修改,都进行编译,防止语法错误,否则很难检查问题。
文件emq_plugin_wunaozai_app.erl 进行修改
 1 -module(emq_plugin_wunaozai_app).
 2
 3 -behaviour(application).
 4
 5 -include("emq_plugin_wunaozai.hrl").
 6
 7 %% Application callbacks
 8 -export([start/2, stop/1]).
 9
10 start(_StartType, _StartArgs) ->
11     {ok, Sup} = emq_plugin_wunaozai_sup:start_link(),
12     if_cmd_enabled(auth_cmd, fun reg_authmod/1),
13     if_cmd_enabled(acl_cmd, fun reg_aclmod/1),
14     emq_plugin_wunaozai:load(application:get_all_env()),
15     {ok, Sup}.
16
17 stop(_State) ->
18     ok = emqttd_access_control:unregister_mod(auth, emq_auth_demo_wunaozai),
19     ok = emqttd_access_control:unregister_mod(acl, emq_acl_demo_wunaozai),
20     emq_plugin_wunaozai:unload().
21
22 %% 根据具体配置文件 emq_plugin_wunaozai.conf 是否有auth_cmd 或者 acl_cmd 配置项目来动态加载所属模块
23 reg_authmod(AuthCmd) ->
24     SuperCmd = application:get_env(?APP, super_cmd, undefined),
25     {ok, PasswdHash} = application:get_env(?APP, password_hash),
26     emqttd_access_control:register_mod(auth, emq_auth_demo_wunaozai, {AuthCmd, SuperCmd, PasswdHash}).
27
28 reg_aclmod(AclCmd) ->
29     emqttd_access_control:register_mod(acl, emq_acl_demo_wunaozai, AclCmd).
30
31 if_cmd_enabled(Par, Fun) ->
32     case application:get_env(?APP, Par) of
33         {ok, Cmd} -> Fun(Cmd);
34         undefined -> ok
35     end.
4. 简单验证一下帐号
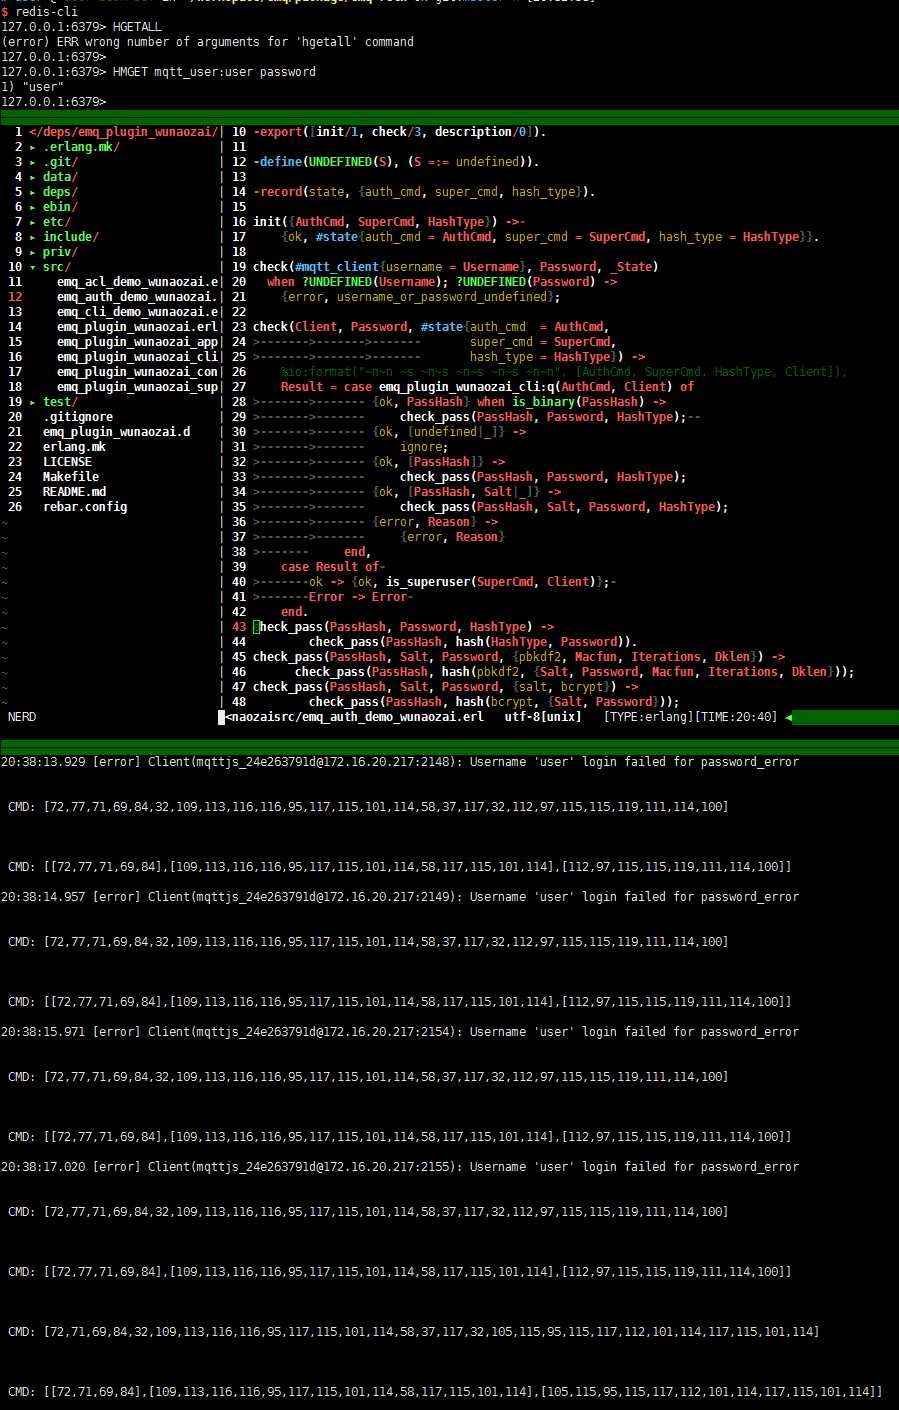
通过上面的简单配置,集成redis模块基本就好了,接下来就是比较重要的业务逻辑判断了。这一步主要是在emq_auth_demo_wunaozai.erl 文件写下帐号密码判断。同理主要还是参考emq_auth_redis.erl

以上对应三部分,第一部分是Redis缓存中存在指定的帐号密码,第二部分是进行简单的验证,第三部分是打印的日志,一开始用错误的帐号密码进行登录,后面使用正确的帐号密码进行登录,以上,验证通过,可以通过Redis缓存信息进行帐号密码验证。
客户端测试工具的话,可以用DashBoard上的WebSocket连接测试,也可以在这里下载 https://repo.eclipse.org/content/repositories/paho-releases/org/eclipse/paho/org.eclipse.paho.ui.app/ ,一个桌面端程序。
测试的时候,建议用这个桌面端程序,WS连接的那个,有时候订阅不成功也提示订阅成功,会很麻烦。
同时好像还有一个问题,就是在采用Redis进行验证是,EMQ默认会开启ACL缓存,就是说,一个MQTT设备的一次新Connect,第一次才会去读取ACL,进行判断,后面就不会再进行ACL判断了。在测试时,可以关闭cache, 在./etc/emq.conf 文件下 mqtt.cache_acl = true 改为 mqtt.cache_acl = false ,这样每次pub/sub 都会读取Redis进行ACL判断。这个功能有好有坏,根据业务取舍。https://github.com/emqtt/emqttd/pull/764
个人想法,如果是安全性要求不高的局域网控制,是可以开启cache_acl的,如果是安全性要求较高的,这个选项就不开启了。这样性能会有所下降,如果是采用传统的关系型数据库进行ACL判断,每次pub/sub信息都会读取数据库,物联网下,可能不太现实,这里我是准备用Redis作为ACL Cache,具体效果怎样,要后面才知道。
目前我是先搭一下框架,性能优化在后面才会进行考虑。
下一小结主要对上面进行小结,并提供对应的插件代码
