标签:style blog http color io os 使用 ar strong
回想一下我们之前在设备上使用“kernelFunction<<<1,1>>>(..)”执行一个函数的代码,我在那里还曾说过后面会细说,本文就详细介绍一下参数N1,<<>>,这里就是并行魔法发生地。
N1是我们想并行运行的块数,如果我们调用“kernelFunction<<<5,1>>>(..)”,这个函数将分成5个副本并行运行,每个副本称为一个块。
接下来我们必须要做的事情是,使用一个索引让每个副本为解决方案的不同部分工作,如果所有线程做完全一样的事情,就没有必要并行计算了,幸运的是,CUDA内置了一个变量blockIdx可以用来跟踪每个块的运行。
blockIdx是一个2D变量,包含x和y,你可以使用x或同时使用x和y,这取决于我们要解决什么问题,一个简单的例子是同时使用x和y处理2D图像,为x和y轴上的每个像素产生一个线程,你也可以只使用x,这里没有什么指导原则。
现在,我们通过检查blockIdx.x知道线程运行的id,并且知道如何并行运行内核,让我们创建一个简单的例子吧。
在这个例子中,我们将创建一个应用程序,完全以并行内核生成一个数组,这个数组将包含每个运行的线程的threadID,当线程结束后,我们使用printf将结果打印出来。
实现内核
我们从查看内核代码开始:
__global__ void generateArray( int *hostArray )
{
    int ThreadIndex = blockIdx.x;
    hostArray[ThreadIndex] = ThreadIndex;
}
首先,我们按BLOCKS大小创建一个数组,在设备上未数组分配空间,并调用:
generateArray<<<BLOCKS,1>>>( deviceArray );.
这个函数将在BLOCKS并行内核中运行,在一个调用中创建好全部数组。
这个操作完成后,我们将结果从设备拷贝到主机,并将它打印在屏幕上,释放数组,最后退出。
整个应用程序的源代码如下:
 1 #include <stdio.h>
 2 #define BLOCKS 25
 3 __global__ void generateArray( int *hostArray )
 4 {
 5 int ThreadIndex = blockIdx.x;
 6 hostArray[ThreadIndex] = ThreadIndex;
 7 }
 8 int main( void )
 9 {
10 int hostArray[BLOCKS];
11 int *deviceArray;
12 cudaMalloc( (void**)&deviceArray, BLOCKS * sizeof(int) );
13 cudaMemcpy( deviceArray,
14 hostArray, BLOCKS * sizeof(int),
15 cudaMemcpyHostToDevice );
16 generateArray<<<BLOCKS,1>>>( deviceArray );
17 cudaMemcpy( hostArray,
18 deviceArray,
19 BLOCKS * sizeof(int),
20 cudaMemcpyDeviceToHost );
21 for (int i=0; i<BLOCKS; i++)
22 {
23 printf( “Thread ID running: %d\n”, hostArray[i] );
24 }
25 cudaFree( deviceArray );
26 return 0;
27 }
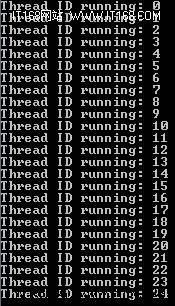
现在编译并运行这段代码,你将会看到像下面这样的输出:

程序运行输出结果
恭喜,你已经使用CUDA成功创建了你的第一个并行应用程序!
标签:style blog http color io os 使用 ar strong
原文地址:http://www.cnblogs.com/liangliangdetianxia/p/3977823.html