标签:style blog http color io os ar 文件 2014
 1 class BaseTest : public cocos2d::Layer
 2 {
 3 public:
 4     virtual std::string title() const;// 主标题
 5     virtual std::string subtitle() const;// 副标题
 6
 7     virtual void restartCallback(Ref* sender);// 重置场景回调
 8     virtual void nextCallback(Ref* sender);// 下一个场景回调
 9     virtual void backCallback(Ref* sender);// 上一个场景回调
10
11     virtual void onEnter() override;// 进入层时
12     virtual void onExit() override;// 退出层时
13 };
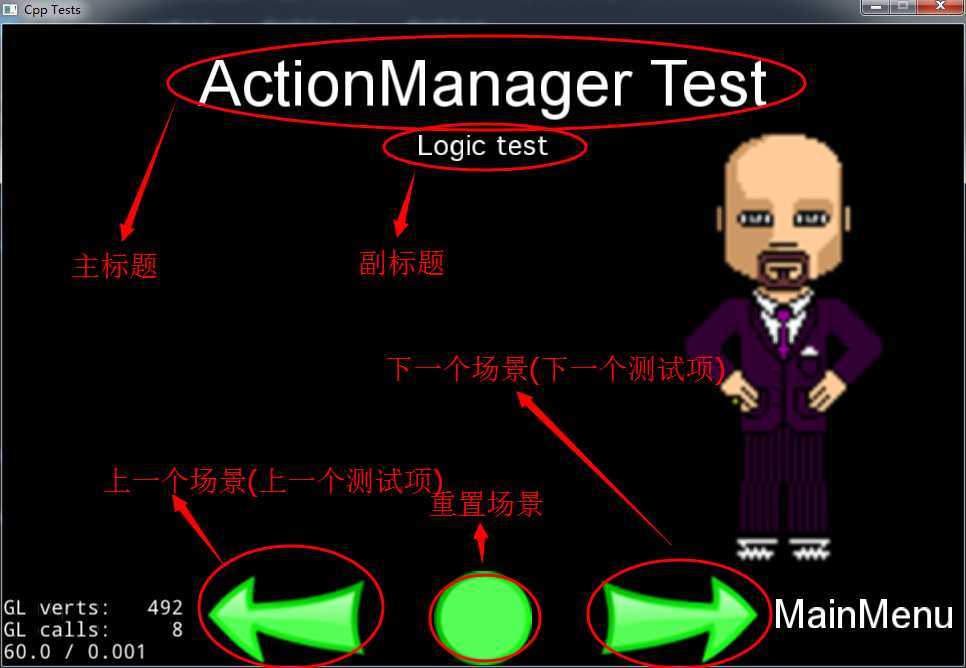
上面就是BaseTest类的头文件,里面只要提供了测试每个场景时用于场景的切换,其实就是测试项的切换,同时也是接口类,我们来看一下效果图:

接下我们来看一下实现BaseTest.cpp文件:
 1 void BaseTest::onEnter()
 2 {
 3     Layer::onEnter();
 4     // ...
 5     // 添加主标题
 6     std::string str = title();
 7     const char * pTitle = str.c_str();
 8
 9     TTFConfig ttfConfig("fonts/arial.ttf", /* 字号 */32);
10     auto label = Label::createWithTTF(ttfConfig,pTitle);
11     addChild(label, 9999);
12     label->setPosition( Vec2(VisibleRect::center().x, VisibleRect::top().y - 30) );
13     // 添加副标题
14     std::string strSubtitle = subtitle();
15     if( ! strSubtitle.empty() )
16     {
17         ttfConfig.fontFilePath = "fonts/Thonburi.ttf";// 字体文件路径
18         ttfConfig.fontSize = 16;// 字体字号
19         auto l = Label::createWithTTF(ttfConfig,strSubtitle.c_str());
20         addChild(l, 9999);
21         l->setPosition( Vec2(VisibleRect::center().x, VisibleRect::top().y - 60) );
22     }
23     // 添加菜单图片项
24     auto item1 = MenuItemImage::create(s_pathB1, s_pathB2, CC_CALLBACK_1(BaseTest::backCallback, this) );
25     auto item2 = MenuItemImage::create(s_pathR1, s_pathR2, CC_CALLBACK_1(BaseTest::restartCallback, this) );
26     auto item3 = MenuItemImage::create(s_pathF1, s_pathF2, CC_CALLBACK_1(BaseTest::nextCallback, this) );
27
28     auto menu = Menu::create(item1, item2, item3, nullptr);
29     // 设置位置
30     menu->setPosition(Vec2::ZERO);
31     item1->setPosition(Vec2(VisibleRect::center().x - item2->getContentSize().width*2, VisibleRect::bottom().y+item2->getContentSize().height/2));
32     item2->setPosition(Vec2(VisibleRect::center().x, VisibleRect::bottom().y+item2->getContentSize().height/2));
33     item3->setPosition(Vec2(VisibleRect::center().x + item2->getContentSize().width*2, VisibleRect::bottom().y+item2->getContentSize().height/2));
34
35     addChild(menu, 9999);
36 }
上面的函数当进入层时调用可以重写,主要是显示主要标题,副标题,切换箭头图标,重置图标,至于其他嘛就没什么了。
1 /* 层退出时调用 */
2 void BaseTest::onExit()
3 {
4     // ...
5     Layer::onExit();
6 }
这个就不用说了,可以重写。
 1 /* 这四个函数主要是继承时要进行重写 */
 2 std::string BaseTest::title() const
 3 {
 4     return "";
 5 }
 6
 7 std::string BaseTest::subtitle() const
 8 {
 9     return "";
10 }
11
12 void BaseTest::restartCallback(Ref* sender)
13 {
14     log("override restart!");
15 }
16
17 void BaseTest::nextCallback(Ref* sender)
18 {
19     log("override next!");
20 }
21
22 void BaseTest::backCallback(Ref* sender)
23 {
24     log("override back!");
25 }
这四个函数摆明就是要重写的,因为这个类是提供接口类,所以至于怎么切换还是要看后面怎么重写了。
这个总的来说,就是为其他类提供场景的切换功能。
Cocos2d-x_3.2 Demo ----------BaseTestt类
标签:style blog http color io os ar 文件 2014
原文地址:http://www.cnblogs.com/studweijun/p/3978249.html