标签:android style blog http color io os 使用 ar
fl2440开发板,linux3.0内核,交叉编译器路径/opt/buildroot-2011.11/arm920t/usr/bin/arm-linux-,无线网卡RT3070
一.配置linux内核支持wireless无线上网
[*] Networking support --->
-*- Wireless --->
<*> cfg80211 - wireless configuration API
[ ] nl80211 testmode command
[ ] enable developer warnings
[ ] cfg80211 regulatory debugging
[*] enable powersave by default
[ ] use statically compiled regulatory rules database
[ ] cfg80211 wireless extensions compatibility
<*> Common routines for IEEE802.11 drivers
[ ] lib80211 debugging messages
<*> Generic IEEE 802.11 Networking Stack (mac80211)
[ ] PID controller based rate control algorithm
[*] Minstrel
[*] Minstrel 802.11n support
Default rate control algorithm (Minstrel) --->
[ ] Enable mac80211 mesh networking (pre-802.11s) support
[ ] Select mac80211 debugging features --->
Device Drivers --->
Generic Driver Options --->
(/sbin/hotplug) path to uevent helper
[ ] Maintain a devtmpfs filesystem to mount at /dev
[ ] Select only drivers that don‘t need compile-time external firmware
[ ] Prevent firmware from being built
-*- Userspace firmware loading support
[*] Include in-kernel firmware blobs in kernel binary
() External firmware blobs to build into the kernel binary
[*] Network device support --->
[*] Wireless LAN --->
<*> Ralink driver support --->
--- Ralink driver support
< > Ralink rt2500 (USB) support
< > Ralink rt2501/rt73 (USB) support
<*> Ralink rt27xx/rt28xx/rt30xx (USB) support //因为我们用的是RT3070,所以选择这个选项,以后你们用其他芯片的话,就选择其他选项
[ ] rt2800usb - Include support for rt33xx devices
[ ] rt2800usb - Include support for rt35xx devices (EXPERIMENTAL)
[ ] rt2800usb - Include support for rt53xx devices (EXPERIMENTAL)
[ ] rt2800usb - Include support for unknown (USB) devices
[*] Ralink debug output
二.RT3070无线模块驱动移植到开发板
1.下载wireless_tools固件
下载地址:http://www.hpl.hp.com/personal/Jean_Tourrilhes/Linux/
如果链接失效了,可以自己百度下载
2.解压wireless_tools安装包,并修改makefile
[weishusheng@localhost wifi]$ tar -zxf wireless_tools.29.tar.gz
[weishusheng@localhost wifi]$ cd wireless_tools.29
[weishusheng@localhost wireless_tools.29]$ vim Makefile
添加自己的交叉编译器路径和交叉编译器的库,这些工具的编译可以先在自己的虚拟机或者PC上编译,将编译生成的可执行文件拷贝到开发板的相应目录下!
修改如下:( 红色部分为修改部分)
## Compiler to use (modify this for cross compile).
CC = /opt/buildroot-2012.08/arm920t/usr/bin/arm-linux-gcc
## Other tools you need to modify for cross compile (static lib only).
AR = /opt/buildroot-2012.08/arm920t/usr/bin/arm-linux-ar
RANLIB = /opt/buildroot-2012.08/arm920t/usr/bin/arm-linux-ranlib
3.编译wireless_tools安装包,生成iwconfig、iwpriv、 iwevent、libiw.so.29等文件
[weishusheng@localhost wireless_tools.29]$ make
。。。
[weishusheng@localhost wireless_tools.29]$ ls

4. 将iwconfig, iwpriv, iwevent、iwspy拷贝到开发板的bin目录下,将libiw.so.29拷贝到开发板的/lib下:(用tftp传送文件,这里不在赘述)
以下是我拷贝完毕后查看相应安装包的结果:

修改他们的权限
>: chmod 777 iw* libiw.so.29

wpa_supplicant本是开源项目源码,被谷歌修改后加入Android移动平台,它主要是用来支持WEP,WPA/WPA2和WAPI无线协议和加密认证的,而实际上的工作内容是通过socket(不管是wpa_supplicant与上层还是 wpa_supplicant与驱动都采用socket通讯)与驱动交互上报数据给用户,而用户可以通过socket发送命令给wpa_supplicant调动驱动来对WiFi芯片操作。 简单的说,wpa_supplicant就是WiFi驱动和用户的中转站外加对协议和加密认证的支持。
1.下载后解压wpa_supplicant压缩包文件:
[weishusheng@localhost wifi]$ tar -zxf wpa_supplicant-0.7.3.tar.gz
1.下载地址:http://www.openssl.org/source/ openssl-0.9.8i.tar.gz
我之前用上面的链接下载的时候,这个链接已经失效了,大家可以百度openssl-0.9.8i进行下载,我最后是在CSDN上花积分下载的
在编译openssl-0.9.8i数据包前,需要用到wpa_supplicant的一个补丁,所以将wpa_supplicant-0.7.3的patches拷贝到openssl数据包的patch目录下,这里可以自己创建一个install目录和patch目录,install目录用来存放编译openssl-0.9.8i时生成的可执行文件,patch目录用来存放wpa_supplicant-0.7.3的patches补丁,具体操作如下:
[weishusheng@localhost openssl-0.9.8i]$ mkdir install patch
2.将wpa_supplicant中的补丁拷贝到openssl中:
[weishusheng@localhost wifi]$ cd wpa_supplicant-0.7.3
[weishusheng@localhost wpa_supplicant-0.7.3]$ ls
COPYING patches README src wpa_supplicant
[weishusheng@localhost wpa_supplicant-0.7.3]$ cd patches/
[weishusheng@localhost patches]$ ls
openssl-0.9.8d-tls-extensions.patch openssl-0.9.8i-tls-extensions.patch
openssl-0.9.8e-tls-extensions.patch openssl-0.9.8-tls-extensions.patch
openssl-0.9.8g-tls-extensions.patch openssl-0.9.9-session-ticket.patch
openssl-0.9.8h-tls-extensions.patch
[weishusheng@localhost patches]$ cp openssl-0.9.8i-tls-extensions.patch /home/weishusheng/modules/wifi/openssl-0.9.8i/patch
3.修改openssl-0.9.8i目录下的makefile如下:
CC= /opt/buildroot-2011.11/arm920t/usr/bin/arm-linux-gcc
AR=/opt/buildroot-2011.11/arm920t/usr/bin/arm-linux-ar $(ARFLAGS) r
RANLIB= /opt/buildroot-2011.11/arm920t/usr/bin/arm-linux-ranlib
添加编译后可执行文件的存放目录,这个目录的设置不唯一,你可以自己选择存放路径,红色部分为要修改的部分,修改成你自己的目录:
# INSTALL_PREFIX is for package builders so that they can configure
# for, say, /usr/ and yet have everything installed to /tmp/somedir/usr/.
# Normally it is left empty.
INSTALL_PREFIX=
INSTALLTOP=/home/weishusheng/modules/wifi/openssl-0.9.8i/install //29行
# Do not edit this manually. Use Configure --openssldir=DIR do change this!
OPENSSLDIR=/home/weishusheng/modules/wifi/openssl-0.9.8i/install //32行
4.编译安装openssl-0.9.8i
[skyyang@centos6 openssl-0.9.8x]$ make && make install
5.编译通过后,可以看到install目录下生成了很多文件
[weishusheng@localhost openssl-0.9.8i]$ ls install/lib/
engines libcrypto.a libssl.a pkgconfig
6.拷贝libcrypto.a libssl.a到开发板的/lib下
[weishusheng@localhost wifi]$ cd wpa_supplicant-0.7.3
[weishusheng@localhost wpa_supplicant-0.7.3]$ ls
COPYING patches README src wpa_supplicant
[weishusheng@localhost wpa_supplicant-0.7.3]$ cd wpa_supplicant/
1.复制defconfig 改名为.config,并修改如下:
[weishusheng@localhost wpa_supplicant]$ cp defconfig .config
[weishusheng@localhost wpa_supplicant]$ vim .config
27 #CC=/opt/brcm/hndtools-mipsel-uclibc/bin/mipsel-uclibc-gcc
28 CC=/opt/buildroot-2011.11/arm920t/usr/bin/arm-linux-gcc -L/home/weishusheng/modules/wifi/openssl-
0.9.8i/install/lib
29 #CFLAGS += -Os
30 CFLAGS += -I/home/weishusheng/modules/wifi/openssl-0.9.8i/install/include
31 #CPPFLAGS += -I../src/include -I../../src/router/openssl/include
32 #LIBS += -L/opt/brcm/hndtools-mipsel-uclibc-0.9.19/lib -lssl
33 LIBS +=-L/home/weishusheng/modules/wifi/openssl-0.9.8i/install/lib
2.编译wpa_supplicant
[weishusheng@localhost wpa_supplicant]$ make
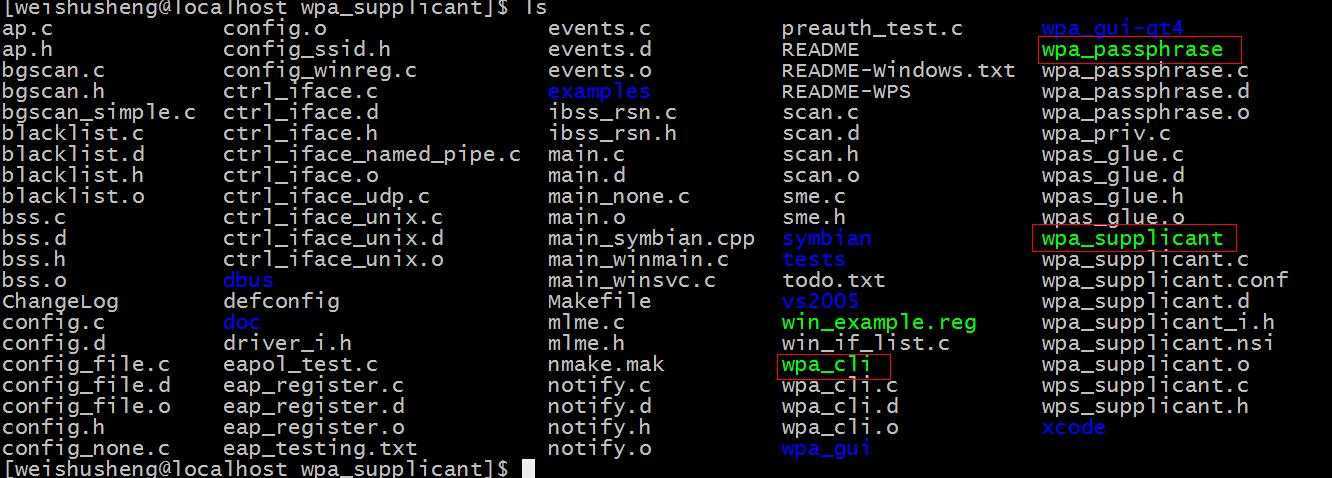
[weishusheng@localhost wpa_supplicant]$ ls

3.将wpa_cli,wpa_supplicant,wpa_passphrase拷贝到开发板的bin目录下:
~ # ls bin/
1.使用wpa_passphrase创建wpa_supplicant的配置文件,使用加密后的密码,不用明文。当然使用明文密码也可以连接到无线路由器:
以下命令是在开发板上进行的操作:
/apps/wireless # wpa_passphrase CMCC 9b4019b401 >> wpa_supplicant.conf
/apps/wireless # cat wpa_supplicant.conf
2.修改wpa_supplicant.conf配置文件,添加密码加密算法和使用明文密码:
>: vi wpa_supplicant.conf
ctrl_interface=/var/run/wpa_supplicant
network={
ssid="Router_LingYun"
key_mgmt=WPA-PSK
#proto=WPA
#psk="lingyun-emb"
proto=WPA2
pairwise=TKIP CCMP
group=TKIP CCMP
psk="lingyun-emb"
#psk=20a17fe2e0482c0db4e4dcf6c4494cebbd88ae4f166015115ca83ce9022b8cd2
}

2.4.2 使能RT3070无线网卡模块
>: ifconfig wlan0 up
通常情况下,load firmware的动作是通过用户空间的hotplug handler,也就是/proc/sys/kernel/hotplug里设定的执行档,来完成。root_qtopia默认会在/etc/init.d/rcS里将/proc/sys/kernel/hotplug设定为/sbin/mdev,即busybox的mdev模块。它在收到来自内核的请求加载rt3070.bin这个firmware消息后,会从/lib/firmware目录下去找rt3070.bin,如果能找到就加载。
具体解释看这个链接:
http://www.linuxidc.com/Linux/2012-01/50806.htm
但是那时候我按照这个链接上的方法做了,还是不行,后来找了其他博客,说是要移植RT2870和RT3070这两个系统固件,才可以使能无线网卡!于是我到官网去下载了这两个固件:(其实我们用的是RT3070,所以只需要加载RT3070.bin文件就行了)
[weishusheng@localhost ~]$ git clone git://git.kernel.org/pub/scm/linux/kernel/git/dwmw2/linux-firmware.git
[weishusheng@localhost ~]$ cd linux-firmware/
将RT3070.bin固件下载到开发板的/lib/firmware目录下:
/lib >: mkdir -p /lib/firmware
/lib >: cd firmware/
/lib/firmware >: tget rt3070.bin
Rt3070.bin 100% |*******************************| 8192 0:00:00 ETA
>: ifconfig wlan0 up
>: ifconfig
eth0 Link encap:Ethernet HWaddr FA:BF:B1:79:4B:F5
inet addr:192.168.1.23 Bcast:192.168.1.255 Mask:255.255.255.0
UP BROADCAST RUNNING MULTICAST MTU:1500 Metric:1
RX packets:2838 errors:0 dropped:0 overruns:0 frame:0
TX packets:1544 errors:0 dropped:0 overruns:0 carrier:0
collisions:0 txqueuelen:1000
RX bytes:1768351 (1.6 MiB) TX bytes:243628 (237.9 KiB)
Interrupt:51 Base address:0x2300
lo Link encap:Local Loopback
inet addr:127.0.0.1 Mask:255.0.0.0
UP LOOPBACK RUNNING MTU:16436 Metric:1
RX packets:0 errors:0 dropped:0 overruns:0 frame:0
TX packets:0 errors:0 dropped:0 overruns:0 carrier:0
collisions:0 txqueuelen:0
RX bytes:0 (0.0 B) TX bytes:0 (0.0 B)
wlan0 Link encap:Ethernet HWaddr 00:24:25:50:A9:4D
UP BROADCAST MULTICAST MTU:1500 Metric:1
RX packets:0 errors:0 dropped:0 overruns:0 frame:0
TX packets:0 errors:0 dropped:0 overruns:0 carrier:0
collisions:0 txqueuelen:1000
RX bytes:0 (0.0 B) TX bytes:0 (0.0 B)
>:
我们注意到当你第一次使能无线网卡的时候,你只是使能了它,但是这张网卡的参数还未配置,还没有IP,所以现在还是不能上网,要配置网卡参数、连接路由器之后才能上网!
1.启动命令:
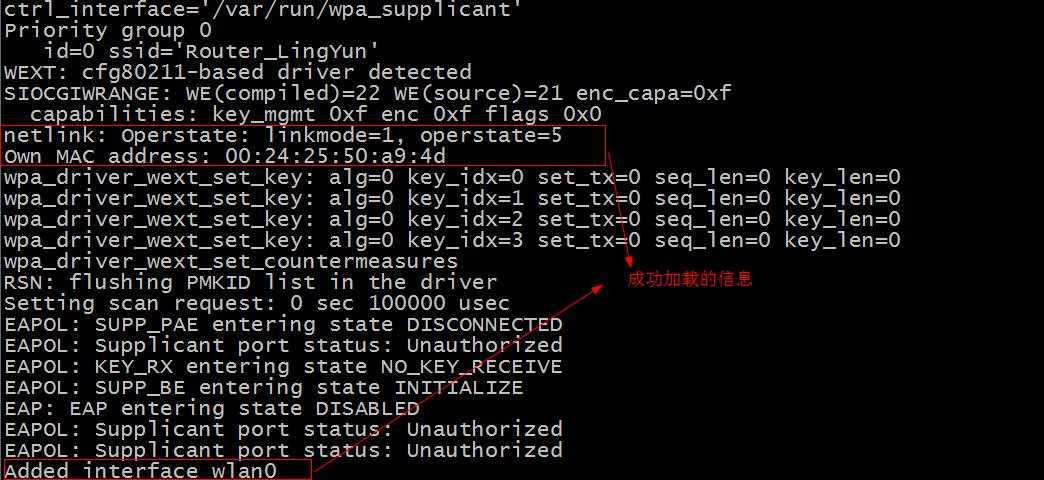
~#wpa_supplicant -B -Dwext -iwlan0 -c/apps/wireless/wpa_supplicant.conf -d
-d :增加调试信息
-D :驱动名称,无线网卡为wext
-i :网络接口名称,这里无线为wlan0
-B:后台守护进程
-c:指定配置文件

2.配置无线网卡IP和子网掩码:
>: ifconfig wlan0 192.168.1.244 broatcast 192.168.1.1 netmask 255.255.255.0 up

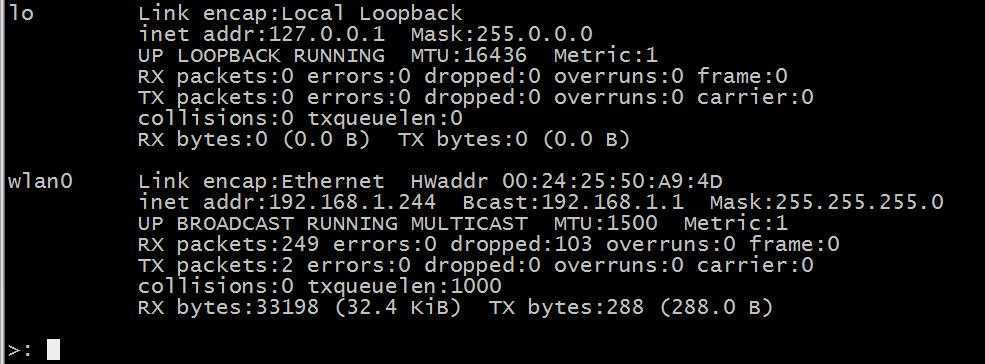
3.测试开发板是否可以无线上网:
>: ifconfig eth0 down
>: ifconfig
lo Link encap:Local Loopback
inet addr:127.0.0.1 Mask:255.0.0.0
UP LOOPBACK RUNNING MTU:16436 Metric:1
RX packets:0 errors:0 dropped:0 overruns:0 frame:0
TX packets:0 errors:0 dropped:0 overruns:0 carrier:0
collisions:0 txqueuelen:0
RX bytes:0 (0.0 B) TX bytes:0 (0.0 B)
wlan0 Link encap:Ethernet HWaddr 00:24:25:50:A9:4D
inet addr:192.168.1.244 Bcast:192.168.1.1 Mask:255.255.255.0
UP BROADCAST RUNNING MULTICAST MTU:1500 Metric:1
RX packets:499 errors:0 dropped:147 overruns:0 frame:0
TX packets:14 errors:0 dropped:0 overruns:0 carrier:0
collisions:0 txqueuelen:1000
RX bytes:50920 (49.7 KiB) TX bytes:2916 (2.8 KiB)
>: ping 192.168.1.3

看到了没,可以上网了!如果你想上外网,那么就要给开发板添加DNS域名解析服务!还有添加默认网关!
此时我们把开发板上的网线拔了依旧可以上网ping通。
标签:android style blog http color io os 使用 ar
原文地址:http://www.cnblogs.com/wss-linux/p/3978139.html