标签:des style blog http color io os 使用 ar
场景编辑器中的触发器是一种通过事件触发机制,在特定的事件被触发的时候自动执行自己预先定义的动作或者功能。
编辑器中带有一些默认的事件、条件和动作,当然也可以扩展自定义的事件、条件和动作。
触发器可以创建多个,每个触发器都有可以设置自己的:事件、条件、动作。
是指触发监听的条件,在程序代码中,我们要在希望开启触发监听的地方用sendEvent(事件ID)来启动事件监听,这时候才会检测“条件”是否满足。
默认包含8种事件,分别是SceneOnEnter、SceneOnExit、SceneInit、SceneUpdate;TouchBegan、TouchMoved、TouchEnded、TouchCancelled。
用来判断触发当前事件时是否执行预订的动作。只有当条件成立的时候才会继续执行预订的动作。当不包含任何条件的时候,动作会被直接触发。
当包含多个条件的时候,条件之间的关系为并,只有当所有的条件都是符合的时候才能够执行预订的动作。
默认提供了TimeElapsedTo、ActionState、IsNodeInRect、IsNodeVisible四种条件,分别对应四个类来检测条件是否满足。
当触发当前触发器且条件都成立的情况下,要执行的动作。
默认提供了PlayMusic、MoveTo、MoveBy、RotateTo、RotateBy、 ScaleTo、ScaleBy、SkewTo、SkewBy、TriggerState、ArmaturePlayAction12种默认动作。
条件和动作都带有属性窗口,在属性里可以设置参数,在代码中可以拿到这些设置过的参数以便处理。
当我们设置好触发器后,点击生成,则会根据当前触发器配置生成代码文件放在Code文件夹内,您可以将这些代码文件直接加入您的项目工程:

最后在确定,保存当前触发器配置。
下面重点讲解:触发器的扩展
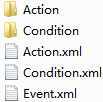
要添加自己的触发器,那么就需要按照已有触发器的模板来写自己的触发器,模板在CocoStudio项目目录下CocoStudio\Samples\Trigger\TriggerXML,
这里是所有触发器的定义,xml文件格式:

<?xmlversion="1.0" encoding="utf-8"?>
<RootType="Scene">
  <EventList>
    <Event ClassName="EnterScene"Name="SceneOnEnter"/>
    <Event ClassName="LeaveScene"Name="SceneOnExit"/>
    <EventClassName="InitScene" Name="SceneInit"/>
         <EventClassName="UpdateScene" Name="SceneUpdate"/>
         <EventClassName="TouchBegan" Name="TouchBegan"/>
         <EventClassName="TouchMoved" Name="TouchMoved"/>
         <EventClassName="TouchEnded" Name="TouchEnded"/>
         <Event ClassName="TouchCancelled"  Name="TouchCancelled"/>
  </EventList>
</Root>
EventList就是事件列表,每一行是一个独立的事件,其中ClassName属性是在程序中使用的名称,给sendEvent(事件名称)用的,Name是显示在编辑器中的列表。
该文件配置好后,当通过编辑器生成的时候,将会自动生成以下代码,放在“EventDef.h”中
#ifndef__EVENTDEF__
#define__EVENTDEF__

enum {

TRIGGEREVENT_ENTERSCENE = 0,
TRIGGEREVENT_LEAVESCENE,
TRIGGEREVENT_INITSCENE,
TRIGGEREVENT_UPDATESCENE,
TRIGGEREVENT_TOUCHBEGAN,
TRIGGEREVENT_TOUCHMOVED,
TRIGGEREVENT_TOUCHENDED,
TRIGGEREVENT_TOUCHCANCELLED,
};

#endif
在程序中使用sendEvent方法,就将cocos2d-x引擎的事件引入到了触发器系统中了 :
boolHelloWorld::ccTouchBegan(CCTouch *pTouch, CCEvent *pEvent)
{
         sendEvent(TRIGGEREVENT_TOUCHBEGAN);
         return true;
}
<?xmlversion="1.0" encoding="utf-8"?>
<RootType="Scene">
  <ConditionList>
    <Condition ClassName="TimeElapsed" Name="TimeElapsedTo"/>
         <Condition ClassName="ArmatureActionState" Name="ActionState"/>
         <Condition ClassName="NodeInRect" Name="IsNodeInRect"/>
         <Condition ClassName="NodeVisible" Name="IsNodeVisible"/>
  </ConditionList>
</Root>
我们知道条件是有属性的,所以这里边的每一个ClassName都对应一个扩充文件,在Condition文件夹下:

ArmatureActionState.xml:
<?xmlversion="1.0" standalone="yes" ?>
<Root>
  <Item Type="IntegerUpDown"Name="Node Tag" Key = "Tag" Default="10000" />
  <Item Type="TextBox"Name="ComName"  Key ="componentName" Default="CCArmature" />
  <Item Type="TextBox"Name="AniName"  Key ="AnimationName" Default="run" />
  <Item Type="ComboBox"Name="ActionState" Key = "ActionType"Default="0">
    <Childes>
      <Child Name="START"ID="0"/>
      <Child Name="COMPLETE"ID="1"/>
          <Child Name="LOOP_COMPLETE" ID="2"/>
    </Childes>
  </Item>
</Root>
Root标签下是属性状态数组,每个Item是一个属性状态。 属性中Type表示类型,Name是编辑器中显示的属性名,Key是用于用户输入的属性值的索引,通过它在程序中找到用户填入的值,Default代表Key的默认值。
有一点要说明,如果想要显示中文属性名,需要添加:CHName="目标Id"
<Item Type="IntegerUpDown" Name="TargetId" CHName="目标Id" Key = "Tag" Default="10000" />
Type一共有IntegerUpDown、DoubleUpDown、TextBox、ComboBox四种种类型。其中IntegerUpDown、DoubleUpDown表示整数型值和双精度小数的素质,可以手动输入数字。TextBox表示文本型,可以接收一个字符串。ComboBox表示下拉列表型,提供预设值。
<ItemType="ComboBox" Name="ActionState" Key ="ActionType" Default="0">
    <Childes>
      <Child Name="START"ID="0"/>
      <Child Name="COMPLETE"ID="1"/>
      <Child Name="LOOP_COMPLETE" ID="2"/>
    </Childes>
  </Item>
该Item是一个下拉列表,包含一个元素表,每个元素均包含一个Name和 一个ID。ID是提供给程序使用的,就是用户的选择项。
在xml中配置,是直接用于编辑器显示的,当我们生成的时候,会生成程序代码,“条件”对应的程序代码放在 cons.h 和 cons.cpp 中,以ArmatureActionState为例,如下:
ArmatureActionState.h
class ArmatureActionState : public cocos2d::extension::BaseTriggerCondition
{
    DECLARE_CLASS_INFO
public:
     ArmatureActionState(void);//构造方法
     virtual ~ArmatureActionState(void);//析构方法

     virtual bool init();//初始化方法
     virtual bool detect();//获取判断判断结果接口****关键点****
     virtual void serialize(constrapidjson::Value &val);//序列化,用于获取编辑器中设置的条件值
     virtual void removeAll();//清理当前条件

     void animationEvent(cocos2d::extension::CCArmature*armature, cocos2d::extension::MovementEventType movementType, const char*movementID);
private:
     int _nTag;
     std::string _comName;
     std::string _aniname;
     int _nState;
     bool _bSuc;
};
ArmatureActionState.cpp
void ArmatureActionState::serialize(const rapidjson::Value &val)
{
   int count =DICTOOL->getArrayCount_json(val, "dataitems");
   for (int i = 0; i < count; ++i)
   {
       const rapidjson::Value&subDict = DICTOOL->getSubDictionary_json(val, "dataitems",i);
       std::string key =DICTOOL->getStringValue_json(subDict, "key");
       if (key == "Tag")
       {
          _nTag =DICTOOL->getIntValue_json(subDict, "value");
          continue;
       }
       else if (key =="componentName")
       {
          _comName =DICTOOL->getStringValue_json(subDict, "value");
          continue;
       }
       else if (key =="AnimationName")
       {
          _aniname =DICTOOL->getStringValue_json(subDict, "value");
          continue;
       }
       else if (key =="ActionType")
       {
          _nState =DICTOOL->getIntValue_json(subDict, "value");
          continue;
       }
   }
}
其中的判断条件值elseif (key == "componentName")就对应的前面提的配置文件中的Key,这里通过key来做判断,得到我们想要的值value。
和“条件判断”的实现多数方法也是类似,但不同的是detect()替换为done()函数,在该函数里,我们做触发事件后的处理。
void TMoveTo::done()
{
   do
   {
      CCNode*pNode = SceneReader::sharedSceneReader()->getNodeByTag(_nTag);
      CC_BREAK_IF(pNode== NULL);
      CCActionInterval*  actionTo = CCMoveTo::create(_fDuration,_pos);
      CC_BREAK_IF(actionTo== NULL);
      pNode->runAction(actionTo);
   }while (0);
}
参考链接:http://www.cocoachina.com/bbs/simple/?t194739.html
cocos2d-x CocoStudio中场景触发器(Trigger)的使用和扩展
标签:des style blog http color io os 使用 ar
原文地址:http://www.cnblogs.com/gl5773477/p/3976046.html