为什么使用QT,包括进一步使用QML?两个主要原因,一是因为我是一个c++程序员,有语言使用惯性;二是我主要做图像处理方面工作,使用什么平台对于我来说不重要,我只需要在不同平台上面能够运行我的图像处理程序(而主要是和OpenCV有关系的)。所以选择QT,它能够在win/linux/android,包括PI上面都提供不错的GUI支持;而如果我想在Android上编写图像处理程序,又主要遇到两个问题,一是相机的获取。OpenCV的videocapture在Android上支持不好,在最新版本的OpenCV里面已经把这个部分相关内容去掉了,同时QCamera(基于widget的camera)支持也不好,Qml是目前对Android支持最好的。这个地方QML提供的camera功能就类似windows中的dshow一样,是一个基础类库;二是界面的创建,在windows下面,基于ribbon等,我能够创建还说的过去的界面,但是在Android中,目前没有很好的工具。特别是在手机这个小小界面中,如果界面有问很影响使用。
我需要的是一个界面说的过去(有官方控件),对相机支持好,能够支持各种平台的这么一个工具,不求最好,但是要能用。在不多的选择中,QML(qtquick)是最合适的。当然如果要掌握QML也要跨越一些学习曲线,但是付出是值得的。
本文中参考了一些资料(主要是《qtquick核心编程》),我们基于qml创建最简单的图像处理程序。两个主要内容,一个是直接使用qml自己的能力进行图像处理;二个是引用并且使用OpenCV。只求实现主要功能,很多细节还需打磨,但我相信瑕不掩瑜。
新建工程,最新默认的界面main.qml代码为
import QtQuick 2.9
import QtQuick.Window 2.2
Window {
visible: true
width: 640
height: 480
}
import QtQuick.Window 2.2
Window {
visible: true
width: 640
height: 480
}
我就直接在这个QML上进行修改
import QtQuick 2.9
import QtQuick.Window 2.2
import QtQuick.Controls 1.1
import QtQuick.Dialogs 1.1
import QtQuick.Controls.Styles 1.1
Window {
visible: true
width: 640
height: 480
//RGB
color: "#0000FF";
//忙等控件,包含在QtQuick.Controls中
BusyIndicator {
id: busy;
running: false;
anchors.centerIn: parent;
z: 2;
}
//状态显示Label
Label {
id: stateLabel;
visible: false;
anchors.centerIn: parent;
}
//主要界面
Image {
objectName: "imageViewer";
id: imageViewer;
asynchronous: true;
anchors.fill: parent;
fillMode: Image.PreserveAspectFit;
//根据imageviewer状态判断,控制控件表现出不同状态
onStatusChanged: {
if (imageViewer.status === Image.Loading) {
busy.running = true;
stateLabel.visible = false;
}
else if(imageViewer.status === Image.Ready){
busy.running = false;
}
else if(imageViewer.status === Image.Error){
busy.running = false;
stateLabel.visible = true;
stateLabel.text = "ERROR";
}
}
}
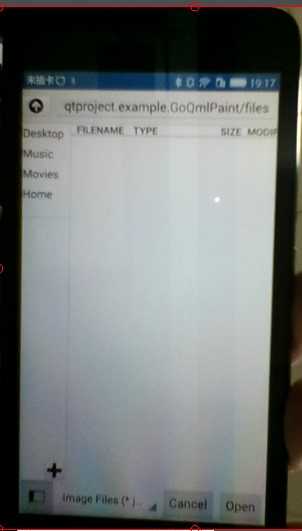
//打开文件界面,包含在 QtQuick.Dialogs 中。固然在Android中使用这个方法打开图片不是最佳方法,但是可用方法
FileDialog {
id: fileDialog;
title: "Please choose a file";
nameFilters: ["Image Files (*.jpg *.png *.gif)"];
onAccepted: {
console.log(fileDialog.fileUrl);
imageViewer.source = fileDialog.fileUrl;
}
}
//以下用于创建button,其中ButtonStyle来自QtQuick.Controls.Styles
//其中所谓Component就是可重用构建的意思,这个用于Button的Componet是可以复用的
Component{
id: btnStyle;
ButtonStyle {
background: Rectangle {
implicitWidth: 140;
implicitHeight: 50;
border.width: control.pressed ? 2 : 1;
border.color: (control.pressed || control.hovered) ? "#00A060" : "#888888";
radius: 12;
gradient: Gradient {
GradientStop { position: 0 ; color: control.pressed ? "#cccccc" : "#e0e0e0"; }
GradientStop { position: 1 ; color: control.pressed ? "#aaa" : "#ccc"; }
}
}
}
}
//就是做了个黑色的框子,用于放button的
Rectangle {
anchors.left: parent.left;
anchors.top: parent.top;
anchors.bottom: openFile.bottom;
anchors.bottomMargin: -6;
anchors.right: quit.right;
anchors.rightMargin: -6;
color: "#404040";
opacity: 0.7;
}
//打开按钮
Button {
id: openFile;
text: "打开";
anchors.left: parent.left;
anchors.leftMargin: 6;
anchors.top: parent.top;
anchors.topMargin: 6;
onClicked: {
fileDialog.visible = true;
}
//直接使用了btnStyle
style: btnStyle;
z: 1;
}
//退出就是退出
Button {
id: quit;
text: "退出";
anchors.left: openFile.right;
anchors.leftMargin: 4;
anchors.bottom: openFile.bottom;
onClicked: {
Qt.quit()
}
style: btnStyle;
z: 1;
}
//另外一个黑色框子,注意用到了op,也就是上面的4个按钮
Rectangle {
anchors.left: parent.left;
anchors.top: op.top;
anchors.topMargin: -4;
anchors.bottom: parent.bottom;
anchors.right: op.right;
anchors.rightMargin: -4;
color: "#404040";
opacity: 0.7;
}
//以另一种方式将几个按钮连在一起
//我们实现4个比较简单的效果
Grid {
id: op;
anchors.left: parent.left;
anchors.leftMargin: 4;
anchors.bottom: parent.bottom;
anchors.bottomMargin: 4;
rows: 2;
columns: 2;
rowSpacing: 4;
columnSpacing: 4;
z: 1;
//柔化效果
Button {
text: "柔化";
style: btnStyle;
onClicked: {
//busy.running = true;
//processor.process(fileDialog.fileUrl, ImageProcessor.Soften);
}
}
//灰度效果
Button {
text: "灰度";
style: btnStyle;
onClicked: {
//busy.running = true;
//processor.process(fileDialog.fileUrl, ImageProcessor.Gray);
}
}
//浮雕效果
Button {
text: "浮雕";
style: btnStyle;
onClicked: {
//busy.running = true;
//processor.process(fileDialog.fileUrl, ImageProcessor.Emboss);
}
}
//黑白效果
Button {
text: "黑白";
style: btnStyle;
onClicked: {
//busy.running = true;
//processor.process(fileDialog.fileUrl, ImageProcessor.Binarize);
}
}
}
}
import QtQuick.Window 2.2
import QtQuick.Controls 1.1
import QtQuick.Dialogs 1.1
import QtQuick.Controls.Styles 1.1
Window {
visible: true
width: 640
height: 480
//RGB
color: "#0000FF";
//忙等控件,包含在QtQuick.Controls中
BusyIndicator {
id: busy;
running: false;
anchors.centerIn: parent;
z: 2;
}
//状态显示Label
Label {
id: stateLabel;
visible: false;
anchors.centerIn: parent;
}
//主要界面
Image {
objectName: "imageViewer";
id: imageViewer;
asynchronous: true;
anchors.fill: parent;
fillMode: Image.PreserveAspectFit;
//根据imageviewer状态判断,控制控件表现出不同状态
onStatusChanged: {
if (imageViewer.status === Image.Loading) {
busy.running = true;
stateLabel.visible = false;
}
else if(imageViewer.status === Image.Ready){
busy.running = false;
}
else if(imageViewer.status === Image.Error){
busy.running = false;
stateLabel.visible = true;
stateLabel.text = "ERROR";
}
}
}
//打开文件界面,包含在 QtQuick.Dialogs 中。固然在Android中使用这个方法打开图片不是最佳方法,但是可用方法
FileDialog {
id: fileDialog;
title: "Please choose a file";
nameFilters: ["Image Files (*.jpg *.png *.gif)"];
onAccepted: {
console.log(fileDialog.fileUrl);
imageViewer.source = fileDialog.fileUrl;
}
}
//以下用于创建button,其中ButtonStyle来自QtQuick.Controls.Styles
//其中所谓Component就是可重用构建的意思,这个用于Button的Componet是可以复用的
Component{
id: btnStyle;
ButtonStyle {
background: Rectangle {
implicitWidth: 140;
implicitHeight: 50;
border.width: control.pressed ? 2 : 1;
border.color: (control.pressed || control.hovered) ? "#00A060" : "#888888";
radius: 12;
gradient: Gradient {
GradientStop { position: 0 ; color: control.pressed ? "#cccccc" : "#e0e0e0"; }
GradientStop { position: 1 ; color: control.pressed ? "#aaa" : "#ccc"; }
}
}
}
}
//就是做了个黑色的框子,用于放button的
Rectangle {
anchors.left: parent.left;
anchors.top: parent.top;
anchors.bottom: openFile.bottom;
anchors.bottomMargin: -6;
anchors.right: quit.right;
anchors.rightMargin: -6;
color: "#404040";
opacity: 0.7;
}
//打开按钮
Button {
id: openFile;
text: "打开";
anchors.left: parent.left;
anchors.leftMargin: 6;
anchors.top: parent.top;
anchors.topMargin: 6;
onClicked: {
fileDialog.visible = true;
}
//直接使用了btnStyle
style: btnStyle;
z: 1;
}
//退出就是退出
Button {
id: quit;
text: "退出";
anchors.left: openFile.right;
anchors.leftMargin: 4;
anchors.bottom: openFile.bottom;
onClicked: {
Qt.quit()
}
style: btnStyle;
z: 1;
}
//另外一个黑色框子,注意用到了op,也就是上面的4个按钮
Rectangle {
anchors.left: parent.left;
anchors.top: op.top;
anchors.topMargin: -4;
anchors.bottom: parent.bottom;
anchors.right: op.right;
anchors.rightMargin: -4;
color: "#404040";
opacity: 0.7;
}
//以另一种方式将几个按钮连在一起
//我们实现4个比较简单的效果
Grid {
id: op;
anchors.left: parent.left;
anchors.leftMargin: 4;
anchors.bottom: parent.bottom;
anchors.bottomMargin: 4;
rows: 2;
columns: 2;
rowSpacing: 4;
columnSpacing: 4;
z: 1;
//柔化效果
Button {
text: "柔化";
style: btnStyle;
onClicked: {
//busy.running = true;
//processor.process(fileDialog.fileUrl, ImageProcessor.Soften);
}
}
//灰度效果
Button {
text: "灰度";
style: btnStyle;
onClicked: {
//busy.running = true;
//processor.process(fileDialog.fileUrl, ImageProcessor.Gray);
}
}
//浮雕效果
Button {
text: "浮雕";
style: btnStyle;
onClicked: {
//busy.running = true;
//processor.process(fileDialog.fileUrl, ImageProcessor.Emboss);
}
}
//黑白效果
Button {
text: "黑白";
style: btnStyle;
onClicked: {
//busy.running = true;
//processor.process(fileDialog.fileUrl, ImageProcessor.Binarize);
}
}
}
}
虽然代码代码看上去有点多,但是好在还算有结构。
1、头文件,不多说。用在哪里的看注释;
2、全部的界面都包含在Windos{}中的
Window {
visible: true
width: 640
height: 480
//RGB
color: "#0000FF";
……
visible: true
width: 640
height: 480
//RGB
color: "#0000FF";
……
在这段代码中width和height已经没有什么实际价值了。需要注意的是color为背景色,而qml是按照RGB来定义的。
3、控件控件,全部都是控件的定义。我们使用QML就要习惯直接使用代码定义的方式精确地进行界面定位,包含以下:
//忙等控件,包含在QtQuick.Controls中
BusyIndicator {
id: busy;
running: false;
anchors.centerIn: parent;
z: 2;
}
//状态显示Label
Label {
id: stateLabel;
visible: false;
anchors.centerIn: parent;
}
//主要图片显示
Image {
objectName: "imageViewer";
id: imageViewer;
asynchronous: true;
anchors.fill: parent;
fillMode: Image.PreserveAspectFit;
//根据imageviewer状态判断,控制控件表现出不同状态
onStatusChanged: {
if (imageViewer.status === Image.Loading) {
busy.running = true;
stateLabel.visible = false;
}
else if(imageViewer.status === Image.Ready){
busy.running = false;
}
else if(imageViewer.status === Image.Error){
busy.running = false;
stateLabel.visible = true;
stateLabel.text = "ERROR";
}
}
}
//打开文件界面,包含在 QtQuick.Dialogs 中。固然在Android中使用这个方法打开图片不是最佳方法,但是可用方法
FileDialog {
id: fileDialog;
title: "Please choose a file";
nameFilters: ["Image Files (*.jpg *.png *.gif)"];
onAccepted: {
console.log(fileDialog.fileUrl);
imageViewer.source = fileDialog.fileUrl;
}
}
4、按钮控件,但是使用了一些可重用思想
//以下用于创建button,其中ButtonStyle来自QtQuick.Controls.Styles
//其中所谓Component就是可重用构建的意思,这个用于Button的Componet是可以复用的
Component{
id: btnStyle;
ButtonStyle {
background: Rectangle {
implicitWidth: 140;
implicitHeight: 50;
border.width: control.pressed ? 2 : 1;
border.color: (control.pressed || control.hovered) ? "#00A060" : "#888888";
radius: 12;
gradient: Gradient {
GradientStop { position: 0 ; color: control.pressed ? "#cccccc" : "#e0e0e0"; }
GradientStop { position: 1 ; color: control.pressed ? "#aaa" : "#ccc"; }
}
}
}
}
//打开按钮
Button {
id: openFile;
text: "打开";
anchors.left: parent.left;
anchors.leftMargin: 6;
anchors.top: parent.top;
anchors.topMargin: 6;
onClicked: {
fileDialog.visible = true;
}
//直接使用了btnStyle
style: btnStyle;
z: 1;
}
//退出就是退出
Button {
id: quit;
text: "退出";
anchors.left: openFile.right;
anchors.leftMargin: 4;
anchors.bottom: openFile.bottom;
onClicked: {
Qt.quit()
}
style: btnStyle;
z: 1;
}
5、将按钮放在一起,我们使用grid
//以另一种方式将几个按钮连在一起
//我们实现4个比较简单的效果
Grid {
id: op;
anchors.left: parent.left;
anchors.leftMargin: 4;
anchors.bottom: parent.bottom;
anchors.bottomMargin: 4;
rows: 2;
columns: 2;
rowSpacing: 4;
columnSpacing: 4;
z: 1;
//柔化效果
Button {
text: "柔化";
style: btnStyle;
onClicked: {
//busy.running = true;
//processor.process(fileDialog.fileUrl, ImageProcessor.Soften);
}
}
//灰度效果
Button {
text: "灰度";
style: btnStyle;
onClicked: {
//busy.running = true;
//processor.process(fileDialog.fileUrl, ImageProcessor.Gray);
}
}
//浮雕效果
Button {
text: "浮雕";
style: btnStyle;
onClicked: {
//busy.running = true;
//processor.process(fileDialog.fileUrl, ImageProcessor.Emboss);
}
}
//黑白效果
Button {
text: "黑白";
style: btnStyle;
onClicked: {
//busy.running = true;
//processor.process(fileDialog.fileUrl, ImageProcessor.Binarize);
}
}
}
6、两个黑色框子,没有其它用途,就是美观
//就是做了个黑色的框子,用于放button的
Rectangle {
anchors.left: parent.left;
anchors.top: parent.top;
anchors.bottom: openFile.bottom;
anchors.bottomMargin: -6;
anchors.right: quit.right;
anchors.rightMargin: -6;
color: "#404040";
opacity: 0.7;
}
Rectangle {
anchors.left: parent.left;
anchors.top: parent.top;
anchors.bottom: openFile.bottom;
anchors.bottomMargin: -6;
anchors.right: quit.right;
anchors.rightMargin: -6;
color: "#404040";
opacity: 0.7;
}
//另外一个黑色框子,注意用到了op,也就是上面的4个按钮
Rectangle {
anchors.left: parent.left;
anchors.top: op.top;
anchors.topMargin: -4;
anchors.bottom: parent.bottom;
anchors.right: op.right;
anchors.rightMargin: -4;
color: "#404040";
opacity: 0.7;
}
Rectangle {
anchors.left: parent.left;
anchors.top: op.top;
anchors.topMargin: -4;
anchors.bottom: parent.bottom;
anchors.right: op.right;
anchors.rightMargin: -4;
color: "#404040";
opacity: 0.7;
}
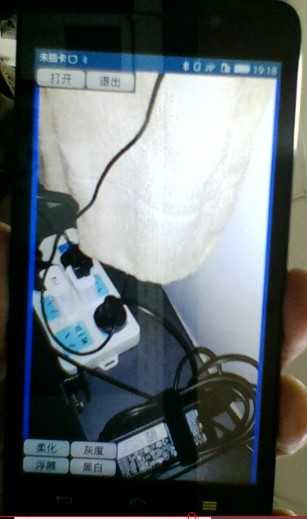
这个时候已经有以下界面,能够打开显示图片了
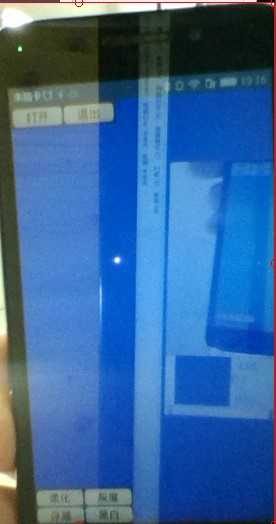
打开图片,显示图片
到这个部分请查看 阶段代码1
附件列表