ELK技术实战–了解Elk各组件 转载 http://www.ywnds.com/?p=9776
ELK Stack是软件集合Elasticsearch、Logstash、Kibana的简称,由这三个软件及其相关的组件可以打造大规模日志实时处理系统。
其中,Elasticsearch 是一个基于 Lucene 的、支持全文索引的分布式存储和索引引擎,主要负责将日志索引并存储起来,方便业务方检索查询。
Logstash是一个日志收集、过滤、转发的中间件,主要负责将各条业务线的各类日志统一收集、过滤后,转发给 Elasticsearch 进行下一步处理。
Kibana是一个可视化工具,主要负责查询 Elasticsearch 的数据并以可视化的方式展现给业务方,比如各类饼图、直方图、区域图等。
所谓“大规模”,指的是 ELK Stack 组成的系统以一种水平扩展的方式支持每天收集、过滤、索引和存储 TB 规模以上的各类日志。
通常,各类文本形式的日志都在处理范围,包括但不限于 Web 访问日志,如 Nginx/Apache Access Log 。
基于对日志的实时分析,可以随时掌握服务的运行状况、统计 PV/UV、发现异常流量、分析用户行为、查看热门站内搜索关键词等。
版本跳跃
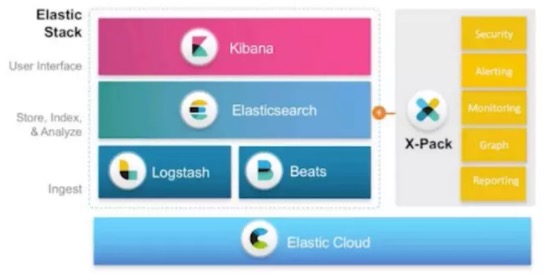
ELK在5.0版本以后(从2.x版本直接全部升级为5.x版本),Elastic公司将原来的ELK Stack称之为Elastic Stack,原因是引入了Beats套件。
Elastic Products全家福:
Elastic Stack平台搭建
对于ELK部署使用而言,下面是一个再常见不过的架构了,如下图:
上图是ELK Stack实际应用中典型的一种架构,其中:
1)filebeat:部署在具体的业务机器上,通过定时监控的方式获取增量的日志,并转发到Kafka消息系统暂存。
2)Kafka:以高吞吐量的特征,作为一个消息系统的角色,接收从filebeat收集转发过来的日志,通常以集群的形式提供服务。
3)logstash:然后,Logstash从Kafka中获取日志,并通过Input-Filter-Output三个阶段的处理,更改或过滤日志,最终输出我们感兴趣的数据。通常,根据Kafka集群上分区(Partition)的数量,1:1确定Logstash实例的数量,组成Consumer Group进行日志消费。
4)elasticsearch:最后,Elasticsearch存储并索引Logstash转发过来的数据,并通过Kibana查询和可视化展示,达到实时分析日志的目的。
Elasticsearch/Kibana还可以通过安装x-pack插件实现扩展功能,比如监控Elasticsearch集群状态、数据访问授权等。
我们一步步安装部署Elastic Stack系统的各个组件,然后以网站访问日志为例进行数据实时分析。
首先,到ELK 官网下载需要用到的Filebeat/Logstash/Elasticsearch/Kibana软件安装包。(推荐下载编译好的二进制可执行文件,直接解压执行就可以部署)
1. 系统环境
|
1
2
3
4
5
6
7
|
System: Centos release 7.2 (Final)
ElasticSearch: 5.4.1
Logstash: 5.4.1
Kibana: 5.4.1
Java: openjdk version "1.8.0_131"
kafka: 2.10
Nginx: 1.10.1
|
2. 软件下载
|
1
2
3
4
5
|
wget https://artifacts.elastic.co/downloads/elasticsearch/elasticsearch-5.4.1.tar.gz
wget https://artifacts.elastic.co/downloads/kibana/kibana-5.4.1-linux-x86_64.tar.gz
wget https://artifacts.elastic.co/downloads/logstash/logstash-5.4.1.tar.gz
wget https://artifacts.elastic.co/downloads/beats/filebeat/filebeat-5.4.1-linux-x86_64.tar.gz
wget http://apache.fayea.com/kafka/0.10.2.1/kafka_2.10-0.10.2.1.tgz
|
这里我下载是我所使用的软件版本(都是当前最新版),如果你想使用旧一点或者更新一点的版本可以自行下载。
|
1
2
3
4
5
6
7
8
9
|
$ ll
total 327156
-rw-r--r-- 1 root root 1539364 Jun 5 05:33 3.2.0.tar.gz
-rw-r--r-- 1 root root 33321278 Jun 1 09:58 elasticsearch-5.4.1.tar.gz
-rw-r--r-- 1 root root 8780385 Jun 1 09:57 filebeat-5.4.1-linux-x86_64.tar.gz
-rw-r--r-- 1 root root 53791517 Jun 1 09:59 kibana-5.4.1-linux-x86_64.tar.gz
-rw-r--r-- 1 root root 92710340 Jun 1 09:59 logstash-5.4.1.tar.gz
-rw-r--r-- 1 root root 9788179 Jun 1 09:58 packetbeat-5.4.1-linux-x86_64.tar.gz
-rw-r--r-- 1 root root 38424081 Apr 26 15:59 kafka_2.10-0.10.2.1.tgz
|
3. 安装Nginx
这里我们部署ELK之前,需要一个产生日志的源,这里呢就选项Nginx服务器。
默认情况下,CentOS的官方资源是没有php-fpm和Nginx的,需要安装第三方资源库即可。(此步骤可省略)
|
1
2
3
|
$ wget http://www.atomicorp.com/installers/atomic
$ sh ./atomic
$ yum check-update
|
安装启动nginx(关于nginx可以看本博客也有详细介绍)
|
1
2
|
$ yum install nginx -y
$ nginx
|
|
1
2
|
$ netstat -nplt | grep nginx
tcp 0 0 0.0.0.0:80 0.0.0.0:* LISTEN 12719/nginx: master
|
nginx的访问日志格式定义,默认如下:
|
1
2
|
log_format main ‘$remote_addr - $remote_user [$time_local] "$request" ‘
‘$status $body_bytes_sent "$http_referer" ‘
|
在/etc/nginx/conf.d/default.conf中添加如下一行,定义nginx日志使用的格式,以及日志文件的位置。
|
1
|
access_log /var/log/nginx/access.log main;
|
然后重新启动nginx
|
1
2
|
$ nginx -s stop
$ nginx
|
4. 安装JAVA
由于kafka/logstash/elastisearch的运行依赖于Java环境, 而Logstash 1.5以上版本依赖java版本不能低于java 1.7,因此推荐使用最新版本的Java。因为我们只需要Java的运行环境,所以可以只安装JRE,不过这里我依然使用JDK。由于我使用的是CentOS7系统,java版本是1.8,符合需求,我就使用yum直接安装了。
|
1
|
$ yum install java-1.8.0-openjdk
|
查看JAVA版本
|
1
2
3
4
|
$ java -version
openjdk version "1.8.0_131"
OpenJDK Runtime Environment (build 1.8.0_131-b11)
OpenJDK 64-Bit Server VM (build 25.131-b11, mixed mode)
|
如果java -version没有问题,就不需要设置环境变量。一般使用yum安装的jdk不需要设置JAVA_HOME环境变量。如果你是使用二进制版本安装的jdk,那么可能需要设置一下JAVA_HOME环境变量,具体的JAVA_HOME环境变量设置根据安装路径不同而不同。
5. 安装部署Kafka
确认已安装java运行环境,直接解压Kafka即可使用。
|
1
|
$ tar xvf kafka_2.10-0.10.2.1.tgz -C /usr/local/elk
|
解压后,编辑配置文件:
|
1
2
3
4
5
6
7
8
9
10
11
12
13
14
15
16
17
18
19
20
21
22
23
24
25
26
27
28
29
30
|
$ cat /usr/local/elk/kafka_2.10-0.10.2.1/config/server.properties
############################# Server Basics #############################
broker.id=0
delete.topic.enable=true
############################# Socket Server Settings #############################
listeners=PLAINTEXT://0.0.0.0:9092
num.network.threads=3
num.io.threads=8
socket.send.buffer.bytes=102400
socket.receive.buffer.bytes=102400
socket.request.max.bytes=104857600
############################# Log Basics #############################
log.dirs=/tmp/kafka-logs
num.partitions=1
num.recovery.threads.per.data.dir=1
############################# Log Flush Policy #############################
log.flush.interval.messages=10000
log.flush.interval.ms=1000
############################# Log Retention Policy #############################
log.retention.hours=168
log.segment.bytes=1073741824
log.retention.check.interval.ms=300000
############################# Zookeeper #############################
zookeeper.connect=localhost:2181
zookeeper.connection.timeout.ms=6000
|
kafka需要依赖zookeeper,所以需要先启动zookeeper。
|
1
|
$ nohup /usr/local/elk/kafka_2.10-0.10.2.1/bin/zookeeper-server-start.sh /usr/local/elk/kafka_2.10-0.10.2.1/config/zookeeper.properties &
|
启动Kafka Server:(指定 JMX_PORT 端口,可以通过 Kafka-manager 获取统计信息)
|
1
|
$ nohup /usr/local/elk/kafka_2.10-0.10.2.1/bin/kafka-server-start.sh /usr/local/elk/kafka_2.10-0.10.2.1/config/server.properties &
|
6. 安装部署Filebeat
|
1
|
$ tar xvf filebeat-5.4.1-linux-x86_64.tar.gz -C /usr/local/elk/
|
把filebeat解压后就可以使用了,是不是很简单。
开启日志增量监控 ,添加filebeat输出源为kafka(修改filebeat.yml文件):
|
1
2
3
4
5
6
7
8
9
10
11
12
13
14
15
16
17
18
19
20
21
22
23
24
25
26
27
28
29
30
31
|
$ cat /usr/local/elk/filebeat-5.4.1-linux-x86_64/filebeat.yml
filebeat.prospectors:
- input_type: log
paths:
- /var/log/*.log
- input_type: log
paths:
- /var/log/nginx/*.log
encoding: utf-8
document_type: my-nginx-log
scan_frequency: 10s
harvester_buffer_size: 16384
max_bytes: 10485760
tail_files: true
output.kafka:
enabled: true
hosts: ["127.0.0.1:9092"]
topic: elk-%{[type]}
worker: 2
max_retries: 3
bulk_max_size: 2048
timeout: 30s
broker_timeout: 10s
channel_buffer_size: 256
keep_alive: 60
compression: gzip
max_message_bytes: 1000000
required_acks: 0
client_id: beats
|
上述配置表示,Filebeat定期监控:/var/log/nginx/目录下所有以.log结尾的文件,并且将增量日志转发到Kafka集群。filebeat支持file、tcp、udp等输入方式,输出方式支持kafka,file,redis,elasticsearch、logstash等。
然后,后台启动Filebeat进程:
|
1
|
$ nohup /usr/local/elk/filebeat-5.4.1-linux-x86_64/filebeat -c /usr/local/elk/filebeat-5.4.1-linux-x86_64/filebeat.yml &
|
这时候,在浏览器上访问Nginx服务器并生成访问日志后,Filebeat 会及时的将日志转发到 Kafka 集群。
我们这个时候可以查一下kafka的队列信息,可以看到有elk-log的。
|
1
2
3
|
$ /usr/local/elk/kafka_2.10-0.10.2.1/bin/kafka-topics.sh --list --zookeeper localhost:2181
__consumer_offsets
elk-log
|
具体深入kafka需要单独学习了,如果嫌麻烦可以使用Redis比较简单。
7. 安装配置Logstash
|
1
|
$ tar xvf logstash-5.4.1.tar.gz -C /usr/local/elk
|
把logstash解压后就可以使用了,是不是很简单。和所有的编程语言一样,我们以一个输出 “hello world” 的形式开始我们的logstash学习。
7.1 开始使用logstash
在终端中,像下面这样运行命令来启动 Logstash进程:
|
1
2
3
4
5
6
7
8
9
10
|
$ /usr/local/elk/logstash-5.4.1/bin/logstash -e ‘input{stdin{}}output{stdout{codec=>rubydebug}}‘
Sending Logstash‘s logs to /usr/local/elk/logstash-5.4.1/logs which is now configured via log4j2.properties
[logstash.setting.writabledirectory] Creating directory {:setting=>"path.queue", :path=>"/usr/local/elk/logstash-5.4.1/data/queue"}
[logstash.agent ] No persistent UUID file found. Generating new UUID {:uuid=>"cbfff69e-1504-48f8-bd8b-6b37b8e6b1d9", :path=>"/usr/local/elk/logstash-5.4.1/data/uuid"}
[logstash.pipeline ] Starting pipeline {"id"=>"main", "pipeline.workers"=>4, "pipeline.batch.size"=>125, "pipeline.batch.delay"=>5, "pipeline.max_inflight"=>500}
[logstash.pipeline ] Pipeline main started
The stdin plugin is now waiting for input:
[2017-06-05T09:41:06,159][INFO ][logstash.agent ] Successfully started Logstash API endpoint {:port=>9600}
hello world
|
执行完命令,然后你会发现终端在等待你的输入。没问题,敲入hello world,然后回车,logstash会返回以下结果!
|
1
2
3
4
5
6
|
{
"@timestamp" => 2017-06-05T13:41:41.840Z,
"@version" => "1",
"host" => "gpmaster",
"message" => "hello world"
}
|
输出没有问题,就证明可以正式来使用logstash了。
解释一下命令含义
每位系统管理员都肯定写过很多类似这样的命令:cat randdata | awk ‘{print $2}’ | sort | uniq -c | tee sortdata。这个管道符|可以算是Linux世界最伟大的发明之一(另一个是“一切皆文件”)。Logstash就像管道符一样!你输入(就像命令行的 cat )数据,然后处理过滤(就像 awk 或者 uniq 之类)数据,最后输出(就像 tee )到其他地方。
Logstash会给事件添加一些额外信息。最重要的就是@timestamp,用来标记事件的发生时间。因为这个字段涉及到Logstash的内部流转,所以必须是一个job对象,如果你尝试自己给一个字符串字段重命名为@timestamp的话,Logstash会直接报错。所以,请使用filters/date插件来管理这个特殊字段。
此外,大多数时候,还可以见到另外几个:
host – 标记事件发生在哪里。
type – 标记事件的唯一类型。
tags – 标记事件的某方面属性,这是一个数组,一个事件可以有多个标签。
你可以随意给事件添加字段或者从事件里删除字段。事实上事件就是一个 Ruby对象,或者更简单的理解为就是一个哈希也行。
小贴士:每个logstash过滤插件,都会有四个方法叫add_tag, remove_tag, add_field和remove_field。它们在插件过滤匹配成功时生效。
Logstash的运行方式为主程序+配置文件。Collect,Enrich和Transport的行为在配置文件中定义。配置文件的格式有点像json。
下面来创建一个logstash_index.conf文件:
|
1
2
3
4
5
6
7
8
9
10
11
12
13
14
15
16
17
18
19
20
21
22
|
$ cat /usr/local/elk/logstash-5.4.1/etc/logstash_index.conf
input {
kafka {
#codec => "json"
topics_pattern => "elk-.*"
bootstrap_servers => "127.0.0.1:9092"
auto_offset_reset => "latest"
group_id => "logstash-g1"
}
}
output {
elasticsearch { #Logstash输出到elasticsearch;
hosts => ["localhost:9200"] #elasticsearch为本地;
index => "logstash-nginx-%{+YYYY.MM.dd}" #创建索引;
document_type => "nginx" #文档类型;
workers => 1 #进程数量;
user => elastic #elasticsearch的用户;
password => changeme #elasticsearch的密码;
flush_size => 20000
idle_flush_time => 10
}
}
|
如上配置文件,input定义了从Redis中读取数据;而output我是输出到了本地的elasticsearch中存储。
Logstash传递的每条数据都带有元数据,如@version,@timestamp,host等等,有些可以修改,有些不允许修改。host记录的是当前的主机信息。Logstash可能不会去获取主机的信息或者获取的不准,这里建议替换成自己定义的主机标识,以保证最终的日志输出可以有完美的格式。
另外我这里添加了elasticsearch的用户名和密码,因为后面我使用了x-pack插件,默认用户名是elastic,密码是changeme。
启动Logstash:
|
1
|
$ nohup /usr/local/elk/logstash-5.4.1/bin/logstash -f /usr/local/elk/logstash-5.4.1/etc/logstash_index.conf &
|
8. 安装使用Elastcearch
|
1
|
$ tar xvf elasticsearch-5.4.1.tar.gz -C /usr/local/elk/
|
同Logstash一样,解压完就可以使用了。但是注意使用elasticsearch不能使用root用户,所以这里我创建了一个elk用户,把elasticsearch.2.3.2目录及子目录的属主和属组改为elk用户了。
|
1
2
|
$ useradd elk
$ chown elk.elk -R /usr/local/elk/elasticsearch-5.4.1
|
修改elasticsearch配置文件,添加如下几行(注意开启network.host):
|
1
2
3
4
5
6
7
8
9
10
11
12
13
14
15
16
17
18
19
20
21
22
23
24
25
26
|
$ cat /usr/local/elk/elasticsearch-5.4.1/config/elasticsearch.yml
# ---------------------------------- Cluster -----------------------------------
cluster.name: my-application
# ------------------------------------ Node ------------------------------------
node.name: node-1
#node.attr.rack: r1
# ----------------------------------- Paths ------------------------------------
path.data: /data/elasticsearch/
path.logs: /var/log/elasticsearch/
# ----------------------------------- Memory -----------------------------------
bootstrap.memory_lock: false
# ---------------------------------- Network -----------------------------------
network.host: 0.0.0.0
http.port: 9200
# --------------------------------- Discovery ----------------------------------
#discovery.zen.ping.unicast.hosts: ["host1", "host2"]
#discovery.zen.minimum_master_nodes: 3
# ---------------------------------- Gateway -----------------------------------
#gateway.recover_after_nodes: 3
<span class="pl-ent">indices.memory.index_buffer_size</span>: <span class="pl-s">15%</span>
|
指定文档和日志的存储路径以及监听的地址和端口。注意,应当保证有足够的磁盘空间来存储文档,否则ES将拒绝写入新数据。
创建elasticsearch需要的数据目录和日志目录。
|
1
2
3
4
|
$ mkdir -p /data/elasticsearch
$ mkdir -p /var/log/elasticsearch/
$ chown elk.elk /data/elasticsearch/ -R
$ chown elk.elk /var/log/elasticsearch/ -R
|
启动elasticsearch
|
1
|
$ nohup sudo -u elk /usr/local/elk/elasticsearch-5.4.1/bin/elasticsearch &
|
|
1
2
|
$ netstat -nplt | grep 9200
tcp6 0 0 :::9200 :::* LISTEN 5026/java
|
如果启动Elasticsearch出现以下错误提示:
错误1:max file descriptors [4096] for elasticsearch process is too low, increase to at least [65536]
解决:打开/etc/security/limits.conf文件,添加以下两行代码并保存:
|
1
2
|
* soft nofile 65536 //*表示任意用户,这里是elasticsearch报的错,也可以直接填运行elk的用户;
* hard nofile 131072
|
错误2:memory locking requested for elasticsearch process but memory is not locked
解决:修改elasticsearch.yml文件
|
1
|
bootstrap.memory_lock : false
|
错误3:max virtual memory areas vm.max_map_count [65530] is too low, increase to at least [262144]
解决:修改内核配置
|
1
2
|
$ sysctl -w vm.max_map_count=262144
$ sysctl -p
|
错误4:os::commit_memory(0x00000001006cd000, 77824, 0) failed; error=’Cannot allocate memory’ (errno=12)
解决:提供内存不足,增大主机内存或减小elasticsearch的内存大小
JVM默认配置参数:
|
1
2
3
4
5
6
7
8
9
10
11
12
13
14
15
16
17
18
19
20
21
|
$ grep -v "^#" /usr/local/elk/elasticsearch-5.4.1/config/jvm.options | grep -v "^$"
-Xms1g
-Xmx1g
-XX:+UseConcMarkSweepGC
-XX:CMSInitiatingOccupancyFraction=75
-XX:+UseCMSInitiatingOccupancyOnly
-XX:+DisableExplicitGC
-XX:+AlwaysPreTouch
-server
-Xss1m
-Djava.awt.headless=true
-Dfile.encoding=UTF-8
-Djna.nosys=true
-Djdk.io.permissionsUseCanonicalPath=true
-Dio.netty.noUnsafe=true
-Dio.netty.noKeySetOptimization=true
-Dio.netty.recycler.maxCapacityPerThread=0
-Dlog4j.shutdownHookEnabled=false
-Dlog4j2.disable.jmx=true
-Dlog4j.skipJansi=true
-XX:+HeapDumpOnOutOfMemoryError
|
然后使用curl访问http://localhost:9200/?pretty
|
1
2
3
4
5
6
7
8
9
10
11
12
13
14
|
$ curl http://localhost:9200/?pretty
{
"name" : "node-1",
"cluster_name" : "my-application",
"cluster_uuid" : "Jf0qp0GqQ_W1MHN4pDtLdA",
"version" : {
"number" : "5.4.1",
"build_hash" : "2cfe0df",
"build_date" : "2017-05-29T16:05:51.443Z",
"build_snapshot" : false,
"lucene_version" : "6.5.1"
},
"tagline" : "You Know, for Search"
}
|
如果可以看到类似上面的返回,则说明ES单机运行没有问题了。
安装x-pack插件
x-pack是elasticsearch的一个扩展包,将安全,警告,监视,图形和报告功能捆绑在一个易于安装的软件包中,虽然x-pack被设计为一个无缝的工作,但是你可以轻松的启用或者关闭一些功能。
|
1
|
$ /usr/local/elk/elasticsearch-5.4.1/bin/elasticsearch-plugin install x-pack
|
ES如果是一个集群,需要在每一个节点上安装(包括kibana)。
用户和权限管理
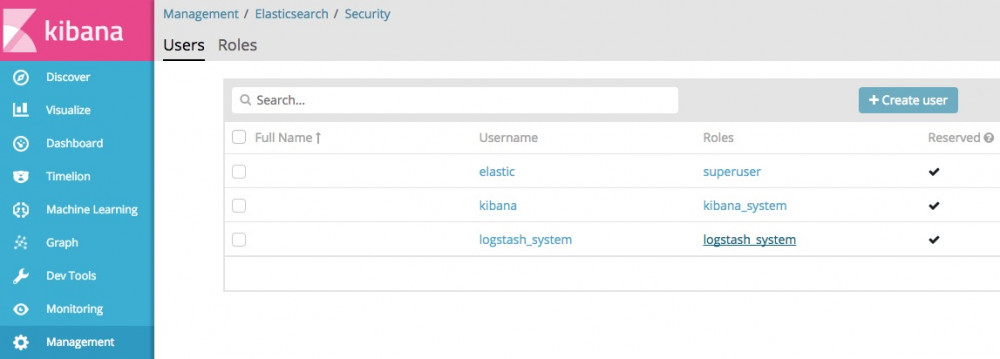
x-pack安装之后有一个超级用户elastic ,其默认的密码是changeme,拥有对所有索引和数据的控制权,可以使用该用户创建和修改其他用户,当然这里可以通过kibana的web界面进行用户和用户组的管理。
X-pack的elk之间的数据传递保护
安装完x-pack之后,我们就可以用我们所创建的用户来保护elk之间的数据传递
1:kibana<——>elasticsearch
在kibana.yml文件中配置:
|
1
2
|
elasticsearch.username: "elastic"
elasticsearch.password: "changeme"
|
2:logstash<——>elasticsearch
|
1
2
3
4
5
6
7
|
output {
elasticsearch {
hosts => ["http://localhost:9200"]
user => elastic
password => changeme
}
}
|
这里如果不进行相关配置的话,elk之间的数据传递就会出现问题。
安装Cerebro
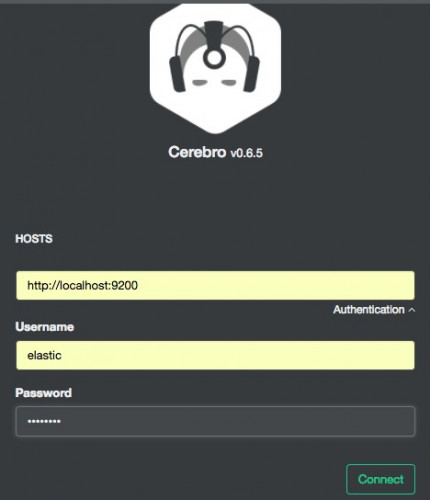
Cerebro时一个第三方的Elasticsearch集群管理软件,可以方便地查看集群状态:
|
1
|
$ tar xvf cerebro-0.6.5.tgz -C /usr/local/elk/
|
下载地址(下载二进制版):https://github.com/lmenezes/cerebro
启动进程:
|
1
|
$ nohup /usr/local/elk/cerebro-0.6.5/bin/cerebro -Dhttp.port=1234 -Dhttp.address=0.0.0.0 &
|
可以在浏览器查看,需要输入elasticsearch的用户和密码(如果安装了x-pack)。
可以在管理后台修改模板,优化索引配置,例如:
安装head插件
由于elasticsearch 5.0版本变化较大,目前elasticsearch 5.0暂时不支持直接安装head插件,但是head作者提供了另一种安装方法。推荐使用docker直接安装elasticsearch-head。
|
1
|
$ docker run -p 9100:9100 -d mobz/elasticsearch-head:5
|
Docker需要自行安装即可,另外由于elasticsearch安装了x-pack,所以elasticsearch有密码。head连接elasticsearch需要账号密码。
|
1
|
http://localhost:9100/?auth_user=elastic&auth_password=changeme
|
8. 安装kibana
Kibana安装跟logstash、elasticsearch一样不需要安装,解压就能用。
|
1
|
$ tar xvf kibana-5.4.1-linux-x86_64.tar.gz -C /usr/local/elk
|
安装x-pack
|
1
2
3
4
5
6
7
8
9
10
|
$ /usr/local/elk/kibana-5.4.1-linux-x86_64/bin/kibana-plugin install x-pack
Attempting to transfer from x-pack
Attempting to transfer from https://artifacts.elastic.co/downloads/kibana-plugins/x-pack/x-pack-5.4.1.zip
Transferring 119988917 bytes....................
Transfer complete
Retrieving metadata from plugin archive
Extracting plugin archive
Extraction complete
Optimizing and caching browser bundles...
Plugin installation complete
|
调整配置文件,主要配置一下下面三个参数:
|
1
2
3
4
5
6
7
8
9
10
11
12
13
14
15
16
17
18
19
20
21
|
$ cat /usr/local/elk/kibana-5.4.1-linux-x86_64/config/kibana.yml
server.port: 5601
server.host: "0.0.0.0"
server.basePath: ""
server.maxPayloadBytes: 1048576
elasticsearch.url: "http://127.0.0.1:9200"
elasticsearch.preserveHost: true
kibana.index: ".kibana"
elasticsearch.pingTimeout: 1500
elasticsearch.requestTimeout: 30000
elasticsearch.shardTimeout: 0
elasticsearch.startupTimeout: 5000
pid.file: /var/run/kibana.pid
logging.dest: stdout
logging.silent: false
logging.quiet: false
logging.verbose: false
ops.interval: 5000
i18n.defaultLocale: "en"
# elasticsearch.username: "user"
# elasticsearch.password: "pass"
|
启动Kibana
|
1
|
$ nohup /usr/local/elk/kibana-5.4.1-linux-x86_64/bin/kibana &
|
|
1
2
|
$ netstat -nplt | grep node
tcp 0 0 0.0.0.0:5601 0.0.0.0:* LISTEN 12471/node
|
然后打开浏览器输入IP加端口5601即可访问,界面如下(需要输入用户密码了):
默认账号:elastic
默认密码:changeme
x-pack安装之后有一个超级用户elastic ,其默认的密码是changeme,拥有对所有索引和数据的控制权,可以使用该用户创建和修改其他用户。
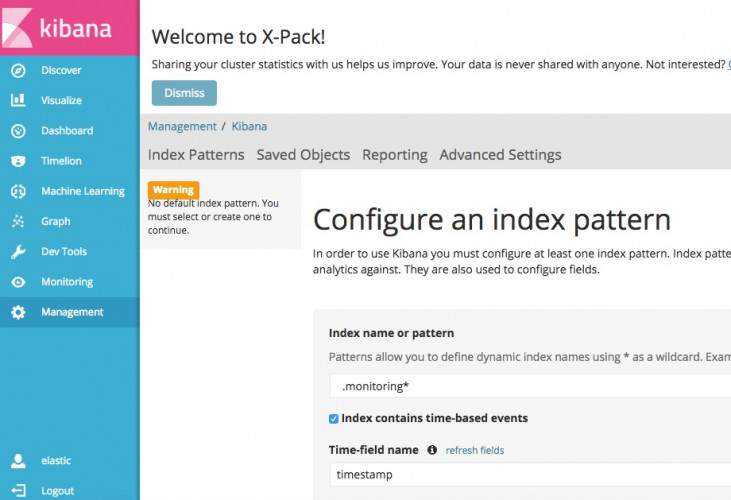
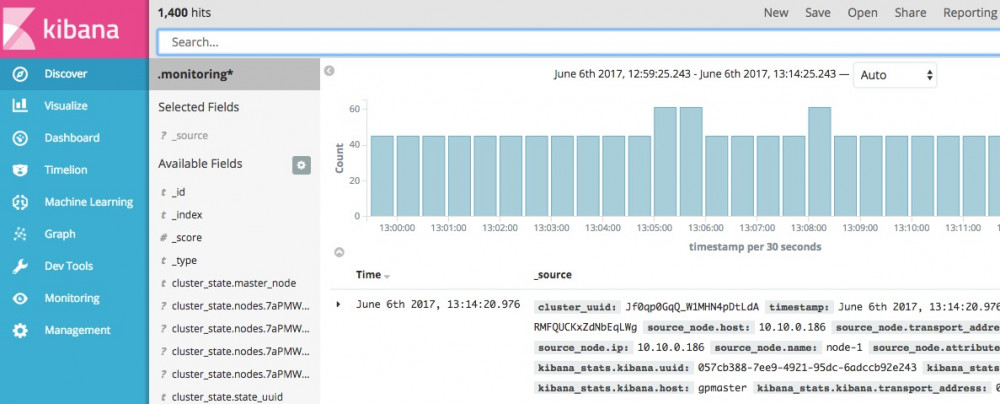
初次访问Kibana的时候,需要配置一个默认的ES索引,一般填写.monitoring*即可,这是因为在上述安装x-pack后,会自动开始监控Elasticsearch集群的状态,并将监控结果以.monitoring*命名索引文件。
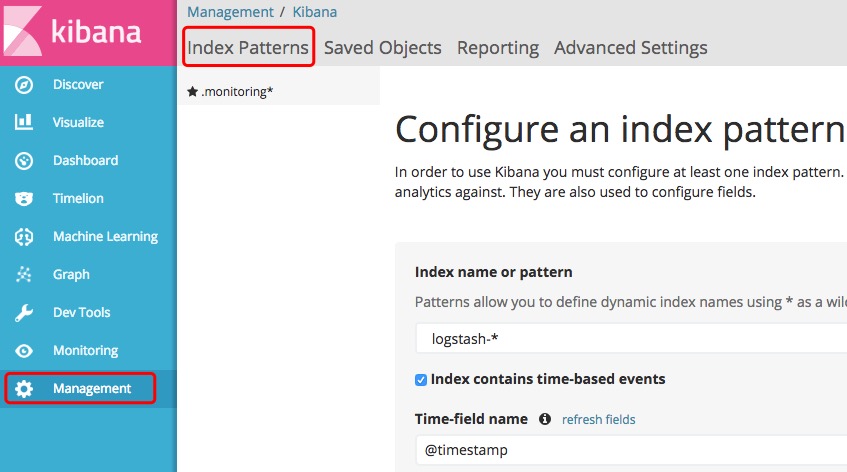
添加logstash索引(Management->index Patterns->+)
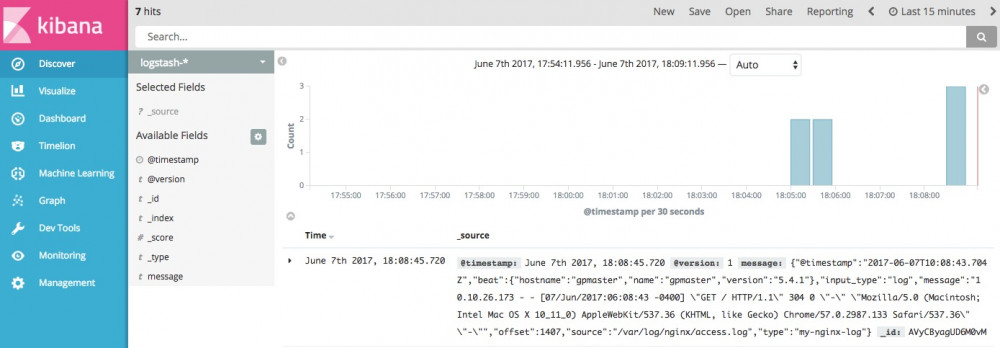
看日志已经出来了。
ELK的搭建已经基本完成,接下来就是搭建elasticsearch集群,以及使用kibana了。
X-PACK使用
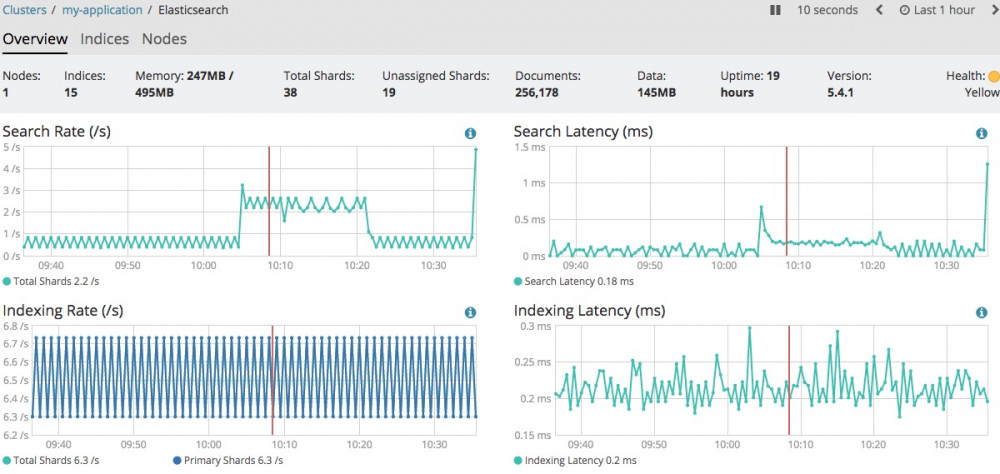
x-pack的监控功能
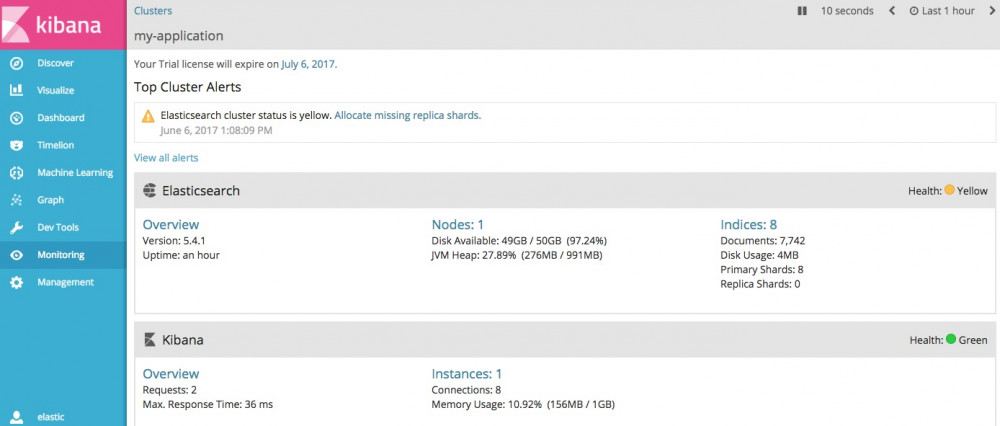
X-Pack监控组件使您能够通过Kibana轻松监控Elasticsearch,您可以实时查看集群运行状况和性能,以及分析过去的集群,索引和节点指标。 此外,您可以监控Kibana本身的性能。在群集上安装X-Pack时,监视代理会在每个节点上运行,以从Elasticsearch收集索引指标。 通过在Kibana中安装X-Pack,您可以通过一组专用仪表板查看监视数据。
x-pack的Graph
https://www.elastic.co/guide/en/x-pack/current/graph-getting-started.html
Redis当队列配置
如果嫌使用kafka当队列太麻烦,可以把Kafka换成Redis即可,配置如下:
filebeat配置
|
1
2
3
4
5
6
7
8
9
10
11
12
13
14
15
16
17
18
19
20
21
22
23
24
|
filebeat.prospectors:
- input_type: log
paths:
- /var/log/*.log
- input_type: log
paths:
- /var/log/nginx/*.log
encoding: utf-8
document_type: my-nginx-log
scan_frequency: 10s
harvester_buffer_size: 16384
max_bytes: 10485760
tail_files: true
output.redis:
enabled: true
hosts: ["127.0.0.1:6379"]
port: 6379
key: filebeat
db: 0
worker: 1
timeout: 5s
max_retries: 3
|
logstash配置
|
1
2
3
4
5
6
7
8
9
10
11
12
13
14
15
16
17
18
19
20
|
input {
redis { #去redis队列取数据;
host => "localhost" #连接redis服务器;
port => 6379 #连接redis端口;
data_type => "list" #数据类型;
key => "filebeat" #队列名称;
}
}
output {
elasticsearch { #Logstash输出到elasticsearch;
hosts => ["localhost:9200"] #elasticsearch为本地;
index => "logstash-nginx-%{+YYYY.MM.dd}" #创建索引;
document_type => "nginx" #文档类型;
workers => 1 #进程数量;
flush_size => 20000
idle_flush_time => 10
user => elastic
password => changeme
}
}
|
查看Redis队列信息
|
1
2
3
4
5
|
$ redis-cli
127.0.0.1:6379> KEYS *
1) "filebeat"
127.0.0.1:6379> llen filebeat
(integer) 2
|
Redis要自行安装了。
Nginx日志输出为JSON格式
把Nginx日志的格式输出成JSON格式展示在Kibana面板,生产环境中基本都是这么使用。
配置Nginx
主要修改nginx的访问日志格式,这里定义成json格式,以便后面logstash更好的处理,建议生产环境也这样使用。在主配置/etc/nginx/nginx.conf文件中添加如下内容(注释其他日志格式):
|
1
2
3
4
5
6
7
8
9
10
11
12
|
log_format json ‘{"@timestamp":"$time_iso8601",‘
‘"host":"$server_addr",‘
‘"clientip":"$remote_addr",‘
‘"size":$body_bytes_sent,‘
‘"responsetime":$request_time,‘
‘"upstreamtime":"$upstream_response_time",‘
‘"upstreamhost":"$upstream_addr",‘
‘"http_host":"$host",‘
‘"url":"$uri",‘
‘"referer":"$http_referer",‘
‘"agent":"$http_user_agent",‘
‘"status":"$status"}‘;
|
在/etc/nginx/conf.d/default.conf中添加如下一行,定义nginx日志使用的格式,以及日志文件的位置。
|
1
|
access_log /var/log/nginx/access.log json;
|
然后重新启动nginx
|
1
2
|
$ nginx -s stop
$ nginx
|
配置Logstash
修改Indexer角色的配置文件:logstash_indexer.conf
|
1
2
3
4
5
6
7
8
9
10
11
12
13
14
15
16
17
18
19
20
21
22
23
24
25
26
27
28
|
$ cat /usr/local/logstash-2.3.2/etc/logstash_indexer.conf
input {
redis {
host => "localhost"
data_type => "list"
key => "filebeat"
type => "redis-input"
}
}
filter {
json {
source => "message"
remove_field => "message"
}
}
output {
elasticsearch {
hosts => ["localhost"]
index => "logstash-nginx-%{+YYYY.MM.dd}"
document_type => "nginx"
# template => "/usr/local/logstash-2.3.2/etc/elasticsearch-template.json"
workers => 1
flush_size => 20000
idle_flush_time => 10
}
}
|
删除elasticsearch老的数据
|
1
|
$ rm -fr /data/elasticsearch/*
|
然后重启logstash_indexer.conf和elastisearch即可,继续刷新Nginx日志。
打开Kibana,应该会让你重新创建索引,如果没有问题会出现JSON格式的日志。
参考:http://www.jianshu.com/p/f3658d267b5d

