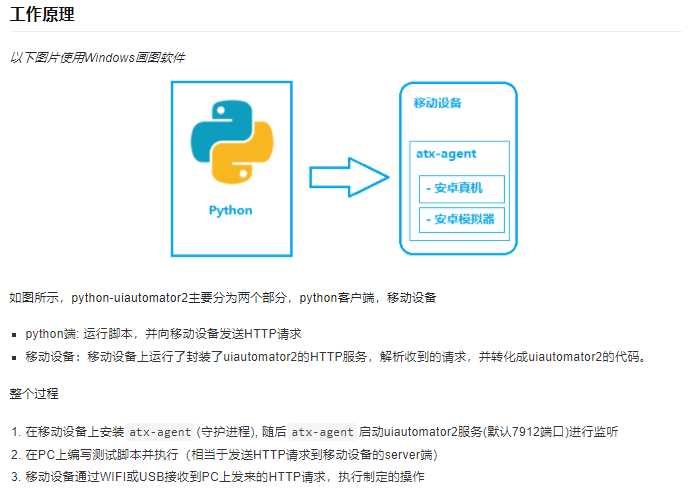
项目地址:https://github.com/openatx/uiautomator2,详情见文档
亮点就是通过WiFi互联(基于atx-agent)
命令行
python -m weditor(http://atx.open.netease.com)ctrl+c退出服务
不常用的
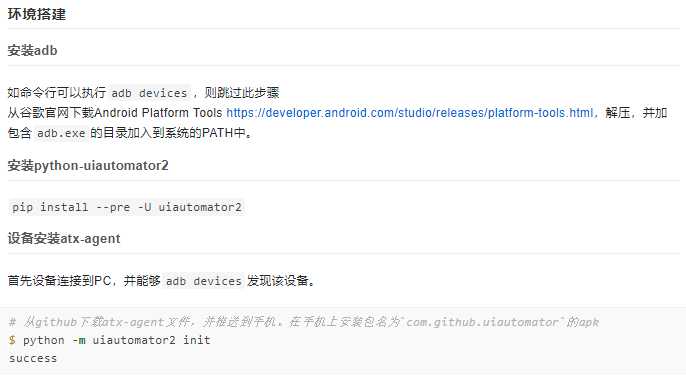
pip install --pre uiautomator2
pip install pillow
python -m uiautomator2 init(这个命令会安装到设备端一个软件)
python -m uiautomator2 clear-cache
python -m uiautomator2 app-stop-all device_ip(可以是ip,也可以是序列号)
实用
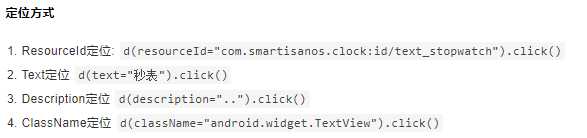
就用这四种方式定位元素,其他的不用定位元素,全靠不标准的滑动等
定位的时候直接复制code,
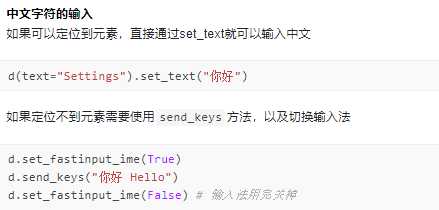
d.set_fastinput_ime(True)
这句代码会关闭我们默认的输入法,而使用IME输入法
获取点击的时候,默认都是使用的百分比
如何停用uiautomator:
辅助功能:就是方便人们使用的一些功能,增加一些快捷键。按电源按钮可以结束通话。,自动安装等等,在设置中可以打开
uiautomatorviewer:是Androidsdk中的一个工具,可以审查元素等等,appium-desktop好像就是基于他的,反正当你运行着uiautomator时,如果再用appium-desk执行session就会报错
1.打开app,点击quit是全部退出,直接退出app,服务也会全部停止
2.d.service("uiautomator").stop()
关于session,不是太明白:
session
session就是一个会话,在Webdriver/Appium中,所有的command只有在session开始启动后才能正在开始。一般通过POST /session这个URL,然后传入Desired capabilities就可以开启session了,开启session后,会返回一个全局唯一的sessionid,以后几乎所有的请求都必须带上这个sessionid,因为这个sessionid代表的是所打开的浏览器,或者移动设备,模拟器或者是打开UWP的APP。如果打开一个包,即一个app的话,那这个session的级别就是app级别的。我们所写的所有代码都是在一个session中,它的级别是设备级别的。
session的作用就是打开app,与我们之前的别无二至。。。。。上面全是胡诌session好像根本不能用
import uiautomator2 as u2

d = u2.connect(‘192.168.1.103‘)
# 第一步连接
# d = u2.connect(‘192.168.1.103‘/‘序列号’)
# d = u2.connect_usb("{Your-Device-Serial}")
# d=u2.connect_wifi(‘10.0.0.1‘)


# app操作
# 安装app
# d.app_install(‘http://some-domain.com/some.apk‘)
# 清楚数据
# d.app_clear()
# d.app_uninstall()
# d.app_uninstall_all()
# 不能用
# d.dismiss_apps()
# 打开app/切换app
# d.app_start(‘com.tencent.tim‘)
# d.app_start(‘com.kugou.android‘)
# d.app_start(‘com.tencent.tim‘)
# d.app_start(‘com.kugou.android‘)
# d.app_start(‘com.tencent.tim‘)
# 关闭app,有时我们需要先关闭app
# d.app_stop(‘com.tencent.tim‘)
# d.app_stop(‘com.tencent.mm‘)
# d.app_stop(‘com.kugou.android‘)
# 停止所有正在进行的app
# d.app_stop_all()
# 可以保护的白名单
# d.app_stop_all(excludes=[‘com.examples.demo‘])

# 基于元素选择器
# 元素的选择就用复制的
# d(text=‘Clock‘, className=‘android.widget.TextView‘)
# 但是不能操作可滚动的,只能通过大概的触摸,任何在元素选择
# d(text="Settings").get_text()  # get widget text
# d(text="Settings").set_text("My text...")  # set the text
# d(text="Settings").clear_text()  # clear the text
# 元素的拖拽
# d(text="Settings").drag_to(x, y, duration=0.5)
# drag the UI object to (the center position of) another UI object, in 0.25 second
# d(text="Settings").drag_to(text="Clock", duration=0.25)
# 元素的两指操作
# d(text="Settings").gesture((sx1, sy1), (sx2, sy2), (ex1, ey1), (ex2, ey2))
# d(text="Settings").pinch_in(percent=100, steps=10)
# d(text="Settings").pinch_out()
# 元素是否消失返回真假
# d(text="Settings").wait(timeout=3.0) # return bool
# d(text="Settings").wait_gone(timeout=1.0)
# 从屏幕上找可以滚动的元素
# 惯性滑动
# d(scrollable=True).fling()
# 惯性滑动向前
# d(scrollable=True).fling.horiz.forward()
# # fling backward vertically
# d(scrollable=True).fling.vert.backward()
# # fling to beginning horizontally
# d(scrollable=True).fling.horiz.toBeginning(max_swipes=1000)
# # fling to end vertically
# d(scrollable=True).fling.toEnd()
# 滚动默认向前,垂直方向 向前,向后,开始,结尾,到特定元素
# d(scrollable=True).scroll(steps=10)
# # scroll forward horizontally
# d(scrollable=True).scroll.horiz.forward(steps=100)
# # scroll backward vertically
# d(scrollable=True).scroll.vert.backward()
# # scroll to beginning horizontally
# d(scrollable=True).scroll.horiz.toBeginning(steps=100, max_swipes=1000)
# # scroll to end vertically
# d(scrollable=True).scroll.toEnd()
# # scroll forward vertically until specific ui object appears
# d(scrollable=True).scroll.to(text="Security")
# d(scrollable=True).scroll.to(text="信息学院16级")
d(scrollable=True).scroll.to(text="信息学院16级")


# 操作--session中的
# 点击d.tap()就是d.click()
# 一定时间内出现就点击,不出现就不惦记了
# clicked = d(text=‘Skip‘).click_exists(timeout=10.0)
# 点击,坐标直接复制
# d.click()
# d.long_click(x, y)
# d.long_click(x, y, 0.5) # long click 0.5s (default)

# 执行拖拽操作
# d.swipe((x,y),(x1,y1))
# d.swipe((x,y),(x1,y1)) # swipe for 0.5s(default)
# 尽量不用这个
# d.drag(sx, sy, ex, ey)
# d.drag(sx, sy, ex, ey, 0.5) # swipe for 0.5s(default)
# 最后的0.2代表每一次滑动的时间。
# d.swipe_points([(0.235, 0.456), (0.503, 0.449), (0.509, 0.601), (0.777, 0.603), (0.771, 0.763), (0.222, 0.75)], 0.2)

# 按硬件
# d.press("home")
# d.press("back")
# list=[ ‘home‘,‘back‘, ‘left‘,‘right‘, ‘up‘, ‘down‘, ‘center‘, ‘menu‘, ‘search‘,
#   ‘enter‘,‘delete‘, ‘recent‘, ‘volume_up‘, ‘volume_down‘,  ‘volume_mute‘, ‘camera‘, ‘power‘]
# for i in list:
#     d.press(i)
#上下左右:可以用来选择一些可选的元素,比如停留在桌面可以用来选择打开的app
# center,enter就是回车,可以当点击
# recent就是左键
# 声音上下键,还有静音
# camrea打开
# delet删除一个字符
# power就是电源按键

# 文字操作
# 打开输入法之后就会替换默认的输入法,注意只有遇到可以输入子的地方就会触发
# d.set_fastinput_ime(True)
# d.send_keys("你好 Hello")
# d.set_fastinput_ime(False)
# d.clear_text()

# 打开通知
# d.open_notification()
# 快速设置----不能用
# d.open_quick_settings()

# # 屏幕操作
# d.screen_on()
# d.screen_off()
# 返回ture/false
# a=d.info.get(‘screenOn‘)
# 设置屏幕方向
# orientation = d.orientation
# d.set_orientation(‘l‘) # or "left"
# d.set_orientation("l") # or "left"
# d.set_orientation("r") # or "right"
# d.set_orientation("n") # or "natural"
# # freeze rotation
# d.freeze_rotation()
# # un-freeze rotation
# d.freeze_rotation(False)

# 获取设备信息
# print(d.device_info)
# print(d.window_size())
# print(d.current_app())
# print(d.serial)

# 测试完成关闭手机客户端
# d.service("uiautomator").stop()


# 没用的东西
# 检查并维持设备端守护进程处于运行状态,几乎没什么用,因为当我们第一次打开app的时候他就会检验一次并且打开
# d.healthcheck()
# 打开调试,本来就是打开的几乎没用
# d.debug = True
# session不能用
# sess = d.session(" com.netease.cloudmusic")
# sess2 = d.session(‘com.netease.cloudmusic ‘,attach = True)
# sess(text="Music").click()
# sess.running()
# 电脑手机传送文件,只能是单文件,不能是文件夹
# 到手机
# d.push("foo.txt", "/sdcard/")
# 可以改名
# d.push("foo.txt", "/sdcard/bar.txt")
# push fileobj
# with open("foo.txt", ‘rb‘) as f:
#     d.push(f, "/sdcard/")
# push and change file access mode
# d.push("foo.sh", "/data/local/tmp/", mode=0o755)
# 到电脑
# d.pull("/sdcard/tmp.txt", "tmp.txt")
# FileNotFoundError will raise if the file is not found on the device
# d.pull("/sdcard/some-file-not-exists.txt", "tmp.txt")
# 监视器,当不能进行测试发生意外情况是触发,方法也就哪几种: