vue 学前知识储备,ES6基础语法
模板字符串(ESC下面的符号``),变量拼接 ${v-name}
<script>
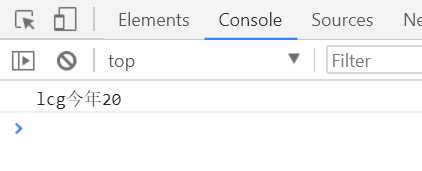
var name = ‘lcg‘, age = 20;
var str = `${name}今年${age}`;
console.log(str);
</script>
箭头函数
<script>
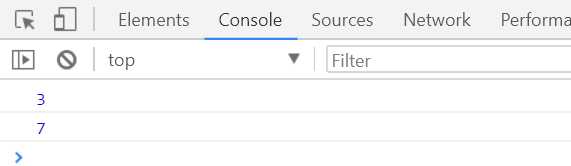
// es5
function add(x, y) {
return x + y
}
console.log(add(1, 2))
//es6 function 函数名(){}===var 函数名=()=>{}
var add2=(a,b)=>{
return a+b
}
console.log(add2(3,4))
</script>
创建对象
<script>
// 字面量方式创建对象
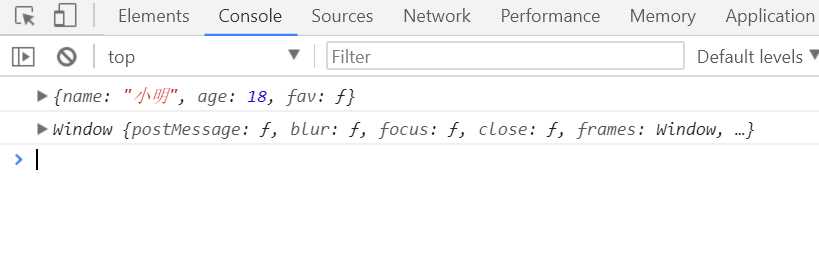
var person = {
name : ‘小明‘,
age : 18,
fav : function () {
// es5中的this指向当前对象person
console.log(this)
}
};
person.fav();
var person2 = {
name : ‘小刚‘,
age : 19,
fav :()=> {
// es6中箭头函数的this指向的是对象的父亲(person2的父亲是window对象)
console.log(this);
}
};
person2.fav();
</script>
<script>
    // 对象的单体模式
    var person3= {
        name : ‘小红‘,
        age : 20,
        fav(){
            // es6中使用对象单体模式解决this指向问题
            console.log(this);
        }
    };
    person3.fav();
</script>

声明变量与常量
ES6 新增了let命令,用来声明变量。它的用法类似于var,但是所声明的变量,只在let命令所在的代码块内有效。
{
  let a = 10;
  var b = 1;
}

a // ReferenceError: a is not defined.
b // 1
上面代码在代码块之中,分别用let和var声明了两个变量。然后在代码块之外调用这两个变量,结果let声明的变量报错,var声明的变量返回了正确的值。这表明,let声明的变量只在它所在的代码块有效。
const声明一个只读的常量。一旦声明,常量的值就不能改变。
const PI = 3.1415;
PI // 3.1415

PI = 3;
// TypeError: Assignment to constant variable.
本质
const实际上保证的,并不是变量的值不得改动,而是变量指向的那个内存地址不得改动。对于简单类型的数据(数值、字符串、布尔值),值就保存在变量指向的那个内存地址,因此等同于常量。但对于复合类型的数据(主要是对象和数组),变量指向的内存地址,保存的只是一个指针,const只能保证这个指针是固定的,至于它指向的数据结构是不是可变的,就完全不能控制了。因此,将一个对象声明为常量必须非常小心。
es6面向对象
三大特性:封装、继承、多态
ES5中:
<script>
    // es5中的构造函数
    function Dog(name,age) {
        this.name = name;
        this.age = age;

    };
    // js中有原型prototype的概念,创建了一个Dog,那么Dog就有一个原型,原型是Dog的父类。
    // 在Dog的父类上添加方法,Dog就有这个方法
    Dog.prototype.showName=function () {
      console.log(this.name);
    };
    var d = new Dog(‘小黄‘,3);
    d.showName();
</script>
ES6中:
<script>
    // es6中使用class类方式创建,单体模式之间不要有逗号
    class Cat{
        // constructor 构造器
        constructor(name,age){
            this.name = name;
            this.age = age;
        }
        showName(){
            console.log(this.name)
        }
        showAge(){
            console.log(this.age)
        }
    }
    var c = new Cat(‘小花‘,‘3‘);
    c.showName();
    c.showAge();
</script>

vue 学前其他知识储备
node.js 6.10.0下载:https://nodejs.org/en/download/releases/
npm ==> node package manager
webpack:打包机
babel:能将es6的代码转换成浏览器识别的代码

vue部分开始

vue的简单使用
<body>
 <!--插值语法 vue {{}} ; react{} ; angular{{}}-->
<div id="app">
    {{msg}}
</div>

<script src="https://cdn.jsdelivr.net/npm/vue@2.5.13/dist/vue.js"></script>
<script>
    var app =new Vue({
        el:"#app",
        data:{
            msg:"今天我们学习vue"
        }
    })
</script>

vue中的指令系统
条件渲染 v-if
<body>

<div id="app">
    <div  v-if="isShow">被发现了</div>

    <div v-if="type === ‘A‘">
        A
    </div>
    <div v-else-if="type === ‘B‘">
        B
    </div>
    <div v-else-if="type === ‘C‘">
        C
    </div>
    <div v-else>
        Not A/B/C
    </div>
</div>

<script src="https://cdn.jsdelivr.net/npm/vue@2.5.13/dist/vue.js"></script>
<script>
    var app =new Vue({
        el:"#app",
        data:{
            type:‘A‘,
            isShow:true
        }

    })
</script>

</body>

v-if 与v-show的区别:
不同的是带有 v-show 的元素始终会被渲染并保留在 DOM 中。v-show 只是简单地切换元素的 CSS 属性 display。
v-if 是“真正”的条件渲染,因为它会确保在切换过程中条件块内的事件监听器和子组件适当地被销毁和重建。
事件处理 v-on (可简写成@)
<body>

<div id="app">
    <div class="div1" v-if="isShow">1</div>
    <button v-on:click = ‘showHandler‘>点击按钮显示或隐藏数字</button>
    <button @click = ‘showHandler‘>点击按钮显示或隐藏数字</button>
</div>

<script src="https://cdn.jsdelivr.net/npm/vue@2.5.13/dist/vue.js"></script>
<script>
    var app =new Vue({
        el:"#app",
        data:{
            type:‘A‘,
            isShow:true
        },
        methods:{
            showHandler(){
                this.isShow=!this.isShow
            }
        }

    })
</script>

事件修饰符
<!-- 阻止单击事件继续传播 -->
<a v-on:click.stop="doThis"></a>

<!-- 提交事件不再重载页面 -->
<form v-on:submit.prevent="onSubmit"></form>

<!-- 修饰符可以串联 -->
<a v-on:click.stop.prevent="doThat"></a>

<!-- 只有修饰符 -->
<form v-on:submit.prevent></form>

<!-- 添加事件监听器时使用事件捕获模式 -->
<!-- 即元素自身触发的事件先在此处处理,然后才交由内部元素进行处理 -->
<div v-on:click.capture="doThis">...</div>

<!-- 只当在 event.target 是当前元素自身时触发处理函数 -->
<!-- 即事件不是从内部元素触发的 -->
<div v-on:click.self="doThat">...</div>
绑定标签属性v-bind (可简写成:)
<div id="app">
    <a v-bind:href="url">百度一下</a>
    <a :href="url">百度一下</a>
</div>

<script src="https://cdn.jsdelivr.net/npm/vue@2.5.13/dist/vue.js"></script>
<script>
    var app =new Vue({
        el:"#app",
        data:{
            url:‘https://www.baidu.com‘
        }
    })

列表渲染 v-for
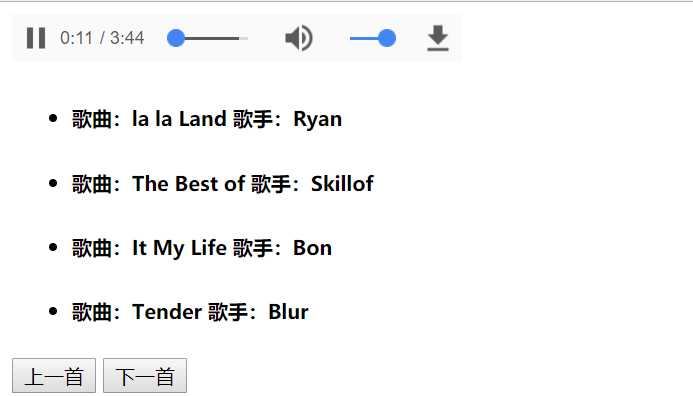
制作简易音乐播放器
<!DOCTYPE html>
<html lang="en">
<head>
    <meta charset="UTF-8">
    <title>简易音乐播放器</title>
</head>
<body>
<!-- autoplay:自动播放;controls:控件 -->
<!--@ended:播放完成后的事件-->
<div id="music">
    <audio :src="currentSong" autoplay controls @ended="nextSongs"></audio>

    <ul>

        <li v-for = ‘(item,index) in songs‘ @click="currentThis(item,index)">

            <h5>歌曲:{{item.name}}   歌手:{{item.author}}</h5>
        </li>
    </ul>
    <button @click=‘previousSongs‘>上一首</button>
    <button @click=‘nextSongs‘>下一首</button>
</div>

<script type="text/javascript" src="vue.js"></script>
<script type="text/javascript">
    var songs = [
        {id: 1, src: ‘./audios/1.mp3‘, name: "la la Land", author: ‘Ryan‘},
        {id: 2, src: ‘./audios/2.mp3‘, name: "The Best of", author: ‘Skillof‘},
        {id: 3, src: ‘./audios/3.mp3‘, name: "It My Life", author: ‘Bon‘},
        {id: 4, src: ‘./audios/4.mp3‘, name: "Tender", author: ‘Blur‘}
    ];

    var music = new Vue({
        el: "#music",
        data: {
            currentSong:‘./audios/1.mp3‘,
            songs:songs,
            currentIndex:0
        },
        methods:{
            currentThis(item,index){
                this.currentSong=this.songs[index].src
            },
            nextSongs(){
                this.currentIndex=this.currentIndex+1;
                if (this.currentIndex == 4) {
                    this.currentIndex = 0
                };
                this.currentSong=this.songs[this.currentIndex].src
            },
            previousSongs(){

                this.currentIndex=this.currentIndex-1
                if(this.currentIndex==-1){
                    this.currentIndex = 4
                }
                this.currentSong=this.songs[this.currentIndex].src
            }
        }
    })
</script>

</body>
</html>