CentOS 6.5下openssh升级
在有的企业中每年都会安全扫描,因为实现远程连接比较重要,如果openssh版本过低,就要对其升级,本文主要讲述openssh升级的步骤。
openssh升级主要有三步:
(1) 安装新版本的openssl
(2) 安装新版本的openssh
如果是生产环境,并且存在备机,建议从备机开始升级,备机升级完了再升级主机。
详细的过程如下:
1.1 安装zlib
Zlib下载地址: http://www.greenxiazai.com/soft/101492.html
[root@localhost ~]# tar –xf zlib-1.2.8.tar.gz
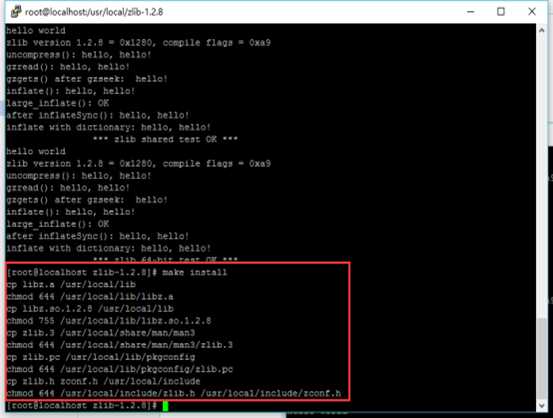
[root@localhost ~]# cd zlib-1.2.8 && ./configure –shared && make && make test && make install

1.2 安装新版本的openssl
这里给出openssl的下载地址:
https://www.openssl.org/source/openssl-1.0.2i.tar.gz,
如果是生产环境,请一定要先确认之前运行的服务是否支持最新的ssl链接库。 安装的命令如下:
1) 备份之前的ssh配置及相关文件
[root@localhost ~]# cp -raf /etc/ssh /etc/ssh.old
[root@localhost ~]# cp -raf /etc/init.d/sshd /etc/init.d/sshd.old
[root@localhost ~]# cp -raf /root/.ssh/ /root/.ssh.old
2) 删掉旧的openssl和openssh
[root@localhost ~]# yum remove -y openssh
[root@localhost ~]# rpm -qa | grep openssl | xargs rpm -e --nodeps
3) 安装openssl
[root@localhost ~]# tar zxvf openssl-1.0.2j.tar.gz
[root@localhost ~]# cd openssl-1.0.2j
[root@localhost ~]# ./config --prefix=/usr/ --shared --openssldir=/etc/ssl --libdir=lib zlib-dynamic
[root@localhost ~]# make depend && make
[root@localhost ~]# make MANDIR=/usr/share/man MANSUFFIX=ssl install && install -dv -m755 /usr/share/doc/openssl-1.0.2i && cp -vfr doc/* /usr/share/doc/openssl-1.0.2i
4) 链接一些必要的库
[root@localhost~]#ln -s \ /usr/lib/libcrypto.so.1.0.0 /usr/lib64/libcrypto.so.1.0.0
[root@localhost ~]# ln -s \ /usr/lib/libssl.so.1.0.0 /usr/lib64/libssl.so.1.0.0
[root@localhost ~]# ln -s \ /usr/lib/libcrypto.so.1.0.0 /usr/lib64/libcrypto.so.10
[root@localhost ~]# ln -s \ /usr/lib/libssl.so.1.0.0 /usr/lib64/libssl.so.10
如果不链接一些必要的库,有一些程序可能会使用不了,比如yum和mysql,安装完成之后可以使用openssl version命令查看版本信息,如果显示下面的图片,表示安装成功。
1.3. 安装并重启openssh
这里给出openssh的下载地址:
http://openbsd.hk/pub/OpenBSD/OpenSSH/portable/openssh-7.4p1.tar.g
1) 安装并重启的命令如下:
[root@localhost ~]# tar zxvf openssh-7.4p1.tar.gz
[root@localhost ~]# cd openssh-7.4p1
2) 隐藏版本号配置
[root@localhost ~]# sed -i ‘/SSH_VERSION/s/OpenSSH_7.4/Goodbye/g‘ version.h
[root@localhost ~]# sed -i ‘/SSH_PORTABLE/s/p1/./g‘ version.h
[root@localhost ~]# echo "/usr/include/openssl/">>/etc/ld.so.conf
[root@localhost ~]# ldconfig
[root@localhost~]#./configure --prefix=/usr --sysconfdir=/etc/ssh --with-md5-passwords --with-ssl-dir=/usr/local/ssl/ --with-privsep-path=/var/empty/sshd
[root@localhost ~]# make
[root@localhost ~]# make install &&
[root@localhost~]# install -v -m755 contrib/ssh-copy-id /usr/bin && install -v -m644 contrib/ssh-copy-id.1 /usr/share/man/man1 && install -v -m755 -d /usr/share/doc/openssh-7.4p1 && install -v -m644 INSTALL LICENCE OVERVIEW README* /usr/share/doc/openssh-7.4p1
3) 恢复备份
[root@localhost ~]# cp -raf /etc/init.d/sshd.old /etc/init.d/sshd
[root@localhost~]#mv?/etc/ssh/sshd_config /etc/ssh/sshd_config.new
[root@localhost~]#cp?-raf/etc/ssh.old/sshd_config /etc/ssh/sshd_config
注:同样,如果在生产环境下,公司对出网有端口限制,那么就要先杀死dropbear第一个监听的端口,把sshd服务配置文件(/etc/ssh/sshd_config)中的监听端口改掉,然后重启sshd服务。
[root@localhost ~]# service sshd restart
重启如果出现下面图片显示的内容:

只需要在sshd配置文件中将相关项注释掉即可,并不影响使用。
最后将sshd服务设置为开机自启动。
[root@localhost ~]# chkconfig sshd on
4) 查看版本

1.4. 注意事项
升级完成后如果ssh拒绝root登录,需修改配置:
[root@localhost ~]# vi /etc/ssh/sshd_config

[root@localhost ~]# service sshd restart
[root@localhost ~]# chkconfig sshd on
升级完成后如果使用xftp拒绝连接,做以下配置:
[root@localhost ~]# vi /etc/ssh/sshd_config
默认配置:

修改后配置:

重启服务:
[root@localhost ~]# service sshd restart
