1 构建京淘框架
1.1 框架介绍
1.1.1 框架的图解
1.2 测试类代码实现
1.2.1 编辑Controller
@Controller

public class UserController {
@Autowired

private UserService userService;
@RequestMapping("/findAll")

public String findAll(Model model){

List<User> userList = userService.findAll();

//将数据保存到request域中

model.addAttribute("userList", userList);

//request.setAttribute("userList", userList);

//通过springMVC的视图解析器来维护路径 /WEB-INF/views/XXXXX.jsp

return "userList";

}

}
1.2.2 编辑Service
@Service
public class UserServiceImpl implements UserService {
//@Resource

/**如果是单个项目用该注解可以实现功能,

     如果是分布式项目必须使用 @autowired

**/

@Autowired
private UserMapper userMapper;
//大型公司要求 如果是接口方法必须添加Override.方便后期维护
@Override
public List<User> findAll() {
return userMapper.findAll();

}
}
1.2.3 编辑Mapper
public interface UserMapper {
    //查询全部用户信息
    List<User> findAll();
}
1.2.4 编辑jsp页面
<%@ page language="java" import="java.util.*" contentType="text/html; charset=utf-8" pageEncoding="utf-8"%>
<%@ taglib uri="http://java.sun.com/jsp/jstl/core" prefix="c" %>
<html>
    <head>
    <meta http-equiv="content-type" content="text/html; charset=UTF-8">
        <title>用户列表页面</title>
    </head>
    <body>
        <table width="60%" algin="center" border="1">
            <tr align="center">
                <td colspan="5"><h2>用户信息</h2></td>
            </tr>
            <tr align="center">
                <td>ID</td>
                <td>姓名</td>
                <td>年龄</td>
                <td>性别</td>
            </tr>
            <c:forEach items="${userList}" var="u">
                <tr align="center">
                <td>${u.id}</td>
                <td>${u.name}</td>
                <td>${u.age}</td>
                <td>${u.sex}</td>
            </tr>
            </c:forEach>
        </table>
    </body>
</html>
1.3 配置SpringMVC
1.3.1 编辑applicationContext-mvc
<?xml version="1.0" encoding="UTF-8"?>
<beans xmlns="http://www.springframework.org/schema/beans"
    xmlns:xsi="http://www.w3.org/2001/XMLSchema-instance"
    xmlns:context="http://www.springframework.org/schema/context"
    xmlns:mvc="http://www.springframework.org/schema/mvc"
    xsi:schemaLocation="
        http://www.springframework.org/schema/beans
        http://www.springframework.org/schema/beans/spring-beans.xsd
        http://www.springframework.org/schema/mvc
        http://www.springframework.org/schema/mvc/spring-mvc-4.0.xsd
        http://www.springframework.org/schema/context
        http://www.springframework.org/schema/context/spring-context.xsd">

    <!--开启包扫描 controller层  -->
    <context:component-scan base-package="com.jt.manage.controller"/>

    <!--开启mvc注解  -->
    <mvc:annotation-driven/>

    <!--添加视图解析器  内部资源视图解析器-->
    <bean id="internalResource" class="org.springframework.web.servlet.view.InternalResourceViewResolver">
        <property name="prefix" value="/WEB-INF/views/"/>
        <property name="suffix" value=".jsp"/>
    </bean>

    <!--配置文件上传解析器  后期维护-->

</beans>
1.3.2 编辑web.xml
<?xml version="1.0" encoding="UTF-8"?>
<web-app xmlns:xsi="http://www.w3.org/2001/XMLSchema-instance"
    xmlns="http://java.sun.com/xml/ns/javaee"
    xsi:schemaLocation="http://java.sun.com/xml/ns/javaee http://java.sun.com/xml/ns/javaee/web-app_2_5.xsd"
    id="jt-manage" version="2.5">
    <display-name>jt-manage</display-name>

    <!--配置前端控制器  -->
    <servlet>
        <servlet-name>springmvc-web</servlet-name>
        <servlet-class>org.springframework.web.servlet.DispatcherServlet</servlet-class>
        <init-param>
            <param-name>contextConfigLocation</param-name>
            <param-value>classpath:/spring/applicationContext*.xml</param-value>
        </init-param>
    </servlet>

    <!-- /*.action        url:localhost:8091/hello.action
        /*.do              url:localhost:8091/hello.do
        /  作用满足restFul的格式  拦截请求和静态资源  不会拦截.jsp页面
         -->

    <!--注意事项 /会拦截静态资源文件  -->
    <servlet-mapping>
        <servlet-name>springmvc-web</servlet-name>
        <url-pattern>/</url-pattern>
    </servlet-mapping>

    <!--解决POST乱码问题 -->
    <filter>
        <filter-name>characterEncodingFilter</filter-name>
        <filter-class>org.springframework.web.filter.CharacterEncodingFilter</filter-class>
        <!--指定字符集编码  -->
        <init-param>
            <param-name>encoding</param-name>
            <param-value>UTF-8</param-value>
        </init-param>
    </filter>
    <filter-mapping>
        <filter-name>characterEncodingFilter</filter-name>
        <url-pattern>/*</url-pattern>
    </filter-mapping>


    <welcome-file-list>
        <welcome-file>index.jsp</welcome-file>
    </welcome-file-list>
</web-app>
1.3.3 编辑Spring的配置文件
<beans xmlns="http://www.springframework.org/schema/beans"
    xmlns:context="http://www.springframework.org/schema/context"
    xmlns:aop="http://www.springframework.org/schema/aop"
    xmlns:tx="http://www.springframework.org/schema/tx"
    xmlns:util="http://www.springframework.org/schema/util"
    xmlns:xsi="http://www.w3.org/2001/XMLSchema-instance"
    xsi:schemaLocation="
    http://www.springframework.org/schema/beans http://www.springframework.org/schema/beans/spring-beans-4.0.xsd
    http://www.springframework.org/schema/context http://www.springframework.org/schema/context/spring-context-4.0.xsd
    http://www.springframework.org/schema/aop http://www.springframework.org/schema/aop/spring-aop-4.0.xsd
    http://www.springframework.org/schema/tx http://www.springframework.org/schema/tx/spring-tx-4.0.xsd
    http://www.springframework.org/schema/util http://www.springframework.org/schema/util/spring-util-4.0.xsd">

    <!--开启包扫描  -->
    <context:component-scan base-package="com.jt"/>

    <!--动态的引入properties文件  -->
    <!-- <context:property-placeholder location="classpath:/hello*.properties"/> -->
    <bean id="propertyPlaceholder" class="org.springframework.beans.factory.config.PropertyPlaceholderConfigurer">
        <property name="locations" >
            <list>
                <value>classpath:/properties/jdbc.properties</value>
            </list>
        </property>
    </bean>

    <!--配置数据源  -->
    <!-- 配置连接池 -->
    <bean id="dataSource" class="com.jolbox.bonecp.BoneCPDataSource" destroy-method="close">
        <!-- 数据库驱动 -->
        <property name="driverClass" value="${jdbc.driver}" />
        <!-- 相应驱动的jdbcUrl -->
        <property name="jdbcUrl" value="${jdbc.url}" />
        <!-- 数据库的用户名 -->
        <property name="username" value="${jdbc.username}" />
        <!-- 数据库的密码 -->
        <property name="password" value="${jdbc.password}" />
        <!-- 检查数据库连接池中空闲连接的间隔时间,单位是分,默认值:240,如果要取消则设置为0 -->
        <property name="idleConnectionTestPeriod" value="60" />
        <!-- 连接池中未使用的链接最大存活时间,单位是分,默认值:60,如果要永远存活设置为0 -->
        <property name="idleMaxAge" value="30" />
        <!-- 每个分区最大的连接数 -->
        <property name="maxConnectionsPerPartition" value="150" />
        <!-- 每个分区最小的连接数 -->
        <property name="minConnectionsPerPartition" value="5" />
    </bean>


    <!--
        只要开启了注解,需要在各个方法中添加注解
    <tx:annotation-driven/>
    -->

    <!--定义事务管理器
        要求id:transactionManager  -->
    <bean id="transactionManager" class="org.springframework.jdbc.datasource.DataSourceTransactionManager">
        <property name="dataSource" ref="dataSource"/>
    </bean>

    <!--定义事务通知
        propagation="REQUIRED" 当前的数据库操作必须添加事务
        spring中有默认的事务策略:
            1.如果是runtimeException或error则自动的回滚事务
            2.如果是检查异常,则不管

        propagation="SUPPORTS" 表示事务支持的
        如果方法需要事务,则查询方法也有事务
        如果方法不需事务.则查询不会添加事务
        一个方法处理多个业务逻辑时用到!!!
    -->
    <tx:advice id="txAdvice" transaction-manager="transactionManager">
        <tx:attributes>
            <tx:method name="save*" propagation="REQUIRED" rollback-for="Exception"/>
            <tx:method name="update*" propagation="REQUIRED" rollback-for="Exception"/>
            <tx:method name="delete*" propagation="REQUIRED" rollback-for="Exception"/>
            <tx:method name="find*" propagation="SUPPORTS"  read-only="true"/>
            <tx:method name="select*" propagation="SUPPORTS" read-only="true"/>
            <tx:method name="query*" propagation="SUPPORTS" read-only="true"/>
            <tx:method name="*"  propagation="SUPPORTS" read-only="true"/>
        </tx:attributes>
    </tx:advice>

    <!--配置事务切面
        切入点表达式:控制业务层的所有方法
        execution(返回值类型 包名.类名.方法名(参数列表))
    -->
    <aop:config>
        <aop:pointcut expression="execution(* com.jt.manage.service..*.*(..))" id="pc"/>
        <aop:advisor advice-ref="txAdvice" pointcut-ref="pc"/>
    </aop:config>

</beans>
1.4 配置Mybatis
1.4.1 配置mybatis配置文件
编辑:mybatis-config.xml
<?xml version="1.0" encoding="UTF-8" ?>
<!DOCTYPE configuration
  PUBLIC "-//mybatis.org//DTD Config 3.0//EN"
  "http://mybatis.org/dtd/mybatis-3-config.dtd">
<configuration>
    <!--开启驼峰映射
        数据库字段  user_id ~~~~~~~~ 属性userId 实现自动映射.
        注意:如果开启驼峰自动的映射规则.则属性和字段必须按此规则定义

        Mybatis缓存策略:
            一级缓存 默认开启的
            作用:在一个sqlSession内.实现数据共享

            二级缓存 默认是关闭
            作用:如果开启二级缓存,则在sqlSessionFactory内实现数据共享
            A:获取sqlSessionA    执行一次select * from user
            B:获取sqlSessionB    该sqlSession将不会执行sql,直接从缓存中获取
      -->
    <settings>
        <!-- 开启驼峰自动映射 -->
        <setting name="mapUnderscoreToCamelCase" value="true" />

        <!-- 二级缓存的总开关,被redis替代 -->
        <setting name="cacheEnabled" value="false" />
    </settings>

</configuration>
1.4.2 配置映射文件
<?xml version="1.0" encoding="UTF-8" ?>
<!DOCTYPE mapper
  PUBLIC "-//mybatis.org//DTD Mapper 3.0//EN"
  "http://mybatis.org/dtd/mybatis-3-mapper.dtd">
<mapper namespace="com.jt.manage.mapper.UserMapper">
    <!--
        说明:
        1.namespace是映射文件的唯一标识 不允许重复
        2.在配置时应该和mybatis的客户端(Mapper接口文件)路径保持一致
        3.映射文件中的Id,应该和接口方法名称一一对应
     -->

    <!--根据分类ID查询分类名称  -->
    <select id="findAll" resultType="User">
        select * from user
    </select>
</mapper>
1.4.3 Spring整合Mybatis
<beans xmlns="http://www.springframework.org/schema/beans"
    xmlns:context="http://www.springframework.org/schema/context"
    xmlns:aop="http://www.springframework.org/schema/aop"
    xmlns:tx="http://www.springframework.org/schema/tx"
    xmlns:util="http://www.springframework.org/schema/util"
    xmlns:xsi="http://www.w3.org/2001/XMLSchema-instance"
    xsi:schemaLocation="
    http://www.springframework.org/schema/beans http://www.springframework.org/schema/beans/spring-beans-4.0.xsd
    http://www.springframework.org/schema/context http://www.springframework.org/schema/context/spring-context-4.0.xsd
    http://www.springframework.org/schema/aop http://www.springframework.org/schema/aop/spring-aop-4.0.xsd
    http://www.springframework.org/schema/tx http://www.springframework.org/schema/tx/spring-tx-4.0.xsd
    http://www.springframework.org/schema/util http://www.springframework.org/schema/util/spring-util-4.0.xsd">

    <!--整合Mybatis  -->
    <bean id="sqlSessionFactory" class="org.mybatis.spring.SqlSessionFactoryBean">
        <!--添加数据源  -->
        <property name="dataSource" ref="dataSource"/>
        <!--引入mybatis的核心配置文件  -->
        <property name="configLocation" value="classpath:/mybatis/mybatis-config.xml"/>
        <!--添加映射文件  -->
        <property name="mapperLocations" value="classpath:/mybatis/mappers/*.xml"/>
        <!--配置别名包  -->
        <property name="typeAliasesPackage" value="com.jt.manage.pojo"></property>
    </bean>

    <!--为mapper接口生成代理对象 该代理对象是JDK生成的 -->
    <bean id="mapperScanner" class="org.mybatis.spring.mapper.MapperScannerConfigurer">
        <property name="basePackage" value="com.jt.manage.mapper"/>
    </bean>
</beans>
1.5 框架的终极教学
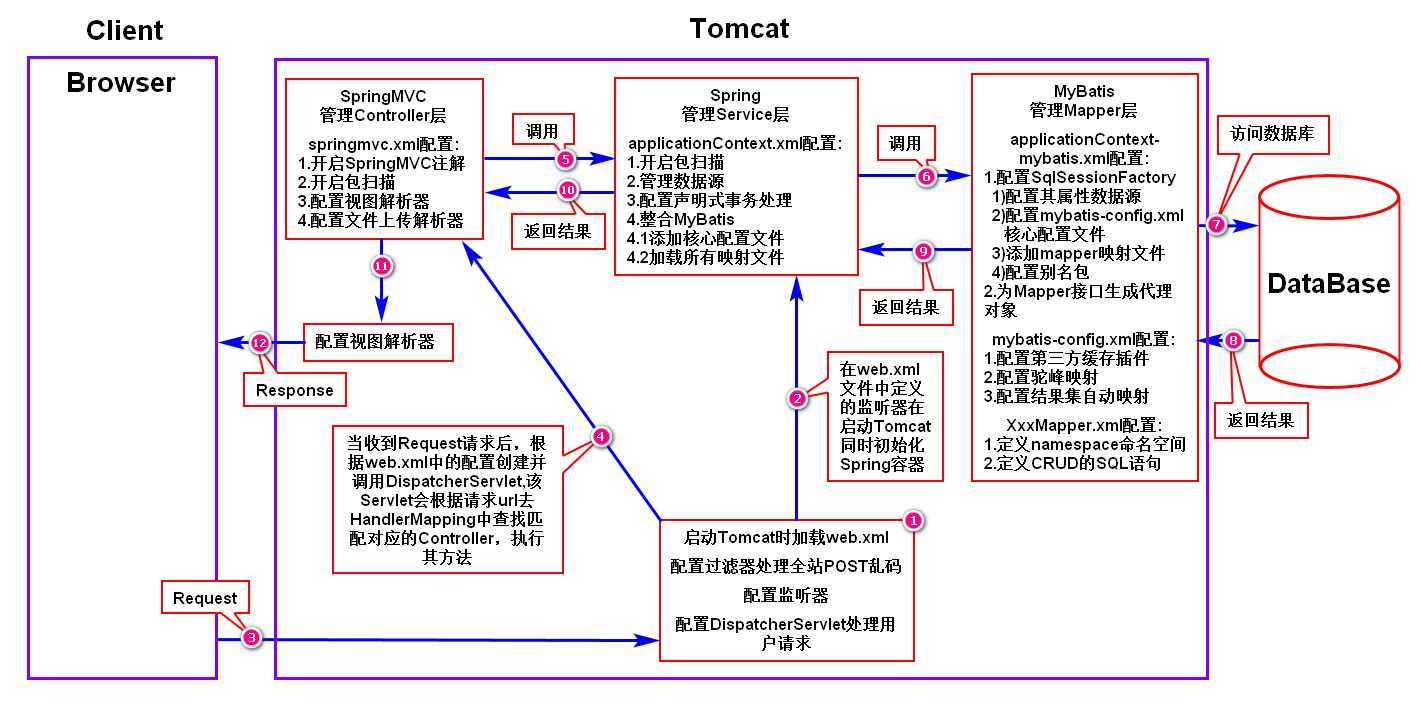
1.5.1 调用流程
1.从tomcat启动
2.加载web.xml配置文件
当解析当前端控制器时开始实例容器 spring容器(springmvc-spring)
根据具体的扫描路径开始加载配置文件classpath:/spring/applicationContext*.xml
3.解析SpringMVC的配置文件
applicationContext-mvc.xml----加载applicationContext-mybatis-----applicationCntext.xml.
tomcat已经加载全部的配置文件.
在内部进行对象的创建和赋值.最终形成了完整的对象.
4.当tomcat启动完成后,可以通过url进行页面访问http://localhost:8091/findAll
被前端控制器拦截,交给对应的Controller进行数据处理.
2 补充知识
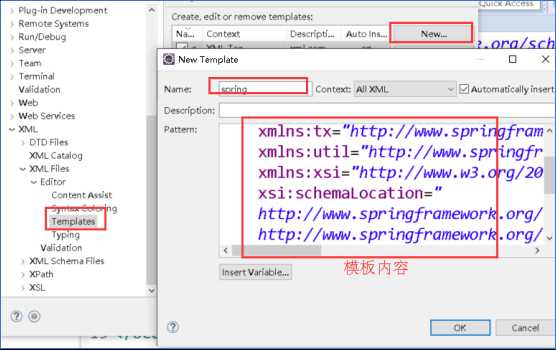
2.1 添加模板
2.1.1 添加spring模板