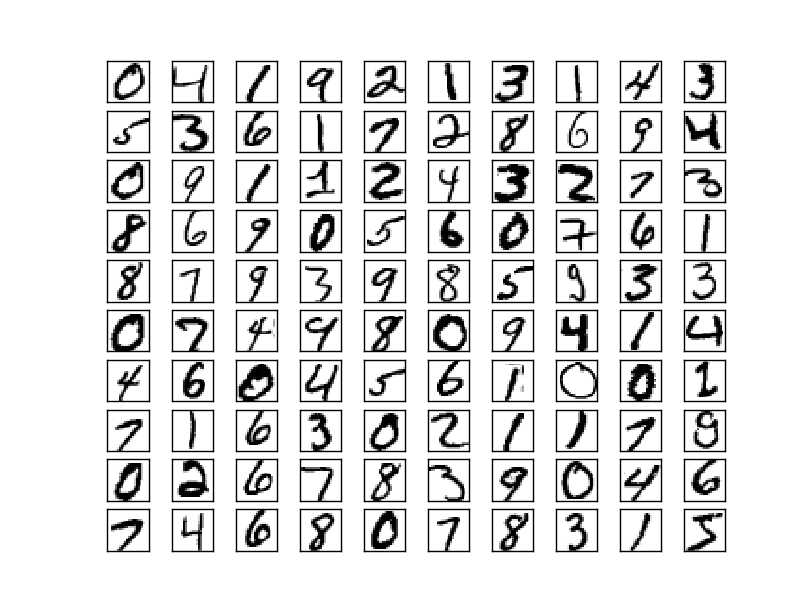
mnist是一个被重度使用的数字手写字符集。它来自美国国家标准与技术研究所, National Institute of Standards and Technology (NIST). 训练集 (training set) 由来自 250 个不同人手写的数字构成, 其中 50% 是高中学生, 50% 来自人口普查局 (the Census Bureau) 的工作人员. 测试集(test set) 也是同样比例的手写数字数据
总共4个文件,名字也很直接:
train-images-idx3-ubyte: training set images
train-labels-idx1-ubyte: training set labels
t10k-images-idx3-ubyte: test set images
t10k-labels-idx1-ubyte: test set labels
图片都被转成二进制放到了文件里面,读取的时候要按照固定方法来读。
2、什么是ANN;
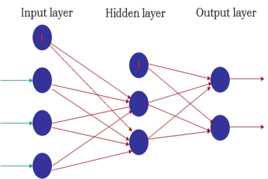
人工神经网络(Artificial Neural Network,简称ANN )是指由大量的处理单元(神经元) 互相连接而形成的复杂网络结构,是对人脑组织结构和运行机制的某种抽象、简化和模拟。这里我们用ANN指小型神经网络 ,也经常被叫做多层感知器(Multi-layer Perceptron MLP)。
神经网络是具有适应性的简单单元组成的广泛并行互联的网络。它的组织能够模拟生物神经系统对真实世界物体做做出的反应。神经网络的最基本的成分是神经元模型,也就是最简单的神经元模型。
神经元接收到来自n个其他神经元传递过来的输入信号,这些信号通过带权重的链接进行传递。神经元接收到的总输入值将与神经元的阈值进行比较,然后通过“激活函数”处理以产生神经元的输出。
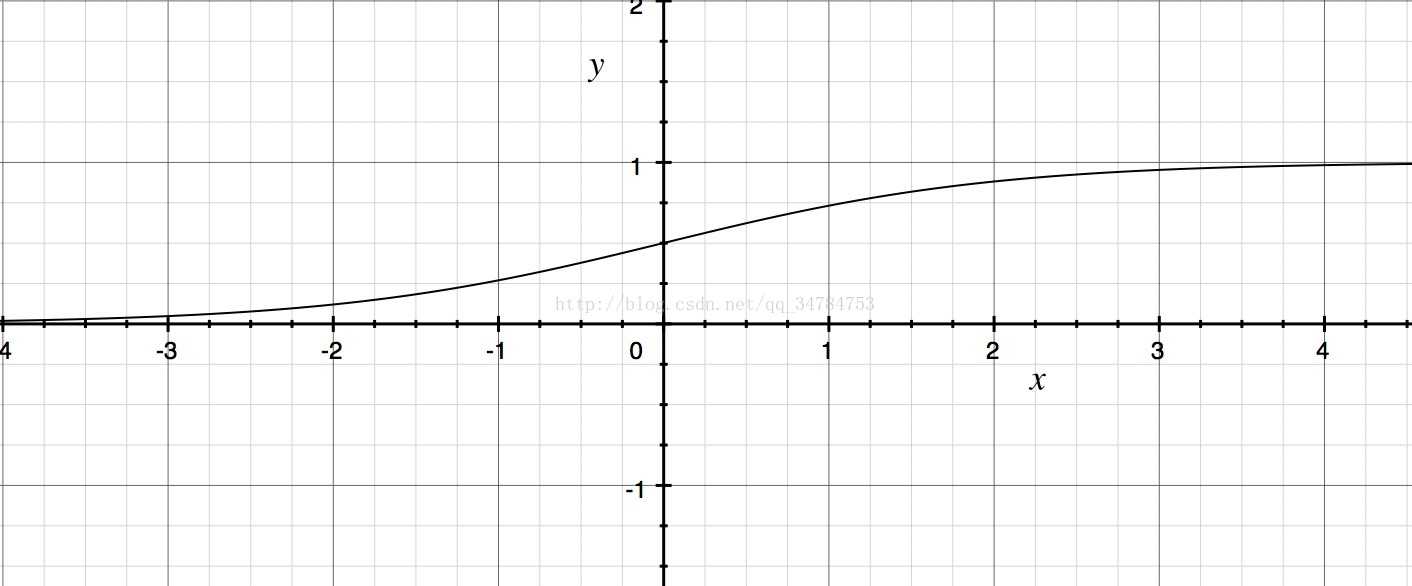
理想的激活函数应该是阶跃函数,也就是它能够将输入值映射成为输出值0或1。其中“0”代表神经元抑制,“1”代表神经元兴奋。但是由于阶跃函数不连续且不可导,因此实际上常常使用sigmoid函数当做神经元的激活函数。它能够将可能在较大范围内变化的输出值挤压到(0,1)之间这个范围内。因此有时也成为挤压函数。常用的sigmoid函数是回归函数。
f(x) = 1/(1+e^(-x))
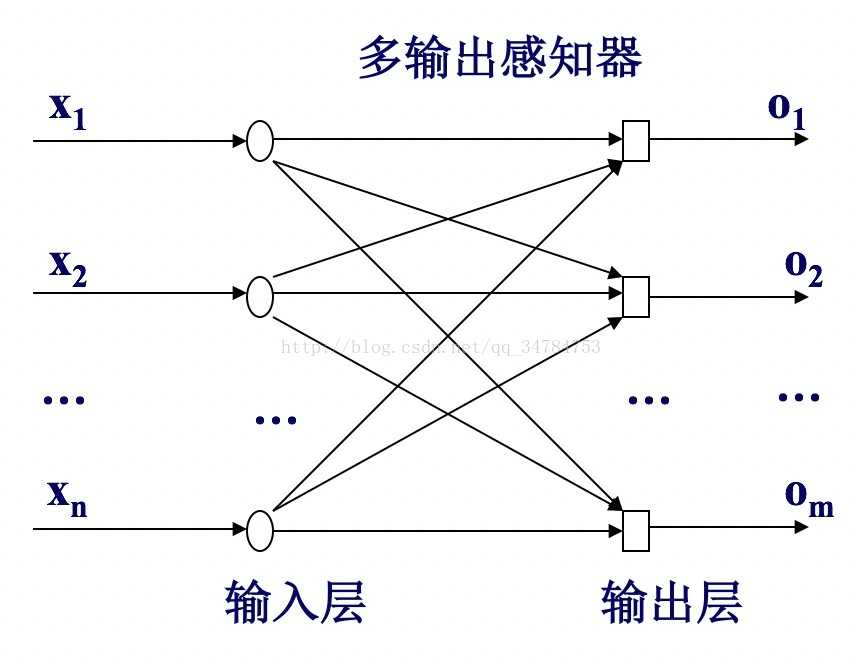
ANN是最简单的神经网络,它由几层神经元组成。输入层接受外界信号后传递给输出层。输出层是M-P神经元。感知机也成为阈值逻辑单元。感知机可以通过采用监督学习来逐步增强模式划分的能力,达到学习的目的。一般来说,默认认为ANN(MLP)都是3层网络,但是每层的元可能比较多,比如像这样

BP算法(误差逆传播算法)是神经网络在发展到中间阶段的时候重要的理论和运用成果。
?在感知器算法中我们实际上是在利用理想输出与实际输出之间的误差作为增量来修正权值,然而在多层感知器中,我们只能计算出输出层的误差,中间隐层由于不直接与外界连接,其误差无法估计。
?反向传播算法(BP算法)的思想:从后向前反向逐层传播输出层的误差,以间接计算隐层的误差。算法可以分为两个阶段:
–正向过程:从输入层经隐层逐层正向计算各单元的输出;
–反向过程:由输出误差逐层反向计算隐层各单元的误差,并用此误差修正前层的权值。
B-P算法的学习过程如下:
(1)选择一组训练样例,每一个样例由输入信息和期望的输出结果两部分组成。
(2)从训练样例集中取一样例,把输入信息输入到网络中。
(3)分别计算经神经元处理后的各层节点的输出。
(4)计算网络的实际输出和期望输出的误差。
(5)从输出层反向计算到第一个隐层,并按照某种能使误差向减小方向发展的原则,调整网络中各神经元的连接权值。
(6)对训练样例集中的每一个样例重复(3)-(5)的步骤,直到对整个训练样例集的误差达到要求时为止。
?优点:
–理论基础牢固,推导过程严谨,物理概念清晰,通用性好等。所以,它是目前用来训练前馈多层网络较好的算法。
?缺点:
–BP算法的收敛速度一般来说比较慢;
–BP算法只能收敛于局部最优解,不能保证收敛于全局最优解;
–当隐层元的数量足够多时,网络对训练样本的识别率很高,但对测试样本的识别率有可能很差,即网络的推广能力有可能较差。
3、OpenCV+Python实现ANN算法;
import cv2
import numpy as np
ann = cv2.ml.ANN_MLP_create()
ann.setLayerSizes(np.array([9, 5, 9], dtype=np.uint8))
ann.setTrainMethod(cv2.ml.ANN_MLP_BACKPROP)
ann.train(np.array([[1.2, 1.3, 1.9, 2.2, 2.3, 2.9, 3.0, 3.2, 3.3]], dtype=np.float32),
cv2.ml.ROW_SAMPLE,
np.array([[0,0,0,0,0,1,0,0,0]], dtype=np.float32))
print(ann.predict(np.array([[1.4, 1.5, 1.2, 2., 2.5, 2.8, 3., 3.1, 3.8]], dtype=np.float32)))
其中
ann = cv2.ml.ANN_MLP_create()
创建ann,可以看到opencv中,ann和mlp就是一个意思
ann.setLayerSizes(np.array([9, 5, 9], dtype=np.uint8))
ann.setTrainMethod(cv2.ml.ANN_MLP_BACKPROP)
设置参数,为959三层网络,并且使用反向传播算法。
ann.train(np.array([[1.2, 1.3, 1.9, 2.2, 2.3, 2.9, 3.0, 3.2, 3.3]], dtype=np.float32),
cv2.ml.ROW_SAMPLE,
np.array([[0,0,0,0,0,1,0,0,0]], dtype=np.float32))
注意这里,ann的train包含三个参数:samples、layout和responses。只有samples是必须设置的,另两个可选。如果不提供layout和responses采用无监督算法,如果提供则是layout和responses有监督算法。我们实现mnist肯定是监督的。由于是959,所以输入9个数据。
完整请参考https://docs.opencv.org/master/d0/dce/classcv_1_1ml_1_1ANN__MLP.html
输入原始数据,训练。由于是959,所以输入9个数据。
print(ann.predict(np.array([[1.4, 1.5, 1.2, 2., 2.5, 2.8, 3., 3.1, 3.8]], dtype=np.float32)))
进行预测并且打印结果
由于使用了ANN,所以整个算法的结构和前面knn/svm都是非常相识的,这一点新版本的OpenCV做的相当好。
这个例子不能说明任何问题,只能给证明opencv中ann是正确安装的。
4、ANN实现动物分类;
注意,我们只采用了模拟数据,以理清楚语法为主要目标
import cv2
import numpy as np
from random import randint
animals_net = cv2.ml.ANN_MLP_create()
animals_net.setTrainMethod(cv2.ml.ANN_MLP_RPROP | cv2.ml.ANN_MLP_UPDATE_WEIGHTS)
animals_net.setActivationFunction(cv2.ml.ANN_MLP_SIGMOID_SYM)
animals_net.setLayerSizes(np.array([3, 8, 4]))
animals_net.setTermCriteria(( cv2.TERM_CRITERIA_EPS | cv2.TERM_CRITERIA_COUNT, 10, 1 ))
"""Input arrays
weight, length, teeth
"""
"""Output arrays
dog, eagle, dolphin and dragon
"""
def dog_sample():
return [randint(10, 20), 1, randint(38, 42)]
def dog_class():
return [1, 0, 0, 0]
def condor_sample():
return [randint(3,10), randint(3,5), 0]
def condor_class():
return [0, 1, 0, 0]
def dolphin_sample():
return [randint(30, 190), randint(5, 15), randint(80, 100)]
def dolphin_class():
return [0, 0, 1, 0]
def dragon_sample():
return [randint(1200, 1800), randint(30, 40), randint(160, 180)]
def dragon_class():
return [0, 0, 0, 1]
def record(sample, classification):
return (np.array([sample], dtype=np.float32), np.array([classification], dtype=np.float32))
records = []
"""
SAMPLES = 5000
for x in range(0, SAMPLES):
print "Samples %d/%d" % (x, SAMPLES)
animals_net.train(np.array([dog_sample()], dtype=np.float32), cv2.ml.ROW_SAMPLE, np.array([dog_class()], dtype=np.float32))
animals_net.train(np.array([condor_sample()], dtype=np.float32), cv2.ml.ROW_SAMPLE, np.array([condor_class()], dtype=np.float32))
animals_net.train(np.array([dolphin_sample()], dtype=np.float32), cv2.ml.ROW_SAMPLE, np.array([dolphin_class()], dtype=np.float32))
animals_net.train(np.array([dragon_sample()], dtype=np.float32), cv2.ml.ROW_SAMPLE, np.array([dragon_class()], dtype=np.float32))
"""
RECORDS = 5000
for x in range(0, RECORDS):
records.append(record(dog_sample(), dog_class()))
records.append(record(condor_sample(), condor_class()))
records.append(record(dolphin_sample(), dolphin_class()))
records.append(record(dragon_sample(), dragon_class()))
EPOCHS = 2
for e in range(0, EPOCHS):
print("Epoch %d:" % e)
for t, c in records:
animals_net.train(t, cv2.ml.ROW_SAMPLE, c)
TESTS = 100
dog_results = 0
for x in range(0, TESTS):
clas = int(animals_net.predict(np.array([dog_sample()], dtype=np.float32))[0])
print("class: %d" % clas)
if (clas) == 0:
dog_results += 1
condor_results = 0
for x in range(0, TESTS):
clas = int(animals_net.predict(np.array([condor_sample()], dtype=np.float32))[0])
print("class: %d" % clas)
if (clas) == 1:
condor_results += 1
dolphin_results = 0
for x in range(0, TESTS):
clas = int(animals_net.predict(np.array([dolphin_sample()], dtype=np.float32))[0])
print("class: %d" % clas)
if (clas) == 2:
dolphin_results += 1
dragon_results = 0
for x in range(0, TESTS):
clas = int(animals_net.predict(np.array([dragon_sample()], dtype=np.float32))[0])
print("class: %d" % clas)
if (clas) == 3:
dragon_results += 1
print ("Dog accuracy: %f%%" % (dog_results))
print ("condor accuracy: %f%%" % (condor_results))
print ("dolphin accuracy: %f%%" % (dolphin_results))
print ("dragon accuracy: %f%%" % (dragon_results))
其中
animals_net = cv2.ml.ANN_MLP_create()
animals_net.setTrainMethod(cv2.ml.ANN_MLP_RPROP | cv2.ml.ANN_MLP_UPDATE_WEIGHTS)
animals_net.setActivationFunction(cv2.ml.ANN_MLP_SIGMOID_SYM)
animals_net.setLayerSizes(np.array([3, 8, 4]))
animals_net.setTermCriteria(( cv2.TERM_CRITERIA_EPS | cv2.TERM_CRITERIA_COUNT, 10, 1 ))
创建ANN,设定为弹性(resilient)反向传播,激励函数为sigmod(这几项都是前面那个例子所没有的),并且层数为384,同时设定算法终止条件。
def dog_sample():
return [randint(10, 20), 1, randint(38, 42)]
def dog_class():
return [1, 0, 0, 0]
def condor_sample():
return [randint(3,10), randint(3,5), 0]
def condor_class():
return [0, 1, 0, 0]
def dolphin_sample():
return [randint(30, 190), randint(5, 15), randint(80, 100)]
def dolphin_class():
return [0, 0, 1, 0]
def dragon_sample():
return [randint(1200, 1800), randint(30, 40), randint(160, 180)]
def dragon_class():
return [0, 0, 0, 1]
定义四种创建样本函数和四种分类函数,用来帮助训练网络。其中dog为类1,condor为类2,dolphin为类3,dragon为勒
RECORDS = 5000
for x in range(0, RECORDS):
records.append(record(dog_sample(), dog_class()))
records.append(record(condor_sample(), condor_class()))
records.append(record(dolphin_sample(), dolphin_class()))
records.append(record(dragon_sample(), dragon_class()))
EPOCHS = 2
for e in range(0, EPOCHS):
print("Epoch %d:" % e)
for t, c in records:
animals_net.train(t, cv2.ml.ROW_SAMPLE, c)
直接将样本生成函数和分类函数压入模型。共创建4类动物数据,每类5k样本。这些动物的向量都是随机生产的(也就是特征都是没有规律的)。这个例子只是为了进一步说明ann是如何实现效果的。这里只进行了2次迭代。那么训练的迭代需要多少次?这个是需要具体研究的;
TESTS = 100
dog_results = 0
for x in range(0, TESTS):
clas = int(animals_net.predict(np.array([dog_sample()], dtype=np.float32))[0])
print("class: %d" % clas)
if (clas) == 0:
dog_results += 1
condor_results = 0
for x in range(0, TESTS):
clas = int(animals_net.predict(np.array([condor_sample()], dtype=np.float32))[0])
print("class: %d" % clas)
if (clas) == 1:
condor_results += 1
dolphin_results = 0
for x in range(0, TESTS):
clas = int(animals_net.predict(np.array([dolphin_sample()], dtype=np.float32))[0])
print("class: %d" % clas)
if (clas) == 2:
dolphin_results += 1
dragon_results = 0
for x in range(0, TESTS):
clas = int(animals_net.predict(np.array([dragon_sample()], dtype=np.float32))[0])
print("class: %d" % clas)
if (clas) == 3:
dragon_results += 1
print ("Dog accuracy: %f%%" % (dog_results))
print ("condor accuracy: %f%%" % (condor_results))
print ("dolphin accuracy: %f%%" % (dolphin_results))
print ("dragon accuracy: %f%%" % (dragon_results))
将数据带回去,比进行简单测试(不是kflod)
这个结果相当的糟糕,当然我们已经进一步知道了语法如何实现ann
5、实现mnist;
import cv2
import numpy as np
import digits_ann as ANN
#用来确定矩形是否完全包含在另一个矩形中
def inside(r1, r2):
x1,y1,w1,h1 = r1
x2,y2,w2,h2 = r2
if (x1 > x2) and (y1 > y2) and (x1+w1 < x2+w2) and (y1+h1 < y2 + h2):
return True
else:
return False
#用来获取数字周围的矩形,在数字上对其中心化,保证数字完全包含在正方形中
def wrap_digit(rect):
x, y, w, h = rect
padding = 5
hcenter = x + w/2
vcenter = y + h/2
roi = None
if (h > w):
w = h
x = hcenter - (w/2)
else:
h = w
y = vcenter - (h/2)
return ((int)(x-padding), (int)(y-padding), (int)(w+padding), (int)(h+padding))
# 创建ann,隐藏层有58个节点,共5w样本
ann, test_data = ANN.train(ANN.create_ANN(58), 50000, 5)
font = cv2.FONT_HERSHEY_SIMPLEX
# 用来测试的识别图像。这个例子需要添加的部分就是要做k-fold或者至少一次测试
path = "D:/dl4cv/workSpace/chapter9/images/numbers.jpg"
img = cv2.imread(path, cv2.IMREAD_UNCHANGED)
bw = cv2.cvtColor(img, cv2.COLOR_BGR2GRAY)
bw = cv2.GaussianBlur(bw, (7,7), 0)
ret, thbw = cv2.threshold(bw, 127, 255, cv2.THRESH_BINARY_INV)
thbw = cv2.erode(thbw, np.ones((2,2), np.uint8), iterations = 2)
#通过轮廓来迭代
image, cntrs, hier = cv2.findContours(thbw.copy(), cv2.RETR_TREE, cv2.CHAIN_APPROX_SIMPLE)
rectangles = []
for c in cntrs:
r = x,y,w,h = cv2.boundingRect(c)
a = cv2.contourArea(c)
b = (img.shape[0]-3) * (img.shape[1] - 3)
is_inside = False
for q in rectangles:
if inside(r, q):
is_inside = True
break
if not is_inside:
if not a == b:
rectangles.append(r)
for r in rectangles:
x,y,w,h = wrap_digit(r)
cv2.rectangle(img, (x,y), (x+w, y+h), (0, 255, 0), 2)
roi = thbw[y:y+h, x:x+w]
try:
digit_class = int(ANN.predict(ann, roi.copy())[0])#digits_ann as ANN
except:
continue
cv2.putText(img, "%d" % digit_class, (x, y-1), font, 1, (0, 255, 0))
cv2.imshow("thbw", thbw)
cv2.imshow("contours", img)
cv2.imwrite("sample.jpg", img)
cv2.waitKey()
以及
import cv2
import pickle
import numpy as np
import gzip
"""OpenCV ANN Handwritten digit recognition example
Wraps OpenCV‘s own ANN by automating the loading of data and supplying default paramters,
such as 20 hidden layers, 10000 samples and 1 training epoch.
The load data code is taken from http://neuralnetworksanddeeplearning.com/chap1.html
by Michael Nielsen
"""
"""
这是一个ann类库,为了尽可能自动执行,我们进行封装
"""
#读取mnist.pkl.gz数据
def load_data():
mnist = gzip.open(‘D:/dl4cv/datesets/mnist.pkl.gz‘, ‘rb‘)
#训练集,校验集和测试集 注意 pickle.load(mnist,encoding="bytes")
training_data, classification_data, test_data = pickle.load(mnist,encoding="bytes")
mnist.close()
return (training_data, classification_data, test_data)
def wrap_data():
tr_d, va_d, te_d = load_data()
training_inputs = [np.reshape(x, (784, 1)) for x in tr_d[0]]
training_results = [vectorized_result(y) for y in tr_d[1]]
training_data = zip(training_inputs, training_results)
validation_inputs = [np.reshape(x, (784, 1)) for x in va_d[0]]
validation_data = zip(validation_inputs, va_d[1])
test_inputs = [np.reshape(x, (784, 1)) for x in te_d[0]]
test_data = zip(test_inputs, te_d[1])
#训练集,校验集和测试集,只有训练集是有results的,也就是由监督的
return (training_data, validation_data, test_data)
#创建包含10个元素的零元组,在期望结果的位置设置1.这样可以用作输出层的类标签
def vectorized_result(j):
e = np.zeros((10, 1))
e[j] = 1.0
return e
#创建一个用于手写数字识别的ann
def create_ANN(hidden = 20):
ann = cv2.ml.ANN_MLP_create()
ann.setLayerSizes(np.array([784, hidden, 10]))
ann.setTrainMethod(cv2.ml.ANN_MLP_RPROP)
ann.setActivationFunction(cv2.ml.ANN_MLP_SIGMOID_SYM)
#截至条件
ann.setTermCriteria(( cv2.TERM_CRITERIA_EPS | cv2.TERM_CRITERIA_COUNT, 100, 1 ))
return ann
def train(ann, samples = 10000, epochs = 1):
tr, val, test = wrap_data()
#给定一定数量的样本和训练周期,加载数据,然后迭代某个设定的次数
for x in range(epochs):
counter = 0
for img in tr:
if (counter > samples):
break
if (counter % 1000 == 0):
print("Epoch %d: Trained %d/%d" % (x, counter, samples))
counter += 1
data, digit = img
ann.train(np.array([data.ravel()], dtype=np.float32), cv2.ml.ROW_SAMPLE, np.array([digit.ravel()], dtype=np.float32))
print("Epoch %d complete" % x)
return ann, test
#封装ann的test
def test(ann, test_data):
sample = np.array(test_data[0][0].ravel(), dtype=np.float32).reshape(28, 28)
cv2.imshow("sample", sample)
cv2.waitKey()
print (ann.predict(np.array([test_data[0][0].ravel()], dtype=np.float32)))
#封装ann的predict
def predict(ann, sample):
resized = sample.copy()
rows, cols = resized.shape
if (rows != 28 or cols != 28) and rows * cols > 0:
resized = cv2.resize(resized, (28, 28), interpolation = cv2.INTER_LINEAR)
return ann.predict(np.array([resized.ravel()], dtype=np.float32))
"""
使用方法::
ann, test_data = train(create_ANN())
test(ann, test_data)
"""
其中:
#读取mnist.pkl.gz数据
def load_data():
mnist = gzip.open(‘D:/dl4cv/datesets/mnist.pkl.gz‘, ‘rb‘)
#训练集,校验集和测试集 注意 pickle.load(mnist,encoding="bytes")
training_data, classification_data, test_data = pickle.load(mnist,encoding="bytes")
mnist.close()
return (training_data, classification_data, test_data)
Load_data()主要作用是解压数据集,然后从数据集中把数据取出来.
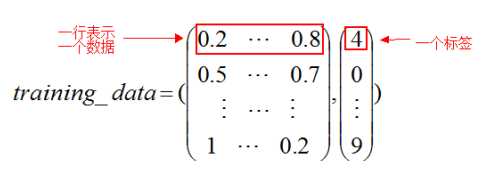
mnist.pkl.gz:是一个由两个元素构成的元组.
其中一个元素是测试图片集合,是一个50000*784的numpy ndarray(其中50000行就是数据的数量,784列就是一个数据的维度(这里是像素)).
第二个元素就是一个测试图片的标签集.是一个50000*1的numpy ndarray.其中指明了每行是一个什么数字…通俗的来说就是这个样子:
validation_data和test_data的结构和上面的training_data是一样的,只是数量(元素的行数)不一样.这两个是10000行.
def wrap_data():
tr_d, va_d, te_d = load_data()
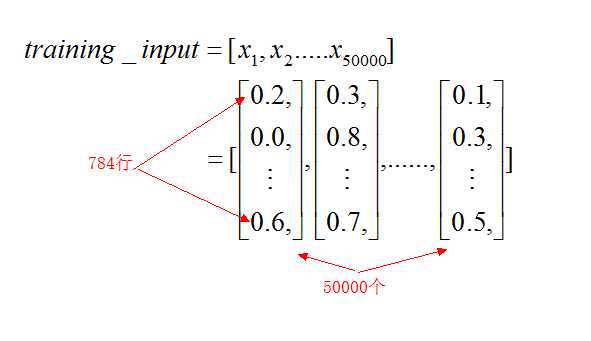
training_inputs = [np.reshape(x, (784, 1)) for x in tr_d[0]]
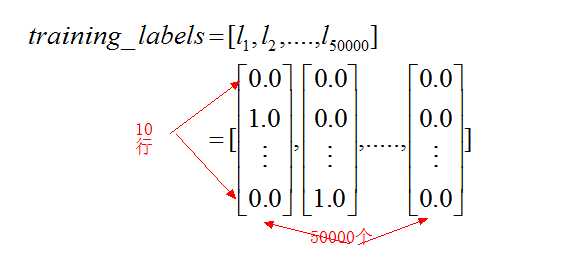
training_results = [vectorized_result(y) for y in tr_d[1]]
training_data = zip(training_inputs, training_results)
validation_inputs = [np.reshape(x, (784, 1)) for x in va_d[0]]
validation_data = zip(validation_inputs, va_d[1])
test_inputs = [np.reshape(x, (784, 1)) for x in te_d[0]]
test_data = zip(test_inputs, te_d[1])
#训练集,校验集和测试集,只有训练集是有results的,也就是由监督的
return (training_data, validation_data, test_data)
load_data返回的格式虽然很漂亮,在load_data的基础上面使用wrap_data函数来进行变换,使其更加适合我们的神经网络训练.
以训练集的变换为例。对于training_inputs和training_labels来说,就是把之前的返回的training_data[0]的所有例子都放到了一个列表中:
training_data为zip函数组合,那么training_data为一个列表,其中每个元素是一个元组,二元组又有一个training_inputs和一个training_labels的元素组合而成
