#This option will direct the machine to write the transaction log to the dataLogDir rather than the dataDir. This allows a dedicated log device to be used, and helps avoid competition between logging and snaphots.
dataLogDir=/opt/elk/kafka/zookeeper/logs
#客户端连接端口
clientPort=2181
#最大客户端连接数
maxClientCnxns=20
#这个时间是作为Zookeeper服务器之间或客户端与服务器之间维持心跳的时间间隔
tickTime=2000
#此配置表示,允许follower(相对于Leaderer言的“客户端”)连接并同步到Leader的初始化连接时间,以tickTime为单位。当初始化连接时间超过该值,则表示连接失败。
initLimit=10
syncLimit=5
#集群模式关键配置参数
server.x=[hostname]:nnnnn[:nnnnn]
There are two port numbers nnnnn. The first followers use to connect to the leader, and the second is for leader election. The leader election port is only necessary if electionAlg is 1, 2, or 3 (default). If electionAlg is 0, then the second port is not necessary. If you want to test multiple servers on a single machine, then different ports can be used for each server.
#server.myid=ip:followers_connect to the leader:leader_election # server 是固定的,myid 是需要手动分配,第一个端口是follower是链接到leader的端口,第二个是用来选举leader 用的port
server.1=192.168.1.1:2888:3888
server.2=192.168.1.2:2888:3888
server.3=192.168.1.2:2889:3889
#我的第二个server和第三个server 是用的同一台机器跑了两个实例,所以端口需要使用不同的端口来配置,切记如果有火墙的话,一定要放行你配置的口
#kafka 的配置同样在config 目录中的server.properties 是kafka的配置文件
vi server.properties
#The broker id for this server. If unset, a unique broker id will be generated.To avoid conflicts between zookeeper generated broker id‘s and user configured broker id‘s, generated broker ids start from reserved.broker.max.id + 1.
#每个server需要单独配置broker id,如果不配置系统会自动配置。
broker.id=0
#消费者的访问端口,logstash或者elasticsearch
listeners=PLAINTEXT://192.168.115.65:9092
#The number of threads that the server uses for receiving requests from the network and sending responses to the network ,接收和发送网络信息的线程数
num.network.threads=3
#The number of threads that the server uses for processing requests, which may include disk I/O
num.io.threads=8
#The SO_SNDBUF buffer of the socket sever sockets. If the value is -1, the OS default will be used.
socket.send.buffer.bytes=102400
#The SO_RCVBUF buffer of the socket sever sockets. If the value is -1, the OS default will be used.
socket.receive.buffer.bytes=102400
#The maximum number of bytes in a socket request
socket.request.max.bytes=104857600
#这个是设置log的目录
log.dirs=/usr/local/kafka/logs
num.partitions=1
#The number of threads per data directory to be used for log recovery at startup and flushing at shutdown
num.recovery.threads.per.data.dir=1
#The replication factor for the offsets topic (set higher to ensure availability). Internal topic creation will fail until the cluster size meets this replication factor requirement.
offsets.topic.replication.factor=1
#The replication factor for the transaction topic (set higher to ensure availability). Internal topic creation will fail until the cluster size meets this replication factor requirement.
transaction.state.log.replication.factor=1
#Overridden min.insync.replicas config for the transaction topic.
transaction.state.log.min.isr=1
#The number of hours to keep a log file before deleting it (in hours), tertiary to log.retention.ms property。 配置多少小时之后会删除之前的数据。
log.retention.hours=168
#The maximum size of a single log file。 单个日志文件的大小
log.segment.bytes=1073741824
#The frequency in milliseconds that the log cleaner checks whether any log is eligible for deletion。多少毫秒检查一次是否有需要删除的log 文件
log.retention.check.interval.ms=300000
#这块是重点,配置kafka链接的ZK server
zookeeper.connect=192.168.165.65:2181,192.168.101.242:2181,192.168.101.242:2182
#zookeeper 链接超时设置
zookeeper.connection.timeout.ms=6000
#The amount of time the group coordinator will wait for more consumers to join a new group before performing the first rebalance. A longer delay means potentially fewer rebalances, but increases the time until processing begins.
group.initial.rebalance.delay.ms=0
#官方参考文档地址:http://kafka.apache.org/10/documentation.html#brokerconfigs
#打包配置好的文件包
tar -zcvf /opt/elk/kafka_2.12-1.0.1-ready.tar.gz kafka_2.12-1.0.1
#scp 源文件到另外一台机器上
scp /opt/elk/kafka_2.12-1.0.1-ready.tar.gz elk@192.168.1.2:/opt/elk/
#登录机器1.2 上配置,这个机器上配置两套kafka,两套ZK
FYI:如果你是三台机器配置的话,就不需要这样麻烦了,只需要把配置好的安装包直接分发到不同的机器上,然后修改zookeeper的myid,kafka的broker.id 就可以了。
#解压拷贝过来的包
tar -zxvf kafka_2.12-1.0.1-ready.tar.gz
#由于这台机器需要配置两套kafka和ZK 需要建立对用的数据目录和log目录给你不同的实例用
#创建kafka 数据目录
mkdir /opt/elk/kafka_2.12-1.0.1/data/{k2,k3}
#创建 ZK的数据和log 目录,官方推荐这两个目录最好不在一个磁盘下,可能会影响磁盘写入读取性能,所以如果数据量大的话,最好分开
mkdir /opt/elk/kafka_2.12-1.0.1/zookeeper/{z2/{data,logs},z3/{data,logs}} -p
#创建myid 文件并写入ID number
echo 2 > /opt/elk/kafka_2.12-1.0.1/zookeeper/z2/data/myid
echo 3 > /opt/elk/kafka_2.12-1.0.1/zookeeper/z3/data/myid
#把ZK 和kafka 都是制定配置文件运行的,所以我们需要分别把zookeeper.properties & server.properties 复制为两个不同的文件名字
cd /opt/elk/kafka_2.12-1.0.1/
cp zookeeper.properties zookeeper-2.properties
mv zookeeper.properties zookeeper-3.properties
cp server.properties server-2.properties
mv server.properties server-3.properties
#所有配置文件搞定了之后,zk-2 &zk-3 需要修改地方如下:
dataDir=刚刚创建好的目录
dataLogDir=刚刚创建好的目录
#zk-3 需要多修改一个地方
clientPort=2182
#Kafka 需要修改如下几个地方:
broker.id=指定的id
#kafka 3 修改port
listeners=PLAINTEXT://192.168.1.2:9093
#到这里所有kafka集群的所有配置都搞定了,开始启动集群了,顺序是先启动zk,然后再启动kafka
#1.1机器上执行如下命令
nohup /opt/elk/kafka_2.12-1.0.1/bin/zookeeper-server-start.sh config/zookeeper.properties >>/dev/null 2>&1 &
#1.2 机器上执行如下命令
nohup bin/zookeeper-server-start.sh config/zookeeper-2.properties >>/dev/null 2>&1 &
nohup bin/zookeeper-server-start.sh config/zookeeper-3.properties >>/dev/null 2>&1 &
#可以通过lsof 命令查看服务是否正常启动
lsof -i:2181
#介绍几个简单的确认zk 服务是否正常的命令
#需要本机安装nc 命令
yum -y install nc
#使用echo ruok|nc 127.0.0.1 2181 测试是否启动了该Server,若回复imok表示已经启动。
#查看zk的配置,配置正常返回证明zk service 正常
echo conf | nc 192.168.1.1 2181 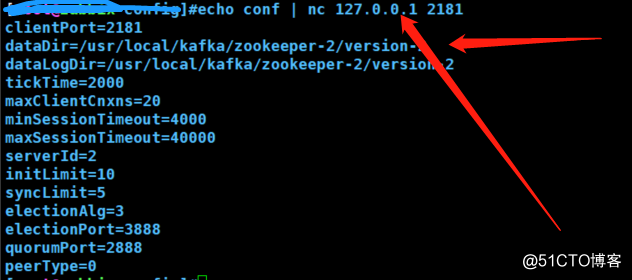
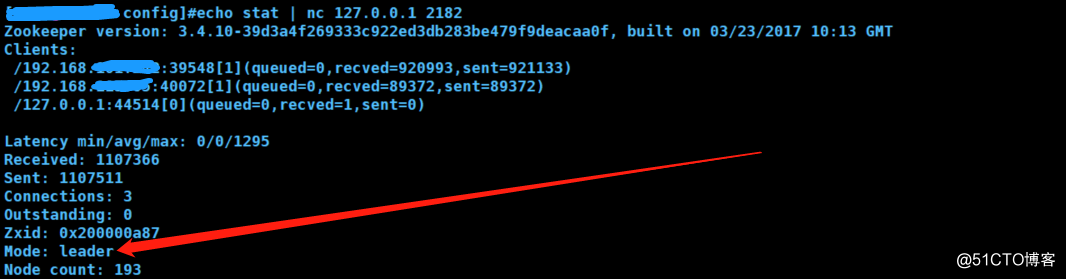
#stat 可以查看集群状态
echo stat | nc 127.0.0.1 2182
还有如下常用命令:
ZooKeeper 支持某些特定的四字命令字母与其的交互。它们大多是查询命令,用来获取 ZooKeeper 服务的当前状态及相关信息。用户在客户端可以通过 telnet 或 nc 向 ZooKeeper 提交相应的命令
#zk 搞定了之后开始搞kafka 了
1.1 上执行如下命令
nohup /opt/elk/kafka_2.12-1.0.1/bin/kafka-server-start.sh /usr/local/kafka/config/server.properties >>/dev/null 2>&1 &
1.2上执行如下两条命:
nohup /opt/elk/kafka_2.12-1.0.1/bin/kafka-server-start.sh /usr/local/kafka/config/server-2.properties >>/dev/null 2>&1 &
nohup /opt/elk/kafka_2.12-1.0.1/bin/kafka-server-start.sh /usr/local/kafka/config/server-3.properties >>/dev/null 2>&1 &
#通过lsof 命令查看端口是否正常启动
#测试kafka 工作是否正常,新建一个topic
/opt/elk/kafka_2.12-1.0.1/bin/kafka-topics.sh --create --zookeeper localhost:2181 --replication-factor 1 --partitions 1 --topic test
#提示以下内容证明没有问题
Created topic "test".
#通过list 来查看
/usr/local/kafka/bin/kafka-topics.sh --zookeeper 192.168.1.1:2181 --list
test
#到这里kafka 集群就搞定了
Centos7上 Nginx + ELK Stack +Kafka + Filebeat 实战二
原文地址:http://blog.51cto.com/seekerwolf/2095137