因为业务需求,需要用到redis存储一点简单的数据,因为redis有良好的哈希机制,可以完美实现我的某些需求,但openwrt官方提供memcached的ipk并没有提供redis,没办法,只能自己编译了,编译的redis版本3.2.1
1.下载redis:http://download.redis.io/releases/redis-3.2.1.tar.gz
2.在openwrt-widora的package目录下创建redis目录,把解压出来的redis目录mv到此目录下,改名为src,在平级目录(openwrt-widora的package下刚刚创建的redis目录)下创建Makefile
内容如下:
include $(TOPDIR)/rules.mk
# Name and release number of this package
PKG_NAME:=redis
PKG_RELEASE:=1

PKG_BUILD_DIR := $(BUILD_DIR)/$(PKG_NAME)
PKG_KCONFIG:=RALINK_MT7620 RALINK_MT7628
include $(INCLUDE_DIR)/package.mk
include $(INCLUDE_DIR)/kernel.mk

define Package/redis
        SECTION:=Diy pack
        CATEGORY:=Diy pack
        TITLE:=redis
        DEPENDS:= +libpthread
endef

# Uncomment portion below for Kamikaze and delete DESCRIPTION variable above
define Package/redis/description
        redis for server
endef

# Specify what needs to be done to prepare for building the package.
# In our case, we need to copy the source files to the build directory.
# This is NOT the default.  The default uses the PKG_SOURCE_URL and the
# PKG_SOURCE which is not defined here to download the source from the web.
# In order to just build a simple program that we have just written, it is
# much easier to do it this way.
define Build/Prepare
        mkdir -p $(PKG_BUILD_DIR)
        $(CP) ./src/* $(PKG_BUILD_DIR)/
endef

# We do not need to define Build/Configure or Build/Compile directives
# The defaults are appropriate for compiling a simple program such as this one
        $(foreach c, $(PKG_KCONFIG),$(if $(CONFIG_$c),-DCONFIG_$(c)=$(CONFIG_$c)))

define Build/Compile
        $(MAKE) MALLOC=libc -C $(PKG_BUILD_DIR) \
        $(TARGET_CONFIGURE_OPTS) CFLAGS="$(TARGET_CFLAGS)  -I$(LINUX_DIR)/include"
endef


# Specify where and how to install the program. Since we only have one file,
# the helloworld executable, install it by copying it to the /bin directory on
# the router. The $(1) variable represents the root directory on the router running
# OpenWrt. The $(INSTALL_DIR) variable contains a command to prepare the install
# directory if it does not already exist.  Likewise $(INSTALL_BIN) contains the
# command to copy the binary file from its current location (in our case the build
# directory) to the install directory.
#$(INSTALL_BIN) $(PKG_BUILD_DIR)/src/redis-server $(1)/bin/
define Package/redis/install
        $(INSTALL_DIR) $(1)/bin
        $(INSTALL_BIN) $(PKG_BUILD_DIR)/src/redis-server $(1)/bin/(如果是需要客户端则为$(INSTALL_BIN) $(PKG_BUILD_DIR)/src/redis-cli $(1)/bin/)
endef
# This line executes the necessary commands to compile our program.
# The above define directives specify all the information needed, but this
# line calls BuildPackage which in turn actually uses this information to
# build a package.

$(eval $(call BuildPackage,redis))
-------------------****************************** Makefile end *******************************************
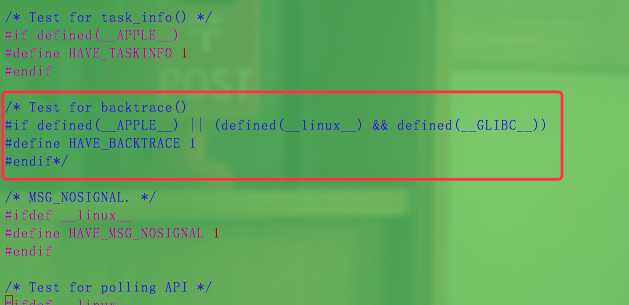
修改src里的src下的config.h文件(也就是redis目录下的config.h文件)
vim src/src/config.h
把#define HAVE_BACKTRACE 1 注掉 ,如下图
然后回到widora 的sdk目录下,make menuconfig,找到Diy pack进入,选择redis(如果是ipk则标注为M,如果编译进固件则是*)
然后正常make -j4 如果一切顺利的话,在sdk的bin/ramips/packages/base/中可以找到前缀为redis的ipk文件
将对应ipk下载下来上传到neo或bit3、bit4中,opkg install redis_xxx.ipk即可
创建redis.conf文件,内容如下
bind 127.0.0.1
protected-mode yes
port 6379
tcp-backlog 511
timeout 0
tcp-keepalive 300
daemonize yes
supervised no
pidfile /tmp/redis_6379.pid
loglevel notice
logfile ""
databases 16
save 900 1
save 300 10
save 60 10000
stop-writes-on-bgsave-error yes
rdbcompression yes
rdbchecksum yes
dbfilename dump.rdb
dir ./
slave-serve-stale-data yes
slave-read-only yes
repl-diskless-sync no
repl-diskless-sync-delay 5
repl-disable-tcp-nodelay no
slave-priority 100
appendonly no
appendfilename "appendonly.aof"
appendfsync everysec
no-appendfsync-on-rewrite no
auto-aof-rewrite-percentage 100
auto-aof-rewrite-min-size 64mb
aof-load-truncated yes
lua-time-limit 5000
slowlog-log-slower-than 10000
slowlog-max-len 128
latency-monitor-threshold 0
notify-keyspace-events ""
hash-max-ziplist-entries 512
hash-max-ziplist-value 64
list-max-ziplist-size -2
list-compress-depth 0
set-max-intset-entries 512
zset-max-ziplist-entries 128
zset-max-ziplist-value 64
hll-sparse-max-bytes 3000
activerehashing yes
client-output-buffer-limit normal 0 0 0
client-output-buffer-limit slave 256mb 64mb 60
client-output-buffer-limit pubsub 32mb 8mb 60
hz 10
aof-rewrite-incremental-fsync yes
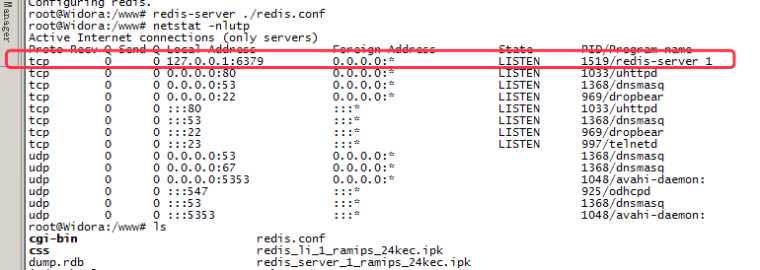
然后 redis-server 您的路径/redis.conf 启动redis
运行效果
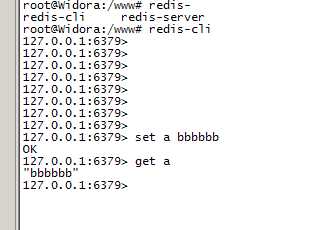
客户端(客户端编译需要的包为redis-cli,Makefile要对应修改一下,上边我给出的Makefile有注释这部分)实测连接:
ok,完工
