标签:sync oba 使用 nes 查询 空格 span read eve

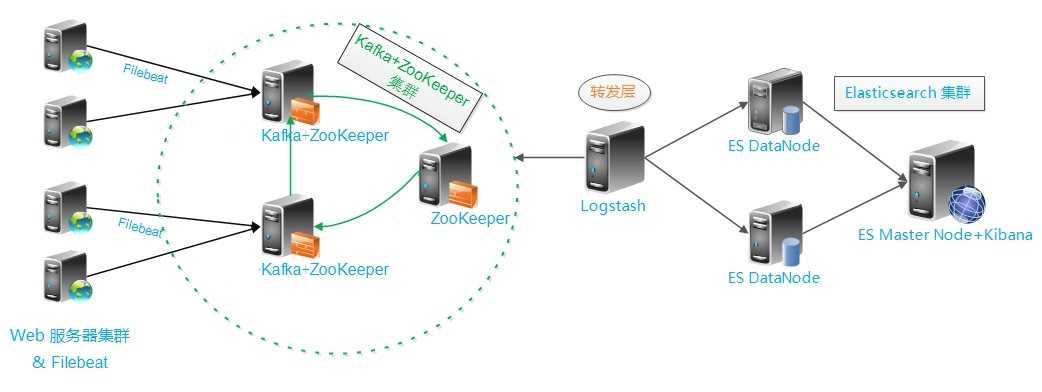
整个架构从左到右,总共分为5层
|
Ip |
角色 |
描述 |
|
192.168.11.51 |
elasticsearch + kibana |
Es集群+ kibana |
|
192.168.11.52 |
elasticsearch |
Es集群 |
|
192.168.11.104 |
logstash |
数据转发层 |
|
192.168.11.101 |
zookeeper + kafka |
Kafka+zookeeper集群 |
|
192.168.11.102 |
zookeeper + kafka |
Kafka+zookeeper集群 |
|
192.168.11.103 |
zookeeper + kafka |
Kafka+zookeeper集群 |
|
192.168.11.104 |
filebeat+web服务器集群 |
业务层日志收集 |
jdk1.8.0_101
elasticsearch-5.1.2
kibana-5.1.2
kafka_2.11-1.1.0.tgz
node-v4.4.7-linux-x64
zookeeper-3.4.9
logstash-5.1.2
Filebeat-5.6.9
1.ES集群安装配置;
2.Logstash客户端配置(直接写入数据到ES集群,写入系统messages日志);
3.Kafka(zookeeper)集群配置;
4.Kibana部署;
6.filebeat日志收集部署
获取es软件包
# wget https://artifacts.elastic.co/downloads/elasticsearch/elasticsearch-5.1.2.tar.gz
解压
# tar -xf elasticsearch-5.1.2.tar.gz -C /usr/local
# mv elasticsearch-5.1.2.tar.gz elasticsearch
修改配置文件(注意,设置参数的时候“:冒号”后面要有空格!)
#vim /usr/local/elasticsearch/config/elasticsearch.yml(192.168.11.51)
 1 # ---------------------------------- Cluster -----------------------------------
 2 cluster.name: es-cluster   #组播名称地址
 3 # ------------------------------------ Node ------------------------------------
 4 node.name: node-1      #节点名称,不能和其他节点相同
 5 node.master: true       #节点能否被选举为master
 6
 7 node.data: true
 8 # ----------------------------------- Paths ------------------------------------
 9 path.data: /data/es/data   #数据目录路径
10 path.logs: /data/es/logs    #日志路径
11 # ----------------------------------- Memory -----------------------------------
12 bootstrap.memory_lock: false
13 # ---------------------------------- Network -----------------------------------
14 network.host: 192.168.11.51
15 http.port: 9200
16 transport.tcp.port: 9301
17 # --------------------------------- Discovery ----------------------------------
18 discovery.zen.ping.unicast.hosts: ["192.168.11.52:9300","192.168.11.51:9301"]
19 # ---------------------------------- Gateway -----------------------------------
20 # ---------------------------------- Various -----------------------------------
21 #------------------------------------http---------------------------------------
22 http.cors.enabled: true
23 http.cors.allow-origin: "*"
复制配置文件
# scp elasticsearch.yml root@192.168.11.52:/usr/local/elasticsearch/config
修改配置文件elasticsearch.yml
node.name: node-2 #192.168.11.52
创建相关目录
# mkdir /data/es/{data,logs} -p
修改内存大小
jvm空间大小由于elasticsearch5.0默认分配jvm空间大小为2g,如果需要,修改jvm空间分配
# vi /usr/local/elasticsearch/config/jvm.options
-Xms1g
-Xmx1g
修改系统参数
# vi /etc/security/limits.conf
* soft nofile 65536
* hard nofile 65536
* soft nproc 2048
* hard nproc 4096
# vi /etc/sysctl.conf
vm.max_map_count=655360
vm.swappiness = 1
# sysctl -p 使修改生效
启动(elasticsearch不能在root下启动)
添加用户并设置权限
# groupadd elasticsearch
# useradd elasticsearch -g elasticsearch -p 123456
# chown -R elasticsearch:elasticsearch /usr/local/elasticsearch
切换到elasticsearch用户
# su elasticsearch
# cd /usr/local/elasticsearch/bin
启动
# ./elasticsearch
查看进程,检查是否启动
# netstat -nlpt | grep -E "9200|"9300
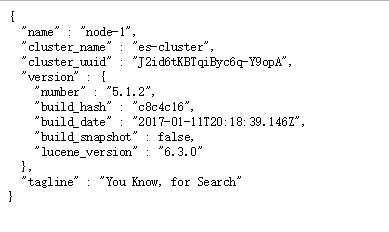
启动成功后访问192.168.11.51:9200

Elasticsearch Head Plugin: 对ES进行各种操作,如查询、删除、浏览索引等。
克隆代码到本地
# cd /usr/local/elasticsearch
# git clone https://github.com/mobz/elasticsearch-head
切换目录到 elasticsearch-head,运行 npm 指令,如果系统没有按照node,还需要安装node
# npm install
修改配置文件
# vi /usr/local/elasticsearch/elasticsearch-head/Gruntfile.js
connect: {
            server: {
                options: {
                    port: 9100,
                    hostname:‘192.168.11.51‘,
                    base: ‘.‘,
                    keepalive: true
                }
            }
        }
启动nodehead
# ./node_modules/grunt/bin/grunt server
启动成功后访问,输入http://192.168.11.51:9100/
可看到集群连接信息

由于head插件本质上还是一个nodejs的工程,因此需要安装node,使用npm来安装依赖的包。(npm可以理解为maven)
获取软件包
# wget https://npm.taobao.org/mirrors/node/latest-v4.x/node-v4.4.7-linux-x64.tar.gz
解压
# tar -zxvf node-v4.4.7-linux-x64.tar.gz
# mv node-v4.4.7-linus-x64 nodejs
设置软连接
# ln -s /usr/local/src/nodejs/bin/node /usr/local/bin/node
获取logstash软件包
# wget https://artifacts.elastic.co/downloads/logstash/logstash-5.1.2.tar.gz
解压
# tar -xf logstash-5.1.2.tar.gz -C /usr/local
# mv logstash-5.1.2 logstash
配置文件
# cd /usr/local/logstash
# mkdir /usr/local/logstash/etc
# vi logstash.conf
input {
  stdin {}
}

output {
  elasticsearch {
    hosts => ["192.168.11.51:9200","192.168.11.52:9200"]
  }
}
启动logstash.conf
# /usr/local/logstash/bin/logstash -f logstash.conf
输入内容

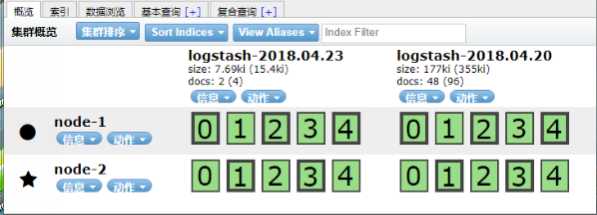
输入http://192.168.11.51:9100,会发现增加了一个日志文件

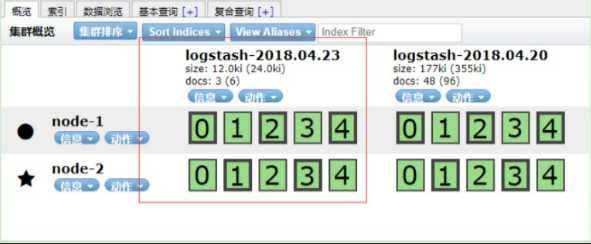
点击数据浏览,可看到自己输入的内容

此时,logstash已经可以正常将数据写到es了
配置从kafka 读取数据到es(此处先不启动,等kafka安装部署完成后再启动校验)
# vi kafka_to_es.conf
input{
    kafka {
        bootstrap_servers  => ["192.168.11.101:9092,192.168.11.102:9092,192.168.11.103:9092"]
        client_id => "test1"
        group_id => "test1"
        auto_offset_reset => "latest"
        topics => ["msyslog"]
        type => "msyslog"
    }
    kafka {
        bootstrap_servers  => ["192.168.11.101:9092,192.168.11.102:9092,192.168.11.103:9092"]
        client_id => "test2"
        group_id => "test2"
        auto_offset_reset => "latest"
        topics => ["msyserrlog"]
        type => "msyserrlog"
    }
}

filter {
   date {
        match => [ "timestamp" , "yyyy-MM-dd HH:mm:ss" ]
        timezone => "+08:00"
    }
}

output {
    elasticsearch {
      hosts => ["192.168.11.51:9200","192.168.11.52:9200"]
      index => "mime-%{type}-%{+YYYY.MM.dd}"
      timeout => 300
    }
}
启动命令
# /usr/local/logstash/bin/logstash -f kafka_to_es.conf
下载zookeeper3.4.9
http://archive.apache.org/dist/zookeeper/
解压
# tar -xf zookeeper-3.4.9.tar.gz -C /usr/local
# mv zookeeper-3.4.9 zookeeper
修改环境变量
# vi /etc/profile
export ZOOKEEPER_HOME=/usr/local/zookeeper

export PATH=$PATH:$ZOOKEEPER_HOME/bin:$ZOOKEEPER_HOME/conf
生效
# source /etc/profile
创建myid文件
192.168.11.101# echo 11 >/usr/local/zookeeper/data/myid
192.168.11.102# echo 12 >/usr/local/zookeeper/data/myid
192.168.11.103# echo 13 >/usr/local/zookeeper/data/myid
编写配置文件
#vi /usr/local/zookeeper/conf/zoo.cfg(三台服务器的配置一样)
tickTime=2000
initLimit=10
syncLimit=5
dataDir=/usr/local/zookeeper/data
clientPort=2181
server.11=192.168.11.101:2888:3888
server.12=192.168.11.102:2888:3888
server.13=192.168.11.103:2888:3888
启动 zookeeper
bin/zkServer.sh start
查看节点状态
bin/zkServer.sh status
获取软件包
# wget http://mirrors.shu.edu.cn/apache/kafka/1.1.0/kafka_2.11-1.1.0.tgz
安装,配置 kafka
# tar -xf kafka_2.11-1.1.0.tgz -C /usr/local
# mv kafka_2.11-1.1.0.tgz kafka
编写配置文件,配置 192.168.11.101 节点
# vi /usr/local/kafka/config/server.properties
############################# Server Basics #############################
broker.id=1
############################# Socket Server Settings #############################
listeners=PLAINTEXT://192.168.11.101:9092
num.network.threads=3
num.io.threads=8
socket.send.buffer.bytes=102400
socket.receive.buffer.bytes=102400
socket.request.max.bytes=104857600
############################# Log Basics #############################
log.dirs=/tmp/kafka-logs
num.partitions=1
num.recovery.threads.per.data.dir=1
offsets.topic.replication.factor=1
transaction.state.log.replication.factor=1
transaction.state.log.min.isr=1
############################# Log Retention Policy #############################
log.retention.hours=168
log.segment.bytes=1073741824
log.retention.check.interval.ms=300000
######################## Zookeeper #############################
zookeeper.connect=192.168.11.101:2181,192.168.11.102:2181,192.168.11.103:2181
zookeeper.connection.timeout.ms=6000
########################### Group Coordinator Settings #############################
group.initial.rebalance.delay.ms=0
host.name=99.48.46.101
advertised.host.name=99.48.46.101
修改其他节点配置文件
scp server.properties 192.168.11.102:/usr/local/kafka/config/
scp server.properties 192.168.11.103:/usr/local/kafka/config/
# 修改 server.properties(192.168.11.102)
broker.id=2
listeners=PLAINTEXT://192.168.11.102:9092
host.name=192.168.11.102
advertised.host.name=192.168.11.102
# 修改 server.properties(192.168.11.103)
broker.id=3
listeners=PLAINTEXT://192.168.11.103:9092
host.name=192.168.11.103
advertised.host.name=192.168.11.103
4.配置主机名对应IP的解析
#vim /etc/hosts
192.168.11.101 server1
192.168.11.102 server2
192.168.11.103 server3
# 记得同步到其他两台节点
启动服务
#bin/kafka-server-start.sh config/server.properties # 其他两台节点启动方式相同
启动生产者(192.168.11.101)
bin/kafka-console-producer.sh --broker-list 192.168.11.101:9092 --topic logstash
输入信息
启动消费者(192.168.11.102)
bin/kafka-console-consumer.sh --bootstrap-server 192.168.11.102:9092 --topic logstash --from-beginning
生产者输入的信息在消费者中可以正常输出,kafka集群搭建成功
软件包下载
wget https://artifacts.elastic.co/downloads/kibana/kibana-5.1.2-linux-x86_64.tar.gz
文件配置
# vi /usr/local/kibana/config/kibana.yml
server.port: 5601
server.host: "192.168.11.51"
elasticsearch.url: "http://192.168.11.51:9200"
启动kibana
# /usr/local/kibana/bin/kibana
Kibana创建索引步骤
索引与es中的一致才能显示日志
左侧菜单 Management--Index Patterns--add New
输入地址http://192.168.11.51:5601,查看日志
filebeat可以直接使用yum安装:
配置yum源文件:
# vim /etc/yum.repos.d/elastic5.repo
[elasticsearch-5.x]
name=Elasticsearch repository for 5.x packages
baseurl=https://artifacts.elastic.co/packages/5.x/yum
gpgcheck=1
gpgkey=https://artifacts.elastic.co/GPG-KEY-elasticsearch
enabled=1
autorefresh=1
type=rpm-md
开始安装
#yum install filebeat
修改配置文件
#vi /etc/filebeat/filebeat.yml
filebeat.prospectors:
- input_type: log
paths:
- /usr/local/src/logs/crawler-web-cell01-node01/*.log

#------------------------------- Kafka output ----------------------------------
output.kafka:
  hosts: ["192.168.11.101:9092","192.168.11.102:9092","192.168.11.103:9092"]
  topic: logstash
  worker: 1
  max_retries: 3
启动服务
#/etc/init.d/filebeat start
多个topics配置,用于日志分类
#vi /etc/filebeat/filebeat.yml
filebeat.prospectors:
- input_type: log
  paths:
    - /usr/local/src/logs/sys.log
  fields:
    level: debug
    log_topics: syslog
- input_type: log
  paths:
    - /usr/local/src/logs/sys-err.log
  fields:
    level: debug
    log_topics: syserrlog
#------------------------------- Kafka output ----------------------------------
output.kafka:
  enabled: true
  hosts: ["192.168.11.101:9092","192.168.11.102:9092","192.168.11.103:9092"]
  topic: ‘%{[fields][log_topics]}‘
  worker: 1
  max_retries: 3
创建测试文件
# cd /usr/local/src/logs/
向日志文件输入数据
# echo "192.168.80.123 - - [19/Oct/2017:13:45:29 +0800] \"GET /mytest/rest/api01/v1.4.0?workIds=10086 HTTP/1.1\" 200 78 \"http://www.baidu.com/s?wd=www\" \"Mozilla/4.0 (compatible; MSIE 7.0; Windows NT 5.1)\"">> tomcat_test.log
输入http://192.168.11.51:9100/
此时数据已经可以通过filebeat收集通过kafka集群发送到es集群了
输入地址http://192.168.11.51:5601,查看日志
标签:sync oba 使用 nes 查询 空格 span read eve
原文地址:https://www.cnblogs.com/cyanqx/p/8945308.html