[root@localhost /]# vi /etc/sysconfig/network-scripts/ifcfg-ens192
      TYPE=Ethernet
      BOOTPROTO=none
      IPADDR=10.20.1.100
      NETMASK=255.255.255.0
      GATEWAY=10.20.1.254
      NAME=ens192
      ONBOOT=yes
[root@localhost /]#systemctl stop firewalld
2、yum源配置。
[root@localhost /]# cd /mnt
[root@localhost /]# mkdir rehl7
[root@localhost /]# mount /dev/sr0 /mnt/rehl7/    //虚拟光驱,提前做好的
[root@localhost /]# vim /etc/yum.repos.d/base.repo
     [base]
     name=base
     baseurl=file:///mnt/rehl7
     enable=1
     gpgcheck=0
[root@localhost /]# yum clean all    //清除缓存
[root@localhost /]# yum makecache    //重载缓存
3、磁盘分区,分区时最好使用LVM格式,以便后期对共享盘空间进行调整。
[root@localhost /]# fdisk -l
Disk /dev/sdb: 536.9 GB, 536870912000 bytes, 1048576000 sectors
Units = sectors of 1 * 512 = 512 bytes
Sector size (logical/physical): 512 bytes / 512 bytes
I/O size (minimum/optimal): 512 bytes / 512 bytes
系统区分完后还剩余500G空间,使用fdisk进行分区,将以上的设备/dev/sdb建立分区,并改变格式为LVM。
[root@localhost ~]# fdisk /dev/sdb
Welcome to fdisk (util-linux 2.23.2).
Changes will remain in memory only, until you decide to write them.
Be careful before using the write command.
Device does not contain a recognized partition table
Building a new DOS disklabel with disk identifier 0x8fa166b8.
  Command (m for help): n  Partition type:
    p   primary (0 primary, 0 extended, 4 free)
    e   extended
Select (default p): p
Partition number (1-4, default 1):
First sector (2048-1048575999, default 2048):
Using default value 2048
Last sector, +sectors or +size{K,M,G} (2048-1048575999, default 1048575999):
Using default value 1048575999
Partition 1 of type Linux and of size 500 GiB is set
Command (m for help): t
Selected partition 1 Hex code (type L to list all codes): 8e
Changed type of partition 'Linux' to 'Linux LVM'
Command (m for help): p
Disk /dev/sdb: 536.9 GB, 536870912000 bytes, 1048576000 sectors
Units = sectors of 1 * 512 = 512 bytes
Sector size (logical/physical): 512 bytes / 512 bytes
I/O size (minimum/optimal): 512 bytes / 512 bytes
Disk label type: dos
Disk identifier: 0x8fa166b8
    Device Boot      Start         End      Blocks   Id  System
/dev/sdb1            2048  1048575999   524286976   8e  Linux LVM
Command (m for help): w
The partition table has been altered!
Calling ioctl() to re-read partition table.
Syncing disks.
[root@localhost /]# partprobe /dev/sdb1    //重载分区表
4、创建LVM。在/dev/sdb1上分别创建PV、VG,并按照分区规划创建LV。
分区规划:
IP pv name lv name size
10.20.1.57 /dev/sdb1 iscsi_57 150G
10.20.1.56 /dev/sdb1 iscsi_56 150G
10.20.1.55 /dev/sdb1 iscsi_55 150G
LVM操作步骤:
[root@localhost /]# pvcreate /dev/sdb1
  Physical volume "/dev/sdb1" successfully created
[root@localhost /]# vgcreate iSCSI /dev/sdb1
  Volume group "iSCSI" successfully created
[root@localhost /]# lvcreate -L 150G -n iscsi_56 iSCSI
  Logical volume "iscsi_56" created
[root@localhost /]# lvcreate -L 150G -n iscsi_57 iSCSI
  Logical volume "iscsi_57" created
[root@localhost /]# lvcreate -L 150G -n iscsi_55 iSCSI
  Logical volume "iscsi_55" created
[root@localhost /]# vgs
  VG    #PV #LV #SN Attr   VSize   VFree
  iSCSI   1   3   0 wz--n- 500.00g 50.00g
  rhel    1   2   0 wz--n-  83.80g     0
[root@localhost /]# lvs
  LV  VG  Attr  LSize  Pool Origin Data%  Move Log Cpy%Sync Convert
  iscsi_55 iSCSI -wi-a----- 150.00g
  iscsi_56 iSCSI -wi-a----- 150.00g
  iscsi_57 iSCSI -wi-a----- 150.00g
  home     rhel  -wi-ao----   4.88g
  root     rhel  -wi-ao----  78.92g
5、targetcli安装及iSCSI配置。配置本地服务器时为了好区分,需要提前修改iqn名,最好在后缀加上server的方式命名,以和Client区分
[root@localhost /]# yum install targetcli –y  //安装iscsi 服务管理器
[root@localhost /]# systemctl start target  //启动target服务
[root@localhost /]# systemctl enable target //将服务设置为开机自动启动
[root@localhost /]# yum install iscsi-initiator-utils //安装iscsi Initiator
[root@localhost /]# vim /etc/iscsi/initiatorname.iscsi //修改iqn name
InitiatorName=iqn.1994-05.com.redhat:iSCSIserver
运行iSCSI配置命令
[root@localhost etc]# targetcli
Warning: Could not load preferences file /root/.targetcli/prefs.bin.
targetcli shell version 2.1.fb34
Copyright 2011-2013 by Datera, Inc and others.
For help on commands, type 'help'.
/> ls    //查看树状结构布局
o- / ........................................................ [...]
  o- backstores ............................................. [...]
  | o- block ................................. [Storage Objects: 0]
  | o- fileio ................................ [Storage Objects: 0]
  | o- pscsi ................................. [Storage Objects: 0]
  | o- ramdisk ............................... [Storage Objects: 0]
  o- iscsi ............................................ [Targets: 0]
  o- loopback ........................................ [Targets: 0]
/> /backstores/block create iscsi55_data /dev/iSCSI/iscsi_55  //分别使用LV创建存储块。
Created block storage object iscsi55_data using /dev/iSCSI/iscsi_55.
/> /backstores/block create iscsi56_data /dev/iSCSI/iscsi_56   //创建iscsi56-data
Created block storage object iscsi56_data using /dev/iSCSI/iscsi_56.
/> /backstores/block create iscsi57_data /dev/iSCSI/iscsi_57   //创建iscsi57-data
Created block storage object iscsi57_data using /dev/iSCSI/iscsi_57.
/> iscsi/ create iqn.1994-05.com.redhat:iSCSIserver  //配置服务端iSCSITarget名,该名称已经在前面写入到文件里。
Created target iqn.1994-05.com.redhat:iSCSIserver.
Created TPG 1.
/> iscsi/iqn.1994-05.com.redhat:server/tpg1/portals create 10.20.1.100  //配置服务端IP及端口,端口默认为3260
Using default IP port 3260
Created network portal 10.20.1.100:3260.
/>ls   //查看配置情况
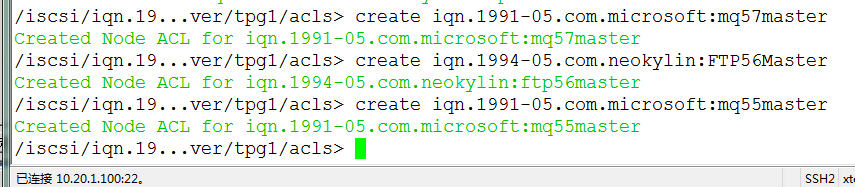
配置Client 启动器,3台客户端的启动器名已以提前修改为统一格式,粘贴复制文本文件。由于在targetcli中使用一些配置路径名太长,可以使用cd命令进入该项下,如果对命令不熟悉可以使用help查看帮助。在acls下使用carete命令分别创建57、56、55的启动器。
> cd iscsi/iqn.1994-05.com.redhat:iscsiserver/tpg1/acls
/iscsi/iqn.19...ver/tpg1/acls> create iqn.1991-05.com.microsoft:mq57master
Created Node ACL for iqn.1991-05.com.microsoft:mq57master
创建LUN,有两种方式,一种是在luns下创建,一种是在启动器下直接建。
首先测试在luns下创建,在luns项下每建好一个LUN,程序会自动将该LUN挂在所有acls下,所以要根据需求在acls下将多余的LUN删除。在luns下使用create创建LUN。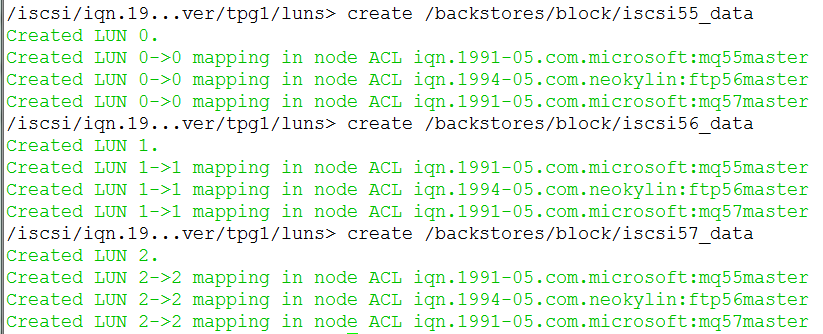
能看到acls下每个启动器上都有3个LUN。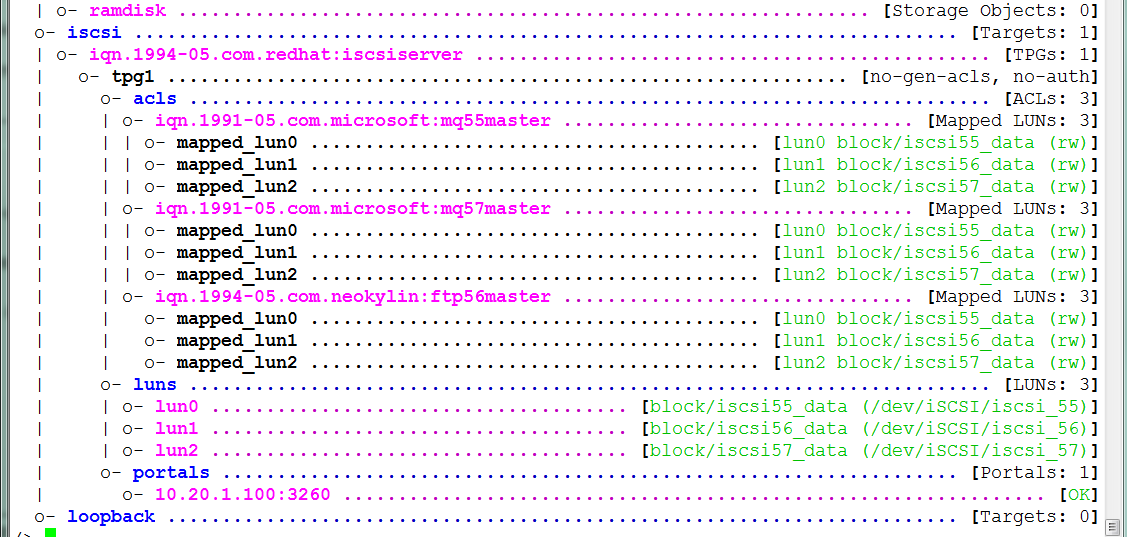
将多余的LUN删除。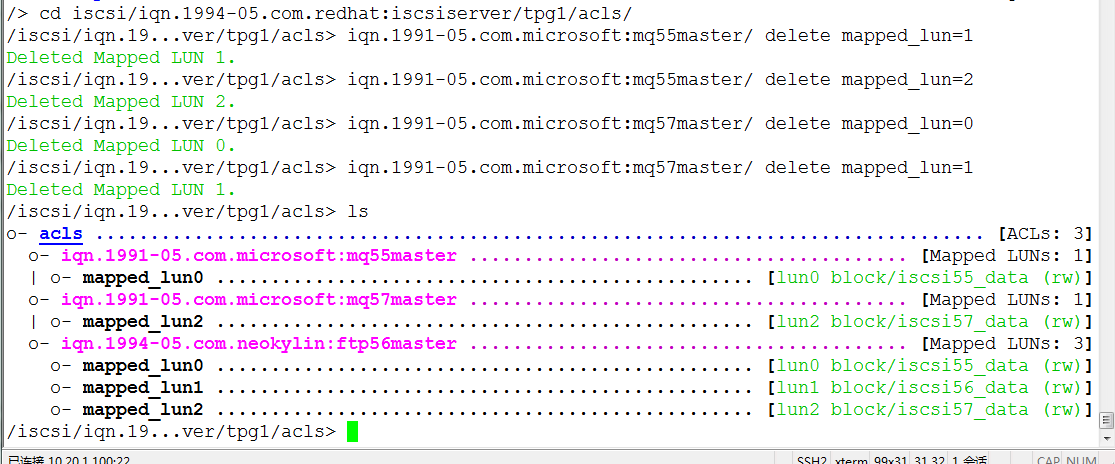
在启动器下创建,这种方式比较直接,在acls项下直接按需新建LUN,直接映射到对应启动器,一次到位,就是命令比较长。
先把原来的3个LUN删除,在acls下使用create创建。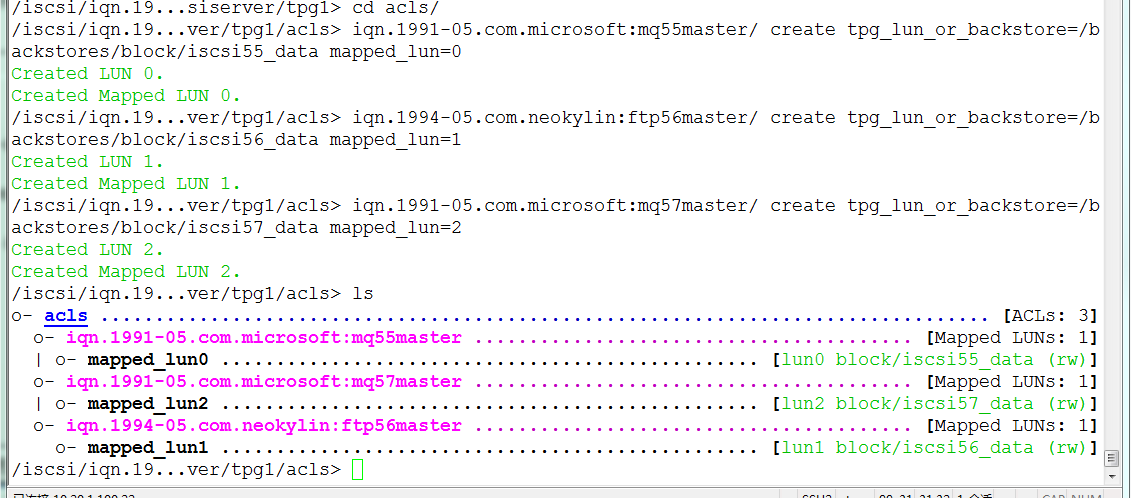
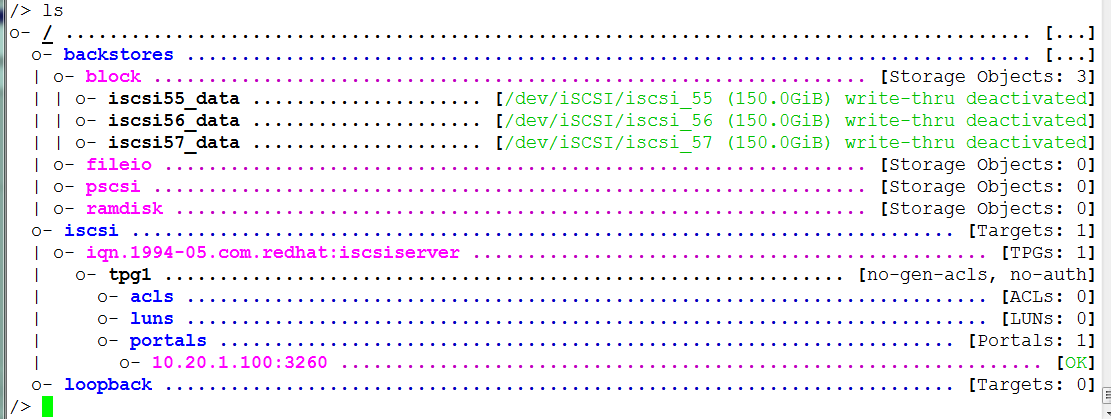
iSCSI配置完毕,看看整体效果: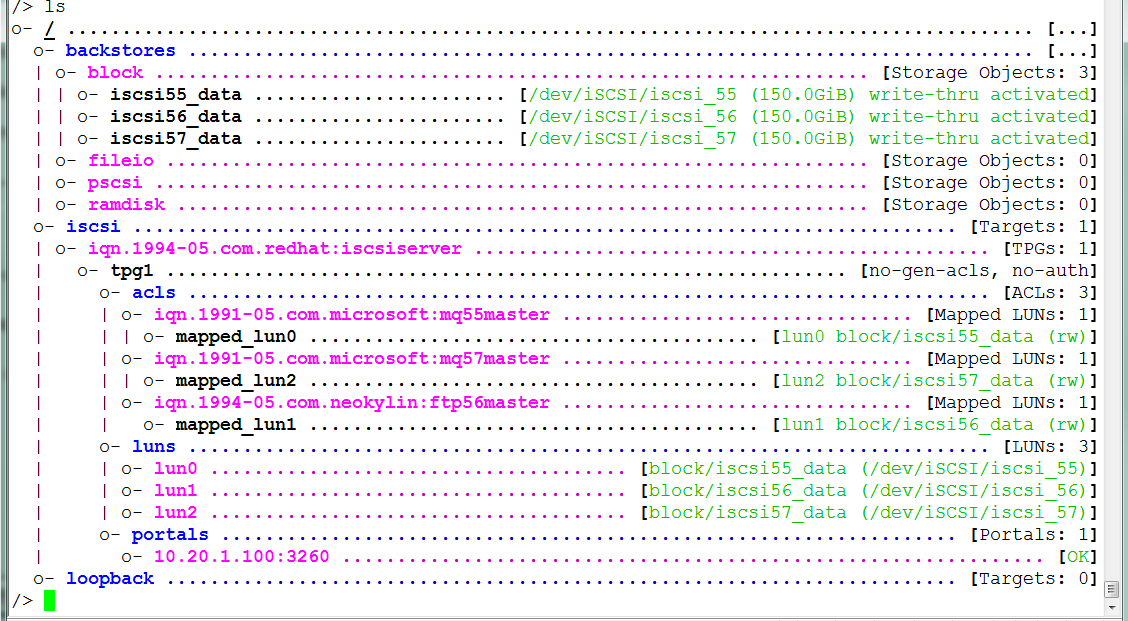
6、客户端配置
windows配置,这种windows挂iSCSI的配置网上教程比较多,这里就只写步骤不配图了。
在管理工具打开iSCSI发起程序,以下步骤:
1) 在目标中输入IP,点快速连接;
2) 弹出快速连接登陆成功报告,点击确定;
3) 在发现和收藏的目标里会有相应的内容;
4) 在卷和设备点击自动配置,会自己获得设备;
5) 点开服务管理器—存储—磁盘管理—在新加硬盘上右键点联机;
6) 初始化为MBR,然后格式化磁盘。
Linux操作系统配置方法,linux按步骤配图
1) 使用命令发现资源
[root@FTPServer ~]# iscsiadm -m discovery -t sendtargets -p 10.20.1.100

2)使用命令登陆资源
[root@FTPServer ~]# iscsiadm -m node T iqn.1994-05.com.redhat:iscsiserver -p 10.20.1.100


3)使用fdisk检查并分区
[root@FTPServer ~]# fdisk –l
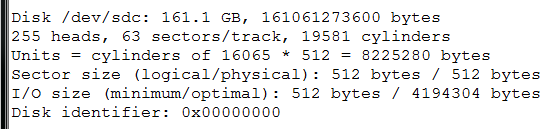
检测到一块161G的设备,进行分区,因为以后可能对磁盘有扩容或缩减的操操作,最好将磁盘格式改为LVM。
[root@FTPServer ~]# fdisk /dev/sdc
[root@FTPServer ~]# partprobe /dev/sdc1   //重读分区表
4)创建LVM并进行格式化
[root@FTPServer ~]# pvcreate /dev/sdc1    //创建PV
   Physical volume "/dev/sdc1" successfully created
[root@FTPServer ~]# vgcreate FtpDataGroup /dev/sdc1    //创建VG
   Volume group "FtpDataGroup" successfully created
[root@FTPServer ~]# lvcreate -l 38398 -n FtpData FtpDataGroup   //创建LV
   Logical volume "FtpData" created
[root@FTPServer ~]# mkfs.xfs /dev/FtpDataGroup/FtpData   //格式化为xfs
5)挂载新分区
由于是网络磁盘,使用自动挂载方式时最好使用UUID来挂载,先查看UUID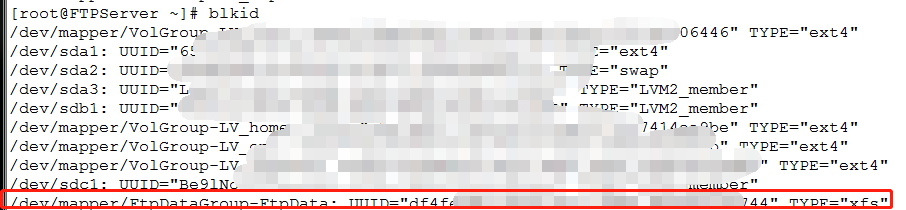
磁盘挂载,注意千万不要忘记netdev前面的下划线。小心万劫不复。。。。
[root@FTPServer ~]# vim /etc/fstab
mount –a 一下 df –h查看分区挂载,完成。
配置完成后重启系统,确定能正常识别新加盘配置完成。
radhat7下使用targetcli为多个启动器配置iSCSI访问控制
原文地址:http://blog.51cto.com/1459687/2112253