标签:测试 初始化 获取 star normal ima 生成 ons rap
在第十三节,我们已经介绍了使用带有全局平均池化层的CNN对CIFAR10数据集分类,在学习了反卷积神经网络之后我们把第十三节那个程序里的卷积层可视化出来。
这里不再使用自己定义的max_pool_2x2函数,改成新加入的带有mask返回值得max_pool_with_argmax()函数:
#定义占位符
input_x = tf.placeholder(dtype=tf.float32,shape=[None,24,24,3])   #图像大小24x24x
input_y = tf.placeholder(dtype=tf.float32,shape=[None,10])        #0-9类别

x_image = tf.reshape(input_x,[batch_size,24,24,3])                #不能传入-1 否则会报错

#1.卷积层 ->池化层
W_conv1 = weight_variable([5,5,3,64])
b_conv1 = bias_variable([64])


h_conv1 = tf.nn.relu(conv2d(x_image,W_conv1) + b_conv1)                    #输出为[-1,24,24,64]
print_op_shape(h_conv1)
h_pool1,mask1 = max_pool_with_argmax(h_conv1,2)                            #输出为[-1,12,12,64]
print_op_shape(h_pool1)


#2.卷积层 ->池化层
W_conv2 = weight_variable([5,5,64,64])
b_conv2 = bias_variable([64])


h_conv2 = tf.nn.relu(conv2d(h_pool1,W_conv2) + b_conv2)                    #输出为[-1,12,12,64]
print_op_shape(h_conv2)
h_pool2,mask2 = max_pool_with_argmax(h_conv2,2)                            #输出为[-1,6,6,64]
print_op_shape(h_pool2)
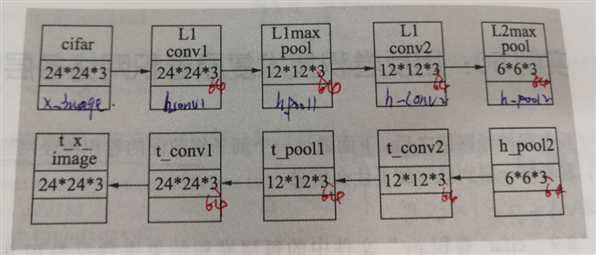
以第二池化输出的变量h_pool2为开始部分,沿着h_pool2生成的方式反向操作一层一层推导,直至生成原始图t1_x_image。
如图所示,上班部分是h_pool2卷积过程,下半部分为反卷积过程,为了分析方便,下半部分名称与代码中的变量一致。

#3 反卷积第二层卷积结果
t_conv2 = un_max_pool(h_pool2,mask2,2)
print_op_shape(t_conv2)                                                    #输出为[128,12,12,64]
t_pool1 = tf.nn.conv2d_transpose(t_conv2 - b_conv2,W_conv2,output_shape=h_pool1.shape,strides=[1,1,1,1],padding=‘SAME‘)
print_op_shape(t_pool1)                                                    #输出为[128,12,12,64]
t_conv1 = un_max_pool(t_pool1,mask1,2)
print_op_shape(t_conv1)                                                    #输出为[128,24,24,64]
t_x_image = tf.nn.conv2d_transpose(t_conv1 - b_conv1,W_conv1,output_shape=x_image.shape,strides=[1,1,1,1],padding=‘SAME‘)  #生成原始图
print_op_shape(t_x_image)                                                  #输出为[128,24,25,3]
因为在卷积过程中,每个卷积后都要加上权重b,所以在反卷积过程中就要将b减去,由于Relu函数基本上恒等变化(除了小于0的部分),所以在反向时不需要可逆操作,可以直接忽略去。
#4 反卷积第一层卷积结果
t1_conv1 = un_max_pool(h_pool1,mask1,2)
print_op_shape(t1_conv1)
t1_x_image = tf.nn.conv2d_transpose(t1_conv1 - b_conv1,W_conv1,output_shape=x_image.shape,strides=[1,1,1,1],padding=‘SAME‘)  #生成原始图
print_op_shape(t1_x_image)
这次是将结果通过TensorBoard进行展示,所以将生成第一层图像和第二层图像与原始图像和在一起,统一放在tf.summary.image()里,这样在TensorBoard的image就可以看到图像了。
#合并还原结果,并输出给TensorBoard输出
stictched_decodings = tf.concat((x_image,t1_x_image,t_x_image),axis=2)
#图像数据汇总,并命名为‘source/cifar‘
decoding_summary_op = tf.summary.image(‘source/cifar‘,stictched_decodings)
在session中建立一个summary_writer,然后在代码结尾处通过session.run()运行前面的tf.summary.image操作,使用summary_writer将得出的结果写入log。
‘‘‘
四 开始训练
‘‘‘
sess = tf.Session();
sess.run(tf.global_variables_initializer())
#创建summary_write,用于写文件
summary_writer = tf.summary.FileWriter(‘./summary_log‘,sess.graph)

# 启动计算图中所有的队列线程 调用tf.train.start_queue_runners来将文件名填充到队列,否则read操作会被阻塞到文件名队列中有值为止。
tf.train.start_queue_runners(sess=sess)

for step in range(training_step):

    #获取batch_size大小数据集
    image_batch,label_batch = sess.run([images_train,labels_train])

    #one hot编码
    label_b = np.eye(10,dtype=np.float32)[label_batch]

    #开始训练
    train.run(feed_dict={input_x:image_batch,input_y:label_b},session=sess)

    if step % display_step == 0:
        train_accuracy = accuracy.eval(feed_dict={input_x:image_batch,input_y:label_b},session=sess)
        print(‘Step {0} tranining accuracy {1}‘.format(step,train_accuracy))


‘‘‘
五 开始测试
‘‘‘
image_batch, label_batch = sess.run([images_test, labels_test])
label_b = np.eye(10,dtype=float)[label_batch]
print ("finished! test accuracy %g"%accuracy.eval(feed_dict={
     input_x:image_batch, input_y: label_b},session=sess))

‘‘‘
六 写summary日志
‘‘‘
#生成summary
decoding_summary = sess.run(decoding_summary_op,feed_dict={input_x:image_batch, input_y: label_b})
#将summary写入文件
summary_writer.add_summary(decoding_summary)
完整代码:

# -*- coding: utf-8 -*-
"""
Created on Thu May  3 12:29:16 2018

@author: zy
"""

‘‘‘
建立一个带有全局平均池化层的卷积神经网络  并对CIFAR-10数据集进行分类  然后反卷积,可视化查看
注意这个程序只能运行在GPU机器上
‘‘‘

import cifar10_input
import tensorflow as tf
import numpy as np

def weight_variable(shape):
    ‘‘‘
    初始化权重

    args:
        shape:权重shape
    ‘‘‘
    initial = tf.truncated_normal(shape=shape,mean=0.0,stddev=0.01)
    return tf.Variable(initial)

def bias_variable(shape):
    ‘‘‘
    初始化偏置

    args:
        shape:偏置shape
    ‘‘‘
    initial =tf.constant(0.01,shape=shape)
    return tf.Variable(initial)


def conv2d(x,W):
    ‘‘‘
    卷积运算 ,使用SAME填充方式   池化层后
         out_height = in_hight / strides_height(向上取整)
         out_width = in_width / strides_width(向上取整)

    args:
        x:输入图像 形状为[batch,in_height,in_width,in_channels]
        W:权重 形状为[filter_height,filter_width,in_channels,out_channels]
    ‘‘‘
    return tf.nn.conv2d(x,W,strides=[1,1,1,1],padding=‘SAME‘)


def max_pool_2x2(x):
    ‘‘‘
    最大池化层,滤波器大小为2x2,‘SAME‘填充方式  池化层后
         out_height = in_hight / strides_height(向上取整)
         out_width = in_width / strides_width(向上取整)

    args:
        x:输入图像 形状为[batch,in_height,in_width,in_channels]
    ‘‘‘
    return tf.nn.max_pool(x,ksize=[1,2,2,1],strides=[1,2,2,1],padding=‘SAME‘)


def max_pool_with_argmax(net,stride):
    ‘‘‘
    重定义一个最大池化函数,返回最大池化结果以及每个最大值的位置(是个索引,形状和池化结果一致) ‘SAME‘填充方式  池化层后
         out_height = in_hight / strides_height(向上取整)
         out_width = in_width / strides_width(向上取整)

    args:
        net:输入数据 形状为[batch,in_height,in_width,in_channels]
        stride:步长,是一个int32类型,注意在最大池化操作中我们设置窗口大小和步长大小是一样的
    ‘‘‘
    #使用mask保存每个最大值的位置 这个函数只支持GPU操作
    _, mask = tf.nn.max_pool_with_argmax( net,ksize=[1, stride, stride, 1], strides=[1, stride, stride, 1],padding=‘SAME‘)
    #将反向传播的mask梯度计算停止
    mask = tf.stop_gradient(mask)
    #计算最大池化操作
    net = tf.nn.max_pool(net, ksize=[1, stride, stride, 1],strides=[1, stride, stride, 1], padding=‘SAME‘)
    #将池化结果和mask返回
    return net,mask


def un_max_pool(net,mask,stride):
    ‘‘‘
    定义一个反最大池化的函数,找到mask最大的索引,将max的值填到指定位置
    args:
        net:最大池化后的输出,形状为[batch, height, width, in_channels]
        mask:位置索引组数组,形状和net一样
        stride:步长,是一个int32类型,这里就是max_pool_with_argmax传入的stride参数
    ‘‘‘
    ksize = [1, stride, stride, 1]
    input_shape = net.get_shape().as_list()
    #  calculation new shape
    output_shape = (input_shape[0], input_shape[1] * ksize[1], input_shape[2] * ksize[2], input_shape[3])
    # calculation indices for batch, height, width and feature maps
    one_like_mask = tf.ones_like(mask)
    batch_range = tf.reshape(tf.range(output_shape[0], dtype=tf.int64), shape=[input_shape[0], 1, 1, 1])
    b = one_like_mask * batch_range
    y = mask // (output_shape[2] * output_shape[3])
    x = mask % (output_shape[2] * output_shape[3]) // output_shape[3]
    feature_range = tf.range(output_shape[3], dtype=tf.int64)
    f = one_like_mask * feature_range
    # transpose indices & reshape update values to one dimension
    updates_size = tf.size(net)
    indices = tf.transpose(tf.reshape(tf.stack([b, y, x, f]), [4, updates_size]))
    values = tf.reshape(net, [updates_size])
    ret = tf.scatter_nd(indices, values, output_shape)
    return ret


def avg_pool_6x6(x):
    ‘‘‘
    全局平均池化层,使用一个与原有输入同样尺寸的filter进行池化,‘SAME‘填充方式  池化层后
         out_height = in_hight / strides_height(向上取整)
         out_width = in_width / strides_width(向上取整)

    args;
        x:输入图像 形状为[batch,in_height,in_width,in_channels]
    ‘‘‘
    return tf.nn.avg_pool(x,ksize=[1,6,6,1],strides=[1,6,6,1],padding=‘SAME‘)

def print_op_shape(t):
    ‘‘‘
    输出一个操作op节点的形状

    args:
        t:必须是一个tensor类型
        t.get_shape()返回一个元组  .as_list()转换为list
    ‘‘‘
    print(t.op.name,‘‘,t.get_shape().as_list())

‘‘‘
一 引入数据集
‘‘‘
batch_size = 128
learning_rate = 1e-4
training_step = 1500
display_step = 200
#数据集目录
data_dir = ‘./cifar10_data/cifar-10-batches-bin‘
print(‘begin‘)
#获取训练集数据
images_train,labels_train = cifar10_input.inputs(eval_data=False,data_dir = data_dir,batch_size=batch_size)
images_test, labels_test = cifar10_input.inputs(eval_data = True, data_dir = data_dir, batch_size = batch_size)
print(‘begin data‘)


‘‘‘
二 定义网络结构
‘‘‘
#定义占位符
input_x = tf.placeholder(dtype=tf.float32,shape=[None,24,24,3])   #图像大小24x24x
input_y = tf.placeholder(dtype=tf.float32,shape=[None,10])        #0-9类别

x_image = tf.reshape(input_x,[batch_size,24,24,3])                       #不要传入-1 否则会报错


#1.卷积层 ->池化层
W_conv1 = weight_variable([5,5,3,64])
b_conv1 = bias_variable([64])


h_conv1 = tf.nn.relu(conv2d(x_image,W_conv1) + b_conv1)                    #输出为[128,24,24,64]
print_op_shape(h_conv1)
h_pool1,mask1 = max_pool_with_argmax(h_conv1,2)                            #输出为[128,12,12,64]
#h_pool1 = max_pool_2x2(h_conv1)                                             #输出为[128,12,12,64]
print_op_shape(h_pool1)


#2.卷积层 ->池化层
W_conv2 = weight_variable([5,5,64,64])
b_conv2 = bias_variable([64])


h_conv2 = tf.nn.relu(conv2d(h_pool1,W_conv2) + b_conv2)                     #输出为[128,12,12,64]
print_op_shape(h_conv2)
h_pool2,mask2 = max_pool_with_argmax(h_conv2,2)                            #输出为[128,6,6,64]
#h_pool2 = max_pool_2x2(h_conv2)                                             #输出为[128,6,6,64]
print_op_shape(h_pool2)


#3 反卷积第二层卷积结果
t_conv2 = un_max_pool(h_pool2,mask2,2)
print_op_shape(t_conv2)                                                    #输出为[128,12,12,64]
t_pool1 = tf.nn.conv2d_transpose(t_conv2 - b_conv2,W_conv2,output_shape=h_pool1.shape,strides=[1,1,1,1],padding=‘SAME‘)
print_op_shape(t_pool1)                                                    #输出为[128,12,12,64]
t_conv1 = un_max_pool(t_pool1,mask1,2)
print_op_shape(t_conv1)                                                    #输出为[128,24,24,64]
t_x_image = tf.nn.conv2d_transpose(t_conv1 - b_conv1,W_conv1,output_shape=x_image.shape,strides=[1,1,1,1],padding=‘SAME‘)  #生成原始图
print_op_shape(t_x_image)                                                  #输出为[128,24,25,3]


#4 反卷积第一层卷积结果
t1_conv1 = un_max_pool(h_pool1,mask1,2)
print_op_shape(t1_conv1)
t1_x_image = tf.nn.conv2d_transpose(t1_conv1 - b_conv1,W_conv1,output_shape=x_image.shape,strides=[1,1,1,1],padding=‘SAME‘)  #生成原始图
print_op_shape(t1_x_image)


#合并还原结果,并输出给TensorBoard输出
stictched_decodings = tf.concat((x_image,t1_x_image,t_x_image),axis=2)
#stictched_decodings = x_image
#图像数据汇总,并命名为‘source/cifar‘
decoding_summary_op = tf.summary.image(‘source/cifar‘,stictched_decodings)

#5.卷积层 ->全局平均池化层
W_conv3 = weight_variable([5,5,64,10])
b_conv3 = bias_variable([10])

h_conv3 = tf.nn.relu(conv2d(h_pool2,W_conv3) + b_conv3)   #输出为[-1,6,6,10]
print_op_shape(h_conv3)

nt_hpool3 = avg_pool_6x6(h_conv3)                         #输出为[-1,1,1,10]
print_op_shape(nt_hpool3)
nt_hpool3_flat = tf.reshape(nt_hpool3,[-1,10])

y_conv = tf.nn.softmax(nt_hpool3_flat)


‘‘‘
三 定义求解器
‘‘‘

#softmax交叉熵代价函数
cost = tf.reduce_mean(-tf.reduce_sum(input_y * tf.log(y_conv),axis=1))

#求解器
train = tf.train.AdamOptimizer(learning_rate).minimize(cost)

#返回一个准确度的数据
correct_prediction = tf.equal(tf.arg_max(y_conv,1),tf.arg_max(input_y,1))
#准确率
accuracy = tf.reduce_mean(tf.cast(correct_prediction,dtype=tf.float32))

‘‘‘
四 开始训练
‘‘‘
sess = tf.Session();
sess.run(tf.global_variables_initializer())
#创建summary_write,用于写文件
summary_writer = tf.summary.FileWriter(‘./summary_log‘,sess.graph)

# 启动计算图中所有的队列线程 调用tf.train.start_queue_runners来将文件名填充到队列,否则read操作会被阻塞到文件名队列中有值为止。
tf.train.start_queue_runners(sess=sess)

for step in range(training_step):

    #获取batch_size大小数据集
    image_batch,label_batch = sess.run([images_train,labels_train])

    #one hot编码
    label_b = np.eye(10,dtype=np.float32)[label_batch]

    #开始训练
    train.run(feed_dict={input_x:image_batch,input_y:label_b},session=sess)

    if step % display_step == 0:
        train_accuracy = accuracy.eval(feed_dict={input_x:image_batch,input_y:label_b},session=sess)
        print(‘Step {0} tranining accuracy {1}‘.format(step,train_accuracy))


‘‘‘
五 开始测试
‘‘‘
image_batch, label_batch = sess.run([images_test, labels_test])
label_b = np.eye(10,dtype=float)[label_batch]
print ("finished! test accuracy %g"%accuracy.eval(feed_dict={
     input_x:image_batch, input_y: label_b},session=sess))

‘‘‘
六 写summary日志
‘‘‘
#生成summary
decoding_summary = sess.run(decoding_summary_op,feed_dict={input_x:image_batch, input_y: label_b})
#将summary写入文件
summary_writer.add_summary(decoding_summary)
标签:测试 初始化 获取 star normal ima 生成 ons rap
原文地址:https://www.cnblogs.com/zyly/p/8993610.html