一、安装

由于celery4.0不支持window,如果在window上安装celery4.0将会出现下面的错误
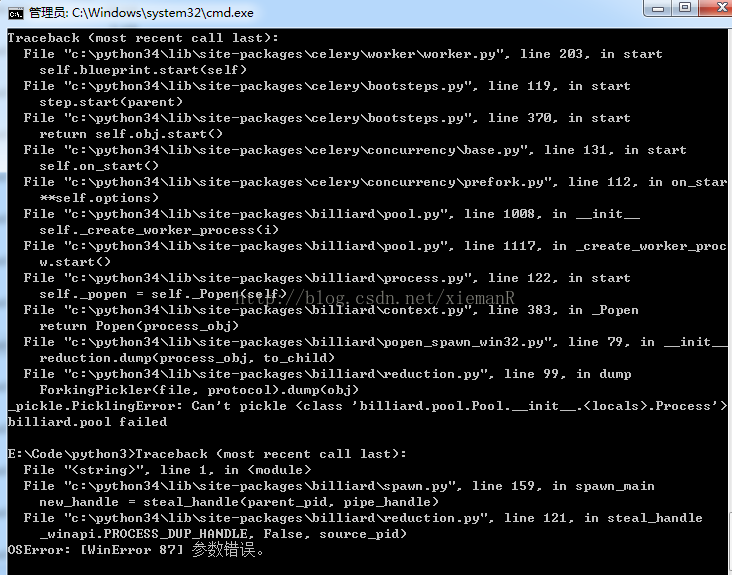
技术分享图片flask_clery

你现在只能安装
pip install celery==3.1

二、安装py for redis 模块

pip install redis

三、安装redis服务

网上很多文章都写得模棱两可,把人坑的不要不要的!!!

Redis对于Linux是官方支持的,但是不支持window,网上很多作者写文章都不写具体的系统环境,大多数直接说pip install redis就可以使用redis了,真的是坑人的玩意,本人深受其毒害

对于windows,如果你需要使用redis服务,那么进入该地址下载
https://github.com/MSOpenTech/redis/releases

redis安装包,双击完成就可以了

如果你在window上不安装该redis包,将会提示

redis.exceptions.ConnectionError: Error 10061 connecting to localhost:6379.

或者

redis.exceptions.ConnectionError

需要注意是:安装目录不能安装在C盘,否则会出现权限依赖错误

四、添加redis环境变量

D:\Program Files\Redis

五、初始化redis

进入redis安装目录,打开cmd运行命令redis-server.exe redis.windows.conf,如果出错

  • 双击目录下的redis-cli.exe
  • 在出现的窗口中输入shutdown
  • 继续输入exit

六、lask 集成celyer

在Flask配置中添加配置

1
2
3
 # Celery 配置
CELERY_BROKER_URL = ‘redis://localhost:6379/0‘ # broker是一个消息传输的中间件
CELERY_RESULT_BACKEND = ‘redis://localhost:6379/1‘ # 任务执行器
  • 在flask工程的__init__目录下生产celery实例
    注意!!以下代码必须在 flask app读取完配置文件后编写,否则会报错
1
2
3
4
5
6
7
8
9
10
11
12
13
14
15
16
17
18
def make_celery(app):
celery = Celery(app.import_name, broker=app.config[‘CELERY_BROKER_URL‘],
backend=app.config[‘CELERY_RESULT_BACKEND‘])
celery.conf.update(app.config)
TaskBase = celery.Task

class ContextTask(TaskBase):
abstract = True

def __call__(self, *args, **kwargs):
with app.app_context():
return TaskBase.__call__(self, *args, **kwargs)

celery.Task = ContextTask
return celery


celery = make_celery(app)

完整示例如下

1
2
3
4
5
6
7
8
9
10
11
12
13
14
15
16
17
18
19
20
21
app = Flask(__name__)
app.config.from_object(config[‘default‘])

def make_celery(app):
celery = Celery(app.import_name, broker=app.config[‘CELERY_BROKER_URL‘],
backend=app.config[‘CELERY_RESULT_BACKEND‘])
celery.conf.update(app.config)
TaskBase = celery.Task

class ContextTask(TaskBase):
abstract = True

def __call__(self, *args, **kwargs):
with app.app_context():
return TaskBase.__call__(self, *args, **kwargs)

celery.Task = ContextTask
return celery


celery = make_celery(app)

在cmd中启动celery服务

执行命令celery -A your_application.celery worker loglevel=info,your_application为你工程的名字,在这里为 get_tieba_film

调用

1
2
3
4
5
6
7
8
9
10
11
12
13
14
15
@app.route(‘/‘)
@app.route(‘/index‘)
def index():
print ("耗时的任务")
# 任务已经交给异步处理了
result = get_film_content.apply_async(args=[1])
# 如果需要等待返回值,可以使用get()或wait()方法
# result.wait()
return ‘耗时的任务已经交给了celery‘


@celery.task()
def get_film_content(a):
util = SpiderRunUtil.SpiderRun(TieBaSpider.FilmSpider())
util.start()

绑定

一个绑定任务意味着任务函数的第一个参数总是任务实例本身(self),就像 Python 绑定方法类似:

1
2
3
@task(bind=True) 
def add(self, x, y):
logger.info(self.request.id)


任务继承

任务装饰器的 base 参数可以声明任务的基类

1
2
3
4
5
6
7
import celery
class MyTask(celery.Task):
def on_failure(self, exc, task_id, args, kwargs, einfo):
print(‘{0!r} failed: {1!r}‘.format(task_id, exc))
@task(base=MyTask)
def add(x, y):
raise KeyError()


任务名称

每个任务必须有不同的名称。
如果没有显示提供名称,任务装饰器将会自动产生一个,产生的名称会基于这些信息:
1)任务定义所在的模块,
2)任务函数的名称

显示设置任务名称的例子:

1
2
3
4
5
>>> @app.task(name=‘sum-of-two-numbers‘)
>>> def add(x, y):
... return x + y
>>> add.name
‘sum-of-two-numbers‘

最佳实践是使用模块名称作为命名空间,这样的话如果有一个同名任务函数定义在其他模块也不会产生冲突。

1
2
3
>>> @app.task(name=‘tasks.add‘)
>>> def add(x, y):
... return x + y


七、安装flower

将各个任务的执行情况、各个worker的健康状态进行监控并以可视化的方式展现

1
pip install flower


启动flower(默认会启动一个webserver,端口为5555):

1
celery flower --address=127.0.0.1 --port=5555


进入http://localhost:5555即可查看。

doc

八、常见错误

1
ERROR/MainProcess] consumer: Cannot connect to redis://localhost:6379/0:

原因是:redis-server 没有启动
解决方案:到redis安装目录下执行redis-server.exe redis.windows.conf
检查redis是否启动:redis-cli ping

1
line 442, in on_task_received

解决:

1
2
3
4
5
6
7
8
9
10
Did you remember to import the module containing this task?
Or maybe you are using relative imports?
Please see http://bit.ly/gLye1c for more information.
The full contents of the message body was:
{‘timelimit‘: (None, None), ‘utc‘: True, ‘chord‘: None, ‘args‘: [4, 4], ‘retries‘: 0, ‘expires‘: None, ‘task‘: ‘main.add‘, ‘callbacks‘: None,
‘errbacks‘: None, ‘taskset‘: None, ‘kwargs‘: {}, ‘eta‘: None, ‘id‘: ‘97000322-93be-47e9-a082-4620e123dc5e‘} (210b)
Traceback (most recent call last):
File "d:\vm_env\flask_card\lib\site-packages\celery\worker\consumer.py", line 442, in on_task_received
strategies[name](message, body,
KeyError: ‘main.add‘

原因:任务没有注册或注册不成功,只有在启动的时候提示有任务的时候,才能使用该任务
技术分享图片flask_celery
解决:

  1. 你在那个类中使用celery就在哪个类中执行celery -A 包名.类名.celery worker -l info
  2. 根据上一部提示的任务列表给任务设置对应的名称
    如在Test中
1
2
3
4
5
6
from main import app, celery

@celery.task(name="main.Test.add".)
def add(x, y):
print "ddddsws"
return x + y

目录结构:

1
2
3
4
5
6
+ Card  # 工程
+ main
+ admin
- Task.py
- __init__.py
- Test.py


则应该启动的命令为:

1
celery -A main.Test.celery worker -l info


同时,如果你的Task.py也有任务,那么你还应该重新创建一个cmd窗口执行

1
celery -A main.admin.Task.celery worker -l info


celery的工作进程可以创建多个
技术分享图片flask_celery
技术分享图片flask_celery

参考链接

转自:https://www.laoyuyu.me/2018/02/10/python_flask_celery/

celery用户指南,强烈推荐看

redis安装

celery使用
https://redis.io/topics/quickstart