标签:gid pre rsa not 阅读 failed 环境 -bash 本地
- 基础环境准备
- 关闭sssd及安装nslcd客户端
- 配置nslcd客户端
- 启动nslcd进程
- 客户端验证
- ssh登录自动创建家目录
本文承接openldap服务端安装配置,基础环境请参考openldap服务端安装配置
关闭sssd进程,由于我这最小化安装,并没有sssd进程
[root@mldap01 ~]# service sssd stop && chkconfig sssd off
sssd: unrecognized service
安装OpenLDAP客户端软件包
[root@test01 ~]# yum -y install openldap-clients nss-pam-ldapd修改nslcd.conf配置文件,该文件是由nss-pam-ldapd包提供
[root@test01 ~]# vim /etc/nslcd.conf
uri ldap://mldap01.gdy.com
base dc=gdy,dc=com
ssl no
tls_cacertdir /etc/openldap/certs
[root@test01 ~]# rpm -qf /etc/nslcd.conf
nss-pam-ldapd-0.7.5-32.el6.x86_64
修改pam_ldap.conf配置文件,由pam_ldap包提供,pam_ldap
[root@test01 ~]# vim /etc/pam_ldap.conf
base dc=gdy,dc=com
uri ldap://mldap01.gdy.com
ssl no
tls_cacertdir /etc/openldap/certs
bind_policy soft
[root@test01 ~]# rpm -qf /etc/pam_ldap.conf
pam_ldap-185-11.el6.x86_64
修改system-auth认证文件
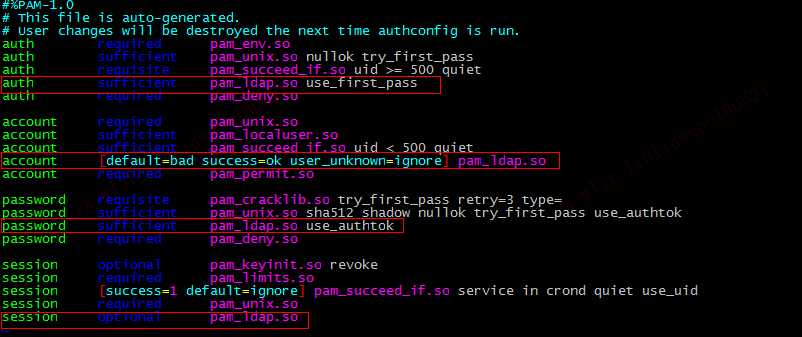
由pam包提供(系统自带包)
[root@test01 ~]# rpm -qf /etc/pam.d/system-auth
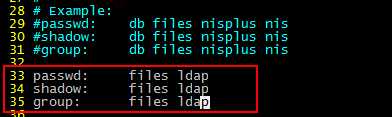
pam-1.1.1-24.el6.x86_64修改nsswitch.conf配置文件
修改authconfig文件
[root@test01 ~]# rpm -qf /etc/sysconfig/authconfig
authconfig-6.1.12-23.el6.x86_64
[root@test01 ~]# vim /etc/sysconfig/authconfig
USESHADOW=yes
USELDAPAUTH=yes
USELOCAUTHORIZE=yes
USELDAP=yes
选项解释如下
USESHADOW=yes   //启用密码验证
USELDAPAUTH=yes   //启用OpenLDAP验证
USELOCAUTHORIZE=yes    //启用本地验证
USELDAP=yes //启用LDAP认证协议[root@test01 ~]# /etc/init.d/nslcd restart
Stopping nslcd: [FAILED]
Starting nslcd: [ OK ]
[root@test01 ~]# chkconfig nslcd on
[root@test01 ~]# chkconfig --list nslcd
nslcd 0:off 1:off 2:on 3:on 4:on 5:on 6:off使用id命令或getent命令验证
[root@test01 ~]# getent passwd user1
user1:x:501:501:user1:/home/user1:/bin/bash
[root@test01 ~]# id user1
uid=501(user1) gid=501(user1) groups=501(user1)
[root@test01 ~]# cat /etc/passwd | grep user1使用ssh登录验证
[root@test01 ~]# ssh user1@127.0.0.1
The authenticity of host ‘127.0.0.1 (127.0.0.1)‘ can‘t be established.
RSA key fingerprint is 1a:8a:57:12:ee:68:91:a4:bd:c5:48:f1:03:a9:5f:9c.
Are you sure you want to continue connecting (yes/no)? yes
Warning: Permanently added ‘127.0.0.1‘ (RSA) to the list of known hosts.
user1@127.0.0.1‘s password:
Could not chdir to home directory /home/user1: No such file or directory
-bash-4.1$ 把/etc/ssh/sshd_config中的UsePAM设置成yes

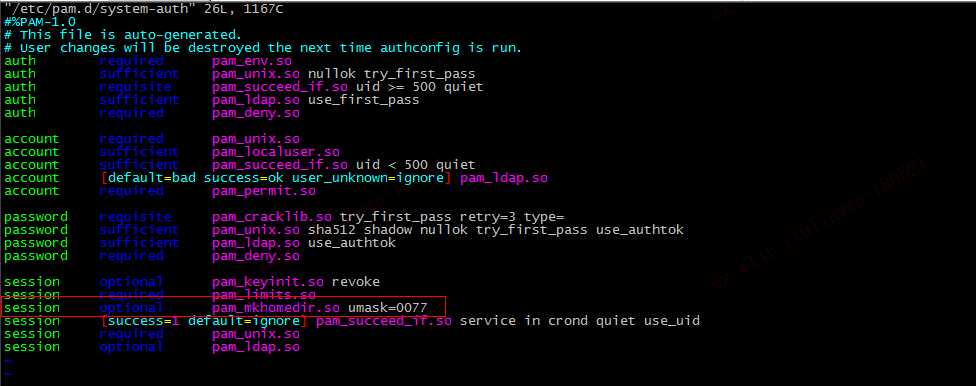
在/etc/pam.d/sshd添加最后一行,加入这行的目的是ssh首次登录服务器时创建home目录
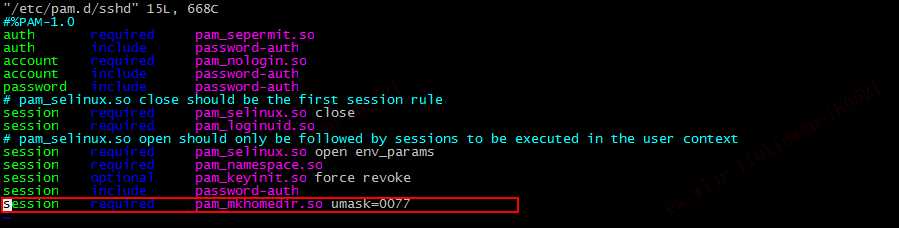
此时ssh登录就会发现会自动创建home目录,并且权限为0700。
修改/etc/pam.d/password-auth
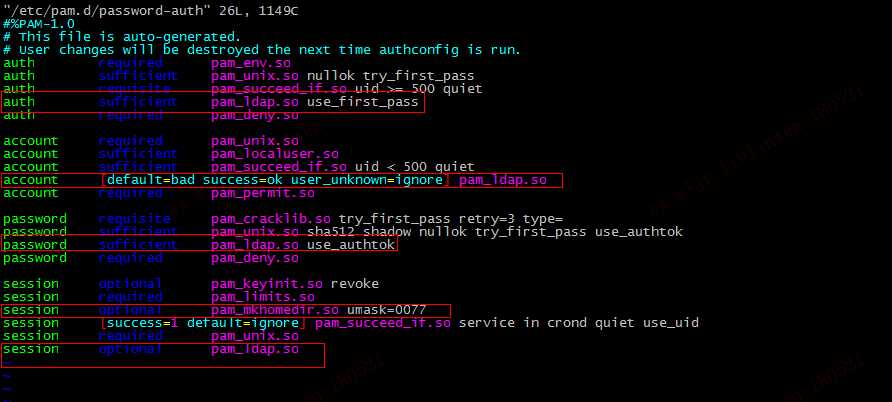
这个还是需要加上,虽然不知道什么意思。如果不加上,openldap 密码策略时那一块总是通过ssh登录不上去。
重启sshd进程。最后不要忘记重启sshd进程。
修改system-auth认证文件,添加如下行。就搞定了。此时su - $user就会自动创建了。
标签:gid pre rsa not 阅读 failed 环境 -bash 本地
原文地址:https://www.cnblogs.com/cishi/p/9127568.html