标签:tutorials vbr 读取方法 介绍 scale cvs cout 分享 tty
近期在参考高翔博士的的“一起学RGBD-SLAM”教程,用realsense D435相机做点云合成。
一. RGBD图像采集
以下是我在ros下,通过image_transport包,根据给定的采集速度从realsense D435发布的topic中订阅深度图的代码。
void depth_Callback(const sensor_msgs::ImageConstPtr& depth_msg)
{
  cv_bridge::CvImagePtr depth_ptr;
  try
  {
    //cv::imshow("depth_view", cv_bridge::toCvShare(depth_msg, sensor_msgs::image_encodings::TYPE_16UC1)->image);
    //depth_ptr = cv_bridge::toCvCopy(depth_msg, sensor_msgs::image_encodings::TYPE_16UC1);
    cv::imshow("depth_view", cv_bridge::toCvShare(depth_msg, sensor_msgs::image_encodings::TYPE_32FC1)->image);
    depth_ptr = cv_bridge::toCvCopy(depth_msg, sensor_msgs::image_encodings::TYPE_32FC1);

    cv::waitKey(1000);
  }
  catch (cv_bridge::Exception& e)
  {
    ROS_ERROR("Could not convert from ‘%s‘ to ‘32fc1‘.", depth_msg->encoding.c_str());
  }

}
在main函数中,
image_transport::ImageTransport it(nh);
image_transport::Subscriber sub1 = it.subscribe("/camera/aligned_depth_to_color/image_raw", 1, depth_Callback);
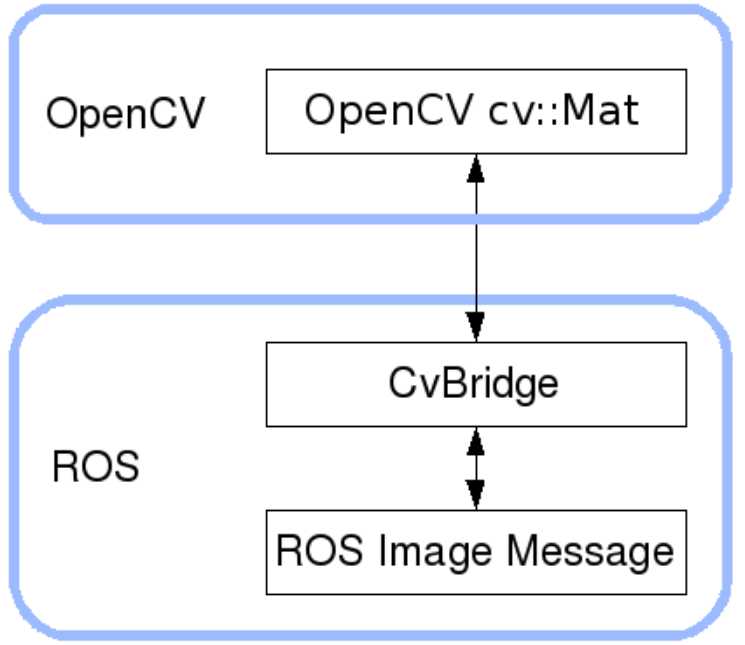
如代码所示,在ros中采集到的深度图是ros自带的数据类型sensor_msgs::image。如果要利用opencv对该深度图像进行操作,则需要转换成opencv的图像数据类型Mat,这一步转换操作通过cv_bridge完成。

代码中 depth_msg->encoding.c_str() 显示了该深度图采用16UC1方式编码。通过查看sensor_msgs::image_encodings,我初次使用TYPE_16UC1,读取出来的数据通过 cv::imshow() 可视化,并与节点原始输出的深度图进行对比,结果显示该编码效果不好。经过查找资料后,选用了TYPE_32FC1,可视化的效果较好。至于为什么选用这种编码方式,我现在也是一头雾水,肯定前辈不吝赐教。
二. 合成点云
获取RGB图和深度图后,要对opencv中矩阵元素进行计算操作,合成点云。这里着重介绍对opencv矩阵元素的操作方法。
opencv中矩阵元素值的读取方法,转自https://blog.csdn.net/u011028345/article/details/73185166
1, 利用at函数读取;
(1)单通道图像读取
Mat img1 = imread(filename,IMREAD_GRAYSCALE);
   for( size_t nrow = 0; nrow < img1.rows; nrow++)
   {
       for(size_t ncol = 0; ncol < img1.cols; ncol++)
       {
           uchar val = mat_CV_8UC1.at<uchar>(nrow,ncol);
       }
   }
(2)三通道图像读取
Mat img2 = imread(filename,IMREAD_COLOR);
   for( size_t nrow = 0; nrow < img2.rows; nrow++)
    {
       for(size_t ncol = 0; ncol < img2.cols; ncol++)
       {
           Vec3i bgr = mat_CV_8UC3.at<Vec3b>(nrow,ncol);//用Vec3b也行
           cout   << "("<<bgr.val[0]<<","
                   <<bgr.val[1]<<","
                   <<bgr.val[2]<<")";
       }
       cout << endl;
    }
2, 使用指针读取;
for( size_t nrow = 0; nrow < img3.rows; nrow++)
    {
        uchar* data = img3.ptr<uchar>(nrow);
       for(size_t ncol = 0; ncol < img3.cols * img3.channels(); ncol++)
       {
            cout << int( data[ncol] ) ;
       }
       cout << endl;
    }
3, 使用迭代器;
Mat img4 = imread(filename,IMREAD_GRAYSCALE);
MatIterator_<uchar> it = img4.begin<uchar>(), it_end = img4.end<uchar>();
   for(int cnt = 1; it != it_end; ++it)
    {
        cout << ( int(*it) ) ;
        if( (cnt++ % img4.cols) ==0 )
            cout << endl;
    }
4, 使用矩阵元素的地址定位
Mat img5(rows, cols,CV_8U, Scalar(0));
for( size_t nrow = 0; nrow < img5.rows; nrow++)
for(size_t ncol = 0; ncol < img5.cols; ncol++)
    {
       cout<<(int)(*(img5.data+img5.step[0]*nrow+img5.step[1]*ncol));
    }
5, 补充:在使用 at 函数的情况下需要预先知道Mat变量中存储的元素类型,如果类型不匹配就会出现读错误。所以可以采用c++ boost库中的BOOST_TYPEOF来获取图像的元素数据类型。
Mat img6 = imread(filename);
typedef BOOST_TYPEOF(*img6.data) ElementType
for( size_t nrow = 0; nrow < img1.rows; nrow++)
   {
       for(size_t ncol = 0; ncol < img1.cols; ncol++)
       {
        cout<<mat_CV_8UC1.at<ElementType>(nrow,ncol);
       }
   }
关于如何判断opencv矩阵元素的数据类型,方法转自https://www.jianshu.com/p/204f292937bb
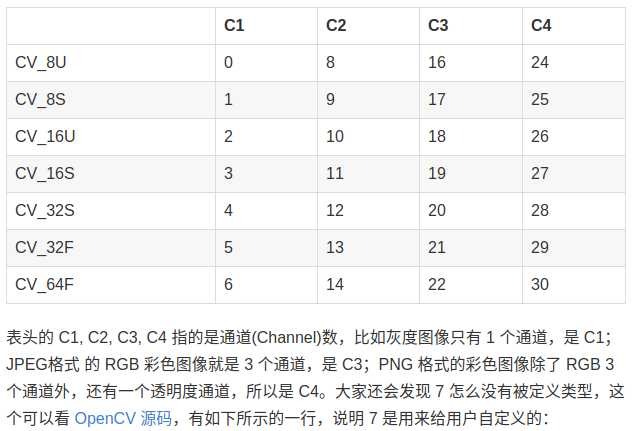
cv::Mat 类的对象有一个成员函数 type() 用来返回矩阵元素的数据类型,返回值是 int类型,不同的返回值代表不同的类型。OpenCV Reference Manual 中对 type() 的解释如下所示:
Mat::type
C++: int Mat::type() const
The method returns a matrix element type. This is an identifier compatible with the CvMat type system, like CV_16SC3 or 16-bit signed 3-channel array, and so on.
以本例的深度图为,
int pic_type = depth_ptr->image.type();
std::cout << "the element type of depth_pic is " << pic_type << std::endl;
从type()函数返回一个整数值,下一步就是查找返回值和具体类型之间的对应关系。

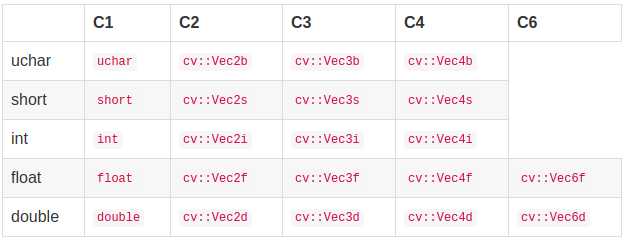
在已知通道数和每个通道数据类型的情况下,指定给at方法的数据类型如下表所示:

至此,我们就可以确定矩阵中的数据类型了。
标签:tutorials vbr 读取方法 介绍 scale cvs cout 分享 tty
原文地址:https://www.cnblogs.com/gdut-gordon/p/9151740.html