标签:获取值 word turn 指定 验证 manage width ppi ping
前提是你的开发电脑安装和配置好了redis,如果没安装请看Window配置Redis环境和简单使用
 <!-- https://mvnrepository.com/artifact/redis.clients/jedis -->
    <dependency>
      <groupId>redis.clients</groupId>
      <artifactId>jedis</artifactId>
      <version>2.9.0</version>
    </dependency>
#redis.host=127.0.0.1
redis.host=localhost
redis.port=6379
redis.password=你的redis密码
redis.maxIdle=50
redis.maxTotal=100
redis.maxWaitMillis=3000
redis.testOnBorrow=true
redis.timeout=5000
指定了redis属性配置文件的路径
<?xml version="1.0" encoding="UTF-8"?>
<beans xmlns="http://www.springframework.org/schema/beans"
       xmlns:xsi="http://www.w3.org/2001/XMLSchema-instance"
       xmlns:util="http://www.springframework.org/schema/util"
       xmlns:p="http://www.springframework.org/schema/p"
       xsi:schemaLocation="
             http://www.springframework.org/schema/beans
             http://www.springframework.org/schema/beans/spring-beans.xsd
             http://www.springframework.org/schema/util
             http://www.springframework.org/schema/util/spring-util.xsd">

    <util:properties id="redisConfig" location="classpath:/config/redis.properties"></util:properties>

    <bean id="jedisPoolConfig" class="redis.clients.jedis.JedisPoolConfig">
        <property name="maxIdle" value="#{redisConfig[‘redis.maxIdle‘]}" />
        <property name="maxTotal" value="#{redisConfig[‘redis.maxTotal‘]}" />
        <property name="maxWaitMillis" value="#{redisConfig[‘redis.maxWaitMillis‘]}" />
        <property name="testOnBorrow" value="#{redisConfig[‘redis.testOnBorrow‘]}" />
    </bean>


    <bean id="jedisPool" class="redis.clients.jedis.JedisPool">

        <constructor-arg index="0" ref="jedisPoolConfig" />
        <!-- 端口,默认6379 -->
        <constructor-arg index="1" value="#{redisConfig[‘redis.host‘]}" name="host" type="java.lang.String"/>
        <constructor-arg index="2" value="#{redisConfig[‘redis.port‘]}"  name="port" type="int"/>
        <constructor-arg index="3" value="#{redisConfig[‘redis.timeout‘]}"  name="timeout" type="int"/>
        <constructor-arg index="4" value="#{redisConfig[‘redis.password‘]}"  name="password" type="java.lang.String"/>
    </bean>

</beans>
最下方利用import标签引入redis的配置文件
<?xml version="1.0" encoding="UTF-8"?>
<beans xmlns="http://www.springframework.org/schema/beans"
    xmlns:xsi="http://www.w3.org/2001/XMLSchema-instance" xmlns:context="http://www.springframework.org/schema/context"
    xmlns:mvc="http://www.springframework.org/schema/mvc"
    xsi:schemaLocation="http://www.springframework.org/schema/beans
    http://www.springframework.org/schema/beans/spring-beans.xsd
    http://www.springframework.org/schema/context
    http://www.springframework.org/schema/context/spring-context-4.0.xsd
    http://www.springframework.org/schema/mvc
    http://www.springframework.org/schema/mvc/spring-mvc-4.0.xsd">
    <!-- 注解扫描包 -->
    <context:component-scan base-package="com.king.weixin"/>
    <!-- 开启注解 -->
    <mvc:annotation-driven/>
    <!--
    配置静态资源,直接映射到对应的文件夹,不被DispatcherServlet处理,3.04新增功能,需要重新设置spring-mvc-3.0.xsd
    -->
    <mvc:resources mapping="/img/**" location="/img/" />
    <mvc:resources mapping="/js/**" location="/js/" />
    <mvc:resources mapping="/css/**" location="/css/" />
    <mvc:resources mapping="/html/**" location="/html/" />
    <mvc:resources mapping="/tinymce/**" location="/tinymce/" />
    <mvc:resources mapping="/upload/**" location="/upload/" />
    <!-- 定义跳转的文件的前后缀 ,视图模式配置-->
    <bean id="viewResolver"
        class="org.springframework.web.servlet.view.InternalResourceViewResolver">
        <!-- 这里的配置我的理解是自动给后面action的方法return的字符串加上前缀和后缀,变成一个 可用的url地址 -->
        <property name="prefix" value="/" />
        <property name="suffix" value=".jsp" />
    </bean>
    <!-- redis配置 -->
    <import resource="spring-redis.xml"/>
</beans>
采用jedis获取redis资源和操作redis,添加值并且给值设置生命周期
public String addStringValue(String key, String value, int expireSeconds) {

        String result = null;
        Jedis jedis = null;
        try {
            jedis = jedisManager.getResource();
            //result = jedis.set(key, value);
            result = jedis.set(key,value).toString();
            if (expireSeconds != 0) {
                //EXPIRE key seconds 为给定 key 设置生存时间,当 key 过期时(生存时间为 0 ),它会被自动删除。
                jedis.expire(key, expireSeconds);
            }

        } catch (Exception e) {
            e.printStackTrace();
        } finally {
            jedisManager.returnResource(jedis);
        }
        return result;
    }
获取值得生命周期方法,ttl (key)
  public long getStringValueTTLByKey(String key){

        long result = 0;
        Jedis jedis = null;
        try {

            jedis = jedisManager.getResource();
            //Redis TTL 命令以秒为单位返回 key 的剩余过期时间。
            result  = jedis.ttl(key);


        } catch (Exception e) {
            e.printStackTrace();
        } finally {
            jedisManager.returnResource(jedis);
        }
        return result;

    }
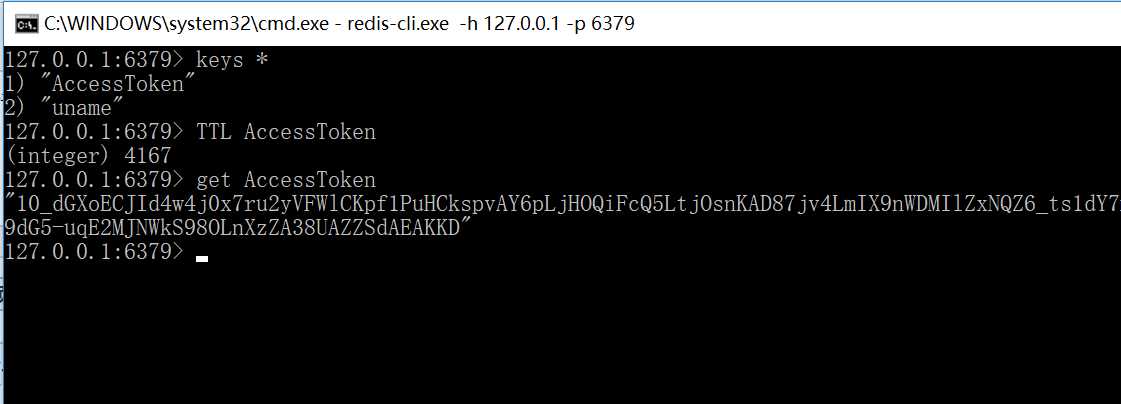
在命令行查看redis中的所有key值和剩余生命周期,如下图可以使用keys * 查看所有缓存的key ,利用TTL key可以查看该key值对应对象的剩余生命周期
标签:获取值 word turn 指定 验证 manage width ppi ping
原文地址:https://www.cnblogs.com/wxjnew/p/9161730.html