标签:style blog http color io 使用 ar strong for
SemanticZoom控件可以让用户实现一种更加高级的列表,这种列表可以对列表的项目进行分组,同时这个SemanticZoom控件会提供两个具有相同内容的不同视图,其中有一个是主视图,另外一个视图可以让用户进行快速导航的分组视图。例如,Windows Phone里面的人脉通讯录列表就是使用SemanticZoom控件实现的。
SemanticZoom控件支持对GridView和ListView控件的视图效果进行缩放,在SemanticZoom控件中需要包含两个列表控件(GridView或ListView):一个控件提供放大视图,另外一个提供缩小视图。放大视图提供一个详细信息视图(ZoomedInView)以让用户查看详细信息,缩小视图提供一个缩小索引视图(ZoomedOutView)让用户快速定位想要查看信息的大概范围或者分组。下面我们从控件的样式设置和数据源创建两个方面来介绍SemanticZoom控件的使用:
(1)SemanticZoom控件的样式设置
SemanticZoom控件实现分组列表会比实现非分组的列表要复杂一些,实现分组列表还需要设置两大属性的内容:ZoomedOutView的内容和ZoomedInView的内容。这两个属性的内容含义如下所示:
<SemanticZoom.ZoomedInView>
<!--在这里放置GridView(或ListView)以表示放大视图,显示详细信息-->
</SemanticZoom.ZoomedInView>
<SemanticZoom.ZoomedOutView>
<!--在这里放置GridView(或ListView)以表示缩小视图,一般情况下绑定Group.Title-->
</SemanticZoom.ZoomedOutView>
在赋值给ZoomedInView属性的列表控件里面,我们一般需要设置它的ItemTemplate模板和GroupStyle.HeaderTemplate模板。ItemTemplate模板要设置的内容就是列表详细信息所展示的内容,GroupStyle.HeaderTemplate模板是指分组的组头模板,如在人脉里面的“a”、“b”……这些就是属于列表的组头,组头也一样是一个列表的集合的也是通过模板的绑定形式来进行定义。
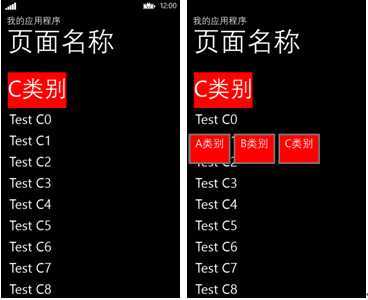
在赋值给ZoomedOutView属性的列表控件里面,我们也需要设置其ItemTemplate模板,在这里要注意的是ZoomedOutView里面的ItemTemplate模板和ZoomedInView里面的模板所产生的作用是不一样的,这里的ItemTemplate模板是指当你点击组头的时候弹出的组头的索引面板的项目展示,如点击人脉里面的“a”、“b”……就会弹出一个字母的现实面板,当你点击某个字母的时候就会从新回到列表的界面并且跳到列表该字母所属的组项目的位置。同时你还可以使用ItemsPanel来设置列表的布局,使用ItemContainerStyle来设置列表项目的容器样式等等,这些功能的使用是和单独的GridView(或ListView)列表的使用是一样的。
(2)SemanticZoom控件的数据源创建
SemanticZoom控件的数据源创建需要用到用到Windows.UI.Xaml.Data命名空间下的CollectionViewSource。CollectionViewSource是专为数据绑定有UI视图互动而设的,尤其是对于要实现分组的情况下,更需要它。创建一个CollectionViewSource对象我们既可以使用XAML的方式来进行创建也可以使用C#代码来直接创建,实现的效果是等效的。在CollectionViewSource对象中我们通常需要设置下面几个重要的属性:
1)Source属性:是设置分组后的数据源,赋值给Source属性的对象是列表嵌套列表的集合对象;
2)IsSourceGrouped属性:指示是否允许分组;
3)ItemsPath属性:是分组后,组内部所包含列表的属性路径;
4)View属性:获取当前与CollectionViewSource的此实例关联的视图对象;
5)View.CollectionGroups属性:返回该视图关联的所有集合组。
那么在绑定数据的时候我们需要把ZoomedInView里面的列表控件的ItemsSource绑定到CollectionViewSource对象的View属性,用于展示CollectionViewSource对象关联的视图;把ZoomedOutView里面的列表控件的ItemsSource绑定到CollectionViewSource对象的View.CollectionGroups属性,用于展示分组的视图。
下面我们用一个简洁的例子来实现这样一个分组列表的数据组织逻辑和相关模板样式的设置,代码如下所示:
代码清单11-5:SemanticZoom分组列表(源代码:第11章\Examples_11_5)
MainPage.xaml文件主要代码
------------------------------------------------------------------------------------------------------------------
    <Grid x:Name="ContentPanel" Grid.Row="1" Margin="12,0,12,0">
        <Grid.Resources>
           <!--创建数据源对象,注意ItemContent属性就是数据源中真正的基础数据的列表的属性,必须设置该属性的值数据源才能定位到实际绑定的数据实体对象-->
            <CollectionViewSource x:Name="itemcollectSource" IsSourceGrouped="true" ItemsPath="ItemContent" />
        </Grid.Resources>
        <SemanticZoom x:Name="semanticZoom">
            <SemanticZoom.ZoomedInView>
                <!-- 在这里放置GridView(或ListView)以表示放大视图 -->
                <ListView x:Name="inView">
                    <ListView.GroupStyle>
                        <GroupStyle>
                            <!--用于显示列表头的数据项的模板-->
                            <GroupStyle.HeaderTemplate>
                                <DataTemplate>
                                    <Border Background="Red" Height="80">

                                        <TextBlock Text="{Binding Key}" FontSize="50"></TextBlock>
                                    </Border>
                                </DataTemplate>
                            </GroupStyle.HeaderTemplate>
                        </GroupStyle>
                    </ListView.GroupStyle>
                    <!--用于显示列表的数据项的模板-->
                    <ListView.ItemTemplate>
                        <DataTemplate>
                            <StackPanel>
                                <TextBlock Text="{Binding Title}" Height="40" FontSize="30"></TextBlock>
                            </StackPanel>
                        </DataTemplate>
                    </ListView.ItemTemplate>
                </ListView>
            </SemanticZoom.ZoomedInView>
            <SemanticZoom.ZoomedOutView>
                <!-- 在这里放置GridView(或ListView)以表示缩小视图 -->
                <GridView x:Name="outView">
                    <!--用于显示弹出的分组列表视图的数据项的模板-->
                    <GridView.ItemTemplate>
                        <DataTemplate>
                            <Border Height="60">
                                <TextBlock Text="{Binding Group.Key}" FontSize="24"></TextBlock>
                            </Border>
                        </DataTemplate>
                    </GridView.ItemTemplate>
                    <!--列表布局模板-->
                    <GridView.ItemsPanel>
                        <ItemsPanelTemplate>
                            <WrapGrid ItemWidth="100" ItemHeight="75" MaximumRowsOrColumns="1" VerticalChildrenAlignment="Center" />
                        </ItemsPanelTemplate>
                    </GridView.ItemsPanel>
                    <!--列表项目容器的样式设置-->
                    <GridView.ItemContainerStyle>
                        <Style TargetType="GridViewItem">
                            <Setter Property="BorderBrush" Value="Gray" />
                            <Setter Property="Background" Value="Red" />
                            <Setter Property="BorderThickness" Value="3" />
                            <Setter Property="HorizontalContentAlignment" Value="Center" />
                            <Setter Property="VerticalContentAlignment" Value="Center" />
                        </Style>
                    </GridView.ItemContainerStyle>
                </GridView>
            </SemanticZoom.ZoomedOutView>
        </SemanticZoom>
    </Grid>
MainPage.xaml.cs文件主要代码
------------------------------------------------------------------------------------------------------------------
    public sealed partial class MainPage : Page
    {
        public MainPage()
        {
            this.InitializeComponent();
            // 先创建一个普通的数据集合
            List<Item> mainItem = new List<Item>();
            for (int i = 0; i < 10; i++)
            {
                mainItem.Add(new Item { Content = "A类别", Title = "Test A" + i });
                mainItem.Add(new Item { Content = "B类别", Title = "Test B" + i });
                mainItem.Add(new Item { Content = "C类别", Title = "Test C" + i });
            }
            // 使用LINQ语法把普通的数据集合转换成分组的数据集合
            List<ItemInGroup> Items = (from item in mainItem group item by item.Content into newItems select new ItemInGroup { Key = newItems.Key, ItemContent = newItems.ToList() }).ToList();
            // 设置CollectionViewSource对象的数据源
            this.itemcollectSource.Source = Items;
            // 分别对两个视图进行绑定
            outView.ItemsSource = itemcollectSource.View.CollectionGroups;
            inView.ItemsSource = itemcollectSource.View;
        }
    }
     // 分组的实体类,也就是分组的数据集合最外面的数据项的实体类
    public class ItemInGroup
    {
        // 分组的组头属性
        public string Key { get; set; }
        // 分组的数据集合
        public List<Item> ItemContent { get; set; }
    }
    // 列表的数据实体类
    public class Item
    {
        public string Title { get; set; }
        public string Content { get; set; }
    }

本文来源于《深入理解Windows Phone 8.1 UI控件编程》
本书更多试读文章:http://www.cnblogs.com/linzheng/p/3763382.html
源代码下载:http://vdisk.weibo.com/s/zt_pyrfNHoezI
欢迎关注我的微博@WP林政 微信公众号:wp开发(号:wpkaifa)
WP8.1技术交流群:372552293
[WP8.1UI控件编程]SemanticZoom控件实现分组列表
标签:style blog http color io 使用 ar strong for
原文地址:http://www.cnblogs.com/linzheng/p/3999217.html