标签:des style blog http color io os ar strong
上篇简单介绍了CentOS 7 在服务和网络方面的一点变化,先前很多烂熟于心的操作指令已经不适用了,不管是否习惯,总要接受、熟悉这些变化。
写上篇的时候还没有最小安装的ISO(CentOS-7.0-1406-x86_64-Minimal.iso),后来安装了首先发现ifconfig、netstat、route、arp都没有了,在哪儿呢?
[root@centos7 ~]# yum search ifconfig
......
======================== Matched: ifconfig =========================
net-tools.x86_64 : Basic networking tools
[root@centos7 ~]#
哦,最小安装默认没有包含这些老工具,如果非用不可,就 yum install net-tools 吧,但我就是要看看不用它们我们怎么来管理网络。
我们将要用到的是ip指令,ss指令和NetworkManager的两个工具 nmtui,nmcli。老实说,这几个工具更加强大了,但还真不太容易习惯呢。
一、ip ss指令替代 ifconfig route arp netstat
1、ip 指令入门
ip [ OPTIONS ] OBJECT { COMMAND | help }
OBJECT 和 COMMAND可以简写到一个字母
ip help 可以查到OBJECT列表和OPTIONS,简写 ip h
ip <OBJECT> help 查看针对该OBJECT的帮助,比如 ip addr help,简写 ip a h
ip addr 查看网络接口地址,简写 ip a
查看网络接口地址,替代ifconfig:
[root@centos7 ~]# ip addr
1: lo: <LOOPBACK,UP,LOWER_UP> mtu 65536 qdisc noqueue state UNKNOWN
    link/loopback 00:00:00:00:00:00 brd 00:00:00:00:00:00
    inet 127.0.0.1/8 scope host lo
       valid_lft forever preferred_lft forever
    inet6 ::1/128 scope host
       valid_lft forever preferred_lft forever
2: enp0s3: <BROADCAST,MULTICAST,UP,LOWER_UP> mtu 1500 qdisc pfifo_fast state UP qlen 1000
    link/ether 08:00:27:15:35:d2 brd ff:ff:ff:ff:ff:ff
    inet 192.168.150.110/24 brd 192.168.150.255 scope global enp0s3
       valid_lft forever preferred_lft forever
    inet6 fe80::a00:27ff:fe15:35d2/64 scope link
       valid_lft forever preferred_lft forever
[root@centos7 ~]#
网络接口统计信息
[root@centos7 ~]# ip -s link
1: lo: <LOOPBACK,UP,LOWER_UP> mtu 65536 qdisc noqueue state UNKNOWN mode DEFAULT
    link/loopback 00:00:00:00:00:00 brd 00:00:00:00:00:00
    RX: bytes  packets  errors  dropped overrun mcast
    0          0        0       0       0       0
    TX: bytes  packets  errors  dropped carrier collsns
    0          0        0       0       0       0
2: enp0s3: <BROADCAST,MULTICAST,UP,LOWER_UP> mtu 1500 qdisc pfifo_fast state UP mode DEFAULT qlen 1000
    link/ether 08:00:27:15:35:d2 brd ff:ff:ff:ff:ff:ff
    RX: bytes  packets  errors  dropped overrun mcast
    8135366    131454   0       0       0       456
    TX: bytes  packets  errors  dropped carrier collsns
    646297     2441     0       0       0       0
2、ip route显示和设定路由
显示路由表
[root@centos7 ~]# ip route
default via 192.168.150.254 dev enp0s3  proto static  metric 1024
192.168.150.0/24 dev enp0s3  proto kernel  scope link  src 192.168.150.110
太难看了,格式化一下(显示的是默认网关和局域网路由,两行的内容没有共通性):
[root@centos7 tmp]# ip route|column -t
default           via  192.168.150.254  dev    enp0s3  proto  static  metric  1024
192.168.150.0/24  dev  enp0s3           proto  kernel  scope  link    src     192.168.150.110
添加静态路由
[root@centos7 ~]# ip route add 10.15.150.0/24 via 192.168.150.253 dev enp0s3
[root@centos7 ~]#
[root@centos7 ~]# ip route|column -t
default           via  192.168.150.254  dev    enp0s3  proto  static  metric  1024
10.15.150.0/24    via  192.168.150.253  dev    enp0s3  proto  static  metric  1
192.168.150.0/24  dev  enp0s3           proto  kernel  scope  link    src     192.168.150.110
[root@centos7 ~]#
[root@centos7 ~]# ping 10.15.150.1
PING 10.15.150.1 (10.15.150.1) 56(84) bytes of data.
64 bytes from 10.15.150.1: icmp_seq=1 ttl=63 time=1.77 ms
64 bytes from 10.15.150.1: icmp_seq=1 ttl=63 time=1.08 ms
64 bytes from 10.15.150.1: icmp_seq=1 ttl=63 time=1.57 ms
^C
删除静态路由只需要把 add 替换成 del,或者更简单的只写目标网络
[root@centos7 ~]# ip route del 10.15.150.0/24
[root@centos7 ~]#
但是,ip route 指令对路由的修改不能保存,重启就没了。
设置永久的静态路由的方法RHEL官网文档讲了几种,试验成功的只有一种:
[root@centos7 ~]#echo "10.15.150.0/24 via 192.168.150.253 dev enp0s3" > /etc/sysconfig/network-scripts/route-enp0s3
重启计算机,或者禁用再启用设备enp0s3才能生效,
注意:/etc/sysconfig/static-routes,/etc/sysconfig/network 配置文件都不好用。
3、用 ip neighbor 代替 arp -n
[root@centos7 ~]# ip nei
192.168.150.254 dev enp0s3 lladdr b8:a3:86:37:bd:f8 STALE
192.168.150.100 dev enp0s3 lladdr 90:b1:1c:94:a1:20 DELAY
192.168.150.253 dev enp0s3 lladdr 00:09:0f:85:86:b9 STALE
4、用ss 代替 netstat
对应netstat -ant
[root@centos7 ~]# ss -ant
State       Recv-Q Send-Q   Local Address:Port     Peer Address:Port
LISTEN      0      100          127.0.0.1:25                  *:*
LISTEN      0      128                  *:22                  *:*
ESTAB       0      0      192.168.150.110:22    192.168.150.100:53233
LISTEN      0      100                ::1:25                 :::*
LISTEN      0      128                 :::22                 :::*
对应netstat -antp
[root@centos7 tmp]# ss -antp
State      Recv-Q Send-Q        Local Address:Port          Peer Address:Port
LISTEN     0      100               127.0.0.1:25                       *:*
users:(("master",1817,13))
LISTEN     0      128                       *:22                       *:*
users:(("sshd",1288,3))
ESTAB      0      0           192.168.150.110:22         192.168.150.100:59413
users:(("sshd",2299,3))
LISTEN     0      100                     ::1:25                      :::*
users:(("master",1817,14))
LISTEN     0      128                      :::22                      :::*
users:(("sshd",1288,4))
[root@centos7 tmp]#
看着真的很别扭,不管多宽的终端屏,users:部分都会折到下一行,其实是在一行的。
格式化一下,内容整齐了,但是标题行串了:
[root@centos7 tmp]# ss -antp|column -t
State   Recv-Q  Send-Q  Local               Address:Port           Peer                        Address:Port
LISTEN  0       100     127.0.0.1:25        *:*                    users:(("master",1817,13))
LISTEN  0       128     *:22                *:*                    users:(("sshd",1288,3))
ESTAB   0       0       192.168.150.110:22  192.168.150.100:59413  users:(("sshd",2299,3))
LISTEN  0       100     ::1:25              :::*                   users:(("master",1817,14))
LISTEN  0       128     :::22               :::*                   users:(("sshd",1288,4))
5、旧的network脚本和ifcfg文件
Centos7 开始,网络由 NetworkManager 服务负责管理,相对于旧的 /etc/init.d/network 脚本,NetworkManager是动态的、事件驱动的网络管理服务。旧的 /etc/init.d/network 以及 ifup,ifdown 等依然存在,但是处于备用状态,即:NetworkManager运行时,多数情况下这些脚本会调用NetworkManager去完成网络配置任务;NetworkManager么有运行时,这些脚本就按照老传统管理网络。
[root@centos7 ~]# /etc/init.d/network start
Starting network (via systemctl):                          [  OK  ]
注意(via systemctl)。
6、网络配置文件:
/etc/sysconfig/network 说是全局设置,默认里面啥也没有
/etc/hostname 用nmtui修改hostname后,主机名保存在这里
/etc/resolv.conf 保存DNS设置,不需要手工改,nmtui里面设置的DNS会出现在这里
/etc/sysconfig/network-scripts/ 连接配置信息 ifcfg 文件
/etc/NetworkManager/system-connections/ VPN、移动宽带、PPPoE连接
二、nmtui配置基本网络连接
nmtui 属于curses-based text user interface(文本用户界面), 类似 Centos6 的 setup 工具,但只能编辑连接、启用/禁用连接、更改主机名。系统初装之后可以第一时间用nmtui配置网络,挺方便。
看图吧,功能跳转可以用 tab 键或光标键,用空格或回车执行。每个子功能完成了、退出了或取消了会直接回命令行(觉得不方便就试试 nmtui help,有直达的方法)。
在命令行运行 nmtui
添加连接,支持的连接很丰富啊,还有WiFi呢。但是vpn在哪?呵呵,nmtui目前还不支持。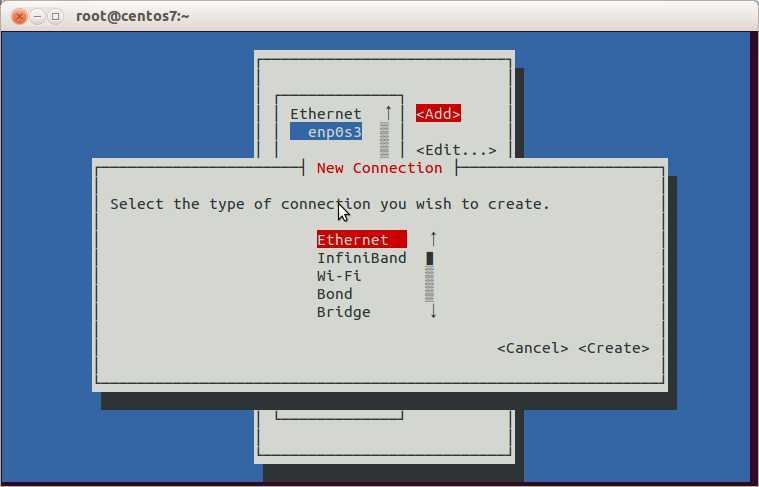
编辑连接。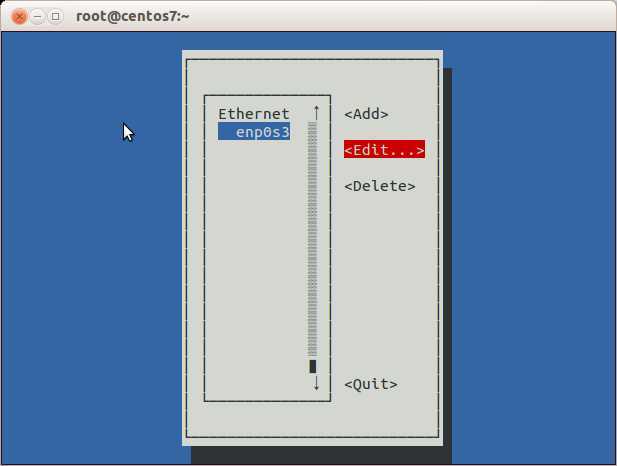
想编哪里就跳到哪里,如果不喜欢enp0s3这样的连接名,可以在Profile name处改掉,后面会说改名的好处。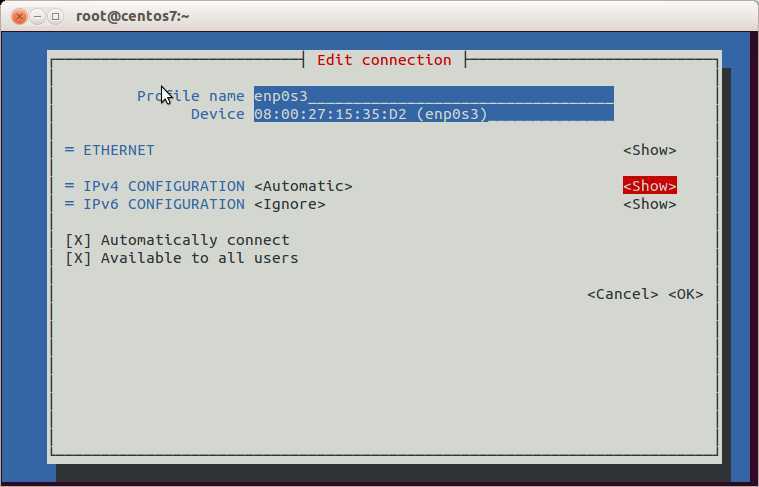
注意,编辑复选框只能用空格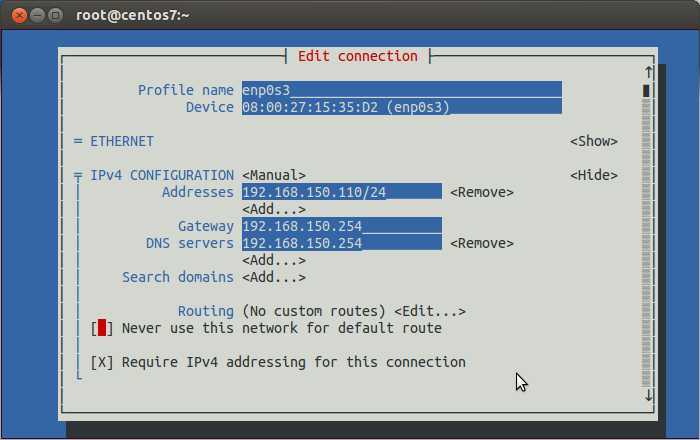
启用/禁用连接,远程连接的时候可以试试执行一下 <Deactivate>,然后以泪洗面吧。。。。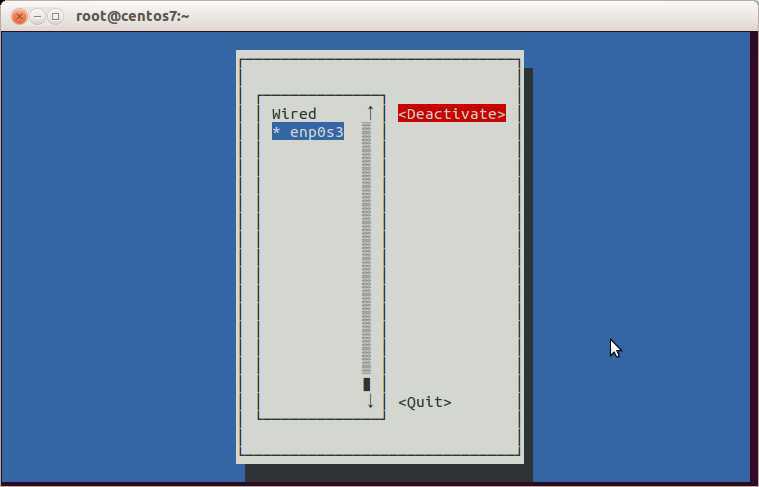
改主机名,改完后重启才有效,不想重启就回命令行执行 hostname <你的主机名> ,注销再登录就好了。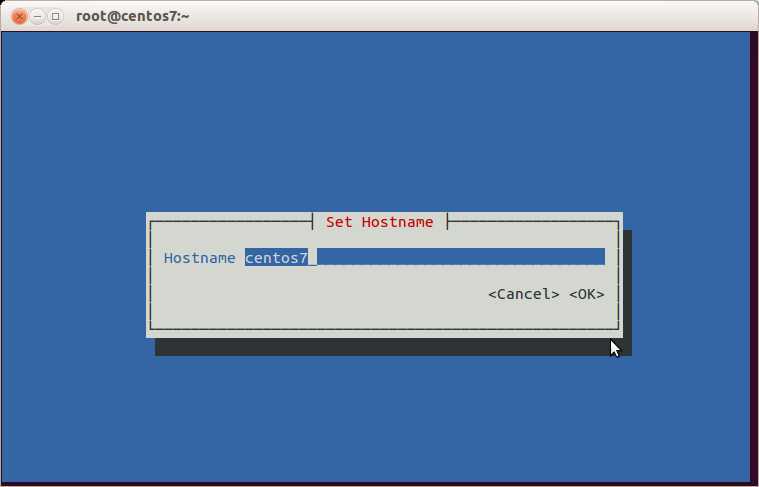
三、nmcli和其他网络设置
nmcli的功能要强大、复杂的多
[root@centos7 ~]# nmcli help
Usage: nmcli [OPTIONS] OBJECT { COMMAND | help }

OPTIONS
  -t[erse]                                   terse output
  -p[retty]                                  pretty output
  -m[ode] tabular|multiline                  output mode
  -f[ields] <field1,field2,...>|all|common   specify fields to output
  -e[scape] yes|no                           escape columns separators in values
  -n[ocheck]                                 don‘t check nmcli and NetworkManager versions
  -a[sk]                                     ask for missing parameters
  -w[ait] <seconds>                          set timeout waiting for finishing operations
  -v[ersion]                                 show program version
  -h[elp]                                    print this help

OBJECT
  g[eneral]       NetworkManager‘s general status and operations
  n[etworking]    overall networking control
  r[adio]         NetworkManager radio switches
  c[onnection]    NetworkManager‘s connections
  d[evice]        devices managed by NetworkManager
OBJECT和COMMAND可以用全称也可以用简称,最少可以只用一个字母,建议用头三个字母。OBJECT里面我们平时用的最多的就是connection和device,这里需要简单区分一下connection和device。
device叫网络接口,是物理设备
connection是连接,偏重于逻辑设置
多个connection可以应用到同一个device,但同一时间只能启用其中一个connection。
这样的好处是针对一个网络接口,我们可以设置多个网络连接,比如静态IP和动态IP,再根据需要up相应的connection。
上篇说了,/etc/udev/rules.d/70-persistent-net.rules 文件没有了,新添加的网卡NetworkManager自动识别。我们现在试试,给Virtualbox虚拟机增加第二块网卡,虚拟机启动后直接可以看到并且生效了。
[root@centos7 ~]# nmcli con show
NAME                UUID                                  TYPE            DEVICE
Wired connection 1  0c451785-b098-4c5c-994d-9107171b439d  802-3-ethernet  enp0s8
enp0s3              295e1841-0ff3-4db9-8800-4e25fc2944da  802-3-ethernet  enp0s3
“Wired connection 1”是新增的网络连接,对应的网络接口叫enp0s8;
“enp0s3”是最初的网络连接,默认与网络接口同名。
我们可以用nmtui把两个连接改成我们熟悉的名字(nmcli也能,但比较麻烦哦)。改完了看看连接:
[root@centos7 ~]# nmcli con show
NAME  UUID                                  TYPE            DEVICE
eth1  0c451785-b098-4c5c-994d-9107171b439d  802-3-ethernet  enp0s8
eth0  295e1841-0ff3-4db9-8800-4e25fc2944da  802-3-ethernet  enp0s3
这样就舒服多了!
看看设备:
[root@centos7 ~]# nmcli dev show enp0s3
GENERAL.DEVICE:                         enp0s3
GENERAL.TYPE:                           ethernet
GENERAL.HWADDR:                         08:00:27:15:35:D2
GENERAL.MTU:                            1500
GENERAL.STATE:                          100 (connected)
GENERAL.CONNECTION:                     eth0
GENERAL.CON-PATH:                       /org/freedesktop/NetworkManager/ActiveConnection/4
WIRED-PROPERTIES.CARRIER:               on
IP4.ADDRESS[1]:                         ip = 192.168.150.110/24, gw = 192.168.150.254
IP4.DNS[1]:                             192.168.150.254
IP6.ADDRESS[1]:                         ip = fe80::a00:27ff:fe15:35d2/64, gw = ::
[root@centos7 ~]#
[root@centos7 ~]# nmcli dev show enp0s8
GENERAL.DEVICE:                         enp0s8
GENERAL.TYPE:                           ethernet
GENERAL.HWADDR:                         08:00:27:98:D1:B7
GENERAL.MTU:                            1500
GENERAL.STATE:                          100 (connected)
GENERAL.CONNECTION:                     eth1
GENERAL.CON-PATH:                       /org/freedesktop/NetworkManager/ActiveConnection/3
WIRED-PROPERTIES.CARRIER:               on
IP4.ADDRESS[1]:                         ip = 10.0.3.15/24, gw = 10.0.3.2
IP4.DNS[1]:                             10.0.3.2
IP6.ADDRESS[1]:                         ip = fe80::a00:27ff:fe98:d1b7/64, gw = ::
[root@centos7 ~]#
但是试试用连接名查设备呢?
[root@centos7 ~]# nmcli dev show eth0
Error: Device ‘eth0‘ not found.
用设备名查连接也是一样出错:
[root@centos7 ~]# nmcli con show enp0s3
Error: enp0s3 - no such connection profile.
这回能看清楚了吧?懂得了连接和设备的区别,在一些指令帮助里面有的参数需要connection,有的需要device,就不会糊涂了。
需要注意的是,enp0s3设备对应的连接名改为eth0,但对应的ifcfg文件并没有改名,我们改改试试,改之前先备份原配置文件到其他目录(注意,不能备份到network-scripts目录!)。
[root@centos7 network-scripts]# cat ifcfg-enp0s3
TYPE=Ethernet
BOOTPROTO=none
DEFROUTE=yes
IPV4_FAILURE_FATAL=no
IPV6INIT=no
IPV6_AUTOCONF=yes
IPV6_DEFROUTE=yes
IPV6_PEERDNS=yes
IPV6_PEERROUTES=yes
IPV6_FAILURE_FATAL=no
NAME=eth0
UUID=295e1841-0ff3-4db9-8800-4e25fc2944da
ONBOOT=yes
IPADDR0=192.168.150.110
PREFIX0=24
GATEWAY0=192.168.150.254
DNS1=192.168.150.254
HWADDR=08:00:27:15:35:D2
[root@centos7 network-scripts]#
[root@centos7 network-scripts]# cp ifcfg-enp0s3 /root/
[root@centos7 network-scripts]# mv ifcfg-enp0s3 ifcfg-eth0
[root@centos7 network-scripts]#
[root@centos7 network-scripts]# systemctl restart network
[root@centos7 network-scripts]#
没有问题,配置文件改名成功,强迫症又一次胜利了,耶!
我们还可以看到,ifcfg-eth0里面没有参数指明设备enp0s3,唯一与设备enp0s3相对应的是MAC地址(HWADDR 08:00:27:15:35:D2)。
现在试试增加一个针对新网络接口enp0s8的连接,现有连接是 eth1:
[root@centos7 network-scripts]# cat ifcfg-eth1
HWADDR=08:00:27:98:D1:B7
TYPE=Ethernet
BOOTPROTO=dhcp
DEFROUTE=yes
PEERDNS=yes
PEERROUTES=yes
IPV4_FAILURE_FATAL=no
IPV6INIT=yes
IPV6_AUTOCONF=yes
IPV6_DEFROUTE=yes
IPV6_PEERDNS=yes
IPV6_PEERROUTES=yes
IPV6_FAILURE_FATAL=no
NAME=eth1
UUID=0c451785-b098-4c5c-994d-9107171b439d
ONBOOT=yes
嗯,是自动获得IP的。
我们新建一个连接eth1-1,分配固定IP,用nmtui可以很容易的建立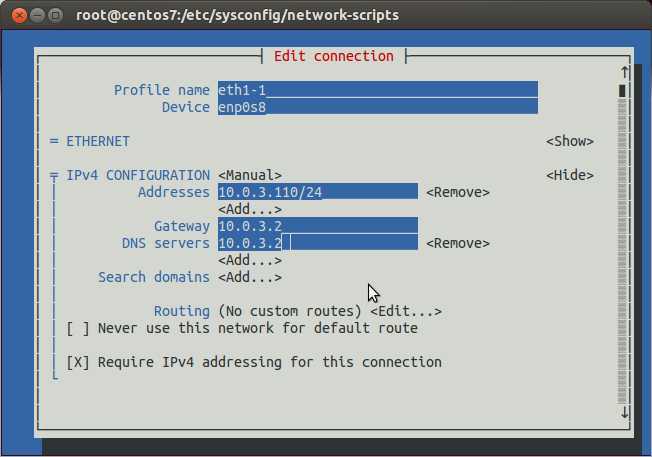
[root@centos7 ~]# nmcli con show
NAME    UUID                                  TYPE            DEVICE
eth1-1  ef5c3fbc-f07a-4d6e-9f4d-83f239ffc2e9  802-3-ethernet  --
eth1    0c451785-b098-4c5c-994d-9107171b439d  802-3-ethernet  enp0s8
eth0    295e1841-0ff3-4db9-8800-4e25fc2944da  802-3-ethernet  enp0s3
只是增加了一个连接,其他的没有变化。
我们启动新连接 eth1-1
[root@centos7 ~]# nmcli con up eth1-1
Connection successfully activated (D-Bus active path: /org/freedesktop/NetworkManager/ActiveConnection/2)
[root@centos7 ~]#
[root@centos7 ~]# nmcli con show
NAME    UUID                                  TYPE            DEVICE
eth1-1  ef5c3fbc-f07a-4d6e-9f4d-83f239ffc2e9  802-3-ethernet  enp0s8
eth1    0c451785-b098-4c5c-994d-9107171b439d  802-3-ethernet  --
eth0    295e1841-0ff3-4db9-8800-4e25fc2944da  802-3-ethernet  enp0s3
[root@centos7 ~]#
[root@centos7 ~]# nmcli -t -f IP4.ADDRESS dev show enp0s8
IP4.ADDRESS[1]:ip = 10.0.3.110/24, gw = 10.0.3.2
“nmcli -t -f IP4.ADDRESS dev show enp0s8” 是以脚本友好的方式显示网络接口信息。
现在可以很明显的看到,将连接eth1-1 up了之后,eth1-1占据了原来由eth1占据的DEVICE enp0s8,并且IP地址已经是指定的10.0.3.110/24 了。
[root@centos7 network-scripts]# cat ifcfg-eth1-1
TYPE=Ethernet
BOOTPROTO=none
IPADDR0=10.0.3.110
PREFIX0=24
GATEWAY0=10.0.3.2
DNS1=10.0.3.2
DEFROUTE=yes
IPV4_FAILURE_FATAL=no
IPV6INIT=no
NAME=eth1-1
UUID=ef5c3fbc-f07a-4d6e-9f4d-83f239ffc2e9
DEVICE=enp0s8
ONBOOT=yes
ifcfg-eth1-1文件里没有HWADDR参数,但是多了一个DEVICE参数,等于enp0s8,你可以对比一下ifcfg-eth1看看区别在哪。
连接的配置文件 ifcfg-*,可以用 DEVICE 指定设备名,也可以用HWADDR指定设备的MAC地址,最终结果都一样的指向某个设备(网络接口)。
我们再试试用nmcli增加连接:
[root@centos7 ~]# nmcli con add con-name eth1-2 ifname enp0s8 type ethernet ip4 10.0.3.120/24 gw4 10.0.3.2
Connection ‘eth1-2‘ (468815f5-ce97-43bd-904a-3078e2e59fec) successfully added.
[root@centos7 ~]#
[root@centos7 ~]# nmcli con show
NAME    UUID                                  TYPE            DEVICE
eth1-1  ef5c3fbc-f07a-4d6e-9f4d-83f239ffc2e9  802-3-ethernet  enp0s8
eth1    0c451785-b098-4c5c-994d-9107171b439d  802-3-ethernet  --
eth0    295e1841-0ff3-4db9-8800-4e25fc2944da  802-3-ethernet  enp0s3
eth1-2  468815f5-ce97-43bd-904a-3078e2e59fec  802-3-ethernet  --
[root@centos7 ~]#
[root@centos7 ~]# nmcli con up eth1-2
Connection successfully activated (D-Bus active path: /org/freedesktop/NetworkManager/ActiveConnection/3)
[root@centos7 ~]#
[root@centos7 ~]# nmcli con show
NAME    UUID                                  TYPE            DEVICE
eth1-1  ef5c3fbc-f07a-4d6e-9f4d-83f239ffc2e9  802-3-ethernet  --
eth1    0c451785-b098-4c5c-994d-9107171b439d  802-3-ethernet  --
eth0    295e1841-0ff3-4db9-8800-4e25fc2944da  802-3-ethernet  enp0s3
eth1-2  468815f5-ce97-43bd-904a-3078e2e59fec  802-3-ethernet  enp0s8
[root@centos7 ~]#
[root@centos7 ~]# nmcli -t -f IP4.ADDRESS dev show enp0s8
IP4.ADDRESS[1]:ip = 10.0.3.120/24, gw = 10.0.3.2
[root@centos7 ~]#
再看看新的ifcfg文件:
[root@centos7 network-scripts]# cat ifcfg-eth1-2
TYPE=Ethernet
BOOTPROTO=none
IPADDR0=10.0.3.120
PREFIX0=24
GATEWAY0=10.0.3.2
DEFROUTE=yes
IPV4_FAILURE_FATAL=no
IPV6INIT=yes
IPV6_AUTOCONF=yes
IPV6_DEFROUTE=yes
IPV6_PEERDNS=yes
IPV6_PEERROUTES=yes
IPV6_FAILURE_FATAL=no
NAME=eth1-2
UUID=468815f5-ce97-43bd-904a-3078e2e59fec
DEVICE=enp0s8
ONBOOT=yes
[root@centos7 network-scripts]#
现在up的连接是eth1-2,网络接口enp0s8的IP是10.0.3.120
如果重新up连接eth1-1,nmcli con up eth1-1,网络接口enp0s8的IP变成了10.0.3.110
如果重新up连接eth1, nmcli con up eth1, 网络接口enp0s8的IP就回到原来自动获得的值10.0.3.15
所以,对一个网络接口设置不同的连接,可以快速的切换不同的网络配置,这个真的满厉害的。
编辑连接
用nmtui编辑连接后,ifcfg文件也会有相应的改动;手工修改ifcfg后,nmtui中也能看到。
但是,不论用nmtui还是直接修改ifcfg文件,想让新的配置生效,我们需要load连接配置文件并重新up连接。
举例,我们编辑ifcfg-eth1-1,把IP改为10.0.3.111,然后执行nmcli con reload 或 nmcli con load /etc/sysconfig/network-scripts/ifcfg-eth1-1
结果如下:
[root@centos7 ~]# nmcli con load /etc/sysconfig/network-scripts/ifcfg-eth1-1
[root@centos7 ~]# nmcli con up eth1-1
Connection successfully activated (D-Bus active path: /org/freedesktop/NetworkManager/ActiveConnection/2)
[root@centos7 ~]# ip addr show enp0s8
3: enp0s8: <BROADCAST,MULTICAST,UP,LOWER_UP> mtu 1500 qdisc pfifo_fast state UP qlen 1000
    link/ether 08:00:27:98:d1:b7 brd ff:ff:ff:ff:ff:ff
    inet 10.0.3.111/24 brd 10.0.3.255 scope global enp0s8
       valid_lft forever preferred_lft forever
    inet6 fe80::a00:27ff:fe98:d1b7/64 scope link
       valid_lft forever preferred_lft forever
[root@centos7 ~]#
新的IP地址生效了。
BONUS:如果有物理WLAN,nmcli能查看wifi,瞅瞅来,好玩吧?(示例来自nmcli-examples(5) man page,指令: man 5 nmcli-examples)
$ nmcli device wifi list

           *  SSID               MODE    CHAN  RATE     SIGNAL  BARS  SECURITY
              netdatacomm_local  Infra   6     54 MB/s  37      ▂▄__  WEP
           *  F1                 Infra   11    54 MB/s  98      ▂▄▆█  WPA1
              LoremCorp          Infra   1     54 MB/s  62      ▂▄▆_  WPA2 802.1X
              Internet           Infra   6     54 MB/s  29      ▂___  WPA1
              HPB110a.F2672A     Ad-Hoc  6     54 MB/s  22      ▂___  --
鉴于很多基本配置可以用nmtui做,而且往往设置一次就够了,nmcli命令行其他强大功能等用的时候再查吧,这里不多讲了。
参考:
https://access.redhat.com/documentation/en-US/Red_Hat_Enterprise_Linux/7/html/Networking_Guide/index.html (这文档写的吧,,,,唉。。。)
nmcli-examples(5) man page — Gives examples of nmcli commands.
ip(8) man page — Describes the ip utility‘s command syntax.
nmcli(1) man page — Describes NetworkManager‘s command‐line tool.
标签:des style blog http color io os ar strong
原文地址:http://www.cnblogs.com/panblack/p/Centos7-WhatsNew-02-networking.html