标签:输出 文件中 模式 strerror 进制 动态库 ons ps 命令 std
除了可以通过在 Makefile 中把这两个选项添加上到 CFLAGS 变量里以外,还有其他几种方法可以达到同样的效果。
在进行 configure 配置时,按如下方式执行。
# ./configure --with-cc-opt=‘-g -O0‘上面是利用 configure 所提出的的选项来做的。也可使用如下方法。
# CFLAGS="-g -O0" ./configure在执行 make 时,按如下方式执行。
# make CFLAGS="-g -O0"直接修改 objs/Makefile 文件和上面提到的第 2 中方法是在我们已经执行 configure 之后进行的,如果之前已经执行过 make,那么在进行第二次 make 时,需带上强制重新编译选项 -B 或 --always-make。也可以通过刷新所有源文件的时间戳,简介达到重新编译出一个新 Nginx 可执行程序的目的。
# find . -name "*.c" | xargs touch不直接使用 make clean 是因为执行它会把 objs 整个目录都删除。
在默认情况下,Nginx 会有多个进程,所以需要通过如下类似的命令正确找到我们所要调试的进程。
# ps -efH | grep nginx
如上,由于源码已经给 Nginx 进程加上了 title,所以根据标题很容易区分出哪个是监控进程,哪些是工作进程。如要对如上所示的工作进程 1561 进行调试,则可以利用 gdb 的 -p 命令参数。
# gdb -p 1561或者执行 gdb 命令进入 gdb 后执行。
(gdb) attach 1561这两种方法都可。
如果是要调试 Nginx 对客户端发过来请求的处理过程,那么要注意请求是否被交付给另外一个工作进程处理而导致绑定到 gdb 的这个工作进程实际没有动作。此时可以考虑开两个终端,运行两个 gdb 分别 attach 到两个工作进程或干脆修改配置项 worker_processes 的值为 1,从而使得 Nginx 只运行一个工作进程。
worker_processes 1;如上方法只是调试 Nginx 运行起来之后的流程,对于启动过程中的逻辑,比如进程创建、配置解析等,因为已经执行完毕而无法调试,要调试这部分逻辑必须在 Nginx 启动的开始就把 gdb 绑定上,也就是在 gdb 里启动 Nginx。有几点需注意,首先是 Nginx 默认以 daemon 形式运行,即它会调用 fork() 创建子进程并且把父进程直接 exit(0) 丢弃,因此在启动 Nginx 前,需设定:
set follow-fork-mode child也就是让 gdb 跟踪 fork() 之后的子进程,而 gdb 默认将跟踪 fork() 之后的父进程,不做此设定则将导致跟踪丢失。但是,因为 Nginx 创建工作进程也用的是 fork() 函数,所以如果要调试监控进程则还需要做另外的灵活处理。可以修改 Nginx 配置文件。
daemon off;这样 Nginx 就不再以 daemon 执行,利用 gdb 可以从 Nginx 的 main() 函数开始执行,默认情况下调试的当然就是监控进程的流程,如果要调试工作进程的流程需要在进入 gdb 后执行set follow-fork-mode child。另外更简单的方法就是直接设置:
master_process off;该命令将会禁止创建多个工作进程,即将监控进程逻辑和工作进程逻辑全部合在一个进程里。如果必须要经过多次 fork() 后才能达到的代码位置(像函数 ngx_cache_manager_process_cycle()),那么就要在多处恰当位置下断点,然后在执行到该断点时根据需要切换 follow-fork-mode标记。这些变通设置对于调试像配置信息解析流程、文件缓存等这一类初始相关逻辑是非常重要的。
在 gdb 里带参数运行 Nginx:
gdb --args ./objs/nginx -c /usr/local/nginx/conf/nginx.conf进入到 gdb 后再执行 r 命令即可;或者在 Shell 里执行:
gdb ./objs/nginx进入到 gdb 后执行r -c /usr/local/nginx/conf/nginx.conf或在 gdb 内先执行命令。
set args -c /usr/local/nginx/conf/nginx.conf再执行 r 命令。
Watchpoints 可以帮助我们监视某个变量在什么时候被修改,这对于我们了解 Nginx 程序的执行逻辑非常有帮助.
Nginx 本身对 gdb 的相关辅助支持,如配置指令 debug_points,该配置项的配置值可以是 stop 或 abort。当 Nginx 遇到严重错误时,比如内存超限或其他不可预料的逻辑错误,就会调用 ngx_debug_point() 函数(类似 assert() 一样的断言函数,只是函数 ngx_debug_point() 本身不带判断),该函数根据 debug_points 配置指令的设置做出相应的处理。
该函数的源码如下:
void
ngx_debug_point(void)
{
    ngx_core_conf_t  *ccf;

    ccf = (ngx_core_conf_t *) ngx_get_conf(ngx_cycle->conf_ctx,
                                           ngx_core_module);

    switch (ccf->debug_points) {

    case NGX_DEBUG_POINTS_STOP:
        raise(SIGSTOP);
        break;

    case NGX_DEBUG_POINTS_ABORT:
        ngx_abort();
    }
}
如上源码所示,如果将 debug_points 设置为 stop,那么 ngx_debug_point() 函数的调用将使得 Nginx 进程进入到暂停状态,以便我们可通过 gdb 接入到该进程查看相关上下文信息。

如上图 ./nginx 状态为 T,即代表 Nginx 进程处在 TASK_STOPPED 状态,此时用 gdb 连上去既可查看问题所在(如上只是一个测试,在 main 调用中主动调用 ngx_debug_point(),实际使用时,需要把该函数放在需要观察的代码点,比如非正常逻辑点).
# gdb -q -p 12827
...
(gdb) bt
#0  0x00007fe65673f1fb in raise (sig=19) at ../nptl/sysdeps/unix/sysv/linux/pt-raise.c:37
#1  0x000000000044e985 in ngx_debug_point () at src/os/unix/ngx_process.c:621
#2  0x000000000040b9a3 in main (argc=1, argv=0x7fff41b783f8) at src/core/nginx.c:368
(gdb)
如果将 debug_points 设置为 abort,那么 Nginx 调用 ngx_debug_point() 函数时直接将程序 abort 崩溃掉,如果对操作系统设置了恰当的设置,则将获得对应的 core 文件。
Nginx 里有大量的宏。如果不事先做一下处理,在 gdb 里将无法查看这些宏的定义以及展开形式,也就会获得如下提示。
(gdb) info macro NGX_OK
The symbol `NGX_OK‘ has no definition as a C/C++ preprocessor macro
at <user-defined>:-1
(gdb) p NGX_OK
No symbol "NGX_OK" in current context.
(gdb)
如果将编译选项 -g 改为 -ggdb3,虽然这样得到的二进制文件比较大,但是因为它包含了所有与宏相关的信息(也包含很多其他信息),所以我们就可以在 gdb 里使用类似的命令。
(gdb) info macro NGX_OK
Defined at /home/rong/samba/nginx-1.13.2/src/core/ngx_core.h:35
  included at /home/rong/samba/nginx-1.13.2/src/core/nginx.c:9
#define NGX_OK 0
(gdb) macro expand NGX_OK
expands to: 0
如上,即可查看指定宏的定义与展开形式,而 gdb 命令里也可以直接使用这些宏,如执行打印指令 p。
(gdb) p NGX_OK
$1 = 0cgdb 是一个封装 gdb 的开源调试工具。它最大的好处在于能在终端里运行并且原生具备 gdb 的强大调试功能。
获取 Nginx 的日志信息,需要在进行 configure 时,加上 --with-debug 选项,这样就能生成一个名为 NGX_DEBUG 的宏,而在 Nginx 源码内,该宏被用作控制开关,如果没有它,那么很多日志逻辑代码将在 make 编译时直接跳过。如对单连接的 debug_connection 调试指令、分模块日志调试 debug_http 功能等。
// ngx_auto_config.h
#define NGX_CONFIGURE " --with-debug"

#ifndef NGX_DEBUG
#define NGX_DEBUG  1
#endif
同时还需要在配置文件中做恰当的设置,即配置 error_log 指令。该配置项的默认情况为:
error_log logs/error.log error;表示日志信息记录在 logs/error.log(如果没有改变 Nginx 的默认工作路径的话,那么其父目录为 /usr/local/nginx/)文件夹内,而日志记录级别为 error。
在实际进行配置时,可修改日志信息记录文件路径(如修改为 /dev/null,此时所有日志信息将被输出到所谓的 Linux 黑洞设备,导致日志信息全部丢弃)或者直接输出到标准终端(此时指定为 stderr)。Nginx 提供的日志记录级别一共有八级,等级从高到低如下:
static ngx_str_t err_levels[] = {
    ngx_null_string,
    ngx_string("emerg"),
    ngx_string("alert"),
    ngx_string("crit"),
    ngx_string("error"),
    ngx_string("warn"),
    ngx_string("notice"),
    ngx_string("info"),
    ngx_string("debug")
};
如果设置为 error,则表示 Nginx 内等级为 error、crit、alert、emerg 的四种级别的日志将被输出到日志文件或标准终端。
当利用日志跟踪 Nginx 时,需要获取最大量的日志信息,此时可将日志等级设置为最低的 debug 级。在这种情况下,若觉得调试日志太多,Nginx 提供按模块控制的更细粒等级:debug_core、debug_alloc、debug_mutex、debug_event、debug_http、debug_imap。如下,指向看 http 的调试日志,则需做如下设置:
error_log logs/error.log debug_http;此时 Nginx 将输出从 info 到 emerg 所有等级的日志信息,而 debug 日志则将只输出与 http 模块相关的内容。
error_log 配置指令可以放在配置文件的多个上下文内,如 main、http、server、location,但同一个上下文只能设置一个 error_log,否则 Nginx 将提示类似如下这样的错误。
nginx: [emerg] "error_log" derective is duplicate in /usr/local/nginx/conf/ nginx.conf:9但在不同的配置文件上下文里可以设置各自的 error_log 配置指令,通过设置不同的日志文件,这是 Nginx 提供的又一种信息切割过滤手段。
...
error_Log logs/error.log error;
...
http {
    error_log logs/http.log debug;
    ...
    server {
        ...
        error_log logs/server.log debug;
...
Nginx 提供的另一种更有针对性的日志调试信息记录是针对特定连接的,这通过 debug_connection 配置指令来设置,如如下设置调试日志仅针对 IP 地址 192.168.1.1 和 IP 段 192.168.10.0/24:
events {
    debug_connection 192.168.1.1;
    debug_connection 192.168.10.0/24;
}Linux 下有两个命令 strace 和 ltrace 可以分别用来查看一个应用程序在运行过程中所发起的系统函数调用和动态库函数调用。
从 strace 的 Man 手册可以看到几个有用的选项。
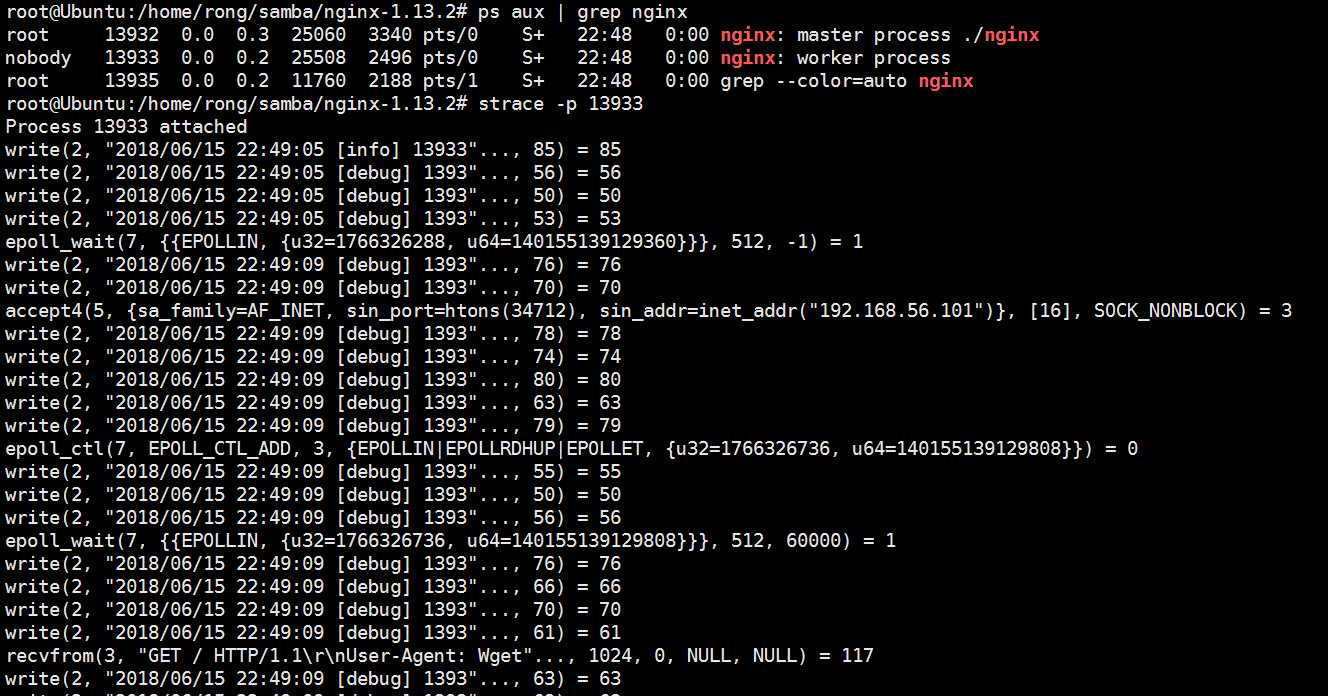
如下,先利用 ps 命令查看系统当前存在的 Nginx 进程,然后利用 strace 命令的 -p 选项跟踪 Nginx 工作进程。

如上图所示,该工作进程会停顿在 epoll_wait 系统调用上,因为当没有客户请求时,Nginx 就阻塞于此。
在另一终端执行 wget 命令向 Nginx 发起 http 请求后,再来看 strace 的输出,如下图:

通过 strace 的输出可以看到 Nginx 工作进程在处理一次客户端请求过程中发起的所有系统调用。
由于 strace 能够提供 Nginx 执行过程中的这些内部信息,所以在出现一些奇怪现象时,比如 Nginx 启动失败、响应的文件数据和和预期不一致、莫名其妙的 Segment action Fault 段错误、存在性能瓶颈(利用 -T 选项跟踪各个函数的消耗时间)。
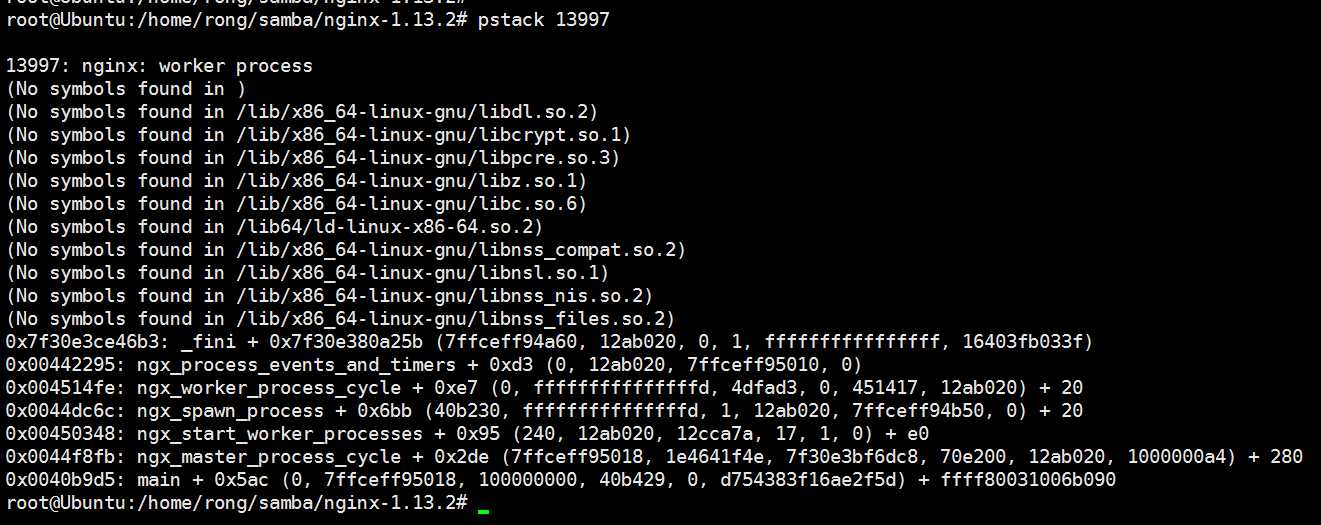
命令 strace 跟踪的是系统调用,对于 Nginx 本身的函数调用关系无法给出更为明朗的信息。若发现 Nginx 当前运行不正常时,想知道 Nginx 当前内部到底在执行什么函数,那么对此可以使用 pstack 命令。
pstack 的使用后面跟进程 ID 即可。如下图:

pstack 和在 gdb 内看到的堆栈信息一模一样,实际该 pstack 本身也就是一个利用 gdb 实现的 shell 脚本。
如下的方法可以一次性获取 Nginx 程序执行的整个流程。
利用 gcc 的一个名为 -finstrument-functions 的编译选项,再加上一些我们自己的处理,就可以到达既定目的。
gcc 提供的 -finstrument-functions 选项提供的是一种函数调用记录追踪功能。如下为获得 Nginx 程序完整执行流程的具体操作。
首先,准备两个文件,文件名和文件内容如下:
#ifndef MY_DEBUG_LENKY_H
#define MY_DEBUG_LENKY_H
#include <stdio.h>

void enable_my_debug(void) __attribute__((no_instrument_function));
void disable_my_debug(void) __attribute__((no_instrument_function));
int get_my_debug_flag(void) __attribute__((no_instrument_function));
void set_my_debug_flag(int) __attribute__((no_instrument_function));
void main_constructor(void) __attribute__((no_instrument_function, constructor));
void main_destructor(void) __attribute__((no_instrument_function, constructor));
void __cyg_profile_func_enter(void *, void *) __attribute__((no_instrument_function));
void __cyg_profile_func_exit(void *, void *) __attribute__((no_instrument_function));

#ifndef MY_DEBUG_MAIN
extern FILE *my_debug_fd;
#else
FILE *my_debug_fd;
#endif

#endif#include "my_debug.h"
#define MY_DEBUG_FILE_PAHT "/usr/local/nginx/sbin/mydebug.log"
int _flag = 0;
#define open_my_debug_file() (my_debug_fd = fopen(MY_DEBUG_FILE_PATH, "a"))
#define close_my_debug_file() do { if (NULL != my_debug_fd) { fclose(my_debug_fd); } } while (0)
#define my_debug_print(args, fmt, ...) do { if (0 == _flag) { break; } if (NULL == my_debug_fd && NULL == open_my_debug_file()) { printf("Err: Can not open output file.\n"); break; } fprintf(my_debug_fd, args, ##fmt); fflush(my_debug_fd);
} while (0)
void enable_my_debug(void)
{
_flag = 1;
}
void disable_my_debug(void)
{
_flag = 0;
}
int get_my_debug_flag(void)
{
return _flag;
}
void set_my_debug(int flag)
{
_flag = flag;
}
void main_constructor(void)
{
// Do Nothing
}
void main_destructor(void)
{
close_my_debug_file();
}
void __cyg_profile_func_enter(void *this, void *call)
{
my_debug_print("Enter\n%p\n%p\n", call, this);
}
void __cyg_profile_func_exit(void *this, void *call)
{
my_debug_print("Exit\n%p\n%p\n", call, this);
}将这两个文件放到 nginx-xxx/src/core/ 目录下,然后编辑 nginx-xxx/objs/Makefile 文件,给 CFLAGS 选项增加 -finstrucment-functions 选项。
接着,需要将 my_debug.h 和 my_debug.c 引入到 Nginx 源码里一起编译,继续修改 nginx-xxx/objs/Makefile,根据 Nginx 的 Makefile 文件特点,修改的地方主要如下:
...
CORE_DEPS = src/core/nginx.h     src/core/my_debug.h ...
HTTP_DEPS = src/http/ngx_http.h     src/core/my_debug.h ...
objs/nginx:     objs/src/core/nginx.o         objs/src/core/my_debug.o ...
        $(LINK) -o objs/nginx         objs/src/core/my_debug.o ...
objs/src/core/my_debug.o: $(CORE_DEPS)     src/core/my_debug.c
    $(CC) -c $(CFLAGS) $(CORE_INCS)         -o objs/src/core/my_debug.o         src/core/my_debug.c
...
为了在 Nginx 源码里引入 my_debug,只需要在头文件 ngx_core.h 加入对 my_debug.h 文件的引入既可。
在源文件 nginx.c 的最前面加上对宏 MY_DEBUG_MAIN 的定义,以使得 Nginx 程序有且仅有一个 my_debug_fd 变量的定义。
#define MY_DEBUG_MAIN 1最后根据需要截取我们想要的执行流程,在适当的位置调用 enable_my_debug();和 函数 disable_my_debug();
测试,直接在 main 函数入口处调用 enable_my_debug():
int ngx_cdecl
main(int argc, char *const *argv)
{
    ...
    enable_my_debug();
至此,代码增补搞完,重新编译 Nginx。
以单进程模式运行 Nginx,并且在配置文件里将日志功能的记录级别设置低一点,否则将有大量的日志函数调用堆栈信息,经过这样的设置后,才能获得更清晰的 Nginx 执行流程,即配置文件里做如下设置。
master_process off;
error_log logs/error.log emerg;
正常运行后的 Nginx 将产生一个记录程序执行流程的文件,这个文件会随着 Nginx 的持续运行迅速增大。
注,该文件中只是显示该函数的对应地址,因此需要利用另外一个工具 add2line,将这些地址转换会可读的函数名。
addr2line.sh:
#!/bin/sh

if [ $# != 3 ]; then
    echo ‘Usage: addr2line.sh executefile addressfile functionfile‘
    exit
fi;

cat $2 | while read line
do
    if [ "$line" = ‘Enter‘ ]; then
        read line1
        read line2
#       echo $line >> $3
        addr2line -e $1 -f $line1 -s >> $3
        echo "--->" >> $3
        addr2line -e $1 -f $line2 -s | sed ‘s/^/  /‘ >> $3
        echo >> $3
    elif [ "$line" = ‘Exit‘ ]; then
        read line1
        read line2
        addr2line -e $1 -f $line2 -s | sed ‘s/^/  /‘ >> $3
        echo "<---" >> $3
        addr2line -e $1 -f $line1 -s >> $3
#       echo $line >> $3
        echo >> $3
    fi;
done
接着执行如下:
chmod a+x addr2line.sh
./addr2line.sh nginx mydebug.log myfun.log加桩简单点说就是为了让一个模块执行起来,额外添加的一些支撑代码。如,我要简单测试一个实现某种排序算法的子函数的功能是否正常,则需要写一个 main 函数,设置一个数组,提供一些乱序的数据,然后利用这些数据调用排序子函数,然后 printf 打印排序后的结果,看是否排序正常,所有写的这些额外代码(main 函数、数组、printf 打印)就是桩代码。
以 Nginx 的 slab 机制为例,通过如下所提供的这些桩代码既可以调试该功能的具体实现。Nginx 的 slab 机制用于对多进程共享内存的管理,单进程也是一样的执行逻辑,除了加/解锁直通以外(即加锁时必定成功)。根据具体情况把桩代码放在合适的调用位置,如这里的 slab 机制就依赖一些全局变量(如 ngx_pagesize 等),所以需要把桩代码的调用位置放在这些全局变量的初始化之后。
void ngx_slab_test()
{
    ngx_shm_t shm;
    ngx_slab_pool_t *sp;
    u_char *file;
    void *one_page;
    void *two_page;

    ngx_memzero(&shm, sizeof(shm));
    shm.size = 4 * 1024 * 1024;
    if (ngx_shm_alloc(&shm) != NGX_OK) {
        goto failed;
    }

    sp = (ngx_slab_pool_t *)shm.addr;
    sp->end = shm.addr + shm.size;
    sp->min_shift = 3;
    sp->addr = shm.addr;

#if (NGX_HAVE_ATOMIC_OPS)
    file = NULL;
#else
    #error must supoort NGX_HAVE_ATOMIC_OPS.
#endif
    if (ngx_shmtx_create(&sp->mutex, &sp->lock, file) != NGX_OK) {
        goto failed;
    }

    ngx_slab_init(sp);

    one_page = ngx_slab_alloc(sp, ngx_pagesize);
    two_page = ngx_slab_alloc(sp, 2 * ngx_pagesize);

    ngx_slab_free(sp, one_page);
    ngx_slab_free(sp, two_page);

    ngx_shm_free(&shm);

    exit(0);
failed:
    printf("failed.\n");
    exit(-1);
}
将上面该函数加在如下地方:
...
    if (ngx_os_init(log) != NGX_OK) {
        return 1;
    }

    ngx_slab_test();
...
如上,程序在进入main 函数后先做一些初始化工作,然后通过 ngx_slab_test() 函数调用到桩代码内执行调试逻辑,完成既定目标后便直接 exit 退出整个程序。
request_timeout.c
/**
 * gcc -Wall -g -o request_timeout request_timeout.c
 */
#include <sys/types.h>
#include <stdio.h>
#include <stdlib.h>
#include <string.h>
#include <errno.h>
#include <sys/socket.h>
#include <netinet/in.h>
#include <arpa/inet.h>
#include <unistd.h>

// char req_header[] = "GET / HTTP/1.1\r\nUser-Agent: curl/7.19.\r\nHost: 127.0.0.1\r\nAccept: */*\r\n\r\n";
char req_header[] = "GET / HTTP/1.1\r\nUser-Agent: curl/7.19.7\r\n";

int main(int argc, char *const *argv)
{
    int sockfd;
    struct sockaddr_in server_addr;

    if ((sockfd = socket(AF_INET, SOCK_STREAM, 0)) == -1) {
        fprintf(stderr, "Socket error, %s\r\n", strerror(errno));
        return -1;
    }

    bzero(&server_addr, sizeof(server_addr));
    server_addr.sin_family = AF_INET;
    server_addr.sin_port = htons(80);

    if (!inet_aton("192.168.1.1", &server_addr.sin_addr)) {
        fprintf(stderr, "Bad address:%s\r\n", strerror(errno));
        close(sockfd);
        return -1;
    }

    if (connect(sockfd, (struct sockaddr *)(&server_addr),
        sizeof(struct sockaddr)) == -1) {
        fprintf(stderr, "Connect Error:%s\r\n", strerror(errno));
        close(sockfd);
        return -1;
    }

    write(sockfd, req_header, strlen(req_header));

    close(sockfd);
    return 0;
}
变量 req_header 存储的是 http 请求头部数据,被注释掉的是正常的请求头,这里使用的是不完整的(正常的请求头可以用 wget、curl 或 wireshark 等工具获得,异常请求头必须根据自己所预期场景来进行构造,如这里,其他异常情况的请求头可能导致 Nginx 以其他错误方式返回而不是进行超时监控),所以这会使得 Nginx 在接收到该请求后,持续等待进一步的头部数据,直到超时。
将接收 http 请求的 Nginx 工作进程绑定到 gdb,然后在超时函数 ngx_event_expire_timers() 内如下地方下断点并按 c 继续。
void
ngx_event_expire_timers(void)
{
    ...
    for ( ;; ) {

        ev->timer_set = 0;

        ev->timedout = 1;

        // 这里下断点
        ev->handler(ev);
    }
}
这个断点是 Nginx 已经捕获到超时事件,设置其超时旗标并调用对应的回调函数进行处理。在另一个 gdb 内执行执行 request_timeout,注意,最后停在return 0;前,避免程序退出,导致它与 Nginx 工作进程之间的连接断开。等待约 60s (Nginx 读取请求头部数据的默认超时时间为 60s,可通过配置指令 client_header_timeout 修改)后,attach 到 Nginx 工作进程的 gdb 就会断下来,按 s 跟进函数,再顺着执行路径而下就会发现此时 Nginx 将执行到这个逻辑里。
static void
ngx_http_process_request_headers(ngx_event_t *rev)
{
    ...
    // 该条件将会成立,即连接超时
    if (rev->timedout) {
        ngx_log_error(NGX_LOG_INFO, c->log, NGX_ETIMEDOUT, "client timed out");
        c->timedout = 1;
        ngx_http_close_request(r, NGX_HTTP_REQUEST_TIME_OUT);
        return;
    }
    ...
}
通过这样的例子,即可了解如何去调试这样的特殊应用逻辑。
标签:输出 文件中 模式 strerror 进制 动态库 ons ps 命令 std
原文地址:https://www.cnblogs.com/jimodetiantang/p/9188789.html