标签:视图 判断 移除 手动 stat 时间格式 OLE values 管理
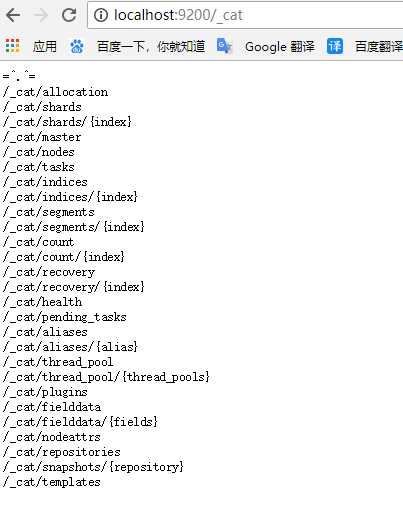
http://localhost:9200/_cat
http://localhost:9200/_cat/health?v

说明:v是用来要求在结果中返回表头
状态值说明
Green - everything is good (cluster is fully functional),即最佳状态
Yellow - all data is available but some replicas are not yet allocated (cluster is fully functional),即数据和集群可用,但是集群的备份有的是坏的
Red - some data is not available for whatever reason (cluster is partially functional),即数据和集群都不可用
查看集群的节点
http://localhost:9200/_cat/nodes?v

http://localhost:9200/_cat/indices?v

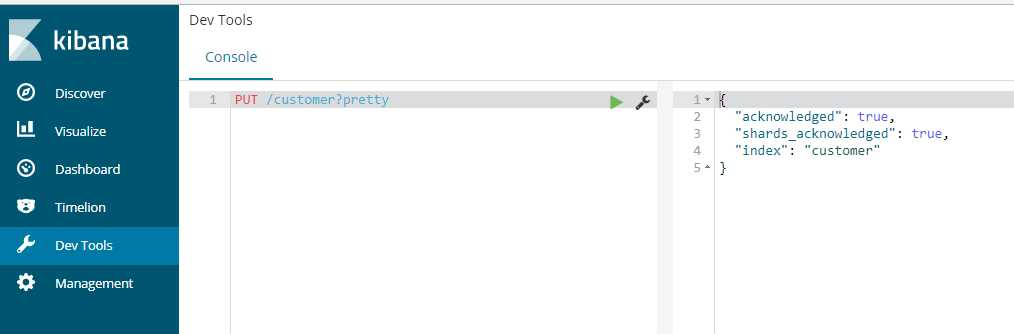
创建一个名为 customer 的索引。pretty要求返回一个漂亮的json 结果
PUT /customer?pretty
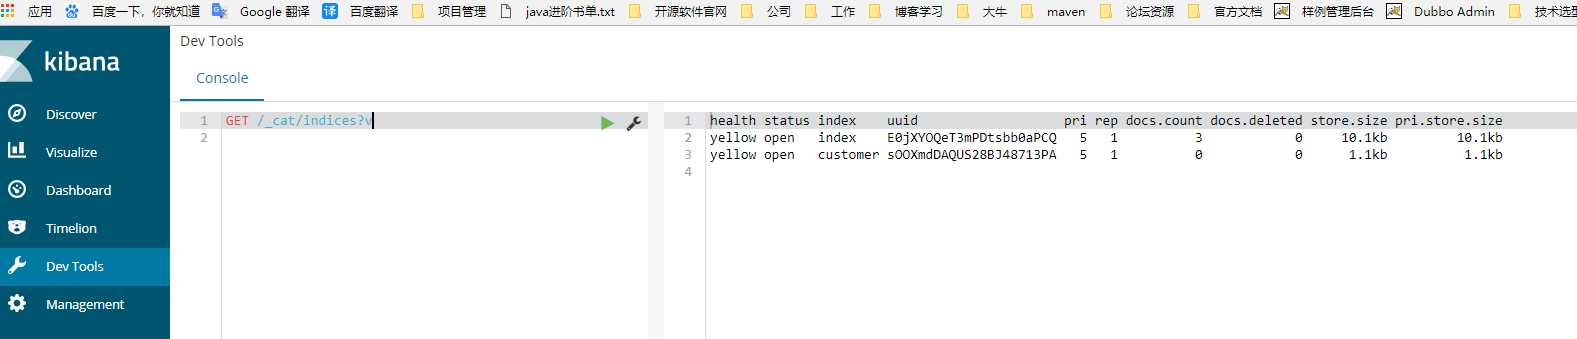
再查看一下所有索引
http://localhost:9200/_cat/indices?v

GET /_cat/indices?v
curl -X PUT "localhost:9200/customer/_doc/1?pretty" -H ‘Content-Type: application/json‘ -d‘
{
  "name": "John Doe"
}
‘
curl -X GET "localhost:9200/customer/_doc/1?pretty"
GET /customer/_search?q=*&sort=name:asc&pretty
JSON格式方式
GET /customer/_search
{
  "query": { "match_all": {} },
  "sort": [
    {"name": "asc" }
  ]
}

创建一个名为twitter的索引,设置索引的分片数为3,备份数为2。注意:在ES中创建一个索引类似于在数据库中建立一个数据库(ES6.0之后类似于创建一个表)
PUT twitter
{
    "settings" : {
        "index" : {
            "number_of_shards" : 3,
            "number_of_replicas" : 2
        }
    }
}
说明:
默认的分片数是5到1024
默认的备份数是1
索引的名称必须是小写的,不可重名
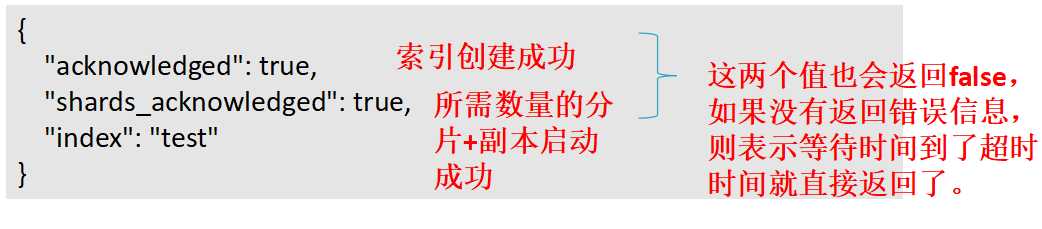
创建结果:

创建的命令还可以简写为
PUT twitter
{
    "settings" : {
        "number_of_shards" : 3,
        "number_of_replicas" : 2
    }
}
注意:在ES中创建一个mapping映射类似于在数据库中定义表结构,即表里面有哪些字段、字段是什么类型、字段的默认值等;也类似于solr里面的模式schema的定义
PUT twitter
{
    "settings" : {
        "index" : {
            "number_of_shards" : 3,
            "number_of_replicas" : 2
        }
    },
   "mappings" : {
        "type1" : {
            "properties" : {
                "field1" : { "type" : "text" }
            }
        }
    }
}
PUT twitter
{
    "aliases" : {
        "alias_1" : {},
        "alias_2" : {
            "filter" : {
                "term" : {"user" : "kimchy" }
            },
            "routing" : "kimchy"
        }
    }
}
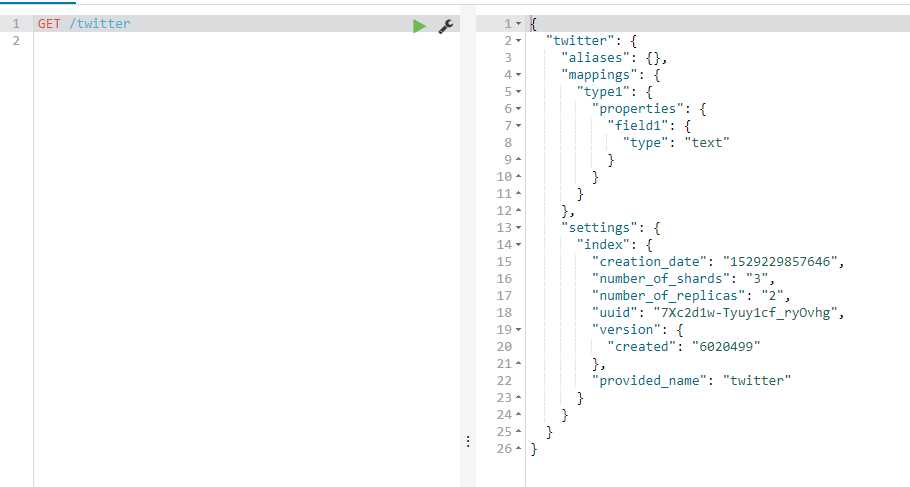
GET /twitter,可以一次获取多个索引(以逗号间隔) 获取所有索引 _all 或 用通配符*
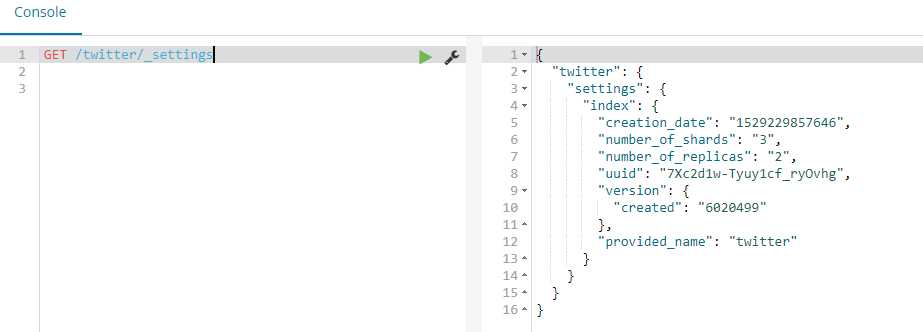
GET /twitter/_settings
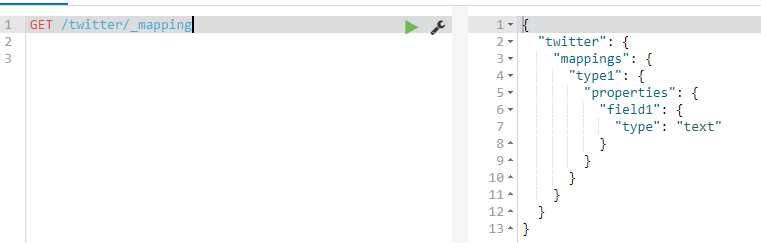
GET /twitter/_mapping
DELETE /twitter
说明:
可以一次删除多个索引(以逗号间隔) 删除所有索引 _all 或 通配符 *
HEAD twitter

HTTP status code 表示结果 404 不存在 , 200 存在
索引的设置信息分为静态信息和动态信息两部分。静态信息不可更改,如索引的分片数。动态信息可以修改。
REST 访问端点:
/_settings 更新所有索引的。
{index}/_settings 更新一个或多个索引的settings。
详细的设置项请参考: https://www.elastic.co/guide/en/elasticsearch/reference/current/index-modules.html#index-modules-settings
PUT /twitter/_settings
{
    "index" : {
        "number_of_replicas" : 2
    }
}
PUT /twitter/_settings
{
    "index" : {
        "refresh_interval" : null
    }
}
index.blocks.read_only:设为true,则索引以及索引的元数据只可读
index.blocks.read_only_allow_delete:设为true,只读时允许删除。
index.blocks.read:设为true,则不可读。
index.blocks.write:设为true,则不可写。
index.blocks.metadata:设为true,则索引元数据不可读写。
在创建索引时,为每个索引写定义信息可能是一件繁琐的事情,ES提供了索引模板功能,让你可以定义一个索引模板,模板中定义好settings、mapping、以及一个模式定义来匹配创建的索引。
注意:模板只在索引创建时被参考,修改模板不会影响已创建的索引
12.1 新增/修改名为tempae_1的模板,匹配名称为te* 或 bar*的索引创建:
PUT _template/template_1
{
  "index_patterns": ["te*", "bar*"],
  "settings": {
    "number_of_shards": 1
  },
  "mappings": {
    "type1": {
      "_source": {
        "enabled": false
      },
      "properties": {
        "host_name": {
          "type": "keyword"
        },
        "created_at": {
          "type": "date",
          "format": "EEE MMM dd HH:mm:ss Z YYYY"
        }
      }
    }
  }
}
12.2 查看索引模板
GET /_template/template_1
GET /_template/temp*
GET /_template/template_1,template_2
GET /_template
12.3 删除模板
DELETE /_template/template_1
POST /my_index/_close
POST /my_index/_open
说明:
关闭的索引不能进行读写操作,几乎不占集群开销。
关闭的索引可以打开,打开走的是正常的恢复流程。
索引的分片数是不可更改的,如要减少分片数可以通过收缩方式收缩为一个新的索引。新索引的分片数必须是原分片数的因子值,如原分片数是8,则新索引的分片数可以为4、2、1 。
什么时候需要收缩索引呢?
最初创建索引的时候分片数设置得太大,后面发现用不了那么多分片,这个时候就需要收缩了
收缩的流程:
先把所有主分片都转移到一台主机上;
在这台主机上创建一个新索引,分片数较小,其他设置和原索引一致;
把原索引的所有分片,复制(或硬链接)到新索引的目录下;
对新索引进行打开操作恢复分片数据;
(可选)重新把新索引的分片均衡到其他节点上。
收缩前的准备工作:
将原索引设置为只读;
将原索引各分片的一个副本重分配到同一个节点上,并且要是健康绿色状态。
PUT /my_source_index/_settings
{
  "settings": {
    <!-- 指定进行收缩的节点的名称 -->
    "index.routing.allocation.require._name": "shrink_node_name",
    <!-- 阻止写,只读 -->
     "index.blocks.write": true
  }
}
进行收缩:
POST my_source_index/_shrink/my_target_index
{
  "settings": {
    "index.number_of_replicas": 1,
    "index.number_of_shards": 1,
    "index.codec": "best_compression"
  }}
监控收缩过程:
GET _cat/recovery?v
GET _cluster/health
当索引的分片容量过大时,可以通过拆分操作将索引拆分为一个倍数分片数的新索引。能拆分为几倍由创建索引时指定的index.number_of_routing_shards 路由分片数决定。这个路由分片数决定了根据一致性hash路由文档到分片的散列空间。
如index.number_of_routing_shards = 30 ,指定的分片数是5,则可按如下倍数方式进行拆分:
5 → 10 → 30 (split by 2, then by 3)
5 → 15 → 30 (split by 3, then by 2)
5 → 30 (split by 6)
为什么需要拆分索引?
当最初设置的索引的分片数不够用时就需要拆分索引了,和压缩索引相反
注意:只有在创建时指定了index.number_of_routing_shards 的索引才可以进行拆分,ES7开始将不再有这个限制。
和solr的区别是,solr是对一个分片进行拆分,es中是整个索引进行拆分。
拆分步骤:
准备一个索引来做拆分:
PUT my_source_index
{
    "settings": {
        "index.number_of_shards" : 1,
        <!-- 创建时需要指定路由分片数 -->
        "index.number_of_routing_shards" : 2
    }
}
先设置索引只读:
PUT /my_source_index/_settings
{
  "settings": {
    "index.blocks.write": true
  }
}
做拆分:
POST my_source_index/_split/my_target_index
{
  "settings": {
    <!--新索引的分片数需符合拆分规则-->
    "index.number_of_shards": 2
  }
}
监控拆分过程:
GET _cat/recovery?v
GET _cluster/health
对于有时效性的索引数据,如日志,过一定时间后,老的索引数据就没有用了。我们可以像数据库中根据时间创建表来存放不同时段的数据一样,在ES中也可用建多个索引的方式来分开存放不同时段的数据。比数据库中更方便的是ES中可以通过别名滚动指向最新的索引的方式,让你通过别名来操作时总是操作的最新的索引。
ES的rollover index API 让我们可以根据满足指定的条件(时间、文档数量、索引大小)创建新的索引,并把别名滚动指向新的索引。
注意:这时的别名只能是一个索引的别名。
Rollover Index 示例:
创建一个名字为logs-0000001 、别名为logs_write 的索引:
PUT /logs-000001
{
  "aliases": {
    "logs_write": {}
  }
}
添加1000个文档到索引logs-000001,然后设置别名滚动的条件
POST /logs_write/_rollover
{
  "conditions": {
    "max_age":   "7d",
    "max_docs":  1000,
    "max_size":  "5gb"
  }
}
说明:
如果别名logs_write指向的索引是7天前(含)创建的或索引的文档数>=1000或索引的大小>= 5gb,则会创建一个新索引 logs-000002,并把别名logs_writer指向新创建的logs-000002索引
Rollover Index 新建索引的命名规则:
如果索引的名称是-数字结尾,如logs-000001,则新建索引的名称也会是这个模式,数值增1。
如果索引的名称不是-数值结尾,则在请求rollover api时需指定新索引的名称
POST /my_alias/_rollover/my_new_index_name
{
  "conditions": {
    "max_age":   "7d",
    "max_docs":  1000,
    "max_size": "5gb"
  }
}
在名称中使用Date math(时间表达式)
如果你希望生成的索引名称中带有日期,如logstash-2016.02.03-1 ,则可以在创建索引时采用时间表达式来命名:
# PUT /<logs-{now/d}-1> with URI encoding:
PUT /%3Clogs-%7Bnow%2Fd%7D-1%3E
{
  "aliases": {
    "logs_write": {}
  }
}

PUT logs_write/_doc/1
{
  "message": "a dummy log"
}

POST logs_write/_refresh
# Wait for a day to pass

POST /logs_write/_rollover
{
  "conditions": {
    "max_docs":   "1"
  }
}
Rollover时可对新的索引作定义:
PUT /logs-000001
{
  "aliases": {
    "logs_write": {}
  }
}

POST /logs_write/_rollover
{
  "conditions" : {
    "max_age": "7d",
    "max_docs": 1000,
    "max_size": "5gb"
  },
  "settings": {
    "index.number_of_shards": 2
  }
}
Dry run 实际操作前先测试是否达到条件:
POST /logs_write/_rollover?dry_run
{
  "conditions" : {
    "max_age": "7d",
    "max_docs": 1000,
    "max_size": "5gb"
  }
}
说明:
测试不会创建索引,只是检测条件是否满足
注意:rollover是你请求它才会进行操作,并不是自动在后台进行的。你可以周期性地去请求它。
17.1 查看索引状态信息
官网链接:
https://www.elastic.co/guide/en/elasticsearch/reference/current/indices-stats.html
查看所有的索引状态:
GET /_stats
查看指定索引的状态信息:
GET /index1,index2/_stats
17.2 查看索引段信息
官网链接:
https://www.elastic.co/guide/en/elasticsearch/reference/current/indices-segments.html
GET /test/_segments
GET /index1,index2/_segments
GET /_segments
17.3 查看索引恢复信息
官网链接:
https://www.elastic.co/guide/en/elasticsearch/reference/current/indices-recovery.html
GET index1,index2/_recovery?human
GET /_recovery?human
17.4 查看索引分片的存储信息
官网链接:
https://www.elastic.co/guide/en/elasticsearch/reference/current/indices-shards-stores.html
# return information of only index test
GET /test/_shard_stores

# return information of only test1 and test2 indices
GET /test1,test2/_shard_stores

# return information of all indices
GET /_shard_stores
GET /_shard_stores?status=green
18.1 Clear Cache 清理缓存
POST /twitter/_cache/clear
默认会清理所有缓存,可指定清理query, fielddata or request 缓存
POST /kimchy,elasticsearch/_cache/clear
POST /_cache/clear
18.2 Refresh,重新打开读取索引
POST /kimchy,elasticsearch/_refresh

POST /_refresh
18.3 Flush,将缓存在内存中的索引数据刷新到持久存储中
POST twitter/_flush
18.4 Force merge 强制段合并
POST /kimchy/_forcemerge?only_expunge_deletes=false&max_num_segments=100&flush=true
可选参数说明:
max_num_segments 合并为几个段,默认1
only_expunge_deletes 是否只合并含有删除文档的段,默认false
flush 合并后是否刷新,默认true
POST /kimchy,elasticsearch/_forcemerge

POST /_forcemerge
映射定义索引中有什么字段、字段的类型等结构信息。相当于数据库中表结构定义,或 solr中的schema。因为lucene索引文档时需要知道该如何来索引存储文档的字段。
ES中支持手动定义映射,动态映射两种方式。
1.1. 为索引创建mapping
PUT test
{
<!--映射定义 -->
"mappings" : {
<!--名为type1的映射类别 mapping type-->
        "type1" : {
        <!-- 字段定义 -->
            "properties" : {
            <!-- 名为field1的字段,它的field datatype 为 text -->
                "field1" : { "type" : "text" }
            }
        }
    }
}
说明:映射定义后续可以修改
ES最先的设计是用索引类比关系型数据库的数据库,用mapping type 来类比表,一个索引中可以包含多个映射类别。这个类比存在一个严重的问题,就是当多个mapping type中存在同名字段时(特别是同名字段还是不同类型的),在一个索引中不好处理,因为搜索引擎中只有 索引-文档的结构,不同映射类别的数据都是一个一个的文档(只是包含的字段不一样而已)
从6.0.0开始限定仅包含一个映射类别定义( "index.mapping.single_type": true ),兼容5.x中的多映射类别。从7.0开始将移除映射类别。
为了与未来的规划匹配,请现在将这个唯一的映射类别名定义为“_doc”,因为索引的请求地址将规范为:PUT {index}/_doc/{id} and POST {index}/_doc
Mapping 映射示例:
PUT twitter
{
  "mappings": {
    "_doc": {
      "properties": {
        "type": { "type": "keyword" },
        "name": { "type": "text" },
        "user_name": { "type": "keyword" },
        "email": { "type": "keyword" },
        "content": { "type": "text" },
        "tweeted_at": { "type": "date" }
      }
    }
  }
}
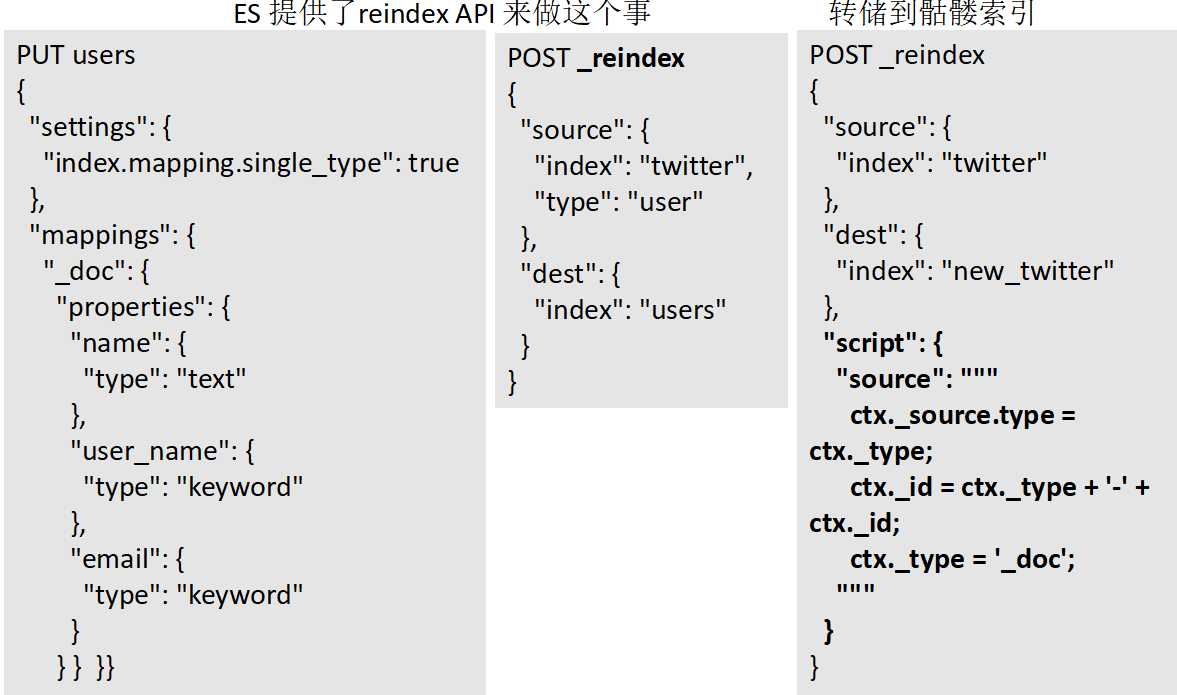
多映射类别数据转储到独立的索引中:
ES 提供了reindex API 来做这个事
字段类型定义了该如何索引存储字段值。ES中提供了丰富的字段类型定义,请查看官网链接详细了解每种类型的特点:
https://www.elastic.co/guide/en/elasticsearch/reference/current/mapping-types.html
3.1 Core Datatypes 核心类型
string
    text and keyword
Numeric datatypes
    long, integer, short, byte, double, float, half_float, scaled_float
Date datatype
    date
Boolean datatype
    boolean
Binary datatype
    binary
Range datatypes     范围
    integer_range, float_range, long_range, double_range, date_range
3.2 Complex datatypes 复合类型
Array datatype
    数组就是多值,不需要专门的类型
Object datatype
    object :表示值为一个JSON 对象
Nested datatype
    nested:for arrays of JSON objects(表示值为JSON对象数组 )
3.3 Geo datatypes 地理数据类型
Geo-point datatype
    geo_point: for lat/lon points  (经纬坐标点)
Geo-Shape datatype
    geo_shape: for complex shapes like polygons (形状表示)
3.4 Specialised datatypes 特别的类型
IP datatype
    ip: for IPv4 and IPv6 addresses
Completion datatype
    completion: to provide auto-complete suggestions
Token count datatype
    token_count: to count the number of tokens in a string
mapper-murmur3
    murmur3: to compute hashes of values at index-time and store them in the index
Percolator type
    Accepts queries from the query-dsl
join datatype
    Defines parent/child relation for documents within the same index
字段的type (Datatype)定义了如何索引存储字段值,还有一些属性可以让我们根据需要来覆盖默认的值或进行特别定义。请参考官网介绍详细了解: https://www.elastic.co/guide/en/elasticsearch/reference/current/mapping-params.html
    analyzer   指定分词器
    normalizer   指定标准化器
    boost        指定权重值
    coerce      强制类型转换
    copy_to    值复制给另一字段
    doc_values  是否存储docValues
    dynamic
    enabled    字段是否可用
    fielddata
    eager_global_ordinals
    format    指定时间值的格式
    ignore_above
    ignore_malformed
    index_options
    index
    fields
    norms
    null_value
    position_increment_gap
    properties
    search_analyzer
    similarity
    store
    term_vector
字段定义属性—示例
PUT my_index
{
  "mappings": {
    "_doc": {
      "properties": {
        "date": {
          "type":   "date",
           <!--格式化日期 -->
          "format": "yyyy-MM-dd HH:mm:ss||yyyy-MM-dd||epoch_millis"
        }
      }
    }
  }
}
当我们需要对一个字段进行多种不同方式的索引时,可以使用fields多重字段定义。如一个字符串字段即需要进行text分词索引,也需要进行keyword 关键字索引来支持排序、聚合;或需要用不同的分词器进行分词索引。
示例:
定义多重字段:
说明:raw是一个多重版本名(自定义)
PUT my_index
{
  "mappings": {
    "_doc": {
      "properties": {
        "city": {
          "type": "text",
          "fields": {
            "raw": {
              "type":  "keyword"
            }
          }
        }
      }
    }
  }
}
往多重字段里面添加文档
PUT my_index/_doc/1
{
  "city": "New York"
}

PUT my_index/_doc/2
{
  "city": "York"
}
获取多重字段的值:
GET my_index/_search
{
  "query": {
    "match": {
      "city": "york"
    }
  },
  "sort": {
    "city.raw": "asc"
  },
  "aggs": {
    "Cities": {
      "terms": {
        "field": "city.raw"
      }
    }
  }
}
官网链接:
https://www.elastic.co/guide/en/elasticsearch/reference/current/mapping-fields.html
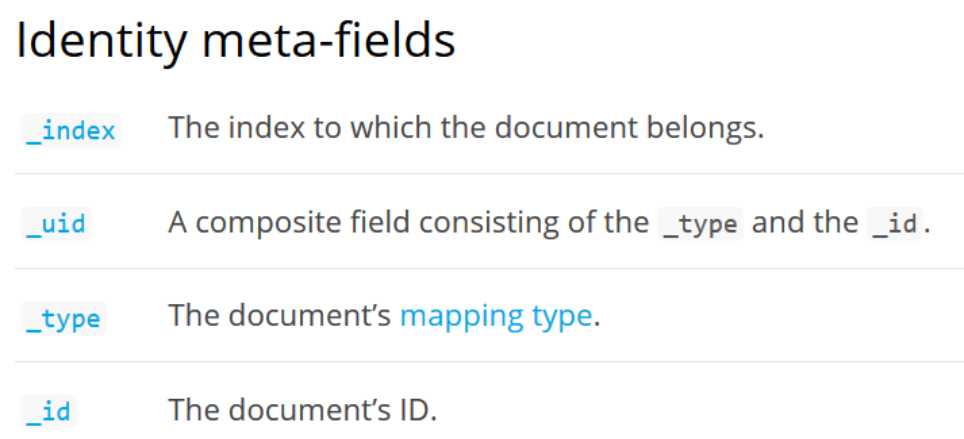
元字段是ES中定义的文档字段,有以下几类:

动态映射:ES中提供的重要特性,让我们可以快速使用ES,而不需要先创建索引、定义映射。 如我们直接向ES提交文档进行索引:
PUT data/_doc/1
{ "count": 5 }
ES将自动为我们创建data索引、_doc 映射、类型为 long 的字段 count
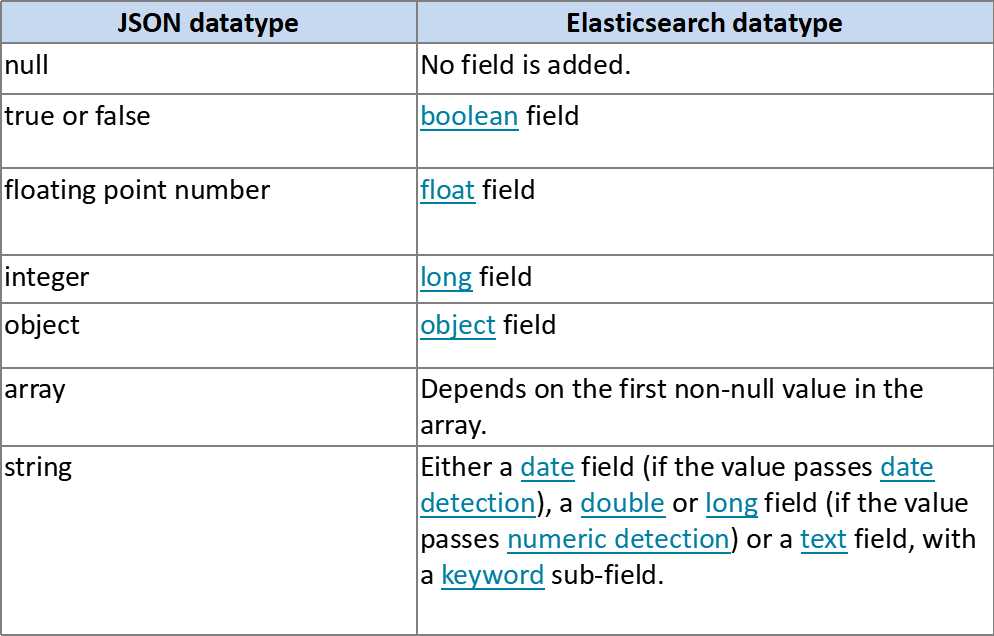
索引文档时,当有新字段时, ES将根据我们字段的json的数据类型为我们自动加人字段定义到mapping中。
7.1 字段动态映射规则
7.2 Date detection 时间侦测
所谓时间侦测是指我们往ES里面插入数据的时候会去自动检测我们的数据是不是日期格式的,是的话就会给我们自动转为设置的格式
date_detection 默认是开启的,默认的格式dynamic_date_formats为:
[ "strict_date_optional_time","yyyy/MM/dd HH:mm:ss Z||yyyy/MM/dd Z"]
PUT my_index/_doc/1
{
  "create_date": "2015/09/02"
}

GET my_index/_mapping
自定义时间格式:
PUT my_index
{
  "mappings": {
    "_doc": {
      "dynamic_date_formats": ["MM/dd/yyyy"]
    }
  }
}
禁用时间侦测:
PUT my_index
{
  "mappings": {
    "_doc": {
      "date_detection": false
    }
  }
}
7.3 Numeric detection 数值侦测
开启数值侦测(默认是禁用的)
PUT my_index
{
  "mappings": {
    "_doc": {
      "numeric_detection": true
    }
  }
}

PUT my_index/_doc/1
{
  "my_float":   "1.0",
  "my_integer": "1"
}

如果希望一次查询可查询多个索引。
如果希望通过索引的视图来操作索引,就像数据库库中的视图一样。
索引的别名机制,就是让我们可以以视图的方式来操作集群中的索引,这个视图可是多个索引,也可是一个索引或索引的一部分。
PUT /logs_20162801
{
    "mappings" : {
        "type" : {
            "properties" : {
                "year" : {"type" : "integer"}
            }
        }
    },
    <!-- 定义了两个别名 -->
    "aliases" : {
        "current_day" : {},
        "2016" : {
            "filter" : {
                "term" : {"year" : 2016 }
            }
        }
    }
}
为索引test1创建别名alias1
POST /_aliases
{
    "actions" : [
        { "add" : { "index" : "test1", "alias" : "alias1" } }
    ]
}
POST /_aliases
{
    "actions" : [
        { "remove" : { "index" : "test1", "alias" : "alias1" } }
    ]
}
还可以这样写
DELETE /{index}/_alias/{name}
删除索引test1的别名alias1,同时为索引test2添加别名alias1
POST /_aliases
{
    "actions" : [
        { "remove" : { "index" : "test1", "alias" : "alias1" } },
        { "add" : { "index" : "test2", "alias" : "alias1" } }
    ]
}
方式1:
POST /_aliases
{
    "actions" : [
        { "add" : { "index" : "test1", "alias" : "alias1" } },
        { "add" : { "index" : "test2", "alias" : "alias1" } }
    ]
}
方式2:
POST /_aliases
{
    "actions" : [
        { "add" : { "indices" : ["test1", "test2"], "alias" : "alias1" } }
    ]
}
注意:只可通过多索引别名进行搜索,不可进行文档索引和根据id获取文档。
方式3:通过统配符*模式来指定要别名的索引
POST /_aliases
{
    "actions" : [
        { "add" : { "index" : "test*", "alias" : "all_test_indices" } }
    ]
}
注意:在这种情况下,别名是一个点时间别名,它将对所有匹配的当前索引进行别名,当添加/删除与此模式匹配的新索引时,它不会自动更新。
索引中需要有字段
PUT /test1
{
  "mappings": {
    "type1": {
      "properties": {
        "user" : {
          "type": "keyword"
        }
      }
    }
  }
}
过滤器通过Query DSL来定义,将作用于通过该别名来进行的所有Search, Count, Delete By Query and More Like This 操作。
POST /_aliases
{
    "actions" : [
        {
            "add" : {
                 "index" : "test1",
                 "alias" : "alias2",
                 "filter" : { "term" : { "user" : "kimchy" } }
            }
        }
    ]
}
可在别名定义中指定路由值,可和filter一起使用,用来限定操作的分片,避免不需要的其他分片操作。
POST /_aliases
{
    "actions" : [
        {
            "add" : {
                 "index" : "test",
                 "alias" : "alias1",
                 "routing" : "1"
            }
        }
    ]
}
为搜索、索引指定不同的路由值
POST /_aliases
{
    "actions" : [
        {
            "add" : {
                 "index" : "test",
                 "alias" : "alias2",
                 "search_routing" : "1,2",
                 "index_routing" : "2"
            }
        }
    ]
}
PUT /{index}/_alias/{name}
PUT /logs_201305/_alias/2013
带filter 和 routing
PUT /users
{
    "mappings" : {
        "user" : {
            "properties" : {
                "user_id" : {"type" : "integer"}
            }
        }
    }
}
PUT /users/_alias/user_12
{
    "routing" : "12",
    "filter" : {
        "term" : {
            "user_id" : 12
        }
    }
}
GET /{index}/_alias/{alias}
GET /logs_20162801/_alias/*
GET /_alias/2016
GET /_alias/20*
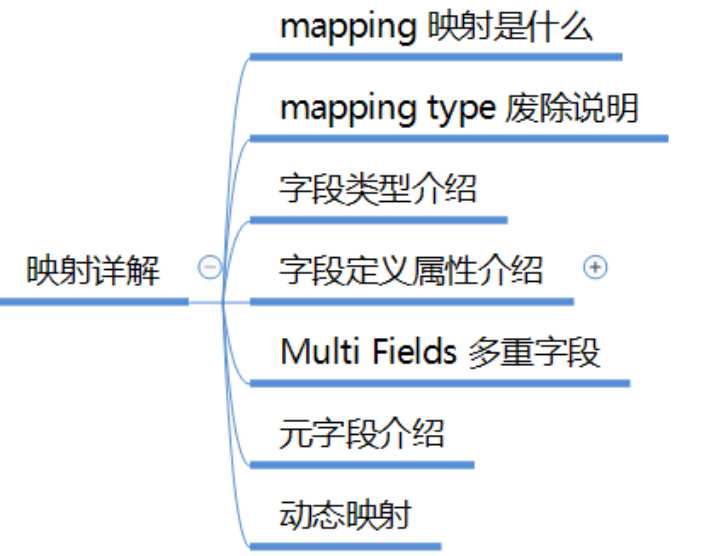
elasticsearch系列二:索引详解(快速入门、索引管理、映射详解、索引别名)
标签:视图 判断 移除 手动 stat 时间格式 OLE values 管理
原文地址:https://www.cnblogs.com/leeSmall/p/9193476.html