标签:pen data tom tomat amp absolute length color ios
一、How to make auto-adjustments(brightness and contrast) for image Android Opencv Image Correctioni‘m using OpenCV for Android.
I would like to know,how to make image correction(auto adjustments of brightness/contrast) for image(bitmap) in android via OpenCV or that can be done by native ColorMatrixFilter from Android!??
I tried to google,but didn‘t found good tutorials/examples.
So how can i achieve my goal? Any ideas?
Thanks!
算法问题,需要寻找到自动调整亮度和对比度的算法。
回答:
Brightness and contrast is linear operator with parameter alpha and beta
O(x,y) = alpha * I(x,y) + betaIn OpenCV you can do this with convertTo.
The question here is how to calculate alpha and beta automatically ?
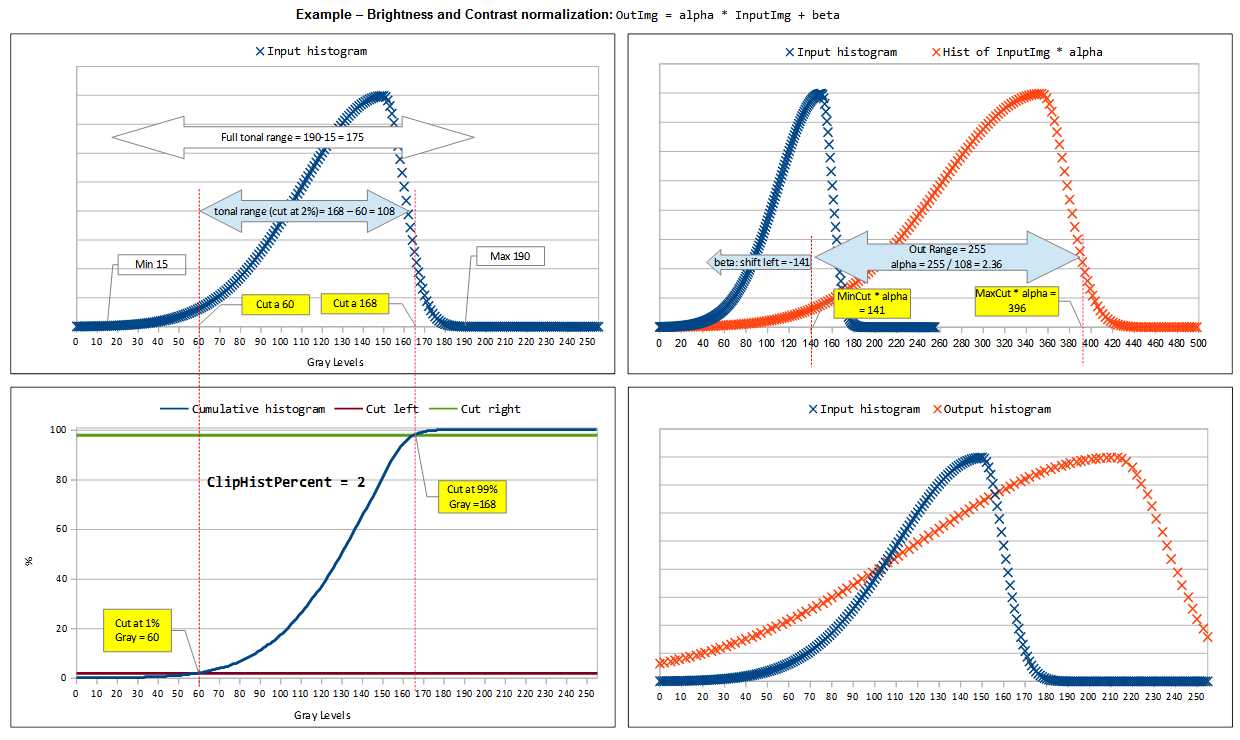
Looking at histogram, alpha operates as color range amplifier, beta operates as range shift.
Automatic brightness and contrast optimization calculates alpha and beta so that the output range is 0..255.
input range = max(I) - min(I)

wanted output range = 255;

alpha = output range / input range = 255 / ( max(I) - min(I) )

min(O) = alpha * min(I) + beta
beta = -min(I) * alpha
Histogram Wings Cut (clipping)
To maximize the result of it‘s useful to cut out some color with few pixels.
This is done cutting left right and wings of histogram where color frequency is less than a value (typically 1%). Calculating cumulative distribution from the histogram you can easly find where to cut.
may be sample chart helps to understand:
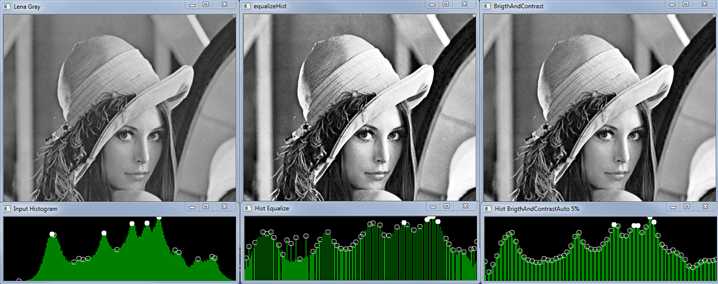
By the way BrightnessAndContrastAuto could be named normalizeHist because it works on BGR and gray images stretching the histogram to the full range without touching bins balance. If input image has range 0..255 BrightnessAndContrastAuto will do nothing.
Histogram equalization and CLAE works only on gray images and they change grays level balancing. look at the images below:
  void BrightnessAndContrastAuto(const cv::Mat &src, cv::Mat &dst, float clipHistPercent)
  {
    CV_Assert(clipHistPercent >= 0);
    CV_Assert((src.type() == CV_8UC1) || (src.type() == CV_8UC3) || (src.type() == CV_8UC4));
    int histSize = 256;
    float alpha, beta;
    double minGray = 0, maxGray = 0;
    //to calculate grayscale histogram
    cv::Mat gray;
    if (src.type() == CV_8UC1) gray = src;
    else if (src.type() == CV_8UC3) cvtColor(src, gray, CV_BGR2GRAY);
    else if (src.type() == CV_8UC4) cvtColor(src, gray, CV_BGRA2GRAY);
    if (clipHistPercent == 0)
    {
        // keep full available range
        cv::minMaxLoc(gray, &minGray, &maxGray);
    }
    else
    {
        cv::Mat hist; //the grayscale histogram
        float range[] = { 0, 256 };
        const float* histRange = { range };
        bool uniform = true;
        bool accumulate = false;
        calcHist(&gray, 1, 0, cv::Mat (), hist, 1, &histSize, &histRange, uniform, accumulate);
        // calculate cumulative distribution from the histogram
        std::vector<float> accumulator(histSize);
        accumulator[0] = hist.at<float>(0);
        for (int i = 1; i < histSize; i++)
        {
            accumulator[i] = accumulator[i - 1] + hist.at<float>(i);
        }
        // locate points that cuts at required value
        float max = accumulator.back();
        clipHistPercent *= (max / 100.0); //make percent as absolute
        clipHistPercent /= 2.0; // left and right wings
        // locate left cut
        minGray = 0;
        while (accumulator[minGray] < clipHistPercent)
            minGray++;
        // locate right cut
        maxGray = histSize - 1;
        while (accumulator[maxGray] >= (max - clipHistPercent))
            maxGray--;
    }
    // current range
    float inputRange = maxGray - minGray;
    alpha = (histSize - 1) / inputRange;   // alpha expands current range to histsize range
    beta = -minGray * alpha;             // beta shifts current range so that minGray will go to 0
    // Apply brightness and contrast normalization
    // convertTo operates with saurate_cast
    src.convertTo(dst, -1, alpha, beta);
    // restore alpha channel from source
    if (dst.type() == CV_8UC4)
    {
        int from_to[] = { 3, 3};
        cv::mixChannels(&src, 4, &dst,1, from_to, 1);
    }
    return;
}
I am evaluating template matching algorithm to differentiate similar and dissimilar objects. What I found is confusing, I had an impression of template matching is a method which compares raw pixel intensity values. Hence when the pixel value varies I expected Template Matching to give a less match percentage.
I have a template and search image having same shape and size differing only in color(Images attached). When I did template matching surprisingly I am getting match percentage greater than 90%.
img = cv2.imread(‘./images/searchtest.png‘, cv2.IMREAD_COLOR)template = cv2.imread(‘./images/template.png‘, cv2.IMREAD_COLOR)
res = cv2.matchTemplate(img, template, cv2.TM_CCORR_NORMED)
min_val, max_val, min_loc, max_loc = cv2.minMaxLoc(res)print(max_val)
Template Image :
Search Image :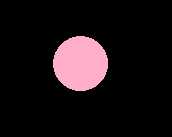
Can someone give me an insight why it is happening so? I have even tried this in HSV color space, Full BGR image, Full HSV image, Individual channels of B,G,R and Individual channels of H,S,V. In all the cases I am getting a good percentage.
Any help could be really appreciated.
这个问题的核心就是彩色模板匹配。很有趣的问题。回答直接给出了source code,关于这个问题,我认为,彩色模板匹配的意义不是很大,毕竟用于定位的时候,黑白效果更好。三、likely position of Feature Matching.I am using Brute Force Matcher with L2 norm. Referring this link https://docs.opencv.org/2.4/doc/tutor...
After the process, I get below image as output
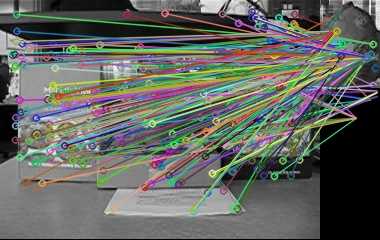
What is the likely position of the object suggested by the feature matching?
I don‘t understand how to choose the likely position using this image :(
这是一个只知其一不知其二的问题,他能够找到旋转的地方,但是对于下一步如何做没有思路。其实,解决此类问题,最好的方法就是参考教程做一遍。
当然,管理员的回答非常明确:
to retrieve the position of your matched object, you need some further steps :
我也给出具体回答:

//used surf // #include "stdafx.h" #include <iostream> #include "opencv2/core/core.hpp" #include "opencv2/imgproc/imgproc.hpp" #include "opencv2/features2d/features2d.hpp" #include "opencv2/highgui/highgui.hpp" #include "opencv2/nonfree/features2d.hpp" #include "opencv2/calib3d/calib3d.hpp" using namespace std; using namespace cv; int main( int argc, char** argv ) { Mat img_1 ; Mat img_2 ; Mat img_raw_1 = imread("c1.bmp"); Mat img_raw_2 = imread("c3.bmp"); cvtColor(img_raw_1,img_1,CV_BGR2GRAY); cvtColor(img_raw_2,img_2,CV_BGR2GRAY); //-- Step 1: 使用SURF识别出特征点 int minHessian = 400; SurfFeatureDetector detector( minHessian ); std::vector<KeyPoint> keypoints_1, keypoints_2; detector.detect( img_1, keypoints_1 ); detector.detect( img_2, keypoints_2 ); //-- Step 2: 描述SURF特征 SurfDescriptorExtractor extractor; Mat descriptors_1, descriptors_2; extractor.compute( img_1, keypoints_1, descriptors_1 ); extractor.compute( img_2, keypoints_2, descriptors_2 ); //-- Step 3: 匹配 FlannBasedMatcher matcher;//BFMatcher为强制匹配 std::vector< DMatch > matches; matcher.match( descriptors_1, descriptors_2, matches ); //取最大最小距离 double max_dist = 0; double min_dist = 100; for( int i = 0; i < descriptors_1.rows; i++ ) { double dist = matches[i].distance; if( dist < min_dist ) min_dist = dist; if( dist > max_dist ) max_dist = dist; } std::vector< DMatch > good_matches; for( int i = 0; i < descriptors_1.rows; i++ ) { if( matches[i].distance <= 3*min_dist )//这里的阈值选择了3倍的min_dist { good_matches.push_back( matches[i]); } } //-- Localize the object from img_1 in img_2 std::vector<Point2f> obj; std::vector<Point2f> scene; for( int i = 0; i < (int)good_matches.size(); i++ ) { //这里采用“帧向拼接图像中添加的方法”,因此左边的是scene,右边的是obj scene.push_back( keypoints_1[ good_matches[i].queryIdx ].pt ); obj.push_back( keypoints_2[ good_matches[i].trainIdx ].pt ); } //直接调用ransac,计算单应矩阵 Mat H = findHomography( obj, scene, CV_RANSAC ); //图像对准 Mat result; warpPerspective(img_raw_2,result,H,Size(2*img_2.cols,img_2.rows)); Mat half(result,cv::Rect(0,0,img_2.cols,img_2.rows)); img_raw_1.copyTo(half); imshow("result",result); waitKey(0); return 0; }The cv::Mat is a CDOcument variable member:
// Attributes
public:
std::vector<CBlob> m_blobs;
cv::Mat m_Mat;
and I draw rectangles over image, with an method (called at some time intervals, according FPS rate):
DrawBlobInfoOnImage(m_blobs, m_Mat);Here is the code of this method:
void CMyDoc::DrawBlobInfoOnImage(std::vector<CBlob>& blobs, cv::Mat& Mat)
{
for (unsigned int i = 0;i < blobs.size();++i)
{
if (blobs[i].m_bStillBeingTracked)
{
cv::rectangle(Mat, blobs[i].m_rectCurrentBounding, SCALAR_RED, 2);
double dFontScale = blobs[i].m_dCurrentDiagonalSize / 60.0;
int nFontThickness = (int)roundf(dFontScale * 1.0);
cv::putText(Mat, (LPCTSTR)IntToString(i), blobs[i].m_vecPointCenterPositions.back(), CV_FONT_HERSHEY_SIMPLEX, dFontScale, SCALAR_GREEN, nFontThickness);
}
}
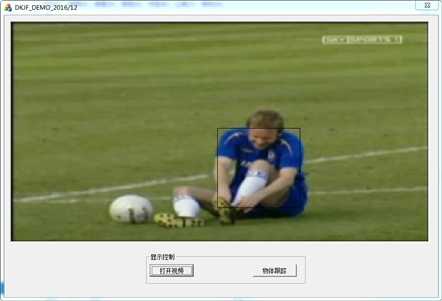
}but the result of this method is something like that:

My question is: how can I draw only the last blobs result over my image ?
I have tried to clean up m_Mat, and to enable to draw only blobs.size() - 1 blob over image, none of this worked ...
非常有意思的问题,主要就是说他能够用mfc调用oepncv了,但是不知道如何将视频中的框子正确显示(也就是不要有拖尾)
这个也是对问题思考不是很深造成的问题。其实,解决的方法无外乎两个
一是直接修改视频流,也就是在原来的“读取-显示”循环里面添加一些东西(也就是框子),如果是这种方法,你使用或者不使用mfc基本没有什么影响;
比如<PariticalFilter在MFC上的运行,源代码公开>
https://www.cnblogs.com/jsxyhelu/p/6336429.html
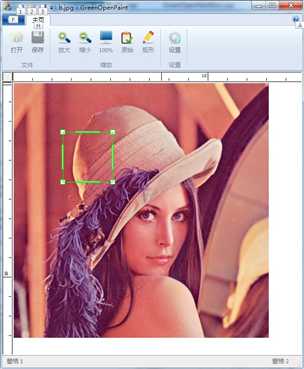
二是采用mfc的机制。mfc不是都是对话框吗?那就创建一个窗体,专门用来显示这个矩形就好啦。
比如<GreenOpenPaint的实现(五)矩形框>https://www.cnblogs.com/jsxyhelu/p/6354341.html
五、How to find the thickness of the red color sealent in the image ????
Hi,
I want to find the thickness of the red colored sealent in the image.
First I‘m extracting the sealent portion by using findcontours by having minimum and maximum conotur area.And then check the Area,length and thickness of the sealent,i can find the area as well as length but i m not able to find the thickness of the sealent portion.
Please help me guys........below is the example image.
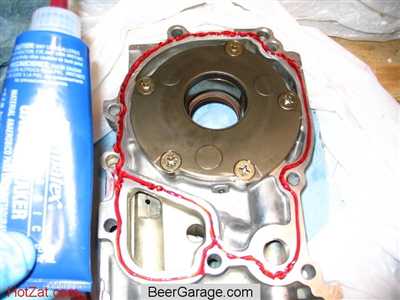
提示一下:
do a distance transform and a skeleton on the binary image.
这是一个算法问题,具体解决,下周给出实现。大家可以先研究一下。
标签:pen data tom tomat amp absolute length color ios
原文地址:https://www.cnblogs.com/jsxyhelu/p/9215646.html