标签:target idg 判断 还需要 fse draw alt 使用 type
自定义窗口及拖动
1.自定义无边框窗口时,需要将窗口标志设为:
Qt::FramelessWindowHint |Qt::WindowSystemMenuHint | Qt::WindowMinMaxButtonsHint
2.然后还需要通过安装EventFilter给自己监视窗口拖动
其中构造函数实现:
myUi::myUi(QWidget *parent) :
    QWidget(parent)
{

setWindowFlags(Qt::FramelessWindowHint |Qt::WindowSystemMenuHint | Qt::WindowMinMaxButtonsHint);
    qApp->installEventFilter(this);                   //给自己加事件过滤器,用来实现拖动窗口
    ... ...
}
eventFilter事件处理函数实现:
bool myUi::eventFilter(QObject *obj, QEvent *evt)
{
    QMouseEvent *mouse =  dynamic_cast<QMouseEvent *>(evt);
    if(obj == this&&mouse)                 //判断拖动
    {
        if(this->isMaximized())
        {
            return true;
        }
        static bool dragFlag = false;
        static QPoint dragPoint(0,0);
         if(mouse->button()==Qt::LeftButton && mouse->type() ==QEvent::MouseButtonPress)    //按下
        {
            dragFlag =true;
            dragPoint = mouse->pos();                                  //记录鼠标所在的界面位置
            return true;
        }
        else if(dragFlag &&  mouse->type() ==QEvent::MouseMove)     //拖动
        {
            this->move(mouse->globalPos() - dragPoint);
            return true;
        }
        else if(mouse->type() ==QEvent::MouseButtonRelease)
        {
            dragFlag = false;
            return true;
        }
    }

       return QWidget::eventFilter(obj,evt);
}
自定义QToolButton/QPushButton开关按钮
1.以QToolButton为例,构造函数里实现:
myUi::myUi(QWidget *parent) :
    QWidget(parent)
{
       //... ...
ui->ToolButton->setText("更新设置");
ui->ToolButton->setIcon( QIcon(":/image/ok.png"));
connect(ui->ToolButton ,SIGNAL(clicked()),this,SLOT(onPageStartBtnClicked()));
ui->ToolButton->setProperty("START","Up");            //设置为未按下状态
       //... ...
}
2.槽函数里实现:
void myUi::onPageStartBtnClicked()
{
            if(b->property("START")=="Up")          //之前是未按下
            {
             ui->ToolButton->setProperty("START","Down");     //设置为按下
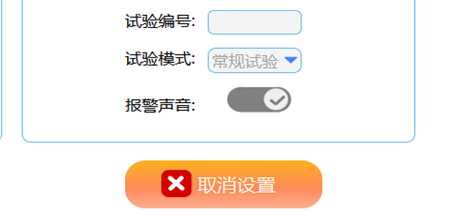
             ui->ToolButton->setText("取消设置");
             ui->ToolButton->setIcon( QIcon(":/image/colose.png"));
                        //... ...
            }
            else
            {
               ui->ToolButton->setProperty("START","Up");    //设置为未按下状态
               ui->ToolButton->setText("更新设置");
               ui->ToolButton->setIcon( QIcon(":/image/ok.png"));
            //... ...
            }
}
3.QSS代码:
/*正常状态下*/
QToolButton[START="Up"] {
        border-radius: 20px;
        border: none;
        padding-left :30px;
        color: rgb(255,255,255);
        background: rgb(56,167,222);
}


QToolButton[START="Up"]:hover {

        padding-bottom: 2px;
        background: rgb(0,205,252);
}

QToolButton[START="Up"]:checked,QToolButton[START="Up"]:pressed {
        background: rgb(6,144,175);
}


/*取消状态下*/
QToolButton[START="Down"] {
        border-radius: 20px;
        border: none;
     padding-left :30px;
     color: rgb(255,255,255);
     background: qlineargradient(spread:pad,
                  x1:0, y1:0, x2:0, y2:1,
              stop:0 rgba(255,176,30, 255),
              stop:0.6 rgba(254,139,91, 255),
              stop:1.0 rgba(254,176,143, 255));
}

QToolButton[START="Down"]:hover {
        padding-bottom: 2px;
        background: qlineargradient(spread:pad,
                 x1:0, y1:0, x2:0, y2:1,
              stop:0 rgba(255,176,30, 255),
              stop:0.6 rgba(255,74,0, 255),
              stop:1.0 rgba(255,183,153, 255));
}
效果
点击前:

点击后:

界面阴影
首先,将界面拖放在QFrame子组件里,然后将该QFrame居中,与主窗口间隔10px左右(用来显示阴影).并将主窗口设为透明属性.
接下来,有2种方法设置阴影:
1.使用QGraphicsDropShadowEffect图像阴影效果类
好处在于快捷,只需要在构造函数里实现即可,坏处就是界面有点卡(我这里测试是这样的)
QGraphicsDropShadowEffect常用函数:
setOffset ( qreal dx, qreal dy );
//设置阴影的偏移度,如果想实现整个界面上下左右都有阴影,则设为dx=0,dy=0.
//当dx为负时,表示偏移为左,反之为右
//当dy为负时,表示偏移为上,反之为下

void setBlurRadius ( qreal blurRadius );
//设置阴影半径,值越大,则阴影效果越强

setColor ( const QColor & color )
//设置阴影颜色
示例-在构造函数里调用:
   setAttribute(Qt::WA_TranslucentBackground);

   QGraphicsDropShadowEffect* shadowEffect = new QGraphicsDropShadowEffect(this);

   shadowEffect->setOffset(0,0);

   shadowEffect->setColor(QColor(0,0,0));

   shadowEffect->setBlurRadius(10);

   ui->frame->setGraphicsEffect(shadowEffect);
效果:

2.QPainter绘画
首先,在构造函数里调用下面函数,设置透明:
setAttribute(Qt::WA_TranslucentBackground);
然后在paintEvent函数里进行绘制
void myUi::paintEvent(QPaintEvent *)  //绘画阴影
{
       int size =10;                //阴影宽度
       QPainter painter(this);
       painter.setRenderHint(QPainter::Antialiasing);

       QColor color(0, 0, 0, 0);
       for(int i=0;i<=size; i++)
       {
            color.setAlpha(i*4);
            painter.setPen(color);
            painter.setBrush(Qt::transparent);
            painter.drawRoundedRect(i,i,this->width()-i*2, this->height()-i*2,15,15);
       }
}
由于界面是圆角的,所以通过drawRoundedRect()绘制.
效果:

参考: https://blog.csdn.net/stephan14/article/details/47406881
参考: http://blog.sina.com.cn/s/blog_a6fb6cc90101eoop.html#cmt_53197A33-7F000001-6E85F70F-8B8-8A0
29.QT-自定义窗口拖动、自定义QToolButton/QPushButton开关按钮、界面阴影
标签:target idg 判断 还需要 fse draw alt 使用 type
原文地址:https://www.cnblogs.com/lifexy/p/9236010.html