标签:信息加密 import map 没有 control file master 根据 文件内容
server:
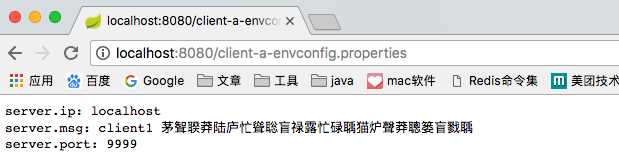
ip: localhost
port: 9999
msg: client1 配置文件测试用例
server.ip=localhost
server.port=9999
server.msg=client1 配置文件测试用例
<parent>
    <groupId>org.springframework.boot</groupId>
    <artifactId>spring-boot-starter-parent</artifactId>
    <version>1.5.9.RELEASE</version>
    <relativePath/> <!-- lookup parent from repository -->
</parent>

<dependencyManagement>
    <dependencies>
        <dependency>
            <groupId>org.springframework.cloud</groupId>
            <artifactId>spring-cloud-dependencies</artifactId>
            <version>Dalston.SR1</version>
            <type>pom</type>
            <scope>import</scope>
        </dependency>
    </dependencies>
</dependencyManagement>
<dependency>
    <groupId>org.springframework.boot</groupId>
    <artifactId>spring-boot-starter-web</artifactId>
</dependency>
<dependency>
    <groupId>org.springframework.cloud</groupId>
    <artifactId>spring-cloud-config-server</artifactId>
</dependency>
server:
  port: 8080
spring:
  application:
    name:config-server
  cloud:
    config:
      server:
        git:
          uri: https://gitee.com/anhdbbt/cloudconfig.git #git地址
          search-paths: demo*     #在git中的搜索路径
          default-label: master      #默认分支
          username: wzy830715@163.com  #git账号
          password: wang16208    #git密码

/{application}/{profile}[/{label}]
/{application}-{profile}.yml
/{label}/{application}-{profile}.yml
/{application}-{profile}.properties
/{label}/{application}-{profile}.properties
application就是文件名的前缀,profile就是后缀,label就是git的分支所以该文件还可以这么访问:
<parent>
    <groupId>org.springframework.boot</groupId>
    <artifactId>spring-boot-starter-parent</artifactId>
    <version>1.5.9.RELEASE</version>
    <relativePath/> <!-- lookup parent from repository -->
</parent>

<dependencyManagement>
    <dependencies>
        <dependency>
            <groupId>org.springframework.cloud</groupId>
            <artifactId>spring-cloud-dependencies</artifactId>
            <version>Dalston.SR1</version>
            <type>pom</type>
            <scope>import</scope>
        </dependency>
    </dependencies>
</dependencyManagement>
<dependency>
    <groupId>org.springframework.boot</groupId>
    <artifactId>spring-boot-starter-web</artifactId>
</dependency>
<!-- client需要添加以下依赖,否则访问/refresh将会得到404 -->
<dependency>
    <groupId>org.springframework.boot</groupId>
    <artifactId>spring-boot-starter-actuator</artifactId>
</dependency>
<dependency>
    <groupId>org.springframework.cloud</groupId>
    <artifactId>spring-cloud-starter-config</artifactId>
</dependency>
spring:
  application:
    name: client-a
  cloud:
    config:
      uri: http://localhost:8080/    #configserver的地址
      profile: master     #文件后缀
      label: master        #分支为master
@Value("${server.msg}")   //配置文件中的节点
private String configValue;
@RequestMapping("testConfig")
public String test(){
    return "读取到配置中心:" + configValue;
}
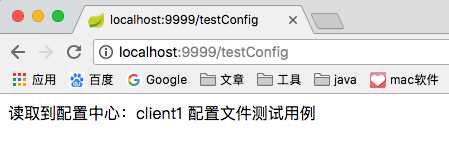
我们发现端口号9999在本地并没有配置,而是在git的配置文件中的,客户端读到了这个配置。而页面的显示更是表明读到了配置文件中的msg字段。
------------------------------------------------------------------------------------------------------------------------------
以上只是配置中心最简单的helloword的实现,它还支持敏感信息加密,配置security跟encrypt相关选项即可,不作赘述。
标签:信息加密 import map 没有 control file master 根据 文件内容
原文地址:https://www.cnblogs.com/nevermorewang/p/9281489.html