标签:mic pen win done html编码 pre 调用 服务器 nta
之前由于一个项目的需要(简单说一下,一个网页游戏,裁判的页面点击开始按钮,玩家便可以开始游戏),研究了很久,最终一个同事跟我推荐了SignalR。距离项目结束已经有一段时间了,再来回顾一下SignalR的简单实现吧。
ASP.NET SignalR 是为.NET 开发者提供即时通讯Web 应用的类库。即时通讯Web服务就是服务器将内容自动推送到已经连接的客户端,而不是服务器等待客户端发起一个新的数据请求。简单来说,就是实现即时通信的功能,里面很多的功能都已经封装好了,只需要配置相关的功能即可,然后通过js实现功能。
1.首先在VS中创建一个MVC项目
2.通过NuGet安装SignalR的包并引用到项目

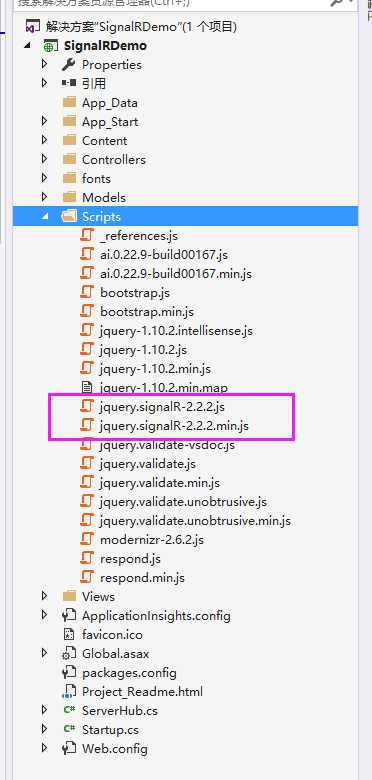
3.成功安装后,会在Scripts文件夹下面添加JS脚本库

4.向项目中添加一个SignalR集线器(v2)并命名为ServerHub。

5.将如下代码写入到刚刚添加的ServerHub类中:

 1 using System;
 2 using System.Collections.Generic;
 3 using System.Linq;
 4 using System.Web;
 5 using Microsoft.AspNet.SignalR;
 6
 7 namespace SignalRDemo
 8 {
 9     public class ServerHub : Hub
10     {
11         private static readonly char[] Constant =
12         {
13             ‘0‘, ‘1‘, ‘2‘, ‘3‘, ‘4‘, ‘5‘, ‘6‘, ‘7‘, ‘8‘, ‘9‘,
14             ‘a‘, ‘b‘, ‘c‘, ‘d‘, ‘e‘, ‘f‘, ‘g‘, ‘h‘, ‘i‘, ‘j‘, ‘k‘, ‘l‘, ‘m‘, ‘n‘, ‘o‘, ‘p‘, ‘q‘, ‘r‘, ‘s‘, ‘t‘, ‘u‘, ‘v‘,
15             ‘w‘, ‘x‘, ‘y‘, ‘z‘,
16             ‘A‘, ‘B‘, ‘C‘, ‘D‘, ‘E‘, ‘F‘, ‘G‘, ‘H‘, ‘I‘, ‘J‘, ‘K‘, ‘L‘, ‘M‘, ‘N‘, ‘O‘, ‘P‘, ‘Q‘, ‘R‘, ‘S‘, ‘T‘, ‘U‘, ‘V‘,
17             ‘W‘, ‘X‘, ‘Y‘, ‘Z‘
18         };
19
20         /// <summary>
21         /// 供客户端调用的服务器端代码
22         /// </summary>
23         /// <param name="message"></param>
24         public void Send(string message)
25         {
26             var name = GenerateRandomName(4);
27
28             // 调用所有客户端的sendMessage方法
29             Clients.All.sendMessage(name, message);
30         }
31
32         /// <summary>
33         /// 产生随机用户名函数
34         /// </summary>
35         /// <param name="length">用户名长度</param>
36         /// <returns></returns>
37         public static string GenerateRandomName(int length)
38         {
39             var newRandom = new System.Text.StringBuilder(62);
40             var rd = new Random();
41             for (var i = 0; i < length; i++)
42             {
43                 newRandom.Append(Constant[rd.Next(62)]);
44             }
45             return newRandom.ToString();
46         }
47     }
48 }
6.将如下代码覆盖原有的Startup的类中:

 1 using Microsoft.Owin;
 2 using Owin;
 3
 4 [assembly: OwinStartupAttribute(typeof(SignalRDemo.Startup))]
 5 namespace SignalRDemo
 6 {
 7     public partial class Startup
 8     {
 9         #region MyRegion
10         public void Configuration(IAppBuilder app)
11         {
12             app.MapSignalR();
13             ConfigureAuth(app);
14         }
15         #endregion
16     }
17 }
7.在Home控制器创建一个Chat Action方法:

1 public ActionResult Chat()
2         {
3             return View();
4         }
8.在Views中创建Chat视图,文件代码如下:

 1 @{
 2     ViewBag.Title = "Chat";
 3 }
 4
 5 <h2>Chat</h2>
 6
 7 <div class="container">
 8     <input type="text" id="message" />
 9     <input type="button" id="sendmessage" value="Send" />
10     <input type="hidden" id="displayname" />
11     <ul id="discussion"></ul>
12 </div>
13
14 @section scripts
15 {
16     <!--引用SignalR库. -->
17     <script src="~/Scripts/jquery.signalR-2.2.2.min.js"></script>
18     <!--引用自动生成的SignalR 集线器(Hub)脚本.在运行的时候在浏览器的Source下可看到 -->
19     <script src="~/signalr/hubs"></script>
20     <script>
21         $(function () {
22             // 引用自动生成的集线器代理
23             var chat = $.connection.serverHub;
24             // 定义服务器端调用的客户端sendMessage来显示新消息
25
26             chat.client.sendMessage = function (name, message) {
27                 // 向页面添加消息
28                 $(‘#discussion‘).append(‘<li><strong>‘ + htmlEncode(name)
29                     + ‘</strong>: ‘ + htmlEncode(message) + ‘</li>‘);
30                 //if (message == "1") {
31                 //    alert(‘已收到消息‘ + message);
32                 //}
33             };
34             // 设置焦点到输入框
35             $(‘#message‘).focus();
36             // 开始连接服务器
37             $.connection.hub.start().done(function () {
38                 $(‘#sendmessage‘).click(function () {
39                     // 调用服务器端集线器的Send方法
40                     chat.server.send($(‘#message‘).val());
41                     // 清空输入框信息并获取焦点
42                     $(‘#message‘).val(‘‘).focus();
43                 });
44             });
45         });
46
47         // 为显示的消息进行Html编码
48         function htmlEncode(value) {
49             var encodedValue = $(‘<div />‘).text(value).html();
50             return encodedValue;
51         }
52     </script>
53 }
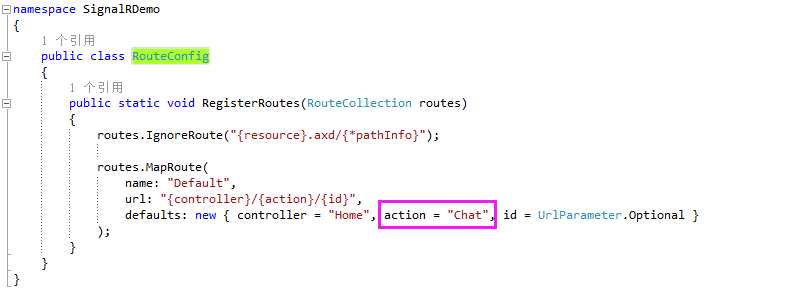
9.将App_Start下面的RouteConfig文件做如下修改,以便程序运行时直接打开Chat页面:

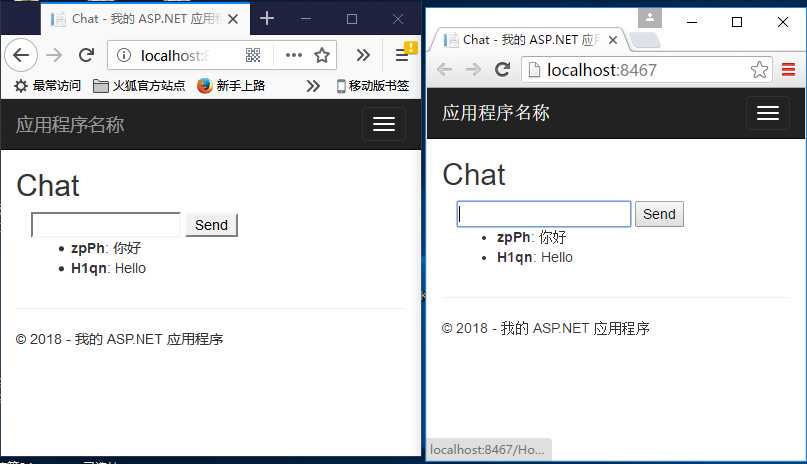
10.运行程序,然后打开两个窗口,即可得到如下运行结果:

正是由于项目的需要,让我无意中学习了这个SignalR,个人觉得,真的是非常好用。至于底层的具体实现,以及如何在客户端中使用,推荐阅读:https://www.cnblogs.com/aaaaq/p/5929104.html,我的项目Demo亦是借鉴于此。
标签:mic pen win done html编码 pre 调用 服务器 nta
原文地址:https://www.cnblogs.com/JentZhang/p/9290117.html