标签:pkg art edr ntb bind extend label net onclick
action 为 Intent.ACTION_MAIN和category为 Intent.CATEGORY_LAUNCHER 信息,我们构造一个这样的 Intent 来查询所有启动页 Activity 。主要代码如下:
activity_main.xml
<?xml version="1.0" encoding="utf-8"?>
<android.support.constraint.ConstraintLayout xmlns:android="http://schemas.android.com/apk/res/android"
    xmlns:app="http://schemas.android.com/apk/res-auto"
    xmlns:tools="http://schemas.android.com/tools"
    android:layout_width="match_parent"
    android:layout_height="match_parent"
    tools:context="com.example.sharpcj.launchertest.MainActivity">

    <android.support.v7.widget.RecyclerView
        android:padding="10dp"
        android:id="@+id/rv_test"
        android:layout_width="match_parent"
        android:layout_height="match_parent"
        android:text="Hello World!"
        app:layout_constraintBottom_toBottomOf="parent"
        app:layout_constraintLeft_toLeftOf="parent"
        app:layout_constraintRight_toRightOf="parent"
        app:layout_constraintTop_toTopOf="parent" />

</android.support.constraint.ConstraintLayout>
recyclerview_item.xml
<?xml version="1.0" encoding="utf-8"?>
<LinearLayout xmlns:android="http://schemas.android.com/apk/res/android"
    android:orientation="vertical"
    android:layout_width="100dp"
    android:layout_height="100dp">

    <ImageView
        android:id="@+id/iv_icon"
        android:layout_width="70dp"
        android:layout_height="70dp"
        android:layout_marginLeft="15dp"
        android:layout_marginTop="10dp"/>
    <TextView
        android:id="@+id/tv_name"
        android:layout_width="wrap_content"
        android:layout_height="15dp"
        android:layout_marginTop="5dp"
        android:textSize="13sp"
        android:maxLines="1"
        android:ellipsize="end"
        android:layout_gravity="center_horizontal"
        />
</LinearLayout>
MainActivity.java
package com.example.sharpcj.launchertest;

import android.content.ComponentName;
import android.content.Intent;
import android.content.pm.ResolveInfo;
import android.support.v7.app.AppCompatActivity;
import android.os.Bundle;
import android.support.v7.widget.GridLayoutManager;
import android.support.v7.widget.RecyclerView;
import android.view.View;

import java.util.ArrayList;
import java.util.Iterator;
import java.util.List;

public class MainActivity extends AppCompatActivity {

    private RecyclerView mRvTest;
    private List<ResolveInfo> mlsResolveInfo;
    private RvTestAdapter mAdapter;

    @Override
    protected void onCreate(Bundle savedInstanceState) {
        super.onCreate(savedInstanceState);
        setContentView(R.layout.activity_main);
        mRvTest = findViewById(R.id.rv_test);
        mlsResolveInfo = new ArrayList<>();

        mRvTest.setLayoutManager(new GridLayoutManager(this, 4));
        mAdapter = new RvTestAdapter(MainActivity.this, mlsResolveInfo, new RvTestAdapter.OnItemClickListener() {
            @Override
            public void onClick(View view, int position) {
                ResolveInfo resolveInfo = mlsResolveInfo.get(position);
                startAppByResolveInfo(resolveInfo);
                MainActivity.this.finish();
            }
        });

        mRvTest.setAdapter(mAdapter);

        List<ResolveInfo> resolveInfos = queryMainActivitiesInfo();
        mlsResolveInfo.addAll(resolveInfos);
        mAdapter.notifyDataSetChanged();

    }


    /**
     * 查询所有包含启动 intent 的 Activity 信息(去掉本应用)
     *
     * @return
     */
    private List<ResolveInfo> queryMainActivitiesInfo() {
        Intent mainIntent = new Intent(Intent.ACTION_MAIN, null);
        mainIntent.addCategory(Intent.CATEGORY_LAUNCHER);
        List<ResolveInfo> resolveInfos = getPackageManager().queryIntentActivities(mainIntent, 0);
        // 去掉本应用
        Iterator<ResolveInfo> iterator = resolveInfos.iterator();
        while (iterator.hasNext()) {
            ResolveInfo resolveInfo = iterator.next();
            String packageName = resolveInfo.activityInfo.packageName;
            if (packageName.equals(getApplication().getPackageName())) {
                iterator.remove();
            }
        }
        return resolveInfos;
    }


    private void startAppByResolveInfo(ResolveInfo resolveInfo) {
        String pkg = resolveInfo.activityInfo.packageName;
        String cls = resolveInfo.activityInfo.name;
        ComponentName componet = new ComponentName(pkg, cls);
        //打开该应用的主activity
        Intent intent = new Intent();
        intent.setComponent(componet);
        startActivity(intent);
    }

}
RvTestAdapter.java
package com.example.sharpcj.launchertest;
import android.content.Context;
import android.content.pm.ResolveInfo;
import android.support.v7.widget.RecyclerView;
import android.view.LayoutInflater;
import android.view.View;
import android.view.ViewGroup;
import android.widget.ImageView;
import android.widget.TextView;
import java.util.List;
/**
* Created by SharpCJ on 2018/7/26.
*/
public class RvTestAdapter extends RecyclerView.Adapter<RvTestAdapter.ViewHolder> {
public interface OnItemClickListener {
void onClick(View view, int position);
}
private Context mContext;
private List<ResolveInfo> mlsResolveInfo;
private OnItemClickListener mListener;
public RvTestAdapter(Context context, List<ResolveInfo> resolveInfos, OnItemClickListener listener) {
this.mContext = context;
this.mlsResolveInfo = resolveInfos;
this.mListener = listener;
}
public void setmListener(OnItemClickListener listener) {
this.mListener = listener;
}
@Override
public ViewHolder onCreateViewHolder(ViewGroup parent, int viewType) {
View view = LayoutInflater.from(mContext).inflate(R.layout.recyclerview_item, parent, false);
RvTestAdapter.ViewHolder viewHolder = new RvTestAdapter.ViewHolder(view, mListener);
return viewHolder;
}
@Override
public void onBindViewHolder(ViewHolder holder, int position) {
ResolveInfo resolveInfo = mlsResolveInfo.get(position);
holder.imageView.setImageDrawable(resolveInfo.activityInfo.loadIcon(mContext.getPackageManager()));
holder.textView.setText(resolveInfo.activityInfo.applicationInfo.loadLabel(mContext.getPackageManager()));
}
@Override
public int getItemCount() {
return mlsResolveInfo.size();
}
class ViewHolder extends RecyclerView.ViewHolder implements View.OnClickListener {
OnItemClickListener onItemClickListener;
ImageView imageView;
TextView textView;
public ViewHolder(View itemView, OnItemClickListener onItemClickListener) {
super(itemView);
this.onItemClickListener = onItemClickListener;
imageView = itemView.findViewById(R.id.iv_icon);
textView = itemView.findViewById(R.id.tv_name);
itemView.setOnClickListener(this);
}
@Override
public void onClick(View v) {
if (onItemClickListener != null) {
onItemClickListener.onClick(v, getAdapterPosition());
}
}
}
}
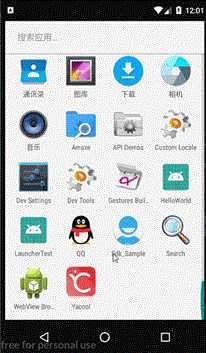
运行效果如图:

标签:pkg art edr ntb bind extend label net onclick
原文地址:https://www.cnblogs.com/joy99/p/9379366.html