标签:not dex void 不同的 empty 响应 over air bool
阻塞队列是一个支持两个附加操作的队列,在普通的队列基础上对方法进行了加强。主要表现在两个方面:
支持阻塞的插入方法:当队列元素存满时,队列会阻塞要进行添加元素的线程,直到队列中的元素出现空缺。
支持阻塞的移除方法:队列为null,获取元素的线程就会被阻塞,直到队列中存在元素。
阻塞队列可以说是生产者和消费者的模式的福音,在消费者和生产者模式者可以被广泛的使用。对于生产者而言,当队列中的元素存满时,其就会被阻塞直到有消费者进行消费。对于消费者而言,当队列中不存在元素时,其就会被阻塞,直到有生产者生产元素放入队列之中。
JDK中实现了7个阻塞队列,但是并不是每个队列都会被经常的使用,作为开发人员也只需要了解一些常用的队列,这样在未来的使用中可以更加的得心应手。
这一篇学习第一个比较常用的阻塞队列ArrayBlockingQueue,看到Array这个东西就会和数组联系起来,的确底层也是通过数组实现的。它作为一个有界阻塞队列在线程池中经常被使用到。
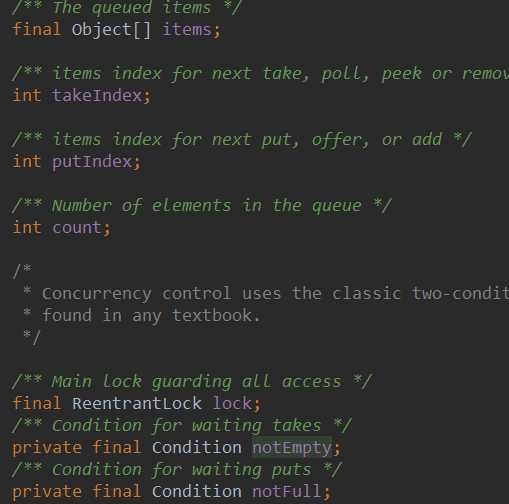
ArrayBlockingQueue是一个遵循FIFO规律的阻塞队列,可以了解一下这个类中的一些基本的成员变量属性:

items:一个数组,这也说明了整个队列的底层通过一个数组实现,重点要看的是ReentrantLock,底层通过一个可重入锁构建,说到可重入锁肯定知道公平和非公平可言,也就说明了ArrayBlockingQueue也是存在公平和非公平获取的,具体的实现可以看博主的ReentrantLock这一篇博文。而Condition就是实现等待通知的方式。可以看一下它的构造方法
1    public ArrayBlockingQueue(int capacity, boolean fair) {
2         if (capacity <= 0)
3             throw new IllegalArgumentException();
4         this.items = new Object[capacity];
5         lock = new ReentrantLock(fair);//非公平锁
6         notEmpty = lock.newCondition();
7         notFull =  lock.newCondition();
8     }
构造方法创建了一个非公平的重入锁,在这个锁的基础上又创建了两个Condition对象分别用于阻塞两种不同的操作,除了了解其构造方法,下面就了解一下其对应的几个特殊的方法也是队列中获取元素的方法既然是BlockingQueue我们这就只了解特殊阻塞的一些方法,下面就是相关对从队列中取元素,往队列中添加元素。
put(E e):往队列中存放元素
 1   public void put(E e) throws InterruptedException {
 2         checkNotNull(e);//检查新增的元素是否为null
 3         final ReentrantLock lock = this.lock;//获取锁操作
 4         lock.lockInterruptibly();//获取锁操作,但是这个操作可以响应中断
 5         try {
 6             while (count == items.length)//队列存满了
 7                 notFull.await();//阻塞添加元素进程
 8             enqueue(e);//入队操作
 9         } finally {
10             lock.unlock();
11         }
12     }
offer(E e,long timeout,TimeUnit unit):offer的增强版,往队列中添加元素
 1   public boolean offer(E e, long timeout, TimeUnit unit)
 2         throws InterruptedException {
 3
 4         checkNotNull(e);
 5         long nanos = unit.toNanos(timeout);//计算超时时间
 6         final ReentrantLock lock = this.lock;
 7         lock.lockInterruptibly();
 8         try {
 9             while (count == items.length) {//如果队列满了
10                 if (nanos <= 0)//等于没有设置就是普通的offer操作
11                     return false;
12                 nanos = notFull.awaitNanos(nanos);//会在固定的时间内进行等待阻塞
13             }
14             enqueue(e);//入队操作
15             return true;
16         } finally {
17             lock.unlock();//解锁
18         }
19     }
enqueue(E e):入队操作
 1   private void enqueue(E x) {
 4         final Object[] items = this.items;//获取数组
 5         items[putIndex] = x;//在要添加的位置上进行赋值
 6         if (++putIndex == items.length)//如果添加的位置等于队列长度
 7             putIndex = 0;//从0开始
 8         count++;//数量自增
 9         notEmpty.signal();//唤醒获取元素线程
10     }
这边做了一个特殊的操作,就是当要添加元素的位置等于队列长度时,此时把要添加的下一个位置置为0,这其实跟ArrayBlockingQueue的特性有关,因为FIFO队列因此第一个被获取到也是最先被添加进来的。
上面的都是往队列中添加元素,而下面的都是从队列中获取元素
take():也是从队列中去获取元素
 1   public E take() throws InterruptedException {
 2         final ReentrantLock lock = this.lock;//获取锁
 3         lock.lockInterruptibly();//获取锁操作,可以响应中断
 4         try {
 5             while (count == 0)
 6                 notEmpty.await();//阻塞
 7             return dequeue();
 8         } finally {
 9             lock.unlock();
10         }
11     }
poll(long timeout,TimeUnit timeUnit):从阻塞队列中获取元素,带超时效果的
 1   public E poll(long timeout, TimeUnit unit) throws InterruptedException {
 2         long nanos = unit.toNanos(timeout);//计算超时时间
 3         final ReentrantLock lock = this.lock;
 4         lock.lockInterruptibly();
 5         try {
 6             while (count == 0) {//当队列中个数为0
 7                 if (nanos <= 0)
 8                     return null;//返回null
 9                 nanos = notEmpty.awaitNanos(nanos);//阻塞等待
10             }
11             return dequeue();
12         } finally {
13             lock.unlock();
14         }
15     }
dequeue():从队列中获取元素的操作
 1   private E dequeue() {
 2         final Object[] items = this.items;
 3         @SuppressWarnings("unchecked")
 4         E x = (E) items[takeIndex];
 5         items[takeIndex] = null;
 6         if (++takeIndex == items.length)
 7             takeIndex = 0;
 8         count--;//自减
 9         if (itrs != null)//只是对迭代器的操作无需关心
10             itrs.elementDequeued();
11         notFull.signal();//唤醒添加元素线程
12         return x;
13     }
dequeue方法和enqueue方法很相似只不过一个是不停的往队列加元素,一个不停的从队列中获取元素
上面是对ArrayBlockingQueue中的会进行阻塞操作的方法的一个大致分析和了解。对于使用ArrayBlockingQueue有一定的帮助并且清楚的了解这些才能在错误中快速的定位错误的所在。
方法了解过了,可以看一下具体的ArrayBlockingQueue的Demo再重新回顾和理解一下
 1 package demo;
 2
 3 import java.util.concurrent.ArrayBlockingQueue;
 4
 5 /**
 6  * 阻塞队列之一:ArrayBlockingQueue示例
 7  */
 8 public class ArrayBlockingQueueDemo {
 9     class Producer extends Thread {
10         ArrayBlockingQueue<String> abq = null;
11
12         public Producer(ArrayBlockingQueue<String> abq) {
13             this.abq = abq;
14         }
15
16         @Override
17         public void run() {
18             int i = 0;
19             try {
20                 while (true) {
21                     Thread.sleep(500);
22                     abq.put("" + i);
23                     System.out.println("存放数据:======" + i + "\t剩余数量" + abq.size());
24                     i++;
25                 }
26             } catch (InterruptedException e) {
27                 e.printStackTrace();
28             }
29         }
30     }
31
32     class Consumer extends Thread {
33         ArrayBlockingQueue<String> abq = null;
34
35         public Consumer(ArrayBlockingQueue<String> abq) {
36             this.abq = abq;
37         }
38
39         @Override
40         public void run() {
41             try {
42                 while (true) {
43                     Thread.sleep(2000);
44                     String msg = abq.take();
45                     System.out.println("取数据:===" + msg + "\t剩余数量" + abq.size());
46                 }
47             } catch (InterruptedException e) {
48                 e.printStackTrace();
49             }
50         }
51     }
52
53     static ArrayBlockingQueue<String> abq = new ArrayBlockingQueue<String>(2);
54
55     public static void main(String[] args) {
56         Thread consumer = new ArrayBlockingQueueDemo().new Consumer(abq);
57         Thread producer = new ArrayBlockingQueueDemo().new Producer(abq);
58         consumer.start();
59         producer.start();
60     }
61 }
下面是这个程序运行的结果:
 1 存放数据:======0    剩余数量1
 2 存放数据:======1    剩余数量2
 3 存放数据:======2    剩余数量2
 4 取数据:===0    剩余数量1
 5 取数据:===1    剩余数量1
 6 存放数据:======3    剩余数量2
 7 取数据:===2    剩余数量1
 8 存放数据:======4    剩余数量2
 9 取数据:===3    剩余数量1
10 存放数据:======5    剩余数量2
11 取数据:===4    剩余数量1
12 存放数据:======6    剩余数量2
当然上面的结果只是我跑了一会的结果,我把生产者的sleep时间降级,将消费者的sleep时间加长,你会发现无论怎么样队列中的数据都不会超过2,这就是阻塞队列的作用以往的做法必须要通过wait和notify结合而阻塞队列相比而言就简单了很多。
ArrayBlockingQueue是一个有界限的队列,其主要的实现就是通过定长的数组,每次从头到尾添加元素,当添加到队尾的时候又从第一个开始往后加,而获取元素就不停的从第一个开始获取直到队尾,再从队头开始获取,也就是不停的在循环这个队列。
==================================================================================
不管岁月里经历多少辛酸和艰难,告诉自己风雨本身就是一种内涵,努力的面对,不过就是一场命运的漂流,既然在路上,那么目的地必然也就是前方。
==================================================================================
标签:not dex void 不同的 empty 响应 over air bool
原文地址:https://www.cnblogs.com/wait-pigblog/p/9403232.html