标签:roles 运行 ansi fine default 日志 服务端 host 客户
何为Ansible:简单的自动化运维管理工具,不需要配置代理工具,基于Python研发。
Ansible是基于模块工作的,本身没有批量部署的能力。真正具有批量部署的是ansible所运行的模块,ansible只是提供一种框架。
| 工具 | 开发语言 | 结构 | 配置文件格式 | 运行任务 |
|---|---|---|---|---|
| Ansible | Python | 无 | YAML | 支持命令行 |
| SaltStack | Python | C/S | YAML | 支持命令行 |
| Puppet | Ruby | C/S | Ruby语法格式 | 通过模块实现 |
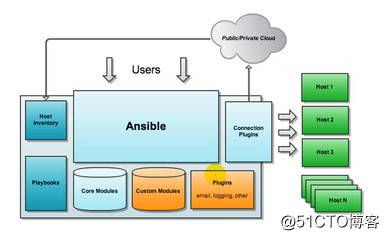
)Ansible:核心引擎

2)host inventory(主机清单):指定操作的主机,是一个配置文件里面定义监控的主机

3)connection plugins(链接插件):负责和被监控端实现通信

4)playbooks(yaml):剧本执行多个任务时,非必需可以让节点一次性运行多个任务

5)core modules(核心模块):各种模块核心模块、command模块、自定义模块

6)custom modules(自定义模块):借助于插件完成记录日志邮件等功能1)轻量级,无需在客户端安装agent,更新时,只需在操作机上进行一次更新即可
2)批量任务执行可以写成脚本,而且不用分发到远程就可以执行
3)使用python编写,维护更简单,ruby语法过于复杂
4)支持sudo1)案列环境
| 角色 | 主机名 | ip地址 |
|---|---|---|
| 控制主机 | web 1 | 192.168.200.130 |
| 被管理主机 | web 2 | 192.168.200.136 |
| 被管理主机 | web 3 | 192.168.200.134 |
2)安装ansible包和epel源包
[root@web1 ansible]# systemctl stop firewalld.service
[root@web1 ansible]# setenforce 0 //关闭防火墙和网络安全性增强功能

[root@web1 ~]# yum install epel-release ansible -y

[root@web1 ~]# ansible --version  //查看版本信息
ansible 2.4.2.0
  config file = /etc/ansible/ansible.cfg
  configured module search path = [u‘/root/.ansible/plugins/modules‘, u‘/usr/share/ansible/plugins/modules‘]
  ansible python module location = /usr/lib/python2.7/site-packages/ansible
  executable location = /usr/bin/ansible
  python version = 2.7.5

[root@web1 ~]# yum install tree -y

[root@web1 ~]# tree /etc/ansible/   //树状结构展示文件夹
/etc/ansible/
├── ansible.cfg    //配置文件
├── hosts          //主机清单文件
└── roles          //角色
1 directory, 2 files
3)配置主机清单
[root@web1 ~]# cd /etc/ansible/
[root@web1 ansible]# ls
ansible.cfg  hosts  roles

[root@web1 ansible]# vim hosts
[web1]
192.168.200.136
[web2]              //被管理主机分类
192.168.200.134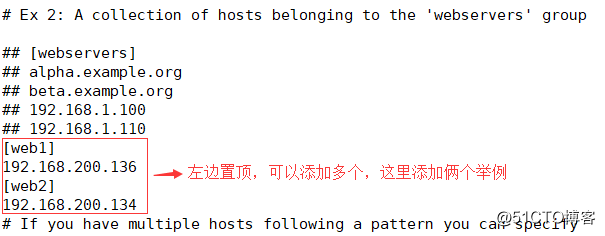
4)设置SSH无密码登陆
[root@web1 ansible]# ssh-keygen -t rsa

[root@web1 ansible]# ssh-copy-id root@192.168.200.134
[root@web1 ansible]# ssh-copy-id root@192.168.200.136
//配置密钥对验证,两台都需配置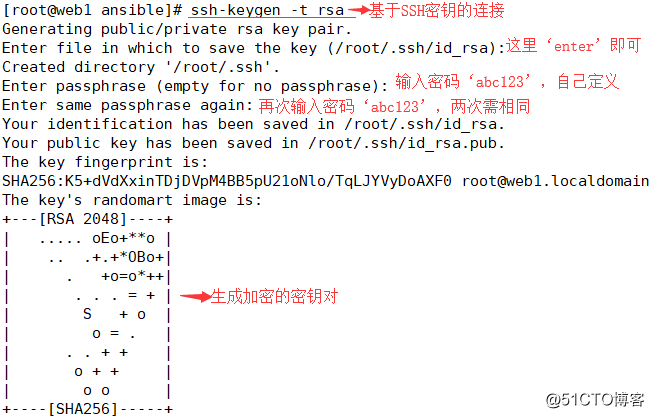
5)免交互代理
[root@web1 ansible]# ssh-agent bash
[root@web1 ansible]# ssh-add
Enter passphrase for /root/.ssh/id_rsa:  //输入之前设置的密码
Identity added: /root/.ssh/id_rsa (/root/.ssh/id_rsa)
6)测试是否配置成功
[root@web1 ansible]# ansible all -a‘date‘
192.168.200.136 | SUCCESS | rc=0 >>
2018年 08月 01日 星期三 23:48:24 CST

192.168.200.134 | SUCCESS | rc=0 >>
2018年 08月 01日 星期三 23:48:24 CST
//可以看见两台被管理主机的时间都已显示,配置成功
注:只需配置控制主机,被管理主机无需任何配置
主配置文件:/etc/ansible/ansible.cfg

默认主机清单:/etc/ansible/hosts

参数:

-m:要执行的模块,默认为command
-a:模块的参数
-u:ssh连接的用户名,默认用root,ansible.cfg中可以配置
-k:提示输入ssh登录密码。当使用密码验证的时候用
-s:sudo运行
-U:sudo到那个用户,默认为root
-K:提示输入sudo密码,当不是NOPASSWD模式时使用
-C:只是测试一下会改变什么内容,不会真正去执行
-c:连接类型(default=smart)
-f:fork多少个进程并发处理,默认为5个
-i:指定hosts文件路径,默认default=/etc/ansible/hosts
-I 指定pattern,对<host_pattern>已匹配的主机中再过滤一次
--list-hosts:只打印有哪些主机会执行这个playbook文件,不是实际执行
-M:要执行的模块路径,默认为/usr/share/ansible
-o:压缩输出,摘要输出
--private-key 私钥路径
-T: ssh连接超时时间,默认10秒
-t:日志输出到该目录,日志文件名以主机名命名ansible <host-pattern> [-f forks] [-m module_name] [-a args]
-f forks:启动的并发数

-m module_name:使用的模块

-args:模块特有参数使用command模块执行date指令,ansible 默认模块,不支持变量传递
[root@yunwei ~]# ansible web -m command -a ‘date‘

192.168.200.114 | SUCCESS | rc=0 >>
2018年 08月 1日 星期三 17:09:53 CST

192.168.200.113 | SUCCESS | rc=0 >>
2018年 08月 1日 星期三 17:09:54 CST

[root@yunwei ~]# ansible web -a ‘date‘

192.168.200.113 | SUCCESS | rc=0 >>
2018年 08月 1日 星期三 17:11:02 CST

192.168.200.114 | SUCCESS | rc=0 >>
2018年 08月 1日 星期三 17:11:02 CST两种状态:1)present表示添加(默认使用),absent表示删除
服务端:
创建一个任务计划:
ansible testhost -m cron -a ‘name=test cron job=‘/bin/touch /tmp/1212.txt‘ weekday=6‘

如果删除该cron只需要加一个字段state=absent

ansible testhost -m cron -a ‘name=test cron state=absent‘

时间表示:
分:minute
时:hour
日:day
月:month
周:weekday
客户端:
查看任务计划:
crontab -l1)创建用户:
ansible webserver -m user -a‘name=test01‘

192.168.200.136 | SUCCESS => {
    "changed": true,
    "comment": "",
    "create_home": true,
    "group": 1001,
    "home": "/home/test01",
    "name": "test01",
    "shell": "/bin/bash",
    "state": "present",
    "system": false,
    "uid": 1001
2)删除用户:
ansible webserver -m user -a ‘name=test01 state=absent‘

192.168.200.136 | SUCCESS => {
    "changed": true,
    "force": false,
    "name": "test01",
    "remove": false,
"state": "absent"1)创建mysql组
ansible webserver -m group -a ‘name=mysql gid=306 system=yes‘

192.168.200.136 | SUCCESS => {
    "changed": true,
    "gid": 306,
    "name": "mysql",
    "state": "present",
    "system": true
}
2)将mysql用户添加到mysql组
ansible webserver -m user -a ‘name=mysql uid=306 group=mysql system=yes‘     //这里模块是用户

192.168.200.136 | SUCCESS => {
    "changed": true,
    "comment": "",
    "create_home": true,
    "group": 306,
    "home": "/home/mysql",
    "name": "mysql",
    "shell": "/bin/bash",
    "state": "present",
    "system": true,
"uid": 306本地/root/aaa复制到目标主机/tmp/aaa
[root@yunwei ~]# ansible web -m copy -a ‘src=/root/aaa dest=/tmp/aaa owner=root group=root mode=0644‘

192.168.200.114 | SUCCESS => {
    "changed": false,
    "checksum": "da39a3ee5e6b4b0d3255bfef95601890afd80709",
    "dest": "/tmp/aaa",
    "gid": 0,
    "group": "root",
    "mode": "0644",
    "owner": "root",
    "path": "/tmp/aaa",
    "secontext": "unconfined_u:object_r:admin_home_t:s0",
    "size": 0,
    "state": "file",
    "uid": 0
[root@yunwei ~]# ansible web -a ‘ls -l /tmp/aaa‘
192.168.200.114 | SUCCESS | rc=0 >>
-rw-r--r--. 1 root root 0 8月 1 17:23 /tmp/aaa设置文件属性,使用path指定文件路径,使用src定义源文件路径,dest来代替源文件的符号链接
1)创建文件
ansible webserver -m file -a‘owner=mysql group=mysql mode=600 path=/opt/test.txt‘

192.168.200.136 | SUCCESS => {
    "changed": true,
    "gid": 306,
    "group": "mysql",
    "mode": "0600",
    "owner": "mysql",
    "path": "/opt/test.txt",
    "secontext": "system_u:object_r:usr_t:s0",
    "size": 12,
    "state": "file",
    "uid": 306
2)设置test.txt的链接文件
ansible webserver -m file -a‘path=/opt/test.txt src=/opt/test.txt state=link‘

192.168.200.136 | FAILED! => {
    "changed": false,
    "gid": 306,
    "group": "mysql",
    "mode": "0777",
    "msg": "refusing to convert from file to symlink for /opt/test.txt",
    "owner": "mysql",
    "path": "/opt/test.txt",
    "secontext": "system_u:object_r:usr_t:s0",
    "size": 12,
    "state": "file",
"uid": 306检测制定主机的连通性
ansible webserver -m ping

192.168.200.136 | SUCCESS => {
    "changed": false,
"ping": "pong"控制管理服务的运行状态:使用enabled表示是否开机自启;使用state指定服务状态
查看两台主机的80端口,再启动

ansible all -m shell -a ‘ss -tnl |grep :80 ‘‘

ansible all -m service -a ‘name=httpd state=started‘首先创建一个shell脚本:
vim /tmp/test.sh
#!/bin/bash
echo `date` > /tmp/ansible_test.txt
然后把该脚本分发到各个机器上
ansible testhost -m copy -a "src=/tmp/test.sh dest=/tmp/test.sh mode=0755"
最后是批量执行该shell脚本
ansible testhost -m shell -a "/tmp/test.sh"
shell模块,还支持远程执行命令并且带管道:
ansible testhost -m shell -a "cat /etc/passwd | wc -l"可以将本地脚本复制到被管理主机上运行,需要注意用相对路径来指定脚本
编辑本地脚本test.sh,辅助到被管理主机上运行

控制机:
[root@localhost ~]# vim test.sh
#!/bin/bash
echo "hello ansible from script"> /opt/script.txt

[root@localhost ~]# chmod +x test.sh
[root@localhost ~]# ansible webserver -m script -a‘test.sh‘

192.168.200.136 | SUCCESS => {
    "changed": true,
    "rc": 0,
    "stderr": "Shared connection to 192.168.200.136 closed.\r\n",
    "stderr_lines": [
        "Shared connection to 192.168.200.136 closed."
    ],
    "stdout": "",
    "stdout_lines": []
    }
客户机:
[root@localhost opt]# cat script.txt
hello ansible from script
安装httpd:

ansible testhost -m yum -a ‘name=httpd‘

在name后面还可以加上state=installed,默认不加也可以安装

开启httpd服务,并设为开机启动:

ansible testhost -m service -a ‘name=httpd state=started enabled=yes‘

这里的name是centos系统里的服务名,可以通过chkconfig --list查看。

ansible文档的使用:

ansible-doc -l查看所有的模块

ansible-doc cron查看指定的模块收集和查看被管理主机的相关设备信息
ansible webserver -m setupAnsible服务的安装和命令应用基础就介绍到此,相关内容下一篇继续讲解,感谢各位道友浏览!
走进自动化运维之Ansible服务部署,附带(参数及模块)详解!
标签:roles 运行 ansi fine default 日志 服务端 host 客户
原文地址:http://blog.51cto.com/13687553/2153468